Thingiverse
Isosceles Barn Door Star Tracker Mount by trabladorr
by Thingiverse
Last crawled date: 3 years, 3 months ago
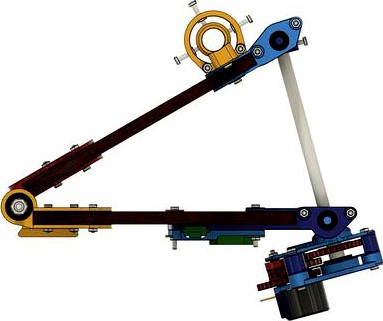
This is an attempt to design a (mostly) 3d-printed star tracker that is accurate even at long focal lengths. After many, many iterations, this overengineered design seems to work good enough!
For an example, the uploaded Milky Way photo was a 94 sec exposure at a 315mm focal length equivalent (shot at f9 with SEL55210 on A6400). It's not perfect by any means, but a much better result than any 3d printed design I have found online.
Bearings are used everywhere so that printing errors don't introduce any wobbliness; Cheap nuts and bolts can also be badly machined, so a lead screw has substituted the common curved rod. Thankfully, all these parts are quite cheap!
The tangent error (that occurs in any non-curved rod barn door design) is fixed in code, by varying the time between stepper steps. It is documented in detail within the Github repo:
Code: https://github.com/trabladorr/Isosceles-barn-door-tracker-arduino
Using a green laser for polar alignment is also quite advantageous, it's easy to check if its parallel by rotating the hinge and seeing if the laser is pointing in the same spot. It's also much easier to point at true North, no kneeling or bending required! A generic <5mw 2*AAA Green Laser Pointer was used, with a uniform OD of 14mm.
The main structure of the mount is 8mm plywood, as it's more rigid than ABS or PLA. PDF plans are provided (Top Plate and Bottom Plate), should be 1:1 if printed on an A4.
The electronic components are an Arduino Nano, a ULN2003 Stepper Driver, and a 28-BYJ48 Stepper Motor.
Connection:
Arduino Nano <-> Uln2003
D2 <--------------------------> IN1
D3 <--------------------------> IN2
D4 <--------------------------> IN3
D5 <--------------------------> IN4
VIN <--------------------------> +
GND <-------------------------> -
Part List:
1 x 160mm M6 Threaded Rod
2 x M6 Washers (OD <14mm)
6 x M6 Nuts
4 x M3 10mm Bolts
13 x M3 16mm Bolts
2 x M3 20mm Bolts
7 x M3 25mm Bolts
4 x M3 44mm Threaded Rods (or Bolts)
34 x M3 Washers (OD <12mm)
34 x M3 Nuts
4 x 3mm x 10mm x 4mm Bearings
6 x 6mm x 17mm x 6mm Bearings
2 x 8mm x 19mm x 6mm Bearings
1 x 150mm Lead Screw (with Bolt), OD 8mm, Pitch 2mm, Lead 2mm
1 x 1/4-20 UNC Camera Screw
1 x Green Laser Pointer, <5mw, 2AAA, OD 14mm
1 x Ball Head Mount (using Neewer Low-Profile Ball Head)
1 x Arduino Nano
1 x ULN2003 Stepper Driver
1 x 28-BYJ48 Stepper Motor
Assembly Instructions:
One part that is not in the design is the mounting screw for the ball head mount, as I reused an old one. It shouldn't be too hard to mount whatever you have access to!
Similar models
thingiverse
free

Motorized barndoor tracker for astrophotography by elenhinan
...r
1x a4988 (or other stepper driver)
1x arduino nano
1x 1/4 inch 20 tpi screw for mounting camera
m3 screws for the laser pointer
thingiverse
free

Enclosure for Arduino Nano and ULN2003 by atlantisq
...o pieces.
designed to work with the astra tracker: https://www.thingiverse.com/thing:4761585 but should work with other projects.
thingiverse
free

Linear actuator for byj48 stepper motor by TucksProjects
...quot;right"), speed [2-10])
movemm(#of millimeters to move, direction ("left" or "right"), speed [2-10])
thingiverse
free

K'Nex adapters for Arduino and electronic hardware by MxBoud
...a k'nex rod on it. this part needs some improvements because it seems not strong enough. fixation is done with six m3 screws.
thingiverse
free

Nema 17 stepper motor Belt tensioner by Flytech81
...that mounts to a nema 17 stepper motor using m3 screws. for the tensing hardware i used two 8mm bearings with a 1/4-20 inch bolt.
thingiverse
free

Astra V2.1: Barn Door Tracker with Straight Drive Screw by atlantisq
...ode:https://atlantisq.wordpress.com/2021/01/25/obj-2601-barn-door-tracker-astra-v2/
v1: https://www.thingiverse.com/thing:4736598
thingiverse
free

Coupling 5x8mm by ts2a
...y ts2a
thingiverse
this is a coupling 5mm and 8mm. print 2 for 1 rod. and you need below too.
4 x m3 socket bolt 14mm
4 x m3 nut
thingiverse
free

Arduino Nano holder by AlpoHassinen
...arduino nano holder by alpohassinen
thingiverse
arduino nano case, two models. use 6mm m3 screw to secure nano to its place.
thingiverse
free
Gyroscope
... screw 45mm
4x m6 nut
1x m6 bolt 25mm
12x m3 bolts 20mm
12x m3 nuts
12x balls 15,85mm
1x gt2 belt
1x gt2 pulley 6mm bore 20 teeth
thingiverse
free

8mm Rod Linear Bearing by inventimark
...ere is a linear bearing for an 8mm rod. it uses 6 - 8x4x3 radial bearings with 20mm m3 bolts. it is meant for the x or y axis.
Isosceles
thingiverse
free

Ternary Isosceles Spinner by Grantisimo
...ng and is weighted with 15 us cents. tolerances are exacting and shouldn't need any glue to hold pennies or bearing in place.
thingiverse
free

3D cross sections isosceles triangle by bradywhits
...3d cross sections isosceles triangle by bradywhits
thingiverse
helpful to see cross sectons
thingiverse
free

Isosceles D4 by wiseman303
...cratch in blender.
two versions are included. the one marked sla is pre-supported for sla printers and is the one i test printed.
thingiverse
free

Pyramids by Vitroid
...pyramids by vitroid thingiverse by request. an isosceles square pyramid and a regular...
thingiverse
free

UNCC Calculus 2 MATH 1242 Non Rotational Solids Question 12 by janthefischer
...solid is circular and the horizontal cross sections are isosceles ...
thingiverse
free

Small Stellated Dodecahedron Ornament by laurentine
...each spike of the ssd is formed from five isosceles ...
thingiverse
free

Sphericon by myxibrium
...incline in a unique way. made by taking 2 isosceles cones, cutting them in half along the altitude, rotating...
thingiverse
free

Ender 3 Top Shelf
...on the bed and with some supports for the isosceles trapezoidal shape that inserts into the...
thingiverse
free

Geometric Point Set #Chess by DearRudence
...of points each piece is worth. 1-pawn, 3-knight(right triangle), 3-bishop(isosceles 5-rook, 9-queen and the king is a circle representing...
Tracker
turbosquid
$8

Tracker Knife
... model tracker knife for download as blend, dae, fbx, and obj on turbosquid: 3d models for games, architecture, videos. (1588741)
turbosquid
$1

Tracker Knife
... available on turbo squid, the world's leading provider of digital 3d models for visualization, films, television, and games.
3d_export
$5

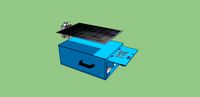
solar tracker
...aterial : -arduino uno -2 step motor with driver -4 ldr sensor -some wires -small photovoltaiic pannel -buzzer -cnc laser machine
3d_export
$7

sci-fi injector or tracker
... can be tracker, use as you want. pbr 4k contain: blend (includes high poly)/ dae / fbx / obj / stl / glowing injector + box
3d_export
$10

Motion Tracker Aliens
...er out moving objects from stationary background and then displayed them on the monitor as a series of contours of probable loci.
3d_export
$5
single axis solar tracker stand
...single axis solar tracker stand
3dexport
3d_export
$60
grumman s-2 f tracker
...ining in service with other air arms into the 21st century. argentina and brazil are the last countries to still use the tracker.
3d_export
$19

Chevrolet tracker 2021
...pport ticket and request for that. we can convert 3d models to: .stl, .c4d, .obj, .fbx, .ma/.mb, .lwo/.lws, .3ds, .3dm, .dxf/.dwg
3d_export
$25
emergency power with solar tracker
...cker
3dexport
this is a tool used to distribute electricity during an emergency disaster, it is recommended to use sketchup 2019
3d_export
$15
M314 Motion Tracker Aliens
...ng objects from stationary background and then displayed them on the m314's monitor as a series of contours of probable loci.
Barn
3d_export
$5

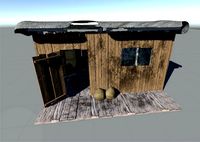
barn
...barn
3dexport
barn
3d_export
$5

barn
...barn
3dexport
normal barn
3d_export
$5
barn
...barn
3dexport
barn with interior decoration
3ddd
$1

Pottery Barn
...pottery barn
3ddd
pottery barn , часы
pottery barn
3ddd
$1

Pottery Barn
...pottery barn
3ddd
pottery barn , декоративный набор
pottery barn
3ddd
free

Pottery barn
...pottery barn
3ddd
pottery barn , декоративный набор
pottery barn
3ddd
free

POTTERY BARN
...pottery barn
3ddd
pottery barn , декоративный набор
pottery barn
3ddd
free
POTTERY BARN
...pottery barn
3ddd
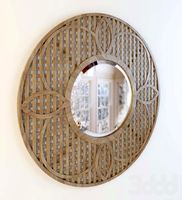
pottery barn , круглое
garden lattice mirror, pottery barn
3ddd
$1

Pottery Barn
...е , декоративный набор , украшение
pottery barn
3ddd
$1

Pottery barn
...е , декоративный набор , украшение
pottery barn
Star
3ddd
$1

Rolling Stars Antic Star
...rolling stars antic star
3ddd
rolling stars , вентилятор
rolling stars antic star
turbosquid
$2

Star Shuriken (Throwing Star)
... available on turbo squid, the world's leading provider of digital 3d models for visualization, films, television, and games.
design_connected
$18
Star
...star
designconnected
helen amy murray star computer generated 3d model. designed by murray, helen amy.
3d_ocean
$2
sea star
...sea star
3docean
game star sea star space star
this model is, normally poly model. use for games screen.
3d_export
$2

star gingerbread
...star gingerbread
3dexport
"star" gingerbread in the style of the movie star wars.
turbosquid
$10

STAR
...ar
turbosquid
royalty free 3d model star for download as max on turbosquid: 3d models for games, architecture, videos. (1338162)
turbosquid
$1

Star
...ar
turbosquid
royalty free 3d model star for download as c4d on turbosquid: 3d models for games, architecture, videos. (1564546)
3d_export
$5

star sword
...star sword
3dexport
star sword
3d_export
$5

Star building
...star building
3dexport
star building
3d_export
free

ikosaedr-star
...ikosaedr-star
3dexport
ikosaedr-star
Door
3d_export
$5
door handle of doors
...door handle of doors
3dexport
door handle of doors
3d_ocean
$4

Door
...3docean
architecture door gate gothic door old style door
door, 3d door, gothic door, architecture, old style door, gate, 3d gate
3d_ocean
$10

Door
...door
3docean
design door doors home house indoor interior opening doors
door design
archibase_planet
free
Door
...r
archibase planet
door sliding door interior door rail door
door n250515 - 3d model (*.gsm+*.3ds) for interior 3d visualization.
archibase_planet
free
Door
...door
archibase planet
door sash door sash-door interior door
door 900 - 3d model (*.gsm+*.3ds) for interior 3d visualization.
archibase_planet
free
Door
...door
archibase planet
door sash door sash-door interior door
door 600 - 3d model (*.gsm+*.3ds) for interior 3d visualization.
archibase_planet
free
Door
...door
archibase planet
door sash door sash-door interior door
door 800 - 3d model (*.gsm+*.3ds) for interior 3d visualization.
archibase_planet
free
Door
...door
archibase planet
door sash door sash-door interior door
door 800 - 3d model (*.gsm+*.3ds) for interior 3d visualization.
archibase_planet
free
Door
...door
archibase planet
door sash door sash-door interior door
door 700 - 3d model (*.gsm+*.3ds) for interior 3d visualization.
archibase_planet
free
Door
...door
archibase planet
door sash door sash-door interior door
door 600 - 3d model (*.gsm+*.3ds) for interior 3d visualization.
Mount
3d_export
free

mounting bracket
...mounting plate is the portion of a hinge that attaches to the wood. mounting plates can be used indoors, cabinetry and furniture.
turbosquid
$2

MOUNTING
... available on turbo squid, the world's leading provider of digital 3d models for visualization, films, television, and games.
turbosquid
free

Mounts
... available on turbo squid, the world's leading provider of digital 3d models for visualization, films, television, and games.
turbosquid
free

Mount Fuji
...fuji
turbosquid
free 3d model mount fuji for download as obj on turbosquid: 3d models for games, architecture, videos. (1579977)
3d_export
$5

Headphone mount LR
...headphone mount lr
3dexport
headphone mount l+r
turbosquid
$39

Mount rainier
...quid
royalty free 3d model mount rainier for download as fbx on turbosquid: 3d models for games, architecture, videos. (1492586)
turbosquid
$5

pipe mounting
...quid
royalty free 3d model pipe mounting for download as obj on turbosquid: 3d models for games, architecture, videos. (1293744)
turbosquid
$3

Mounting Tires
...uid
royalty free 3d model mounting tires for download as fbx on turbosquid: 3d models for games, architecture, videos. (1708511)
3d_export
$5

Magnetic GoPro Mount
...pro mount
3dexport
cool magnetic mount for gopro. allows you to mount the camera on flat metal surfaces and get exclusive shots.
turbosquid
$5

Stone Mount
...ty free 3d model stone mount for download as ma, obj, and fbx on turbosquid: 3d models for games, architecture, videos. (1370306)