Thingiverse
IKEA VIDGA Motorized curtains by JonathanCaes
by Thingiverse
Last crawled date: 3 years ago
IKEA VIDGA motorized curtains.
I stumbled across these IKEA VIDGA curtain sliders after a visit to their store and wondered if I could design something to make them motor driven.
After some measurements I started designing a motor and idler mount that can attach on the end of the sliders. This way I can run a GT2 belt through the slider with the curtain attached to some clips that are hooked onto the belt.
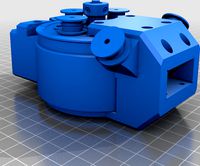
After a day of designing I came up with this prototype. As you can see it is not perfect but it does the job for me.
Links to Fusion 360 files:
Motor Mount: https://a360.co/2pPQGG8
Idler Mount: https://a360.co/2ryaxdl
GT2 Pulley: https://a360.co/2K7KWhK
GT2 Idler: https://a360.co/2NyOdIR
Clip 1: https://a360.co/34MODRS
Clip 2: https://a360.co/32yqfBS
Link to a remix that uses the NEMA17 stepper motor: https://www.thingiverse.com/thing:3621216
I haven't tested the remix yet. If someone has, please leave a comment below. Thanks!
BOM
IKEA VIDGA curtain slider(s) and accessories
1x 28BYJ-48 Stepper Motor
3x M3 Screws (2x short / 1x longer)
1x M3 Nut
GT2 Timing Belt (the length depends on the size of your window)
1x 608ZZ bearing
All the parts listed above are available on AliExpress.
Assembly
Motor mount
Take the motor mount, GT2 pulley, 28BYJ-48 Stepper Motor and 2 short M3 screws
Put the pulley inside the motor mount so that it lines up with the hole for the motor shaft
Take the stepper motor and press the shaft into the pulley
When the stepper motor is attached to the pulley fasten it to the motor mount by screwing in the two M3 screws
Note: it could be helpfull to put a spacer underneeth the GT2 pulley to get the motor shaft in far enough.
Idler mount
Take the idler mount, GT2 idler, bearing slot, 608ZZ bearing, long M3 screw and M3 nut
Press the 608ZZ bearing into the GT2 idler
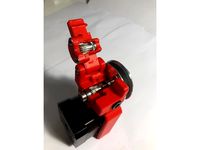
Press the bearing slot into the 608ZZ bearing facing the right direction (see image above from fusion 360)
Slide the GT2 idler assembly in the idler mount so that it lines up with the holes
Drive the long M3 screw through the idler mount and the GT2 pulley (make sure the head of the screw is in the inlet on the idler mount)
Screw the nut on from the other side
Don't fasten it to hard, this will be done later to tension the GT2 belt
VIDGA curtain slider
To assemble the VIDGA curtain slider itself, you can just follow the instructions given by IKEA.
When that is complete put the motor and idler mount on the ends of the slider.
After that take the GT2 belt and run it through the slider and through the motor and idler mount, measure the length of the belt and cut it. Then take Clip 1 and make the belt a closed loop. After that you have to fiddle the clip into the slider at one end and slide it all the way to the other end of the slider. This can be done by removing the idler or motor mount from the slider. When Clip 1 is at the other end of the slider you can attach Clip 2 to the GT2 belt, this way both clips are on either side of the rail. Put the idler or motor mount back on and everything is assembled. Now put the curtain on the slider and you're done.
Controlling the motor
To control the motor you can choose between different platforms.
It's possible to use an Arduino if you don't need wifi connectivity and just use some buttons to control the curtain.
What I do is use an ESP8266 to control the curtain via OpenHAB and MQTT.
To control the motor I use the AccelStepper library.
The program I wrote for the ESP8266 can be downloaded from Github.
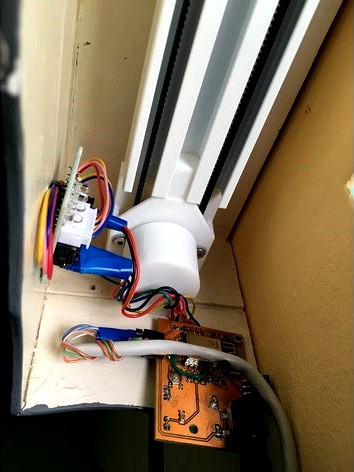
I also made a little PCB for the ESP8266 and some other components. This PCB is just something I quickly put together. I will design a better PCB and associated enclosure later and also link it in here. For now you can find the PCB I'm using here.
I stumbled across these IKEA VIDGA curtain sliders after a visit to their store and wondered if I could design something to make them motor driven.
After some measurements I started designing a motor and idler mount that can attach on the end of the sliders. This way I can run a GT2 belt through the slider with the curtain attached to some clips that are hooked onto the belt.
After a day of designing I came up with this prototype. As you can see it is not perfect but it does the job for me.
Links to Fusion 360 files:
Motor Mount: https://a360.co/2pPQGG8
Idler Mount: https://a360.co/2ryaxdl
GT2 Pulley: https://a360.co/2K7KWhK
GT2 Idler: https://a360.co/2NyOdIR
Clip 1: https://a360.co/34MODRS
Clip 2: https://a360.co/32yqfBS
Link to a remix that uses the NEMA17 stepper motor: https://www.thingiverse.com/thing:3621216
I haven't tested the remix yet. If someone has, please leave a comment below. Thanks!
BOM
IKEA VIDGA curtain slider(s) and accessories
1x 28BYJ-48 Stepper Motor
3x M3 Screws (2x short / 1x longer)
1x M3 Nut
GT2 Timing Belt (the length depends on the size of your window)
1x 608ZZ bearing
All the parts listed above are available on AliExpress.
Assembly
Motor mount
Take the motor mount, GT2 pulley, 28BYJ-48 Stepper Motor and 2 short M3 screws
Put the pulley inside the motor mount so that it lines up with the hole for the motor shaft
Take the stepper motor and press the shaft into the pulley
When the stepper motor is attached to the pulley fasten it to the motor mount by screwing in the two M3 screws
Note: it could be helpfull to put a spacer underneeth the GT2 pulley to get the motor shaft in far enough.
Idler mount
Take the idler mount, GT2 idler, bearing slot, 608ZZ bearing, long M3 screw and M3 nut
Press the 608ZZ bearing into the GT2 idler
Press the bearing slot into the 608ZZ bearing facing the right direction (see image above from fusion 360)
Slide the GT2 idler assembly in the idler mount so that it lines up with the holes
Drive the long M3 screw through the idler mount and the GT2 pulley (make sure the head of the screw is in the inlet on the idler mount)
Screw the nut on from the other side
Don't fasten it to hard, this will be done later to tension the GT2 belt
VIDGA curtain slider
To assemble the VIDGA curtain slider itself, you can just follow the instructions given by IKEA.
When that is complete put the motor and idler mount on the ends of the slider.
After that take the GT2 belt and run it through the slider and through the motor and idler mount, measure the length of the belt and cut it. Then take Clip 1 and make the belt a closed loop. After that you have to fiddle the clip into the slider at one end and slide it all the way to the other end of the slider. This can be done by removing the idler or motor mount from the slider. When Clip 1 is at the other end of the slider you can attach Clip 2 to the GT2 belt, this way both clips are on either side of the rail. Put the idler or motor mount back on and everything is assembled. Now put the curtain on the slider and you're done.
Controlling the motor
To control the motor you can choose between different platforms.
It's possible to use an Arduino if you don't need wifi connectivity and just use some buttons to control the curtain.
What I do is use an ESP8266 to control the curtain via OpenHAB and MQTT.
To control the motor I use the AccelStepper library.
The program I wrote for the ESP8266 can be downloaded from Github.
I also made a little PCB for the ESP8266 and some other components. This PCB is just something I quickly put together. I will design a better PCB and associated enclosure later and also link it in here. For now you can find the PCB I'm using here.
Similar models
thingiverse
free

GT2 idler for 608 bearing M3 NEMA 17 stepper
...
idler for 6mm gt2 belt, designed to mount onto a nema 17 stepper motor and leave room for a 16 tooth pulley
step files included
thingiverse
free

608ZZ Idler Pulley for 10mm GT2 Belt by Skyline89
...y for 10mm gt2 belt by skyline89
thingiverse
idler pulley for 10mm gt2 belt using 8x22x7mm 608zz bearings
print with 100% infill
thingiverse
free
Internal NEMA17 Timing Belt reduction by gouldpa
...
2xhttps://3dprintingperth.com/collections/stepper-motors/products/20-teeth-6mm-width-3mm-inner-18mm-outer-gt2-idler-pulley-wheel
cults
$1

Belt Idler pulley GT2
...aring f605zz
smooth pulley in couple to it, it is possible to take here.
https://cults3d.com/en/3d-model/gadget/belt-idler-pulley
thingiverse
free

TRONXY X5S - Z motor sync by WT1704
...e platform on the stepper and 3 * m5 screws and nuts for the pulley
1 * m3 screw and nut to hold the tension stick with the block
thingiverse
free

axis stepper motor pulley mount by robmlr
...pulley and fits on the end of openbuilds (or similar 20x0 extrusion. it has a mount for an mr105...
thingiverse
free

Gantry CNC Sliders (KRCNC) by Korrokus
...=2mm.
mounting holes for the mill are for m3.
additional mounting holes for m4 screws to be used with 624vv 4mm v-grove bearings.
thingiverse
free
Yet Bondtech Bowden Extruder - Geared with Belt
... be printed in the orientation they are in when loading the files.
designed to be printed with 0.2mm layer or a division here of.
thingiverse
free

Idler pulley for 6mm GT2 timing belt with one 624ZZ ball bearing by hlavaatch
...iverse
idler pulley for a 6mm gt2 timing belt.
comes with two spacers for 10mm wide mount slot to keep the pulley in the middle.
thingiverse
free

2mm GT2 idler for 608zz bearing by cheddarz
...ring by cheddarz
thingiverse
goes over a 608zz bearing for a gt2 belt on a reprap prusa mendel. meant for a belt 6mm in width.
Vidga
thingiverse
free

Vidga rail 146963 (vidga panel curtain holder) by sevelin
...vidga rail 146963 (vidga panel curtain holder) by sevelin
thingiverse
vidga rail 146963 replacement
thingiverse
free

ikea VIDGA by ianrim
...ikea vidga by ianrim
thingiverse
ikea vidga curtain mount.
thingiverse
free

Holder for Ikea Vidga by schrotti
...holder for ikea vidga by schrotti
thingiverse
the ikea vidga system for curtains is fine. something was missing...
thingiverse
free

VIDGA Shim by specky
...ounted curtains to make an angled ceiling or rafter horizontal.
this part is specifically designed to house the ceiling fittings.
thingiverse
free

IKEA VIDGA curtains rail ceiling holder
...ikea vidga curtains rail ceiling holder
thingiverse
ikea vidga curtains rail ceiling holder
thingiverse
free

IKEA Vidga connector by JeEk
...rt.
if you need to cut your vidga rail perpendicular this thing is good to have as well:https://www.thingiverse.com/thing:1753391
thingiverse
free

Ikea VIDGA Accesory by planet_doobie
...apanese blinds. it avoids having to use the small pieces that make stop to move them, working in a similar way to the old models.
thingiverse
free

VIDGA rail connector by Grisworks
...ww.thingiverse.com/thing:2612942
the triple rail to single rail endpiece/converter coming soon
the curtain automation coming soon
thingiverse
free

Ikea VIDGA for FÖNSTERVIVA by LoDyMcFly
...be/fr/p/vidga-support-panneau-blanc-80299157/https://www.ikea.com/be/fr/p/foensterviva-panneau-gris-fonce-60272700/
print in 500%
thingiverse
free

Ikea Vidga Connector by JBijnens
...put the brackets for the rails at the joint of 2 rails. but mine were already on the wall. so a small connector to help out here.
Curtains
3ddd
free

Curtain
...curtain
3ddd
curtain
curtain
3ddd
free

Curtain
...curtain
3ddd
curtain
curtain
3d_ocean
$6

Curtain
...curtain 3docean brown cloth curtain curtains drapes white curtains ...
archibase_planet
free

Curtain
...curtain
archibase planet
curtain drop-curtain
curtain - 3d model for interior 3d visualization.
archibase_planet
free

Curtain
...curtain
archibase planet
curtain drop-curtain
curtain - 3d model for interior 3d visualization.
archibase_planet
free

Curtain
...curtain
archibase planet
curtain drop-curtain
curtain - 3d model for interior 3d visualization.
archibase_planet
free

Curtain
...curtain
archibase planet
curtain drop-curtain
curtain sps - 3d model for interior 3d visualization.
archibase_planet
free

Curtain
...curtain
archibase planet
curtain drop-curtain
curtain al - 3d model for interior 3d visualization.
archibase_planet
free

Curtain
...curtain
archibase planet
curtain drop-curtain
curtain-tnd - 3d model for interior 3d visualization.
archibase_planet
free

Curtain
...curtain
archibase planet
curtain drop-curtain
curtain df - 3d model for interior 3d visualization.
Ikea
3ddd
$1
IKEA
...ikea
3ddd
ikea , стеллаж
ikea
3ddd
$1
IKEA
...ikea
3ddd
ikea
кухня ikea
3ddd
$1

IKEA
...ikea
3ddd
ikea
осторожно, тяжелая модель
ikea
3ddd
$1
IKEA
...ikea
3ddd
ikea
5 зеркал от ikea
3ddd
$1
IKEA
...ikea
3ddd
ikea , бойа
ikea светильник потолочный
3ddd
$1

IKEA
...ikea
3ddd
ikea , барный
bar stool ikea
3ddd
$1

IKEA
...ikea
3ddd
ikea , зубная щетка , косметика
ikea
3ddd
free

IKEA
...ikea
3ddd
ikea , трюмо
дамский столик ikea.
3ddd
$1

IKEA
...3ddd
ps , декоративный набор , ikea
ikea decor
3ddd
$1

Ikea
...ikea
3ddd
ikea , lagra
модель лампы от ikea
Motorized
archibase_planet
free

Motor
...base planet
motor motor engine engine electric motor
motor wagner n250213 - 3d model (*.gsm+*.3ds) for interior 3d visualization.
archibase_planet
free

Motor
...motor
archibase planet
motor motor engine engine
motor n151112 - 3d model (*.gsm+*.3ds) for interior 3d visualization.
archibase_planet
free

Motor
...motor
archibase planet
motor motor engine engine
motor n150615 - 3d model (*.gsm+*.3ds+*.max) for interior 3d visualization.
turbosquid
$15

Motor
...otor
turbosquid
royalty free 3d model motor for download as on turbosquid: 3d models for games, architecture, videos. (1639404)
3d_ocean
$5

Electric motor
...electric motor
3docean
car electric engine industry motor phase train vehicle
an electric motor enjoy!
3d_ocean
$18

Electric Motor
...electric motor
3docean
electric motor engine machine mover parts
3d model electric motor for hoist crane
turbosquid
$29

Motor
... available on turbo squid, the world's leading provider of digital 3d models for visualization, films, television, and games.
turbosquid
$5

Motor
... available on turbo squid, the world's leading provider of digital 3d models for visualization, films, television, and games.
3d_export
$5

electric motor
...electric motor
3dexport
electric motor use for industrial purposes
3d_export
$5

servo motor
...tor
3dexport
it's a simple part of servo motor 0.75kw for used in machines assembly to show specified motor in own project.