Thingiverse

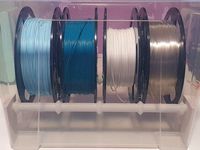
IKEA Samla 22l Drybox by j-men
by Thingiverse
Last crawled date: 3 years, 1 month ago
Deutsche Version
(English version below.)
Benötigte Teile:
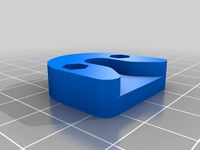
4x Kugellagerhalter-einzel.stl
6x Kugellagerhalter-doppelt.stl
2x Ikea-Samla-22l-Halter.stl
4x Schraube-5mm-mit_Gewinde-M10.stl
alternativ 4x Schraube-5mm-mit_Gewinde-BSP18.stl (s. Update1)
4x Mutter.stl
4x Schraube-4mm.stl
4x Mutter-Kurz.stl
1-4x Deckel.stl
zum Verschließen der nicht genutzten Durchführungen
ein paar mal Klemmring-M8.stl
nicht zwingend erforderlich
Zusätzliche gedruckte Teile:
8-10x Ikea Samla Clip
Skaliert auf 24 mm Breite
Ender 3 Low Friction Filament Guide with Cable Guide
dient gleichzeitig als Anschlag für den PTFE Schlauch
Zubehör:
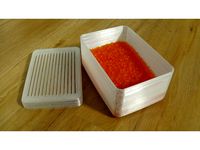
Ikea Samla Box 22l
Deckel für Samla
Dichtungsband selbstklebend (für den Deckel)
2x Gewindestange M8 (je 34 cm)
16x Kugellager 608 (8x22x7) (z.B. kugellagershopberlin.de )
8x Gummidichtung 21 x 30 x 1,9 mm
4x Pneumatikanschlussstücke PC4-M10
4x PTFE Schlauch 4mm
z.B. Amazon
Silica Gel (z.B. Amazon )
Bemerkungen
Das Design von "IKEA Samla Quick Change" gefiel mir direkt. Einfach und funktional.
Wenn es Euch genauso gut gefällt wie mir, dann gebt doch bitte Christian (chertle) auch ein Like.
Ich habe folgendes gegenüber dem Original angepasst:
Kugellagerhalter für 608er Kugellager (8x22x7mm)
Halter etwas niedriger, damit die Spulen nicht am Deckel schleifen, wenn dieser etwas durchhängt.
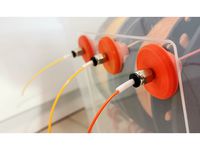
Schlauchdurchführung oben
Schlauch kann komplett durch die Schraube geschoben werden, damit das Filament nicht an dieser reibt.
Pneumatikanschlussstücke, damit der Schlauch gut fixiert ist.
Schlauchdurchführung unten
keine Anschlussstücke, damit ein einfaches "Entnehmen" möglich ist.
Deckel für die "leeren" Schrauben
Klemmringe M8
zur Fixierung der Kugellagerhalter.
geht auch mit M8 Muttern, die muss man aber über die ganze Stange schrauben.
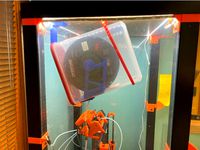
Ich hatte mir auch Gedanken darüber gemacht, wie man das Filament zurück in die Kiste bekommt, wenn man es wechselt, ohne dass man jedes Mal den Deckel öffnen muss.
Das Filament nur zurückzuschieben scheidet aus, da es dadurch nicht mehr ordentlich auf der Spule sitzt und sich evtl. verklemmt.
Es gibt Auto-Reverse Lösungen, diese sind aber allesamt in der Mitte der Spule befestigt, was einen leichten Austausch einzelner Spulen entgegensteht. Zudem ist eine gewisse Reibung zwischen der Spule und der Achse für das Zurückspulen nötig. Dadurch ist es aber auch schwerer das Filament abzurollen.
Daher die Idee, das Filament durch ein zweites Loch unterhalb der Spule wieder hineinzuschieben.
Update 1
Die Schraube für die PC4-M10 Pneumatikanschlussstücke heißt nun Schraube-5mm-mit_Gewinde-M10.stl
Als Alternative hierfür gibt es die gleiche Schraube mit einem BSP 1/8" Gewinde unter dem Namen Schraube-5mm-mit_Gewinde-BSP18.stl.
Scheinbar sollen hier die PC4-M10 besser passen. Ich persönlich hatte keine Probleme die Anschlussstücke in das M10 Gewinde einzuschrauben, aber vielleicht hilft es jemanden.
P.S. für diejenigen, die selbst Teile mit Gewinde konstruieren:
Ich habe, nachdem ich das Gewinde konstruiert hatte die Flächen um 0,1 mm nach Außen geschoben.
Das Außengewinde der Schraube ist ein ISO-Trapezgewinde TR 16x3, bei dem ich die Flächen um 0,2mm verschoben habe. In der Mutter habe ich TR16x3 im "Original" belassen.
English Version
thank you v51k, for the kind "reminder" to make the text available in english as well.
Parts needed:
4x Kugellagerhalter-einzel.stl (bearing holder-single)
6x Kugellagerhalter-doppelt.stl (bearing holder-double)
2x Ikea-Samla-22l-Halter.stl (Ikea-Samla-22l-Holder)
4x Schraube-5mm-mit_Gewinde-M10.stl (Screw-5mm-with_M10-thread)
alternatively 4x Schraube-5mm-mit_Gewinde-BSP18.stl (Screw-5mm-with_BSP 1/8-thread) (s. Update1)
4x Mutter.stl (Nut)
4x Schraube-4mm.stl (Screw-4mm)
4x Mutter-Kurz.stl (Nut-short)
1-4x Deckel.stl (Cover)
to close the not used feedthroughs
a few times Klemmring-M8.stl (clamping ring-M8)
not mandatory
Additional printed parts:
8-10x Ikea Samla Clip
Scaled to 24 mm width
Ender 3 Low Friction Filament Guide with Cable Guide
Also serves as a stop for the PTFE tube
Accessories:
Ikea Samla Box 22l
Lid for Samla
Sealing tape self-adhesive (for the lid)
2x threaded rod M8 (34 cm each)
16x bearing 608 (8x22x7) (e.g. kugellagershopberlin.de )
8x rubber gasket 21 x 30 x 1,9 mm
4x pneumatic connectors PC4-M10
4x PTFE Tube 4mm
e.g. Amazon
Silica Gel (e.g. Amazon )
Remarks
I liked the design of ["IKEA Samla Quick Change"](https://www.thingiverse.com/thing:2873244 right away. Simple and functional. If you like it as much as I do, please give Christian (chertle) a Like too.
I have adapted the following compared to the original:
bearing holder for 608 bearings (8x22x7mm).
Holder a little lower so that the coils do not drag on the lid when it sags a little.
Tube feed through top
Tube can be pushed completely through the screw so that the filament does not rub against it.
Pneumatic connectors, so that the Tube is well fixed.
Tube feed through bottom
no connection pieces, so that an easy "removal" is possible.
Cover for the "empty" screws
Clamping rings M8
to fix the bearing holders.
also goes with M8 nuts, but you have to screw them over the whole rod.
I had also thought about how to get the filament back into the box when you change it, without having to open the lid each time.
Just pushing the filament back is out of the question, as it won't sit neatly on the spool and may get jammed.
There are auto-reverse solutions, but they are all fixed in the center of the spool, which prevents easy replacement of individual spools. In addition, a certain amount of friction is required between the spool and the axle for rewinding. But this also makes it harder to unwind the filament.
Hence the idea of pushing the filament back in through a second hole below the spool..
Update 1
The screw for the PC4-M10 pneumatic fittings is now called Schraube-5mm-mit_Gewinde-M10.stl.
As an alternative, the same screw with a BSP 1/8" thread is available under the name Schraube-5mm-mit_Gewinde-BSP18.stl.
Apparently the PC4-M10 should fit better here. Personally, I had no problems screwing the connectors into the M10 thread, but maybe it will help someone.
P.S. for those who design threaded parts themselves:
After I had designed the thread, I shifted the surfaces outwards by 0.1 mm.
The external thread of the screw is an ISO trapezoidal thread TR 16x3, where I shifted the surfaces by 0.2mm. I left the TR16x3 in the nut in its "original" form.
(English version below.)
Benötigte Teile:
4x Kugellagerhalter-einzel.stl
6x Kugellagerhalter-doppelt.stl
2x Ikea-Samla-22l-Halter.stl
4x Schraube-5mm-mit_Gewinde-M10.stl
alternativ 4x Schraube-5mm-mit_Gewinde-BSP18.stl (s. Update1)
4x Mutter.stl
4x Schraube-4mm.stl
4x Mutter-Kurz.stl
1-4x Deckel.stl
zum Verschließen der nicht genutzten Durchführungen
ein paar mal Klemmring-M8.stl
nicht zwingend erforderlich
Zusätzliche gedruckte Teile:
8-10x Ikea Samla Clip
Skaliert auf 24 mm Breite
Ender 3 Low Friction Filament Guide with Cable Guide
dient gleichzeitig als Anschlag für den PTFE Schlauch
Zubehör:
Ikea Samla Box 22l
Deckel für Samla
Dichtungsband selbstklebend (für den Deckel)
2x Gewindestange M8 (je 34 cm)
16x Kugellager 608 (8x22x7) (z.B. kugellagershopberlin.de )
8x Gummidichtung 21 x 30 x 1,9 mm
4x Pneumatikanschlussstücke PC4-M10
4x PTFE Schlauch 4mm
z.B. Amazon
Silica Gel (z.B. Amazon )
Bemerkungen
Das Design von "IKEA Samla Quick Change" gefiel mir direkt. Einfach und funktional.
Wenn es Euch genauso gut gefällt wie mir, dann gebt doch bitte Christian (chertle) auch ein Like.
Ich habe folgendes gegenüber dem Original angepasst:
Kugellagerhalter für 608er Kugellager (8x22x7mm)
Halter etwas niedriger, damit die Spulen nicht am Deckel schleifen, wenn dieser etwas durchhängt.
Schlauchdurchführung oben
Schlauch kann komplett durch die Schraube geschoben werden, damit das Filament nicht an dieser reibt.
Pneumatikanschlussstücke, damit der Schlauch gut fixiert ist.
Schlauchdurchführung unten
keine Anschlussstücke, damit ein einfaches "Entnehmen" möglich ist.
Deckel für die "leeren" Schrauben
Klemmringe M8
zur Fixierung der Kugellagerhalter.
geht auch mit M8 Muttern, die muss man aber über die ganze Stange schrauben.
Ich hatte mir auch Gedanken darüber gemacht, wie man das Filament zurück in die Kiste bekommt, wenn man es wechselt, ohne dass man jedes Mal den Deckel öffnen muss.
Das Filament nur zurückzuschieben scheidet aus, da es dadurch nicht mehr ordentlich auf der Spule sitzt und sich evtl. verklemmt.
Es gibt Auto-Reverse Lösungen, diese sind aber allesamt in der Mitte der Spule befestigt, was einen leichten Austausch einzelner Spulen entgegensteht. Zudem ist eine gewisse Reibung zwischen der Spule und der Achse für das Zurückspulen nötig. Dadurch ist es aber auch schwerer das Filament abzurollen.
Daher die Idee, das Filament durch ein zweites Loch unterhalb der Spule wieder hineinzuschieben.
Update 1
Die Schraube für die PC4-M10 Pneumatikanschlussstücke heißt nun Schraube-5mm-mit_Gewinde-M10.stl
Als Alternative hierfür gibt es die gleiche Schraube mit einem BSP 1/8" Gewinde unter dem Namen Schraube-5mm-mit_Gewinde-BSP18.stl.
Scheinbar sollen hier die PC4-M10 besser passen. Ich persönlich hatte keine Probleme die Anschlussstücke in das M10 Gewinde einzuschrauben, aber vielleicht hilft es jemanden.
P.S. für diejenigen, die selbst Teile mit Gewinde konstruieren:
Ich habe, nachdem ich das Gewinde konstruiert hatte die Flächen um 0,1 mm nach Außen geschoben.
Das Außengewinde der Schraube ist ein ISO-Trapezgewinde TR 16x3, bei dem ich die Flächen um 0,2mm verschoben habe. In der Mutter habe ich TR16x3 im "Original" belassen.
English Version
thank you v51k, for the kind "reminder" to make the text available in english as well.
Parts needed:
4x Kugellagerhalter-einzel.stl (bearing holder-single)
6x Kugellagerhalter-doppelt.stl (bearing holder-double)
2x Ikea-Samla-22l-Halter.stl (Ikea-Samla-22l-Holder)
4x Schraube-5mm-mit_Gewinde-M10.stl (Screw-5mm-with_M10-thread)
alternatively 4x Schraube-5mm-mit_Gewinde-BSP18.stl (Screw-5mm-with_BSP 1/8-thread) (s. Update1)
4x Mutter.stl (Nut)
4x Schraube-4mm.stl (Screw-4mm)
4x Mutter-Kurz.stl (Nut-short)
1-4x Deckel.stl (Cover)
to close the not used feedthroughs
a few times Klemmring-M8.stl (clamping ring-M8)
not mandatory
Additional printed parts:
8-10x Ikea Samla Clip
Scaled to 24 mm width
Ender 3 Low Friction Filament Guide with Cable Guide
Also serves as a stop for the PTFE tube
Accessories:
Ikea Samla Box 22l
Lid for Samla
Sealing tape self-adhesive (for the lid)
2x threaded rod M8 (34 cm each)
16x bearing 608 (8x22x7) (e.g. kugellagershopberlin.de )
8x rubber gasket 21 x 30 x 1,9 mm
4x pneumatic connectors PC4-M10
4x PTFE Tube 4mm
e.g. Amazon
Silica Gel (e.g. Amazon )
Remarks
I liked the design of ["IKEA Samla Quick Change"](https://www.thingiverse.com/thing:2873244 right away. Simple and functional. If you like it as much as I do, please give Christian (chertle) a Like too.
I have adapted the following compared to the original:
bearing holder for 608 bearings (8x22x7mm).
Holder a little lower so that the coils do not drag on the lid when it sags a little.
Tube feed through top
Tube can be pushed completely through the screw so that the filament does not rub against it.
Pneumatic connectors, so that the Tube is well fixed.
Tube feed through bottom
no connection pieces, so that an easy "removal" is possible.
Cover for the "empty" screws
Clamping rings M8
to fix the bearing holders.
also goes with M8 nuts, but you have to screw them over the whole rod.
I had also thought about how to get the filament back into the box when you change it, without having to open the lid each time.
Just pushing the filament back is out of the question, as it won't sit neatly on the spool and may get jammed.
There are auto-reverse solutions, but they are all fixed in the center of the spool, which prevents easy replacement of individual spools. In addition, a certain amount of friction is required between the spool and the axle for rewinding. But this also makes it harder to unwind the filament.
Hence the idea of pushing the filament back in through a second hole below the spool..
Update 1
The screw for the PC4-M10 pneumatic fittings is now called Schraube-5mm-mit_Gewinde-M10.stl.
As an alternative, the same screw with a BSP 1/8" thread is available under the name Schraube-5mm-mit_Gewinde-BSP18.stl.
Apparently the PC4-M10 should fit better here. Personally, I had no problems screwing the connectors into the M10 thread, but maybe it will help someone.
P.S. for those who design threaded parts themselves:
After I had designed the thread, I shifted the surfaces outwards by 0.1 mm.
The external thread of the screw is an ISO trapezoidal thread TR 16x3, where I shifted the surfaces by 0.2mm. I left the TR16x3 in the nut in its "original" form.
Similar models
thingiverse
free

IKEA Samla DryBox Filamentbox für 5 Rollen by Andy_Podo
... 0.15 25%
5x m10 mutter 0.15 25%
5x m10 unterlegscheibe 0.15 25%
5x m10 schraube 0.15 25%
thingiverse
free

5mm Led Halter mit Gewinde inkl Mutter by Kleinz1971
...arbeitete version mit m10 .abdeckung 12mm.
gewinde m10 inkl mutter
wenn jemand ein längeres gewinde benötigt kann er sich melden
thingiverse
free

Garden Sprinkler by konst57
...d besser.
der innendurchmesser der aufnahme ist 23 mm.
ich habe noch die klemme und 2 verbindungsstücke für 1/2 " beigefügt.
thingiverse
free

Untertisch Halterung für IKEA SAMLE 5L Boxen 28x19x14 by Csd-zman
... ist die benamung in der freecad datei mangelhaft, aber für den fall das jemand was anpassen möchte ist es denke ich ausreichend.
thingiverse
free

Aufsteck_Haken für Regalbretter by Hans_n
...leinkram benutzen. wenn der haken zu locker sitzt, kann eine m8 schraube eingedreht werden. ich musste das gewinde nachschneiden.
thingiverse
free

Screw bottle opener with tank by Ductippi
... in den unteren bereich der schraube. der schraubekopf wird auf das gewinde geschraubt. die schrauben mutter ist nur ein gimmick.
thingiverse
free

Filamentreinigungsschraube 3/8" (Filament Screw) für Prusa i3 Hephestos und ähnliche by Dr_Peacock
...zette zum platzieren in der schraube. siehe fotos.
die schrauben nur handfest anziehen!
update: schraube richtig ausgerichtet.
thingiverse
free

siku adapter by AMCR
...r den druck sollte der adapter um 90 grad gedreht werden damit die stützstruktur unter
sich unter den haltern für den frontlader.
thingiverse
free

YAFSS - Yet Another Filament Storage Solution (for IKEA Samla, 22l) by PrintingTaghor
...
30mm teflon tube (4mm) for 1.75mm filament
version history
links/references:
ikea samla
iso metric screw thead
iso flat washer
thingiverse
free

Bohr Schablone Ikea Samla Hygrometer Feuchtigkeit Rund by Lordcyber
...ie schablone ist für diese halterung:https://www.thingiverse.com/thing:2873873
sensor ist zu finden unter:https://amzn.to/37fb3t7
22L
3d_export
$10

BESPOKE Cuker 22L
...painter available for all software<br>ue4. ue5. blender. maya. 3d max. unity. c4d.<br>formats: .obj .gltf .fbx .blend
3d_export
$10

BESPOKE Cuker 22L
...painter available for all software<br>ue4. ue5. blender. maya. 3d max. unity. c4d.<br>formats: .obj .gltf .fbx .blend
3d_export
$10

BESPOKE Cuker 22L
...painter available for all software<br>ue4. ue5. blender. maya. 3d max. unity. c4d.<br>formats: .obj .gltf .fbx .blend
3d_ocean
$12

HK Living Bottle
...white general this is a 3d model of carafe 22l by hk living, netherlands. it was modeled and prepared...
3d_export
$7

Fendi Casa Domino Luxury Mirror
...- 4cm 64cm h 120cm ( polys: 10870 )<br>sf 22l - 4cm 144cm h 54cm ( polys: 21024 )<br>sf...
3dfindit
free

F-22L
...f-22l
3dfind.it
catalog: esk schultze
thingiverse
free

Samla 22L Socket
...samla 22l socket
thingiverse
owo => https://www.thingiverse.com/thing:743280
sketchfab
$10

BESPOKE Cuker 22L
.... unity. c4d.
formats: .obj .gltf .fbx .blend - bespoke cuker 22l - buy royalty free 3d model by interior model (@interiormodel)
thingiverse
free

IKEA SAMLA Box 22l by 3dpartmaker
...p in step and stl file format for 3d cad designing.
see thing https://www.thingiverse.com/thing:4614790 for printable clip locks.
thingiverse
free

Installation Pompe Fuel sur Bidon 22L by PatrickRioche
...installation pompe fuel sur bidon 22l by patrickrioche
thingiverse
installation d'un pompe à fuel sur une bidon 22l
Drybox
thingiverse
free
Filament Drybox Trockenbox
...filament drybox trockenbox
thingiverse
i use this drybox for the storagebox of my filament.
thingiverse
free
Gravity Rewinder Drybox
...files. any future updated files and instructions have moved to https://www.prusaprinters.org/prints/25858-gravity-rewinder-drybox
thingiverse
free

Drybox nozzle by Shiyaku
...drybox nozzle by shiyaku
thingiverse
for 1.75mm
thingiverse
free
Drybox filament passthrough port by GameFan
...d into the wall of a drybox through a 12mm - 13mm hole and screwed into place from the other side.
suitable for 1.75mm filament.
thingiverse
free
Drybox Filament Tap
... drybox and screw the parts together from both sides. optionally add a suitable o-ring or some silicone to increase airtightness.
thingiverse
free
Samla Drybox Spool Holders
...d spools for ikea samla 22l drybox. measure your tube diameter and use openscad or online custimizer to create required stl files
thingiverse
free
M8 rod holder for Drybox
...with counterpart by wtlx.
i changed the cutouts for the nuts to be on the inside parts.
holds an m8 rod. mounting hardware is m3.
thingiverse
free

Silica gel container for Ikea 365 drybox
...silica gel container for ikea 365 drybox
thingiverse
modified silica gel box without hygrometer for the drybox from twotone74.
thingiverse
free

Filament drybox Lid with Window by Lambcook
...filament drybox lid with window to enable the spool to be seen. glue clear plastic film, such as spool wrapping, over the window.
thingiverse
free

Hefty Drybox by hayseedbyte
...hefty drybox by hayseedbyte
thingiverse
just a quick base to hold pvc in the bottom of a hefty air-tight container.
Samla
thingiverse
free

Samla clip by efaferrer
...samla clip by efaferrer
thingiverse
a simetric clip for samla box 5-11-22 l.
thingiverse
free

IKEA Samla table mount
...ikea samla table mount
thingiverse
for ikea samla 78x56x18
thingiverse
free

SAMLA Clip 55Liter/ 15Gallon
...e.
the lids on these samla seem to be are pretty loose in the narrow direction, make sure the clip engages the container and lid.
thingiverse
free

Samla Clip for 56cm X 78cm
...samla clip for 56cm x 78cm
thingiverse
samla clip for 56cm x 78cm
thingiverse
free

Samla belt loop by bellingeri
...samla belt loop by bellingeri
thingiverse
belt loop for ikea samla box.
i use it to tie up the box inside the van.
thingiverse
free

IKEA SAMLA 11lL Rails by fastplayer95
...es in order to have them flush underneath.
the "bridge" can be used to hold 2 samla boxes.
mounted with 6x30 woodscrews
thingiverse
free

IKEA Samla Väggfäste by UltiLolle
...5mm in distance.
the pictures just show two examples: wall and glass mounting with double-sided adhesive tape
happy hanging
lolle
thingiverse
free

ikea hook for ikea SAMLA boxes by dericcio
...ikea hook for ikea samla boxes by dericcio
thingiverse
ikea samla box hook
thingiverse
free
Samla 22L Socket
...samla 22l socket
thingiverse
owo => https://www.thingiverse.com/thing:743280
thingiverse
free

SAMLA HANGA by jangrewe
...gaps and also added pre-sliced g-code to print 2 samla hangas with as little support material as possible (thanks to simplify3d).
J
3d_export
$17

J-7mg
...j-7mg
3dexport
j-7mg
3d_export
$5

j hook
...j hook
3dexport
j hook
3d_export
$17

J-21 jastreb
...j-21 jastreb
3dexport
j-21 jastreb
3d_export
$17

Chengdu J-10
...chengdu j-10
3dexport
chengdu j-10
turbosquid
$96

J-20
...20
turbosquid
royalty free 3d model j-20 for download as max on turbosquid: 3d models for games, architecture, videos. (1658873)
turbosquid
$68

J-10A
...a
turbosquid
royalty free 3d model j-10a for download as max on turbosquid: 3d models for games, architecture, videos. (1658854)
turbosquid
$30

J-7
...j-7
turbosquid
royalty free 3d model j-7 for download as max on turbosquid: 3d models for games, architecture, videos. (1538420)
turbosquid
$14

Fence J
...turbosquid
royalty free 3d model fence j for download as fbx on turbosquid: 3d models for games, architecture, videos. (1313345)
turbosquid
$7

J for Jug
...rbosquid
royalty free 3d model j for jug for download as max on turbosquid: 3d models for games, architecture, videos. (1688347)
turbosquid
$5

Letter J
...urbosquid
royalty free 3d model letter j for download as max on turbosquid: 3d models for games, architecture, videos. (1408483)
Men
3d_export
$8

men and women
...men and women
3dexport
men and women
3d_export
$6

men women
...men women
3dexport
men women
turbosquid
$55

Men
...oyalty free 3d model men for download as ma, ma, obj, and fbx on turbosquid: 3d models for games, architecture, videos. (1598804)
3d_export
$6

of modern men
...of modern men
3dexport
3d model of modern men
3d_export
$5

Mens Hat
...mens hat
3dexport
men's hat
turbosquid
free

men
... available on turbo squid, the world's leading provider of digital 3d models for visualization, films, television, and games.
3ddd
$1

Hat for Men
...hat for men
3ddd
шляпа
hat for men - design by andre lb vieira
3d_export
$10

urban men and women
...urban men and women
3dexport
urban men and women
3d_export
$8

business men and women
...business men and women
3dexport
business men and women
3d_export
$7

young men and women
...young men and women
3dexport
young men and women
Ikea
3ddd
$1
IKEA
...ikea
3ddd
ikea , стеллаж
ikea
3ddd
$1
IKEA
...ikea
3ddd
ikea
кухня ikea
3ddd
$1

IKEA
...ikea
3ddd
ikea
осторожно, тяжелая модель
ikea
3ddd
$1
IKEA
...ikea
3ddd
ikea
5 зеркал от ikea
3ddd
$1
IKEA
...ikea
3ddd
ikea , бойа
ikea светильник потолочный
3ddd
$1
IKEA
...ikea
3ddd
ikea , барный
bar stool ikea
3ddd
$1

IKEA
...ikea
3ddd
ikea , зубная щетка , косметика
ikea
3ddd
free

IKEA
...ikea
3ddd
ikea , трюмо
дамский столик ikea.
3ddd
$1

IKEA
...3ddd
ps , декоративный набор , ikea
ikea decor
3ddd
$1

Ikea
...ikea
3ddd
ikea , lagra
модель лампы от ikea