Thingiverse
ICEpower 50ASX2 45Watt per channel Stereo Amplifier by bwaslo
by Thingiverse
Last crawled date: 3 years ago
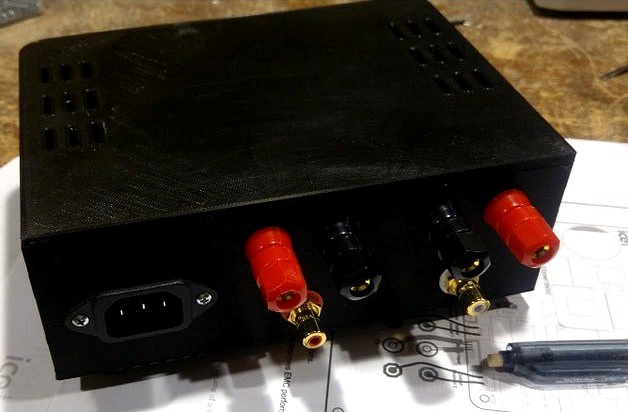
This is a complete enclosure for an ICEpower 50ASX2SE Class D Audio Amplifier module, a 50W stereo amplifier (45W/channel 4 ohms) board made by the Danish company Bang and Olufsen. (Not to be confused with some of the far east "50W" amplifier boards on the market). Until recently, ICEpower modules were not sold to the general public but only to equipment OEMS. Parts Express company now sells the boards, so here's how you can make a very high quality hifi stereo amplifier with quite little soldering and the help of your 3D printer. 200mm x 150mm or larger print bed required.
I needed a small but powerful and high quality stereo amplifier for an installation I was doing, and remembered these modules now being available. The ICEpower modules do not require heat sinks nor a grounded chassis (the board contains the AC power supply, which is double insulated), so a 3D printed enclosure seemed like the obvious and easiest choice. This arrangement printed perfectly first time, but was designed and built using some connectors I already had on hand. For this posting, I went back and modified the audio connector mounting hole sizes for use with more easily obtained parts.
The enclosure consists of a bottom part and a top part, both well vented. The board mounts into the bottom using 4 sheet metal or self-tapping screws. There is also an STL for plastic feet also installed with the same type screws (rubber feet from a hardware store could be used instead if you want something with more friction). The top attaches to the bottom using four of the same type screws.
This is the parts list for the amplifier:
A) The amp board is Parts Express# 326-212
B) The input connectors are PE# 091-1120 (one set needed)
C) The output binding posts are PE# 320-3375 (one set needed)
D) the IEC AC power connector is 090-442
E) wiring can be bought as wiring harness kit PE# 326-150 (one needed)
F) assembly screws are #6x3/8" sheet metal screws (12 needed) [metric: M3 or M3.5x10]
G) #4-40 x 3/4" screws, lockwashers, nuts.(2 sets) [metric: M3 x 15mm]
For the build shown, I used connectors at hand, rather than the ones in the part list (I'm also including the STL file for the case version with holes for mounting those in case that works better for you). [The input connectors in that version were CMC 816U, and the output binding posts were larger ones that mount on a 13mm hole.] I modified that file to use more easily obtained connectors to make the suggested bottom part file.
This is a pretty simple print, would probably be ok without supports (though I used supports when I printed). Also pretty simple assembly, just a few minutes to drive in some screws, maybe half an hour to cut, strip and attach the ends of the wiring harnesses to the connectors. The amp works great and has plenty of very quiet, clean power for most high fidelity loudspeakers.
Similar models
thingiverse
free

15W Stereo Amplifier Case by ctheroux
...t main web page is:http://www.ctheroux.com/15w-stereo-amplifier-case/.
you can request the source files on the page listed above.
thingiverse
free

Enclosure for the DPS3005 by Mawkes
...switch") as can be seen on the picture.
the box has a small tilt for qol.
all the items needed are available via aliexpress.
thingiverse
free

W10871222 dish washer harness control module plugs by dsheets
...wire with spade connectors through the plugs. i then spliced the plugs into the existing undamaged harness with butt connectors.
3dwarehouse
free

Binding Post Pair
..., spades, and bare wire. stereo pair in red/black, explodable for a single post. #amp #amplifier #binding_post #speaker #terminal
grabcad
free

minor audio power amplifier PAM8610
...ww.ebay.de/itm/402179735317"
to build a proper case (3d printing), i simplified that amplifier and created this minor model
thingiverse
free

DPS5015 Power Supply Enclosure by SamPerry
...attach the power supply pcb to the base and similar size screws to attach the bottom to the top...
thingiverse
free

Enclosure Bluetooth Receiver Amp MCM 50-16620 by HamsterHerder
...ave a power switch and integrate the power supply inside. i hate that a power supply is constantly running plugged into the wall.
thingiverse
free

Xbox 360 Power Connector Shell by TheGavitron
...print the "topshell" and the "botshell". the 4 mounting holes are recessed for 2.5mmx8mm allen-head bolts.
thingiverse
free

XH-M543 amplifier enclosure
...ure
thingiverse
enclosure for xh-m543 high power digital amplifier board tpa3116d2 audio amplifier module double channels 2*120w
thingiverse
free

Versatile Power Supply Cover/Enclosure
... the power supply into the case (the wires will be squeezed into the remaining area).
secure with m3 screws on the back and side.
45Watt
thingiverse
free

Laptop Charger Holder by Aarrav_Anil
...is a holder for laptop chargers. it works with 45watt dell chargers and 90watt hp...
thingiverse
free

Softbox Light Kit using a 8½" Heat Lamp Reflector by benoitmeunier
...with 6 feet cord ul listed (amazon): https://geni.us/alyf5x7b9gyi neewer 45watt cfl daylight balanced bulb (amazon): https://geni.us/g94w6rg neewer (2) 33"...
3dwarehouse
free

Marshall Bluesbreaker
...marshall bluesbreaker 3dwarehouse 1962 45watt 2x12 marshall bluesreaker combo tube guitar amp. #1962 #2x12...
3dwarehouse
free

Monsieur Tricot - Madame Cachet standing black
...production date mentioned on lamp. - size95mm; 6w = 45watt 550 lumen, kelvin 2200, dimmable, energy a+ - size125mm;...
3dwarehouse
free

Monsieur Tricot - Madame Cachet standing white
...production date mentioned on lamp. - size95mm; 6w = 45watt 550 lumen, kelvin 2200, dimmable, energy a+ - size125mm;...
3dwarehouse
free

Monsieur Tricot - outdoor white
...production date mentioned on lamp. - size95mm; 6w = 45watt 550 lumen, kelvin 2200, dimmable, energy a+ - size125mm;...
3dwarehouse
free

Monsieur Tricot - outdoor black
...production date mentioned on lamp. - size95mm; 6w = 45watt 550 lumen, kelvin 2200, dimmable, energy a+ - size125mm;...
3dwarehouse
free

Monsieur Tricot - indoor black
...production date mentioned on lamp. - size95mm; 6w = 45watt 550 lumen, kelvin 2200, dimmable, energy a+ - size125mm;...
3dwarehouse
free

Monsieur Tricot - indoor white
...production date mentioned on lamp. - size95mm; 6w = 45watt 550 lumen, kelvin 2200, dimmable, energy a+ - size125mm;...
Bwaslo
thingiverse
free

Another tp holder by bwaslo
...r larger paper rolls, and that also prints a little nicer (no overhands), also check outhttps://www.thingiverse.com/thing:3575916
thingiverse
free

Port tube for speaker cabinet by bwaslo
...ill take quite a while and a lot of filament, though.... check my other things to see if i've posted a design for that yet...
thingiverse
free

Lip Balm (Chapstick) clip by bwaslo
...ng it any harder to get in. my wife lost a chapstick from it slipping out, so i made her one that is a little tighter like that.
thingiverse
free

Short 33rpm spindle for Dual 1218 turntable by bwaslo
...70s and 80s. quick print, i used pillar supports (in slic3r pe) but it might print without. beats paying $15 for one from ebay!
thingiverse
free

Don't Panic! Button guard for LCD controller by bwaslo
...n except when you really mean to!
i plan to retire and live in luxury off the tips from this submission, so keep them rolling in!
thingiverse
free

Pulleys using 608 bearings by bwaslo
... good solid piece.
i've done some in pla and in pet-g, should work ok with abs too i imagine. hope you find a use for these/
thingiverse
free

Enclosures for BMR ambient tweeters by bwaslo
...discussion, at the diyaudio.com website: http://www.diyaudio.com/forums/multi-way/326055-ambience-tweeters-using-bmr-drivers.html
thingiverse
free

Floating cup (Starbucks-remix) by cr3beast
...figured i'd share it. thank you to happymoon and bwaslo for the original and improved models that i used...
thingiverse
free

Cabinet for 2-way ported loudspeaker by bwaslo
...eason i haven't printed it yet.
if by chance anyone out there prints this (maybe for a challenge?), please post a photo here!
thingiverse
free

Reliable Filament Runout Sensor by bwaslo
...-optical-endstop-control-printer/dp/b01flsa47o/ref=sr_1_2?ie=utf8&qid=1502728465&sr=8-2&keywords=optical+limit+switch
Icepower
3dwarehouse
free

Icepower 1000ASP
...icepower 1000asp
3dwarehouse
bang olufsen icepower 1000asp module #classd #diy #gwikse #icepower
3dwarehouse
free

Bang & Olufsen Beolab 8002
...#beolab #beomaster #beosystem_av9000 #beovision #beovox #class_d #classd #driver #ice #icepower #olufsen #organ #pipe #power...
3dwarehouse
free

Bang & Olufsen Beovision 10-46
...#aluminium #aluminum #bo #bang #beovision #black #flat_screen #home #ice #icepower #inch #integrated #lcd #led #modern #olufsen #plasma #power #stand...
3dwarehouse
free

Bang & Olufsen Beovision 8-40
...#aluminium #aluminum #bo #bang #beovision #black #flat_screen #home #ice #icepower #inch #integrated #lcd #led #modern #olufsen #plasma #power #stand...
3dwarehouse
free

Bang & Olufsen Beovision 4-103
...#3d #aluminium #aluminum #bo #bang #beovision #flat_screen #home #ice #icepower #inch #lcd #led #modern #olufsen #plasma #power #stand #surround...
3dwarehouse
free

Bang & Olufsen Beovision 7-32 (black)
...#aluminum #bo #bang #beovision #black #dvd #flat_screen #home #ice #icepower #inch #integrated #lcd #modern #olufsen #plasma #power #stand #surround...
3dwarehouse
free

Bang & Olufsen Beovision 7-32 (Blue)
...#aluminum #bo #bang #beovision #blue #dvd #flat_screen #home #ice #icepower #inch #integrated #lcd #modern #olufsen #plasma #power #stand #surround...
3dwarehouse
free

Bang & Olufsen Beovision 7-32 (red)
...#aluminium #aluminum #bo #bang #beovision #dvd #flat_screen #home #ice #icepower #inch #integrated #lcd #led #modern #olufsen #plasma #power #red...
3dwarehouse
free

Bang & Olufsen Beovision 7-32 (grey)
...#bo #bang #beovision #dvd #flat_screen #gray #grey #home #ice #icepower #inch #integrated #lcd #modern #olufsen #plasma #power #stand #surround...
Amplifier
3d_ocean
$16

Amplifier
...here just for render of presentation. all formats includes amplifier only. this is amplifier and this is my own design. design...
turbosquid
$25

Amplifier
...rbosquid
royalty free 3d model amplifier for download as 3dm on turbosquid: 3d models for games, architecture, videos. (1516647)
turbosquid
$18

Amplifier
...id
royalty free 3d model amplifier for download as ma and ma on turbosquid: 3d models for games, architecture, videos. (1587057)
turbosquid
$55

Amplifier
...y free 3d model amplifier for download as blend, fbx, and obj on turbosquid: 3d models for games, architecture, videos. (1612447)
turbosquid
$29

Amplifier
...ree 3d model amplifier for download as 3ds, obj, c4d, and fbx on turbosquid: 3d models for games, architecture, videos. (1228418)
turbosquid
$10

amplifier
... available on turbo squid, the world's leading provider of digital 3d models for visualization, films, television, and games.
turbosquid
$2

Amplifier
... available on turbo squid, the world's leading provider of digital 3d models for visualization, films, television, and games.
3d_ocean
$25

Amplifier
...lly created with 3ds max 2012 -max file with v-ray adv 2.10 materials and mental ray materials - unit system is set to centime...
archive3d
free

Amplifier 3D Model
...amplifier 3d model
archive3d
amplifier
amplifier - 3d model for interior 3d visualization.
archive3d
free

Amplifier 3D Model
...o equipment
amplifier vox n111213 - 3d model (*.gsm+*.3ds+*.max) for interior 3d visualization.
Stereo
turbosquid
$50

Stereo
... available on turbo squid, the world's leading provider of digital 3d models for visualization, films, television, and games.
turbosquid
$18

stereo
... available on turbo squid, the world's leading provider of digital 3d models for visualization, films, television, and games.
turbosquid
$1

Stereo Sound
...squid
royalty free 3d model stereo sound for download as obj on turbosquid: 3d models for games, architecture, videos. (1342541)
evermotion
$10

stereo 65 am144
...reo system with all textures, shaders and materials. it is ready to use, just put it into your scene.. evermotion 3d models shop.
evermotion
$10

stereo 62 am144
...reo system with all textures, shaders and materials. it is ready to use, just put it into your scene.. evermotion 3d models shop.
evermotion
$10

stereo 63 am144
...reo system with all textures, shaders and materials. it is ready to use, just put it into your scene.. evermotion 3d models shop.
evermotion
$10

stereo 64 am144
...reo system with all textures, shaders and materials. it is ready to use, just put it into your scene.. evermotion 3d models shop.
evermotion
$10

stereo 66 am144
...reo system with all textures, shaders and materials. it is ready to use, just put it into your scene.. evermotion 3d models shop.
evermotion
$10

stereo 75 am144
...reo system with all textures, shaders and materials. it is ready to use, just put it into your scene.. evermotion 3d models shop.
evermotion
$10

stereo 73 am144
...reo system with all textures, shaders and materials. it is ready to use, just put it into your scene.. evermotion 3d models shop.
Channel
turbosquid
$8

Channel Daybed
...ree 3d model channel daybed for download as max, fbx, and obj on turbosquid: 3d models for games, architecture, videos. (1637702)
turbosquid
$6

Channel Ring
... free 3d model channel ring for download as 3dm, obj, and stl on turbosquid: 3d models for games, architecture, videos. (1593829)
turbosquid
$30

Channel Lock
... available on turbo squid, the world's leading provider of digital 3d models for visualization, films, television, and games.
turbosquid
$29

Channelizer drum
... available on turbo squid, the world's leading provider of digital 3d models for visualization, films, television, and games.
turbosquid
$4

C4 Channel
... available on turbo squid, the world's leading provider of digital 3d models for visualization, films, television, and games.
turbosquid
$4

C3 Channel
... available on turbo squid, the world's leading provider of digital 3d models for visualization, films, television, and games.
turbosquid
$3

C8 Channel
... available on turbo squid, the world's leading provider of digital 3d models for visualization, films, television, and games.
turbosquid
$3

C7 Channel
... available on turbo squid, the world's leading provider of digital 3d models for visualization, films, television, and games.
turbosquid
$3

C6 Channel
... available on turbo squid, the world's leading provider of digital 3d models for visualization, films, television, and games.
turbosquid
$2

C18 Channel
... available on turbo squid, the world's leading provider of digital 3d models for visualization, films, television, and games.
Per
turbosquid
$70
Pers
...pers
turbosquid
royalty free 3d model pers for download as on turbosquid: 3d models for games, architecture, videos. (1288905)
3d_export
$5

mmorpg pers
...mmorpg pers
3dexport
pers for mmorpg ,rpg
3d_export
$40

Pers 3D Model
...pers 3d model
3dexport
pers 3d model 666cepesh666 73023 3dexport
turbosquid
$10
scala per piscina
... available on turbo squid, the world's leading provider of digital 3d models for visualization, films, television, and games.
turbosquid
$13
Delaktig 2 pers sofa
... model delaktig 2 pers sofa for download as max, obj, and fbx on turbosquid: 3d models for games, architecture, videos. (1482218)
turbosquid
$9
Chandra rugs PER-15403
... available on turbo squid, the world's leading provider of digital 3d models for visualization, films, television, and games.
turbosquid
$9
Chandra rugs PER-15400
... available on turbo squid, the world's leading provider of digital 3d models for visualization, films, television, and games.
turbosquid
$5

Per oberg table (Soffbord)
... available on turbo squid, the world's leading provider of digital 3d models for visualization, films, television, and games.
turbosquid
$10
globo-Mobile sospeso per lavabo
... available on turbo squid, the world's leading provider of digital 3d models for visualization, films, television, and games.
3d_export
$10

Compressor Dalgakiran flow rate 45m3 per minute
...compressor dalgakiran flow rate 45m3 per minute
3dexport
compressor dalgakiran, with a constant air capacity of 45m3 per minute