Thingiverse

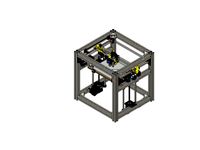
Hypercube Evolution Y axis Euro frame (Y10 / Y12) by PaulArnold
by Thingiverse
Last crawled date: 3 years, 1 month ago
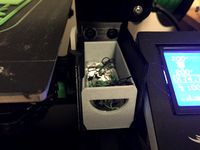
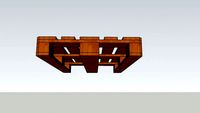
As I dont like the brass inserts for the Hypercube evolution, I searched for a clamp style parts set. This way, I found Bruno's set from which this is a remix.
Unfortunately, the rod holes of the motor mounts and rear pulleys had different distances to the frame, so I could not butt the parts up against the frame.
Also, the hole for the M5 nut was too narrow and didn't fit the corner bracket of the european frame (like that from Bohrers shop)
I remixed the motor mounts and rear pulleys to that the rods runs parallel to the frame with a distance of 30mm. Please be aware that this version uses 10mm rods for the Y axis (like most do).
You'll need:
all parts printed, clamps printed 2x each
4 x GT2 pulley with 20 teeth
10 x M3 nut
8 x M3x20 DIN912 screws (for the 4 clamps)
2 x M3x35 or M3x40 DIN912 (for the 2 rear pulleys)
4 x M4x10 screws
4 x M4 hammernuts
6 x M5x10 screws
Instructions:
Clear all supports from the nut traps, insert nuts
Insert 2 GT Pulleys to each rear idler and fix them with a M3x35 or M3x40 screw
slide the 10mm rods into the motor mount and rear pulley of the corresponding side until the rod is inserted flush. Don't forget to slide on the LM10LU bearing!
insert M4 frame screw into motor mount and rear pulley and slightly screw on the hammernut
insert the assembly onto the frame (see pics)
slightly tighten the M4 screws
tighten 2 x M5 screws at the top of the motor mount
tighten 2 x M5 screws at the top of the rear pulley
tighten the M4 screws
Tighten the clamps with M3x20 screws
Done
EDIT 15.06.2019:
I uploaded a Y12 version upon request.
However, this version is untested as I dont have 12mm rods on Y.
Similar models
thingiverse
free

Hypercube Evolution RAMPS Mount by transwarp2010
...rnuts m5 and 3 of those 5 mm brass insert nuts for assembly. see fotos.
i attach the freecad-file for redesign. allways have fun.
thingiverse
free

Electric Skateboard Dual Drive (6355 Outrunner) by InputUnreal
... bar
5) tighten grubs
6) assemble pulleys
7) install motor pulley
8) install belts
9) insert wheel with pulley
10) install covers
thingiverse
free

Hypercube Evolution adjustable Z-Endstop by transwarp2010
...h, to mount on the hypercube-frame to generate the z-min-stop-signal.
i attach the original freecad-file for changings.
have fun.
thingiverse
free

Hypercube Evolution Pulley Mount 10mm Rod for Insert by Trixigt
... only one, but i like the brass inserts ;p
just modified nedallives excellent pulley mount for 10mm rods to accept brass inserts.
thingiverse
free

3030 Extrusion Gimbal mount for Zesty Nimble for a Hypercube Evolution by kuhnikuehnast
... to mount everything to the frame.
if you have any ideas to improve the nimble, just leave a comment and i'll try my best :-)
thingiverse
free

Hypercube Evolution Mods by Syngenta
... parts:
x carriage with endstop mount ( no brass inserts)
stronger belt clamps
improved belt idler
motor mount with endstop mount
thingiverse
free

Extruder Motor Mount for 3030 Extrusion by thinngimaker
...y 3030 extrusion, you only need four m5x10 screws and 4 hammer nuts for mounting it to the frame.
(and of course an extruder kit)
cults
free

Clamping wheel M5 with insert
...ning insert
clamping wheel with insertion of an m5 nut.
- pause during 95% printing
- insert an m5 nut
- resume printing
thingiverse
free

Sapphire Pro CoreXY-Misalignment Fix #2
...se.com/thing:3969752).
2019-11-18: new version, easier screw insertion.
2019-11-26: new version, additional attachment to v-slot.
thingiverse
free

Nema 17 mount by Hustensaft
...rse
mountplate for a usual nema17 stepper.
you might need:
4 x m3 x 40mm screw (for nema17)
2 x m5 x 16mm screw
2 x m5 hammernut
Paularnold
thingiverse
free

18350 battery sled by PaulArnold
...on't fit.
be sure to only activate supports from the print bed as the bore for the negative wire should stay free of support!
thingiverse
free

Toolson MK2 BLTouch mount by PaulArnold
...rap forums!
just wanted to bring this useful mount to thingiverse.
you can find toolson's mk2 project here:http://scheuten.me
Y12
3dfindit
free

Y12
...y12
3dfind.it
catalog: tvmp
thingiverse
free

BL Touch V 1.0 Mount
...not obstruct airflow from the hotend fan. offset: x-25 y12 print it just like all other parts, with the...
cg_trader
$3

Smartphone vivo Y12
...e vivo y12
cg trader
smartphone vivo y12 3d model telephone, available formats max, obj, 3ds, fbx, ready for 3d animation and ot
cg_trader
$20

Y12- Diamond Earring | 3D
...y12- diamond earring | 3d
cg trader
1.00mm gems and 3-4 grams
grabcad
free

skate frame 3x80mm
...and carbon for the side plates, fits a youth y1213 ...
grabcad
free

Class M Concrete Pile Cap (M & F)
...male and female. using 12mm thickness for base and y12 and y16 reinforcement...
3dwarehouse
free

Y12 SECTION A
...y12 section a
3dwarehouse
3dwarehouse
free

SECTION Y12
...section y12
3dwarehouse
3dwarehouse
free

Y12S - TELEFERICO
...y12s - teleferico
3dwarehouse
equipo superpuesto bajo escalera con puertas abiertas.
Y10
turbosquid
free

Diesel Engine Y10
...osquid
free 3d model diesel engine y10 for download as blend on turbosquid: 3d models for games, architecture, videos. (1578160)
3d_export
$99

Lancia Ypsilon 2011 3D Model
...2010 2011 2012 2013 2014 epsilon compact city mini y10 type 843 elle versus urban italian lancia ypsilon 2011...
cg_studio
$99

Lancia Ypsilon 20113d model
...2010 2011 2012 2013 2014 epsilon compact city mini y10 type 843 elle versus urban italian hatch .3ds .c4d...
3d_ocean
$89

Lancia Ypsilon 2011
...italian lancia lancia ypsilon mini type 843 urban versus y10 ypsilon lancia ypsilon 2011 3d model by humster3d 360...
3dfindit
free

Y9, Y10 & Y19
...y9, y10 & y19
3dfind.it
catalog: wmberg
3dfindit
free

Y9-L & Y10-L
...y9-l & y10-l
3dfind.it
catalog: wmberg
thingiverse
free
Ender-3 Filament Waste Squeegee
...little to prevent scratching of heat bed g1 x248 y10 f3000.0 ; move to start position g1 e20.8 f300.0...
thingiverse
free

HEVO - XY carriage with DA15 connector for multiple head quick swap by iCedric
...see my new head here : https://www.thingiverse.com/thing:3398653 carriage for y10 / x8 & y10 / x10 for use with...
thingiverse
free

X0Y0Z0 (cnc zero) by Idegraaf
...x0 g0 x10 g31 y-25 f100 g92 y0 g0 y10 g0 z15 g0 x-3 y-3 g92 x0 y0 g31...
Hypercube
turbosquid
free

HyperCube
... available on turbo squid, the world's leading provider of digital 3d models for visualization, films, television, and games.
3d_export
$5

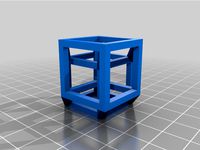
Hypercube 3D Model
...hypercube 3d model
3dexport
cube hypercube four-dimensional space side geometry edge
hypercube 3d model dmitry87 54991 3dexport
3d_export
$5
tesseract hypercube
...t it. moreover different textures and materials can be added and tesseract can be set in any scene. dimensions: x: 4m y: 4m z: 4m
thingiverse
free
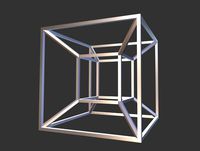
Hypercube
...hypercube
thingiverse
hypercube projected into three dimensional space.
thingiverse
free

Hypercube by alpheccar
...hypercube by alpheccar
thingiverse
projection of an hypercube on an hypersphere.
thingiverse
free
Hypercube by BorisBlavasky
...hypercube by borisblavasky
thingiverse
hypercube. testing the tool.
thingiverse
free

Hypercube by Christian42
...hypercube by christian42
thingiverse
i made a hypercube using rhino3d
thingiverse
free

Hypercube by Christian42
...hypercube by christian42
thingiverse
i made a hypercube using rhino3d
thingiverse
free

HyperCube by wwebber
...hypercube by wwebber
thingiverse
this is the standard perspective projection of the hypercube from 4d to 3d
thingiverse
free
HyperCube scaled by Muzeem
...hypercube scaled by muzeem
thingiverse
customized hypercube
Evolution
3ddd
$1
Evolution
... evolution , комод
комод из каталога emmemobili модель evolution
design_connected
$18

Evolution
...evolution
designconnected
zanotta evolution computer generated 3d model. designed by ïto, ora.
design_connected
$11

Evolute
...evolute
designconnected
danese evolute computer generated 3d model. designed by crasset, matali.
design_connected
$22

Evolution
...evolution
designconnected
emmemobili evolution shelves and storage computer generated 3d model. designed by ferruccio laviani.
3ddd
$1

Zanotta / EVOLUTION
...zanotta / evolution
3ddd
zanotta
zanotta
884 evolution
3ddd
free

Simas Evolution
...simas evolution
3ddd
simas
раковина simas evolution
3ddd
$1

Lancer Evolution
...lancer evolution
3ddd
автомобиль , машина
lancer evolution viii
3ddd
$1
Zanotta Evolution
...zanotta evolution
3ddd
zanotta
современное кресло evolution фабрики zanotta
turbosquid
$25
Evolution Dragon
...d
royalty free 3d model evolution dragon for download as obj on turbosquid: 3d models for games, architecture, videos. (1212928)
turbosquid
$6

Flowers Evolution
...
royalty free 3d model flowers evolution for download as obj on turbosquid: 3d models for games, architecture, videos. (1214159)
Euro
3d_export
$5
euro pallet
...euro pallet
3dexport
euro pallet 1200-800
turbosquid
$17

euro
... available on turbo squid, the world's leading provider of digital 3d models for visualization, films, television, and games.
turbosquid
$7

euro
... available on turbo squid, the world's leading provider of digital 3d models for visualization, films, television, and games.
turbosquid
$1

euro
... available on turbo squid, the world's leading provider of digital 3d models for visualization, films, television, and games.
turbosquid
free

EURO
... available on turbo squid, the world's leading provider of digital 3d models for visualization, films, television, and games.
3d_export
$5
1 euro
...1 euro
3dexport
this coin is valid to be used instead of 1 euro coins in shopping carts.
3d_export
$5

EURO 3D Model
...euro 3d model
3dexport
euro money logo
euro 3d model eldor 72988 3dexport
3ddd
$1
Euro lamp art
...euro lamp art
3ddd
eurolampart
euro lamp art
3d_ocean
$5

Euro Balloon
... was modelled and prepared for photo-realistic renderings, close-ups, cg visualization. the model is ready to be inserted in y...
3d_ocean
$5

Euro Balloon
... was modelled and prepared for photo-realistic renderings, close-ups, cg visualization. the model is ready to be inserted in y...
Axis
3ddd
$1

Мария Axis
...
3ddd
кухня , классическая , axis
модель кухни.
3d_export
$22

Axis robot 6-axis robotic arm
...ing parts drawings, standard parts purchased parts list, can be produced directly according to the drawings, welcome to download!
3ddd
free

Versatile Axis
...ddd
nexus , плитка
http://bvtileandstone.com/ceramic-porcelain/versatile-axis/
3d_export
$19

robot 2 axis
...robot 2 axis
3dexport
robot 2 axis
turbosquid
$40

Axis R5F
... available on turbo squid, the world's leading provider of digital 3d models for visualization, films, television, and games.
turbosquid
$40

Axis S5F
... available on turbo squid, the world's leading provider of digital 3d models for visualization, films, television, and games.
turbosquid
$30

Axis Athlon
... available on turbo squid, the world's leading provider of digital 3d models for visualization, films, television, and games.
turbosquid
$10

Linear Axis
... available on turbo squid, the world's leading provider of digital 3d models for visualization, films, television, and games.
3d_export
$15

drawing axis
...drawing axis
3dexport
simple rendering of the scene file
3ddd
$1

versatile axis ARC
...versatile axis arc
3ddd
versatile , плитка
versatile axis arc red dot design award
Y
turbosquid
$1

Tetera y Galletas y Caf
... available on turbo squid, the world's leading provider of digital 3d models for visualization, films, television, and games.
3ddd
$1

Смеситель Y-CON
...смеситель y-con
3ddd
смеситель , y-con
смеситель y-con
3ddd
$1

Y-Chair
...y-chair
3ddd
tom dixon
y-chair designed by tom dixon,
3ds max + obj, corona
3ddd
$1

Y Chair compilation
....net/products/us/y-chair-sled-base
y chair swivel basehttp://www.tomdixon.net/products/us/y-chair-swivel-base
turbosquid
$190

Y-8
...y-8
turbosquid
royalty free 3d model y-8 for download as max on turbosquid: 3d models for games, architecture, videos. (1658891)
turbosquid
$7

Bench Y
...turbosquid
royalty free 3d model bench y for download as obj on turbosquid: 3d models for games, architecture, videos. (1488746)
turbosquid
$15

bonePile Y
...oyalty free 3d model bonepile y for download as blend and obj on turbosquid: 3d models for games, architecture, videos. (1546374)
turbosquid
$7

Y for Yarn
...d
royalty free 3d model y for yarn model for download as max on turbosquid: 3d models for games, architecture, videos. (1699732)
turbosquid
$2

FONT Y
...quid
royalty free 3d model font y for download as ma and obj on turbosquid: 3d models for games, architecture, videos. (1549457)
3ddd
$1

WOOD-y
...wood-y
3ddd
wooden guy
Frame
archibase_planet
free

Frame
...frame
archibase planet
frame photo frame
frame n190813 - 3d model (*.gsm+*.3ds) for interior 3d visualization.
archibase_planet
free

Frame
...frame
archibase planet
frame photo frame
frame n071113 - 3d model (*.gsm+*.3ds) for interior 3d visualization.
3ddd
$1

Frame
...frame
3ddd
frame
3ddd
free

Frame
...frame
3ddd
frame
archibase_planet
free

Frame
...frame
archibase planet
frame mirror frame ornament
frame n260113 - 3d model (*.gsm+*.3ds) for interior 3d visualization.
archibase_planet
free

Frame
...frame
archibase planet
frame photo frame
frame photo n190813 - 3d model (*.gsm+*.3ds) for interior 3d visualization.
archibase_planet
free

Frame
...frame
archibase planet
frame window window frame
frame 1 - 3d model (*.gsm+*.3ds) for interior 3d visualization.
archibase_planet
free

Frame
...frame
archibase planet
frame window frame window
frame 3 - 3d model (*.gsm+*.3ds) for interior 3d visualization.
archibase_planet
free

Frame
...frame
archibase planet
frame wall frame decoration
frame 1 - 3d model (*.gsm+*.3ds) for interior 3d visualization.
archibase_planet
free

Frame
...frame
archibase planet
frame window window frame
frame 2 - 3d model (*.gsm+*.3ds) for interior 3d visualization.