Thingiverse
HXLMESFlight Prototype V1 by HXLMES
by Thingiverse
Last crawled date: 3 years ago
UPDATE 05.02.19: Thank you everyone for your support and interest in my design. I have since moved on to new projects and will no longer be updating this Thing, replying to comments or answering messages on Thingiverse. I appreciate all of the comments, builds, downloads and collections, wishing all of you makers a happy 2019 :) Zack.
UPDATE 22.07.17: My newest drone design is live! Check out the HXLMESFlight HF210 here:https://www.thingiverse.com/thing:2443581
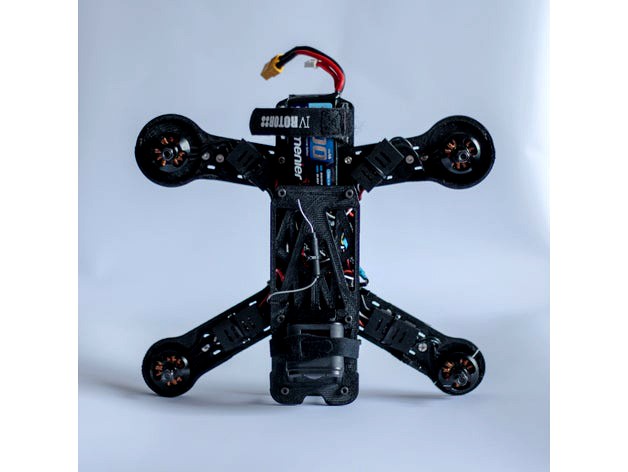
UPDATE 8.04.17: I finally got some decent pictures of the assembled drone today, including detail shots of the wiring and component placement. I've weighed the frame, and assembled drone with/without battery (see below). I also uploaded a new .stl file for a lower front plate designed to hold an FPV camera (using a standard Foxeer/Run Cam mounting bracket). Lastly, I'd like to give a massive thank you to ElCorbo for building this and sharing his progress with me - it means a lot!
UPDATE 30.03.17: It's been a while since I checked in here, and I'm super excited to see how many views and downloads of this Thing there have been! As per ElCorbo's request, today I've added some photos (will soon be replaced with high-res versions) of the final wiring and assembly; and uploaded some .stl files for the custom brackets I designed to supplement the main frame. The battery bracket is designed to prevent the battery from damaging the FC stack in the event of a crash. It slides over the rear standoffs, and provides a mounting point for your VTx aerial too. You might need to modify the base of the bracket (as the picture shows) depending on the layout of your PDB to leave room for the battery wiring. The other two parts (VTx/Rx brackets) slide over the centre standoffs (back to back) and provide mounting options for both your receiver and video transmitter. I designed the 'shelf' to hold a TBS Unify Pro. If you want other mounting options, I highly recommend fixing these components to the underside of the upper plate using 3M VHB tape. I've also included a photo of how I run my Rx antenna, don't make the same mistake I did initially (not securing it properly) and having it shredded by the props :/ Lastly, I have a 12v LED panel up front underneath the lower plate. It is held in place with zip-ties. As you can see from the pictures, I don't currently have this drone set up for FPV as I last used it for testing and had my GoPro Session strapped to its mount in the upper plate. That is why you can't see the camera and VTx in the photos :)
UPDATE: The initial testing of this frame has been completed; I am pleased to announce this has been a huge success! After several severe crashes, the original frame design suffered cracked arms and even a split upper plate. Since these tests, I have completely redesigned these most vulnerable parts and have had no further critical damage. The arms are also thicker, and the upper plate now features a mounting bracket for the GoPro Session along with a second layer of bracing throughout.
These plans are free for anyone interested in testing and sharing their results. You may remix, modify or otherwise alter this design and share it as your own variation, whilst giving credit to me as the original designer/owner.
Flight video: https://www.youtube.com/watch?v=pGcsfYci72s
Design brief: To design and build a prototype remote-controlled flying quadcopter using 3D printed plastics. The design must be strong enough to cope with the forces imposed upon it during flight, and resilient enough to endure the (inevitable) crashes it sustains. The 3D printed parts must all fit on a smaller printing bed size of 150mm x 150mm to encompass a wider range of compatible printer models, and be printable from either PLA or ABS plastic. The assembly must be relatively straightforward, and the number of individual parts kept to a minimum. All of the hardware used during assembly must also be easy to source, and the design cannot require specialty parts of any kind.
The design must be aesthetically pleasing and built to a regulation size for racing.
Non-Commercial:
You do not have permission to print and sell this frame, either as a whole or as individual components. You do have permission to print and test this frame for your own use.
Please pay attention and respect the creative commons license these files are released under. This means the files are available for personal use only.
Key features:
8 components
14 screws
6 standoffs
4 nuts
Only 1 tool needed
Modular design
Extremely strong/lightweight
Print with your preferred material
Quick to print
M3 x 16/19mm slots for motors
30.5mm hole spacing for FC/PDB
250mm standard size frame for racing
Fits 5” propellers
Battery vents double as hanging point for easy storage
Built-in motor guards double as torsion reduction
Print on 150mm x 150mm bed
No support material needed during printing
ASSEMBLY IN LESS THAN 3 MINUTES!*
*Check out the video:https://www.youtube.com/watch?v=gl3VL2uEo4Y
Weight:
Frame only: 164g
Built FPV (no batt): 447g
Built FPV (w/ batt): 525g
Instructions:
Print one of each of the components (8 total). Use your choice of ABS or PLA plastic. I’m using PLA.
Required hardware:
14x M3 x 10mm machine screws
6x M3 x 35mm standoffs
4x M3 nylon nuts
Print settings:
Layer Height: 0.25mm
Walls: 2
Top/Bottom Layers: 2
Infill: 60%*
*I use a triangular infill, you may need to increase the density if using a different infill pattern.
YouTube: https://www.youtube.com/HXLMES
UPDATE 22.07.17: My newest drone design is live! Check out the HXLMESFlight HF210 here:https://www.thingiverse.com/thing:2443581
UPDATE 8.04.17: I finally got some decent pictures of the assembled drone today, including detail shots of the wiring and component placement. I've weighed the frame, and assembled drone with/without battery (see below). I also uploaded a new .stl file for a lower front plate designed to hold an FPV camera (using a standard Foxeer/Run Cam mounting bracket). Lastly, I'd like to give a massive thank you to ElCorbo for building this and sharing his progress with me - it means a lot!
UPDATE 30.03.17: It's been a while since I checked in here, and I'm super excited to see how many views and downloads of this Thing there have been! As per ElCorbo's request, today I've added some photos (will soon be replaced with high-res versions) of the final wiring and assembly; and uploaded some .stl files for the custom brackets I designed to supplement the main frame. The battery bracket is designed to prevent the battery from damaging the FC stack in the event of a crash. It slides over the rear standoffs, and provides a mounting point for your VTx aerial too. You might need to modify the base of the bracket (as the picture shows) depending on the layout of your PDB to leave room for the battery wiring. The other two parts (VTx/Rx brackets) slide over the centre standoffs (back to back) and provide mounting options for both your receiver and video transmitter. I designed the 'shelf' to hold a TBS Unify Pro. If you want other mounting options, I highly recommend fixing these components to the underside of the upper plate using 3M VHB tape. I've also included a photo of how I run my Rx antenna, don't make the same mistake I did initially (not securing it properly) and having it shredded by the props :/ Lastly, I have a 12v LED panel up front underneath the lower plate. It is held in place with zip-ties. As you can see from the pictures, I don't currently have this drone set up for FPV as I last used it for testing and had my GoPro Session strapped to its mount in the upper plate. That is why you can't see the camera and VTx in the photos :)
UPDATE: The initial testing of this frame has been completed; I am pleased to announce this has been a huge success! After several severe crashes, the original frame design suffered cracked arms and even a split upper plate. Since these tests, I have completely redesigned these most vulnerable parts and have had no further critical damage. The arms are also thicker, and the upper plate now features a mounting bracket for the GoPro Session along with a second layer of bracing throughout.
These plans are free for anyone interested in testing and sharing their results. You may remix, modify or otherwise alter this design and share it as your own variation, whilst giving credit to me as the original designer/owner.
Flight video: https://www.youtube.com/watch?v=pGcsfYci72s
Design brief: To design and build a prototype remote-controlled flying quadcopter using 3D printed plastics. The design must be strong enough to cope with the forces imposed upon it during flight, and resilient enough to endure the (inevitable) crashes it sustains. The 3D printed parts must all fit on a smaller printing bed size of 150mm x 150mm to encompass a wider range of compatible printer models, and be printable from either PLA or ABS plastic. The assembly must be relatively straightforward, and the number of individual parts kept to a minimum. All of the hardware used during assembly must also be easy to source, and the design cannot require specialty parts of any kind.
The design must be aesthetically pleasing and built to a regulation size for racing.
Non-Commercial:
You do not have permission to print and sell this frame, either as a whole or as individual components. You do have permission to print and test this frame for your own use.
Please pay attention and respect the creative commons license these files are released under. This means the files are available for personal use only.
Key features:
8 components
14 screws
6 standoffs
4 nuts
Only 1 tool needed
Modular design
Extremely strong/lightweight
Print with your preferred material
Quick to print
M3 x 16/19mm slots for motors
30.5mm hole spacing for FC/PDB
250mm standard size frame for racing
Fits 5” propellers
Battery vents double as hanging point for easy storage
Built-in motor guards double as torsion reduction
Print on 150mm x 150mm bed
No support material needed during printing
ASSEMBLY IN LESS THAN 3 MINUTES!*
*Check out the video:https://www.youtube.com/watch?v=gl3VL2uEo4Y
Weight:
Frame only: 164g
Built FPV (no batt): 447g
Built FPV (w/ batt): 525g
Instructions:
Print one of each of the components (8 total). Use your choice of ABS or PLA plastic. I’m using PLA.
Required hardware:
14x M3 x 10mm machine screws
6x M3 x 35mm standoffs
4x M3 nylon nuts
Print settings:
Layer Height: 0.25mm
Walls: 2
Top/Bottom Layers: 2
Infill: 60%*
*I use a triangular infill, you may need to increase the density if using a different infill pattern.
YouTube: https://www.youtube.com/HXLMES
Similar models
thingiverse
free

F450 FRAME racing mod
...pu, but i recommand you to use tpu to reduce viberation.
led mount 3 is designed to mount a 4x4 led array.
enjoy!
carpenter-zhang
thingiverse
free

FlosStyle rear plate (vtx mount) by ledroneclub
...ubes have a length difference because this frame uses 4,5 mm lock nuts on the middle standoffs.
i print this using tpu filament.
thingiverse
free

MQC One Connex Prosight Mounts by schome1
...ry straps. there is a lot of antenna wire to consider. i wound it up and zip tied them together between the camera and the vtx.
thingiverse
free

Drone wall / case mount for DRUID One frame by bjorntm
...for druid one frame by bjorntm
thingiverse
mounting plate for fpv drone with druid one frame. use m3 bolts and nuts to mount it.
thingiverse
free

Bullfrog 5 inch quadcopter frame (drone) by Brownie1982
... or remix as desired.
parts required...
x4 30mm standoffs
x8 m3 bolts for standoffs
x1 m3 bolt and nut for front fpv camera mount
cg_trader
$3

FPV Drone | 3D
...
mostly m3 screw used
3 inch prop design
dual bottom plate for rigidity
standoff can be extruded for extra height
symmetric model
thingiverse
free

Micro indoor Quadcopter by wohenzhuce
...st print horizontally, so it would have tenacity and won't break when you mount the motor.
updated: quad version-2 2017/02/20
thingiverse
free

Toby-X FPV camera mount by histo
...d .3mm height 30% infill and it holds up to my crashes.
*** updated added 6mm standoff size version. per toby-x creator comment.
thingiverse
free

Shendrones Full Tilt Boogie or Mixuko VTX Plate by neilikus
... mount is in the top-rear of the pod.
i used the immersionrc tramp vtx here and it works great!
printed in tpu for a bit of flex.
thingiverse
free

FPV Drone Antenna Holder - 4mm Standoffs by Thebigskysky
...r it may also work for your application.
included is the solidworks file if you need to customize the model. have fun and enjoy!
Hxlmes
thingiverse
free

DJI Spark/Mavic Controller Stick Guard by HXLMES
...dji spark/mavic controller stick guard by hxlmes
thingiverse
a minimal stick guard for the dji spark or mavic controller.
thingiverse
free

HF210 FPV Racing Drone by HXLMES
...found it provides a great balance of strength and weight, as well as a faster print time.
youtube: https://www.youtube.com/hxlmes
V1
turbosquid
$35

v1
... available on turbo squid, the world's leading provider of digital 3d models for visualization, films, television, and games.
3d_export
$10

street tree v1
...street tree v1
3dexport
street tree v1
3d_export
$5
potato v1
...potato v1
3dexport
turbosquid
$20

Kitchen V1
...bosquid
royalty free 3d model kitchen v1 for download as max on turbosquid: 3d models for games, architecture, videos. (1153622)
turbosquid
$12
sofa v1
...turbosquid
royalty free 3d model sofa v1 for download as max on turbosquid: 3d models for games, architecture, videos. (1283267)
turbosquid
$3

Chair V1
...urbosquid
royalty free 3d model chair v1 for download as fbx on turbosquid: 3d models for games, architecture, videos. (1486093)
turbosquid
$15

Cupboard v1
...royalty free 3d model cupboard v1 for download as max and fbx on turbosquid: 3d models for games, architecture, videos. (1444568)
3d_export
$5
tram v1
...tram v1
3dexport
3d_export
$8
lumber car v1
...lumber car v1
3dexport
lumber car v1 printable, low poly model.
turbosquid
$20

DELTALIGHT v1
...free 3d model deltalight v1 for download as max, max, and obj on turbosquid: 3d models for games, architecture, videos. (1630928)
Prototype
3ddd
$1
iphone (prototype)
...e (prototype)
3ddd
iphone prototype телефон сотовый прототип , iphone
iphone (prototype)
turbosquid
$60
prototype
...y free 3d model prototype for download as , fbx, stl, and obj on turbosquid: 3d models for games, architecture, videos. (1516333)
turbosquid
free

prototype
... available on turbo squid, the world's leading provider of digital 3d models for visualization, films, television, and games.
turbosquid
free

Prototype Crossbow
...squid
free 3d model prototype crossbow for download as blend on turbosquid: 3d models for games, architecture, videos. (1237541)
turbosquid
$25

Atlas Prototype
... available on turbo squid, the world's leading provider of digital 3d models for visualization, films, television, and games.
turbosquid
$20

Prototype Airplane
... available on turbo squid, the world's leading provider of digital 3d models for visualization, films, television, and games.
3d_export
$10

starship prototype
...y manufactured in boca chica ,texas by spacex. this prototype consist features like forward flaps, bottom flaps and landing legs.
design_connected
$11
Jellyfish Chandelier (prototype)
...sakai design associate jellyfish chandelier (prototype) pendant lights computer generated 3d model. designed by toshihiko sakai.
turbosquid
free

Prototype Plasma Rifle
...d
free 3d model prototype plasma rifle for download as blend on turbosquid: 3d models for games, architecture, videos. (1237576)
turbosquid
$15

Prototype CNC Router
... model prototype cnc router for download as iam, ige, and stl on turbosquid: 3d models for games, architecture, videos. (1667298)