Thingiverse
Hotbed for Microcube by ort
by Thingiverse
Last crawled date: 3 years ago
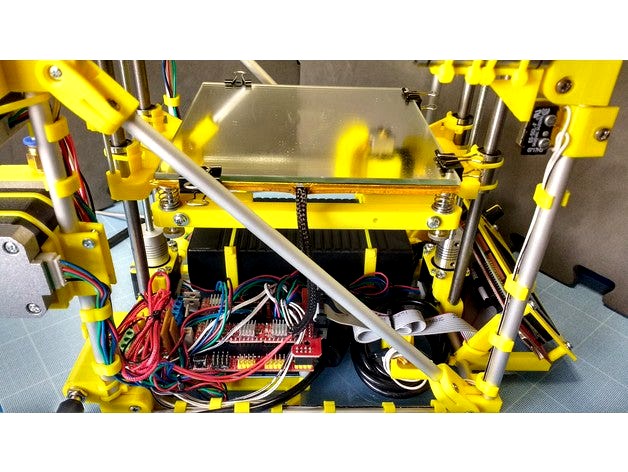
Add an heated bed to your microcube, to improve bed tickness for PLA, and allow it to print PETG, and more (maybe ABS if your heater patch is powerfull enough to reach 110°C).
Beware: An heating bed require a lot a power. You MUST ensure your power supply is strong enough. The printer alone need at least 60W (says 70W for safety). You power supply must be 70W PLUS the Watt power of the heating patch you will be using (plus another safety margin, to be sure). I'm using a 120W power supply for a 40W heating patch.
It's even more important if you are using a cheap chinese power supply (which are usually goods, but often lacks of security cutoff for that price).
I'll need:
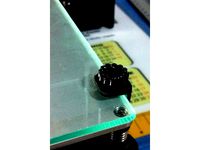
An aluminium plate, 150x150mm, 1.5-2mm tickness (less, and it may bend, resulting with an unplane bed ; more tick will work but impact the heating speed). Cost me about 4€
A 12V heating film that fit your aluminum plate.
I'm using this one (100mm, circle, 40W), but search "polyimide heater" on ebay & his friends.
Silicon heater patch are also good choices (but a bit more expansive).
The Watt value of the patch has a direct impact on the heating speed and and maximum temperature. The higher, the better, but you MUST ensure your power supply can drive it. And too high power are useless for that printer size (I think above 50/60W is useless ; below 20/25W will be hard to use).
A standard 100k NTC thermistor
Kapton/polyimide adhesive for fixing thermistor and insulation material
Optional: a 150x150mm glass or mirror for a better adhesion and plane.
Optional: insulation material and/or cork sheet
**Instuctions:"
Drill 4 M3/4 holes at the corner of your aluminium plate, the center at 5mm for each side (like you should have done for your actual bed plate)
If you intend to use a glass/mirror, countersink the holes on the top of the plate to use contersunk screws
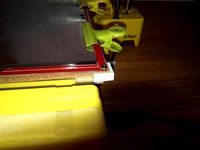
Fix the heating patch on the bottom of the aluminuim plate, on the center. Ensure sur wire are on the same side of the RAMPS of the microcube
Put the thermistor on the center of the patch, and fix it with a large piece of Kapton. The wire on the same direction as the heated patch wires.
Fix the wires to the plate with Kapton
If you use insulating matertial, cut them at the aluminium plate size, and fix them using Kapton. Cotton/heat resistante material first, cork last.
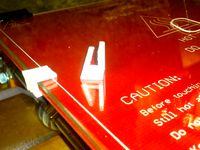
Add screw and spring on each corner, fix your bed on the Microcube plateform
Connect the patch wire to the RAMPS heated bed output (D8, the one near the main power in).
Connect the thermistor wire into the appropriate ntc sensor (the one juste next to the hotend thermistor).
Configure your firmware to enable heated bed. This bed can easly support a 120°C max temperature (if your patch can reach this temperature).
Insulation:
It's not necessary, but it will improve the heating speed and the max temperature.
For information, this is what I measure with my setup (2mm tickness aluminium plate, 40W 100mm diameter polyimide heating patch) :
Without insulation:
ambiant (25°C) to 60°C in 4 minutes
max temperature: 80°C
With insulation (2mm insulating cotton + 2mm cork):
ambiant (25°C) to 60°C in 3 minutes
max temperature: 95°C
Beware: An heating bed require a lot a power. You MUST ensure your power supply is strong enough. The printer alone need at least 60W (says 70W for safety). You power supply must be 70W PLUS the Watt power of the heating patch you will be using (plus another safety margin, to be sure). I'm using a 120W power supply for a 40W heating patch.
It's even more important if you are using a cheap chinese power supply (which are usually goods, but often lacks of security cutoff for that price).
I'll need:
An aluminium plate, 150x150mm, 1.5-2mm tickness (less, and it may bend, resulting with an unplane bed ; more tick will work but impact the heating speed). Cost me about 4€
A 12V heating film that fit your aluminum plate.
I'm using this one (100mm, circle, 40W), but search "polyimide heater" on ebay & his friends.
Silicon heater patch are also good choices (but a bit more expansive).
The Watt value of the patch has a direct impact on the heating speed and and maximum temperature. The higher, the better, but you MUST ensure your power supply can drive it. And too high power are useless for that printer size (I think above 50/60W is useless ; below 20/25W will be hard to use).
A standard 100k NTC thermistor
Kapton/polyimide adhesive for fixing thermistor and insulation material
Optional: a 150x150mm glass or mirror for a better adhesion and plane.
Optional: insulation material and/or cork sheet
**Instuctions:"
Drill 4 M3/4 holes at the corner of your aluminium plate, the center at 5mm for each side (like you should have done for your actual bed plate)
If you intend to use a glass/mirror, countersink the holes on the top of the plate to use contersunk screws
Fix the heating patch on the bottom of the aluminuim plate, on the center. Ensure sur wire are on the same side of the RAMPS of the microcube
Put the thermistor on the center of the patch, and fix it with a large piece of Kapton. The wire on the same direction as the heated patch wires.
Fix the wires to the plate with Kapton
If you use insulating matertial, cut them at the aluminium plate size, and fix them using Kapton. Cotton/heat resistante material first, cork last.
Add screw and spring on each corner, fix your bed on the Microcube plateform
Connect the patch wire to the RAMPS heated bed output (D8, the one near the main power in).
Connect the thermistor wire into the appropriate ntc sensor (the one juste next to the hotend thermistor).
Configure your firmware to enable heated bed. This bed can easly support a 120°C max temperature (if your patch can reach this temperature).
Insulation:
It's not necessary, but it will improve the heating speed and the max temperature.
For information, this is what I measure with my setup (2mm tickness aluminium plate, 40W 100mm diameter polyimide heating patch) :
Without insulation:
ambiant (25°C) to 60°C in 4 minutes
max temperature: 80°C
With insulation (2mm insulating cotton + 2mm cork):
ambiant (25°C) to 60°C in 3 minutes
max temperature: 95°C
Similar models
grabcad
free

Ceramic Air Heater Electric Heater 300W 220V
...eat radiation by air flow
lead wire: silicone high temperature line
remarks:with 150 degrees normally closed thermostat protector
thingiverse
free

RigidBot Heated Bed Insulation Holder by tchotchke
... may want to scale the height to make it thicker or thinner. it should be printed in abs, pc, or other high temperature plastic.
thingiverse
free

Kossel mini heated bed support by jnaulet
...ally tough and can handle the temperatures i use for my prints but abs might be a better choice for a larger set of temperatures.
thingiverse
free

Monoprice Select Mini Heated Bed Repair/Upgrade by Toys
...don't have to worry about the foam putting pressure on the bed and distorting it as there is still an air gap under the cork.
thingiverse
free

Aluminatus Trinity One Heated bed wire support by Steamerzone
...s only held in place by the kapton heater. on my aluminatus this caused the kapton heater to seperate from the alu heat spreader.
thingiverse
free

Anycubic Kossel Linear Plus 240mm insulated heated bed mount by tjko
...is 5.5mm so if using 5mm cork board as insulation, there is space to add layer of kapton tape in between the heater and the cork.
thingiverse
free

Silicone Heat Bed Mount by clough42
...r configured correctly. it's very easy to reach very high temperatures (>150c) very quickly if you have it misconfigured.
thingiverse
free

Auto-retracting insulated cover for Solidoodle heated bed by tealvince
...aning that you can leave it unattended on the lowered bed and it will flip safely out of the way when the bed raises up to print.
thingiverse
free

TEVO Little Monster Bed Heater Wiring Connector Enclosure by vsch
... into one v-groove directed through the notch in the top plate with a short piece of spare harness tube included in the tevo kit.
thingiverse
free

A6 Heated Bed Insulation Retaining Clip by Kingmiwok
...minute period, starting at about 25% print completion. the heater-on time was divided by the elapsed time to get the percentage.
Microcube
thingiverse
free

Microcube 40mm Fan Connector by Surrbradl08
...rbradl08
thingiverse
fan duct adjusted to fit a 40mm fan for the microcube.
microcube: https://www.thingiverse.com/thing:1938877
thingiverse
free

Leaned LCD support for Microcube by ort
... microcube. it also lean the screen for a better view.
an optionnal cover plate (with reset button and spacers) is also provided.
thingiverse
free

PSU mount for Microcube by ort
... the microcube structure
fix the holders with zip ties.
put the psu
block the psu using two zip ties on the bottom of each holder
thingiverse
free

Nema 11 motor mounts for MicroCube by WarHawk8080
...ss for a fair price (approx $10~ a motor)
here is the tinkercad linkhttps://www.tinkercad.com/things/2m1rladvoai-microcube-nema11
thingiverse
free

Microcube RaspberryPi-Octoprint Mount by Eddiie
...he usb connector, solder on some jumper wires and attach to raspberrypi gpio pins to power then stow it under the hdmi connector.
thingiverse
free

MicroCube by Stargrove1
.../14 added spool compartment and spool holder
2017/06/05 added psu holder for laptop supply
2018/11/17 upload of corexy version
thingiverse
free

MicroCube Extruder for M6 connectors by OkurRo
... themselfs.
edited for this pneaumatic connector:https://www.amazon.com/pneumatic-straight-fitting-thread-connector/dp/b00we1a3d2
thingiverse
free

Removable transport handle for Microcube by ort
...ask someone that can do strong seam :)
et voilà! now you can clip and un-clip the handle in a few seconds to carry you microcube.
thingiverse
free

Second z axis for Microcube by ort
...or driver (use the second extruder motor of the ramps), and configure your firmware to replicate z motor move to e1 motor driver.
thingiverse
free

Microcube Modified Z Platform Mount 80 mm distance Z Rod by pebri86
... this tools before) if you want to modify it. thanks
update :
09/07/2018 : fixed some distance error and blocked cable ties hole.
Ort
3ddd
$1

Люстра Martinez y Orts
...
martinez , orts , свеча
люстра martinez y orts
turbosquid
$5

ORT Seattable
... available on turbo squid, the world's leading provider of digital 3d models for visualization, films, television, and games.
3d_export
free

Download free ORT 3D Model
...download free ort 3d model
3dexport
ort pfsource
ort 3d model na-com 23661 3dexport
turbosquid
$19

Chair Orte Bejot
...ty free 3d model chair orte bejot for download as max and fbx on turbosquid: 3d models for games, architecture, videos. (1258712)
3d_export
$10

ORT Russian Old Logo 3D Model
...ort russian old logo 3d model
3dexport
ort russian old logo 3d model archangel 27094 3dexport
3ddd
$1

Люстра Martinez Y Orts 8511/75
...а martinez y orts 8511/75
3ddd
martinez
артикул: 8511/75
производитель: martinez y orts /испания/
размеры: h-112 d1-75 d2-29 (см)
3ddd
$1

люстра
...люстра 3ddd martinez y ort s.a люстра фирмы martinez y orts...
3ddd
$1

ДЕТСКИЙ ИГРОВОЙ КОМПЛЕКС
...комплекс 3ddd турник , шведская детский спортивно-игровой комплекс. дизайн n'ort studio (новосибирск). габаритные размеры 2150х1800хh2600...
3d_sky
free

Chandelier Martinez y Orts
...chandelier martinez y orts
3dsky
candles
chandelier martinez y orts
3d_sky
$8

Bra factory «Martinez y Orts»
...bra factory «martinez y orts»
3dsky
martinez y orts
bra factory «martinez y orts» color bronze / gold art. 7673
Hotbed
cg_studio
$22
Greenhouse3d model
...greenhouse3d model cgstudio greenhouse orangery hothouse warm house glasshouse hotbed seedbed glass metal conservatory frame greenery .obj .max .fbx...
cg_studio
$30

Greenhouse3d model
...greenhouse3d model cgstudio greenhouse orangery hothouse warm house glasshouse hotbed seedbed glass metal conservatory frame greenery easter site components...
cg_studio
$22

Greenhouse brick3d model
...brick3d model cgstudio greenhouse orangery hothouse warm house glasshouse hotbed seedbed glass metal conservatory frame greenery .max .fbx .3ds...
3d_export
$37
Green House Low poly 3d model 3D Model
...garden glazing glass architecture architectural summerhouse plants flowering gardening hotbed grow green house low poly 3d model 3d model...
cg_studio
$49
Greenhouse solar3d model
...greenhouse solar3d model cgstudio orangery hothouse warm house glasshouse hotbed seedbed glass metal conservatory frame lamp plant seedlings seed...
3d_ocean
$19

Green House Low poly 3d model
...brick conservatory flowering garden gardening glass glazing greenhouse grow hotbed old plants summerhouse a 3d model of a low...
thingiverse
free
Hotbed clip by El_Ingeniero
...hotbed clip by el_ingeniero
thingiverse
hotbed clip
thingiverse
free
hotbed clip by xfred
...hotbed clip by xfred
thingiverse
hotbed clip
thingiverse
free
hotbed mount by Aganyte
...hotbed mount by aganyte
thingiverse
hotbed mount for "print-rite" 3d printer (and probably others)
thingiverse
free
Anycubic i3 Mega Hotbed Protector
...anycubic i3 mega hotbed protector
thingiverse
protect the glass hotbed and reduce deformation of the hotbed