Thingiverse
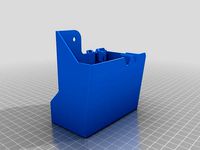
Hood for BCN3D Sigma, after Toobyy (.225" plexi) by Processaurus
by Thingiverse
Last crawled date: 2 years, 11 months ago
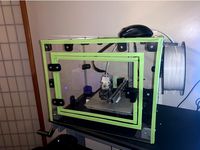
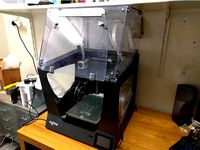
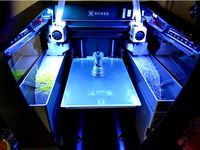
This is a thicker, .225" thick plexiglass version of Toobyy's well conceived enclosure for the BCN3D Sigma 3D printer (theirs was R17, mine is R19, but the version doesn't seem to affect the fit).
Why thicker? Because the material was free! Covid customer service shield from a local company.
Instructions from the original apply here. This uses most of the same parts. This version differs in a couple minor ways:
Plexiglass material is .225" (5.715mm).
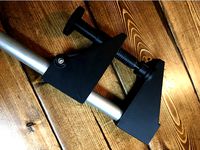
Latches are thicker to accommodate the thicker plexiglass.
Latches engage further into mating part.
Door flap accommodates thicker material.
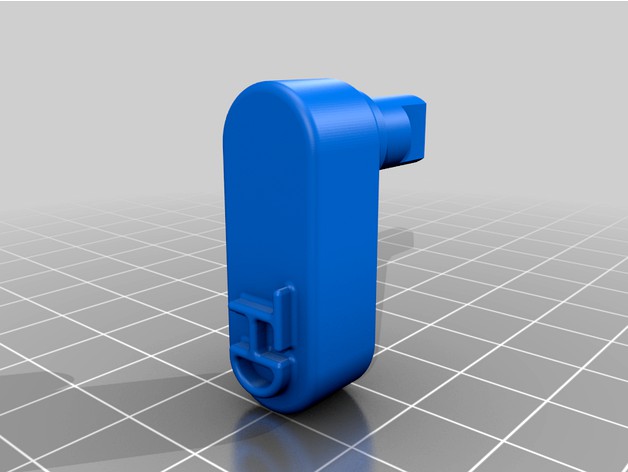
Door flap may be printed in two pieces, or optionally in one piece ("door lower combined" STL).
SAE Hardware used from the american hardware store (I couldn't find metric nuts that would fit right here):
For Brackets:
20x 4-40 pan head machine screws, .75" long
20x 4-40 nuts
20x size #4 fender washers
For hinges
8x 6-32 bolts, .75" long
8x 6-32 nuts
8x #6 washers
8x #6 lock washers
For Hinge pin
2x 4-40 screw, pan head, .75" long
2x 4-40 nut
2x #4 washer
2x #4 lock washer
note, the screw is a little small in diameter, I used some shrink tubing to make the diameter fit the hinges a little better. Room for improvement there.
Latches:
2x #4 sheet metal screw, pan head, .75" long.
Note, drill out latches to size, they were quite small diameter.
Construction notes:
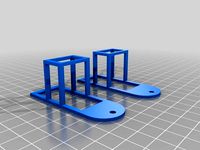
I printed all brackets and latches in one batch, with disolvable PVA supports. Did PLA as the main material here, because it is easy, but extra points for printing in PETG.
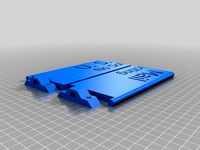
I got the PDF of the pattern for the plexiglass printed at a local print shop on the big, 3' wide black and white printer, it was $4. The important bit is that it is printed TO SCALE. I taped the pattern to the sheet of plexi, and rough cut the six pieces apart with a circular saw on saw horses. Then I used the bandsaw to cut them to size with a fine tooth blade. It was awful, the plexiglass melts easily and makes this wad of melted plastic under the cut. It also gets into the saw. Apparently "extruded" plexiglass melts at a lower temperature than "cast" plexiglass. Mine was a pain to machine, must have been the extruded type.
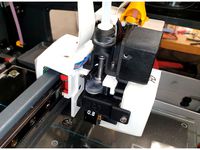
On mine I diverged from Toobyy's advice as far as going gung ho and drilling all of the holes before putting it together. This mostly worked out, but it would be good to drill a little bit towards the corner of the plexiglass- the idea is if the hole is off a little bit in the wrong direction, it won't make the plexiglass too tight against the other plexi pieces. The 4-40 nuts had some slop in the brackets, which was good, as I could put together the enclosure loose, and the brackets could shift around a little, and then tighten them down at the end.
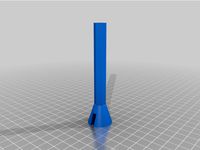
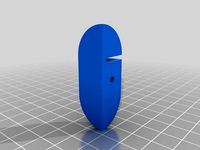
Door Flap. I printed the "combined" (single piece) version of the door flap, and printed it with PVA supports, doing it on end, sticking up, with the part that clamps the plexiglass facing down on the bed. Printed with a brim, which helps it being on end. It fits on the Sigma's build plate if you print it a bit diagonal. I printed the flap once I had most of the enclosure together, as long parts tend to have more of a danger of warping.
Why thicker? Because the material was free! Covid customer service shield from a local company.
Instructions from the original apply here. This uses most of the same parts. This version differs in a couple minor ways:
Plexiglass material is .225" (5.715mm).
Latches are thicker to accommodate the thicker plexiglass.
Latches engage further into mating part.
Door flap accommodates thicker material.
Door flap may be printed in two pieces, or optionally in one piece ("door lower combined" STL).
SAE Hardware used from the american hardware store (I couldn't find metric nuts that would fit right here):
For Brackets:
20x 4-40 pan head machine screws, .75" long
20x 4-40 nuts
20x size #4 fender washers
For hinges
8x 6-32 bolts, .75" long
8x 6-32 nuts
8x #6 washers
8x #6 lock washers
For Hinge pin
2x 4-40 screw, pan head, .75" long
2x 4-40 nut
2x #4 washer
2x #4 lock washer
note, the screw is a little small in diameter, I used some shrink tubing to make the diameter fit the hinges a little better. Room for improvement there.
Latches:
2x #4 sheet metal screw, pan head, .75" long.
Note, drill out latches to size, they were quite small diameter.
Construction notes:
I printed all brackets and latches in one batch, with disolvable PVA supports. Did PLA as the main material here, because it is easy, but extra points for printing in PETG.
I got the PDF of the pattern for the plexiglass printed at a local print shop on the big, 3' wide black and white printer, it was $4. The important bit is that it is printed TO SCALE. I taped the pattern to the sheet of plexi, and rough cut the six pieces apart with a circular saw on saw horses. Then I used the bandsaw to cut them to size with a fine tooth blade. It was awful, the plexiglass melts easily and makes this wad of melted plastic under the cut. It also gets into the saw. Apparently "extruded" plexiglass melts at a lower temperature than "cast" plexiglass. Mine was a pain to machine, must have been the extruded type.
On mine I diverged from Toobyy's advice as far as going gung ho and drilling all of the holes before putting it together. This mostly worked out, but it would be good to drill a little bit towards the corner of the plexiglass- the idea is if the hole is off a little bit in the wrong direction, it won't make the plexiglass too tight against the other plexi pieces. The 4-40 nuts had some slop in the brackets, which was good, as I could put together the enclosure loose, and the brackets could shift around a little, and then tighten them down at the end.
Door Flap. I printed the "combined" (single piece) version of the door flap, and printed it with PVA supports, doing it on end, sticking up, with the part that clamps the plexiglass facing down on the bed. Printed with a brim, which helps it being on end. It fits on the Sigma's build plate if you print it a bit diagonal. I printed the flap once I had most of the enclosure together, as long parts tend to have more of a danger of warping.
Similar models
thingiverse
free
3d Printer Case Parts
...cetus3d by tiertime, but the parts would work with any size (cut plexi to work with your printer). made for 8-32 screws and nuts.
thingiverse
free
Anet AM6/AM8 Dual Mosfet Holder by _silaz
...m3 nut
2x m5x10
2x m5 washer
2x m5 hammer nut for aluminium extrusion
size of mosfet i use is 52mmx42mm from mid-hole to mid-hole
thingiverse
free
Folgertech Kossel 2020 Plexiglass Enclosure support by mcclarydesign
...ces of plex. the third side should have a door cut in it. i have also uploaded magnetic latches which can be used for the door.
thingiverse
free
Mail Slot Flap by FlyByPC
... substantially weighted flap. the pins needed a little post-processing smoothing with a knife, but after that, it works smoothly.
thingiverse
free

Radrunner Quick Release mounts by plasticbarista
...s 4mmx20 (8x)
installation guide
read the attached installation guide (pdf)
also shows spacing for drilling holes under your box
thingiverse
free
G1W Dashcam mount by BaalSac
...r
2x 6-32 x 3/4" screw
2x 6-32 nut
2x #6 washer
2x #6 locking washer
attached to windshield using double sided gorilla tape
thingiverse
free
100mm Fan Enclosure Stand w/ Guard by GoodeDesignSolutionsLLC
...00mm fan enclosure stand w/ guard by goodedesignsolutionsllc
thingiverse
use m6x20 or 1/4"-20x.75" screws & nuts.
thingiverse
free

Corner Supports to make 1/8 in Plexi Glass Enclosure by gustofusion
...s for the inside of the enclosure, the thicker part is for the outside. 3mm holes can be drilled to secure the mounting surfaces.
thingiverse
free
1/4 Wing Nut Drill Bit by JaronLindow
...1/4 wing nut drill bit by jaronlindow
thingiverse
drill bit for wing nut on long 1/4" bolt.
printed with brim.
thingiverse
free
3/4" Conduit Clamp - "F" Style by MStence
...like the other end. they both seem to have similar holding strength. the latch version of the live end...
Toobyy
thingiverse
free
Hood for BCN3D Sigma R17 by Toobyy
...wise. when it is closed you shall be able to read the logo thd on both sides.
i hope that you all think this is fun to build! :-)
thingiverse
free
Ultimaker 3 Print core upgrade to BCN3D SIGMA/SIGMAX by Toobyy
...rnd-connect-rnd-205-00964/p/30145443
and
https://www.elfa.se/sv/crimpkontakt-uttag-28-22awg-rnd-connect-rnd-205-00961/p/30145440
thingiverse
free
BCN3D Sigma Purge bucket (One purge bucket to rule them all!) :-) by Toobyy
...all bottom less purge bucket.
it is possible to replace the filament with these buckets mounted.
i hope you enjoy the design! :)
Processaurus
thingiverse
free
Mu-Tron Knob by Processaurus
...icro layers, or a .25mm nozzle, if you have the patience. printed with supports.
free for private or commercial use, have fun!
thingiverse
free
MidiRex Box by Processaurus
...idirex box design by ben milner 2016
midirex pcb , circuit, and software design by peter kvitek
more info at http://midisizer.com
thingiverse
free
Dodecahedron Lamp - After AK Eric by Processaurus
...fely, get help from someone who does or take a class. you are responsible for the safety of anyone who uses something you build.
thingiverse
free

On Stage Stands KSA7500 (double keyboard stand )cross piece clamp by Processaurus
...etty specific!
print with support- i did mine on its side, so the support was just for the round peg that indexes in the housing.
thingiverse
free
Printable Tripod Mount 2014 - after Starno by Processaurus
...quot; nut that the tripod screws into can just be inside the bottom of "side 2". less parts to print, smaller, better.
thingiverse
free
Tripod Mount for 7 by toenolla
...large phones 3 7/8" to 5 3/4" wide. on processaurus#39; version, you have to pause your print and embed...
Bcn3D
thingiverse
free

BCN3D Bellow by BCN3D
...ech
bcn3d google+: https://plus.google.com/u/2/106660239696256442101
about bcn3d technologies - https://www.bcn3dtechnologies.com
thingiverse
free
BCN3D Bussiness Card Holder by BCN3D
...ech
bcn3d google+: https://plus.google.com/u/2/106660239696256442101
about bcn3d technologies - https://www.bcn3dtechnologies.com
thingiverse
free
Vertical Bowden BCN3D by BCN3D
...ech
bcn3d google+: https://plus.google.com/u/2/106660239696256442101
about bcn3d technologies - https://www.bcn3dtechnologies.com
thingiverse
free

Cookie Cutter - BCN3D & COLORFILA LOGO by BCN3D
...ech
bcn3d google+: https://plus.google.com/u/2/106660239696256442101
about bcn3d technologies - https://www.bcn3dtechnologies.com
thingiverse
free

BCN3D Do Not Disturb Flag by BCN3D
...ech
bcn3d google+: https://plus.google.com/u/2/106660239696256442101
about bcn3d technologies - https://www.bcn3dtechnologies.com
thingiverse
free

BCN3D Sigma Cloth Support by BCN3D
...ech
bcn3d google+: https://plus.google.com/u/2/106660239696256442101
about bcn3d technologies - https://www.bcn3dtechnologies.com
thingiverse
free
BCN3D+ STRONG CARRIAGES by fabiano79
...bcn3d+ strong carriages by fabiano79
thingiverse
this is an upgrade for the extruder carriages of the bcn3d+ printer.
thingiverse
free
BCN3D Sigma - Jumbo Purge Bucket by BCN3D
...ech
bcn3d google+: https://plus.google.com/u/2/106660239696256442101
about bcn3d technologies - https://www.bcn3dtechnologies.com
thingiverse
free

Pen Holder by BCN3D
...ech
bcn3d google+: https://plus.google.com/u/2/106660239696256442101
about bcn3d technologies - https://www.bcn3dtechnologies.com
thingiverse
free

Hollow Draudi by BCN3D
...ech
bcn3d google+: https://plus.google.com/u/2/106660239696256442101
about bcn3d technologies - https://www.bcn3dtechnologies.com
Plexi
turbosquid
$15
Plexi Console
... available on turbo squid, the world's leading provider of digital 3d models for visualization, films, television, and games.
turbosquid
$9

Color Plexi Acrylic Shelves
... available on turbo squid, the world's leading provider of digital 3d models for visualization, films, television, and games.
turbosquid
$3
HUDSON PLEXI TATE BENCH
... available on turbo squid, the world's leading provider of digital 3d models for visualization, films, television, and games.
3d_export
$5
mandalorian helmet darth maul inspired
...paint scheme / art style. recommend to get tinted plexi glass for the front...
3d_ocean
$15
Vrayforc4D Liquid & Transparent BDRF Shader
...flint glas ice liquid material milk oil olive paste plexi sesam shader silikon soya sss subsurface swarovski tooth transparent...
3d_export
$5
filament dry box
...a groove for the placement on a sheet of plexi glass. also includes a threaded hole in the front...
thingiverse
free

Plexi & Glass holder by AbdullahAlh
...holder by abdullahalh
thingiverse
the plexi holder is used to hold a sheet of plexi/acrylic or glass in a frame or a chair back.
thingiverse
free

Picture Frame 10x15cm with Plexi by JanHB42
...picture frame 10x15cm with plexi by janhb42
thingiverse
added holes for a plexi
thingiverse
free
IKEA-LACK Plexi holder by ANETjunkie
...ikea-lack plexi holder by anetjunkie
thingiverse
this is an universal plexi holder.
thingiverse
free
Ikea lack plexi holder by Lalovics
...ikea lack plexi holder by lalovics
thingiverse
this is a plexi holder for ikea lack. (2mm)
Sigma
3ddd
$1
Sigma
...sigma
3ddd
sigma l2
люстра sigma
3ddd
$1
Sigma
...sigma
3ddd
sigma
люстра sigma l2 7117/8
3ddd
$1
Бра Sigma
...бра sigma
3ddd
sigma
sigma
3ddd
$1
Sigma L2
...sigma l2
3ddd
sigma , sigma elle due
подвесы sigma l2
3ddd
$1
Geberit Sigma 10, Sigma 50
... sigma , кнопка слива
ультразамечательнейшие клавиши смыва geberit sigma 10 и sigma 50
3ddd
free
Vibia Sigma
...vibia sigma
3ddd
sigma , vibia
настольный светильник vibia sigma
3ddd
$1

Люстра Sigma
...люстра sigma
3ddd
sigma
:)
3ddd
$1

Sigma L2
...sigma l2
3ddd
sigma
sigma l2 z 187, 470*250 мм
3ddd
free

Sigma A 221
... regal , статуэтка
the regal collection. sigma.
3ddd
free

Sigma l2
...sigma l2
3ddd
sigma l2
настольная лампа. итальянской фабрики sigma l2. модель cl 1657.
225
turbosquid
$39
Nokia 225
... available on turbo squid, the world's leading provider of digital 3d models for visualization, films, television, and games.
turbosquid
$22

Nokia 225
... available on turbo squid, the world's leading provider of digital 3d models for visualization, films, television, and games.
turbosquid
$10

Nokia 225
... available on turbo squid, the world's leading provider of digital 3d models for visualization, films, television, and games.
design_connected
$16
Lloyd Bookcase 225
...lloyd bookcase 225
designconnected
lloyd bookcase 225 computer generated 3d model. designed by massaud, jean-marie.
3d_ocean
$15

Nokia 225
...y 2.0! you need 3ds max 2012 and v-ray 2.0 to best use it. information for you: group: yes, object with parents and childen: y...
3d_export
$17

Antonov 225 Air Plane
...antonov 225 air plane
3dexport
antonov 225 air plane
design_connected
$25
Cestone sofa 225
...cestone sofa 225
designconnected
flexform cestone sofa 225 2-seater computer generated 3d model. designed by antonio citterio.
3ddd
$1

MAMA F-225
... skandiform
стул mama (f-225) фабрики skandiform (швеция)
ширина 53
глубина 57
высота 72
turbosquid
$7

Rug Set 225
...y free 3d model rug set 225 for download as max, obj, and fbx on turbosquid: 3d models for games, architecture, videos. (1501066)
turbosquid
$29

Nokia 225 Yellow
... available on turbo squid, the world's leading provider of digital 3d models for visualization, films, television, and games.
Hood
3d_ocean
$7

Kitchen hood
...box paddle box panel mixer radiator sink tap faucet texture toilet towel
very nice high and realistic hood,ever edge is chamfered
3d_export
$5

Kitchen Hood
...kitchen hood
3dexport
the great kitchen hood
turbosquid
$40

Hood
... available on turbo squid, the world's leading provider of digital 3d models for visualization, films, television, and games.
turbosquid
$5

hood
... available on turbo squid, the world's leading provider of digital 3d models for visualization, films, television, and games.
archive3d
free
Hood 3D Model
... hood cooking hood cooker hood
ranghood - 3d model (*.gsm+*.3ds) for interior 3d visualization.
3d_ocean
$8
Kitchen Hood
...p faucet texture tub shower
realistic kitchen hood you can look here: http://www.frankeal.com/urun/ada-neptun_1076.aspx?catid=102
3d_ocean
$8
kitchen hood
...kitchen hood you can look here : http://www.franke.com/kitchensystems/tr/tr/home/new_products/yeni_davlumbazlar/polyedro_ada.html
3d_export
$10

Hood 3D Model
...hood 3d model
3dexport
hood low poly
hood 3d model cukomop 86172 3dexport
3d_ocean
$9
Kitchen hood
...anke.com/content/kitchensystems/tr/tr/home/urunler/bymodelrange/davlumbaz/breeze/fbr_900_w_bk_xs/110_0181_660_detail.ksflash.html
3d_export
$12
whirlpool hood collection
...nch vented 300-cfm wall-mount canopy hood -36 "stainless steel wall mount flat range hood great details for close up renders