Thingiverse

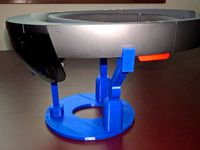
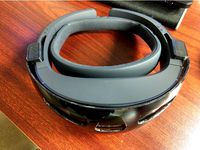
HoloLens Spectator View Mount by noen
by Thingiverse
Last crawled date: 3 years ago
For more information and background, please read:http://www.thetylergibson.com/improving-spectator-view-a-usable-hololens-mount
Amazon wishlist for all the optional goodies that make life easy with this mount:https://www.amazon.com/gp/registry/wishlist/2CVA3M6A6YEED/ref=cm_wl_list_o_3
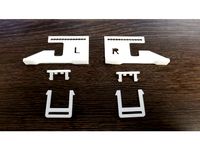
Three mounting options
All three of the brackets are 3D Printable on most consumer 3D Printers. With a build volume of just under 200mm95mm75mm, and two of the three are designed to print without any supports.
The center mount point is positioned at the HoloLens’ center of gravity at a height offset that should fit nearly every DSLR camera on the market today.
You will only need to remove the nose-piece before installing any of the mounts. You will need to drill each screw hole out to size after printing. I did this to enable you to use M5 machine screws if desired, or drill out to use 1/4”-20 screws. I used a #3 drill bit with very good results, but you should measure twice and drill once.
I highly recommend using either PETG or ABS as your print material. My mounts are all printed with Hatchbox PETG @ 250c on a e3dv6 hotend with .2mm layer heights. I used 50% infill and 3 perimeter layers with 8 layers top and bottom. This will produce an extremely rigid part.
Mount 1: Light and simple
The first mount option is for folks who want the absolute least weight. It has a single hot shoe screw mount. You will need to purchase a set of Velcro cable ties, a Tripod Screw hot shoe adapter and one 1/4”-20 nut. You will need to print this mount with supports. Print, insert into the cutouts on each arm of the HoloLens and use 4 cable ties through the cutouts to secure the arms to the mount securely. Ream the tripod mount hole with a drill bit. Press fit the nut in the cut-out (you may need to use a pair of pliers or a clamp to get the nut securely pressed into place) and then secure with the tripod screw hot shoe adapter.
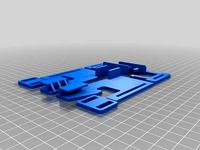
Mount 2: Simple and flexible
The second mount option uses the same Velcro ties, but has a more traditional mounting plate configuration. It provides 1/4"-20 holes spaced 9mm on center alternating with 3/8”-16 holes. The tripod drop mount still provides a standard 1/4"-20 center hole with countersink for a nut. The drop mount area also features additional 1/4"-20 holes for more secure mounting to camera cage rigs as well as ARRI 3/8”-16 mounts with pogo pins for alignment.
This mount is useful if you want to mount other gear to the bracket, especially if you’re mounting to a camera cage. I use the internal volume to mount my Tascam audio recorder and wireless mic receiver.
You can optionally use the top mount plate with this mount for a super-secure and rigid rig. The top plate slots into the risers snugly. Secure the top to base with two 1/4" bolts through any of the internal holes in the cheese grid.
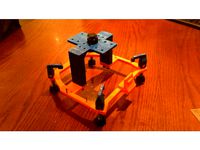
Mount 3: Heavyweight
This mount provides the most flexibility for professional operators. It moves the drop mount to a separate printable adapter and just provides the base plate with cheese grid. Similarly to mount 2, you can secure with Velcro straps or use the top mount place with 1/4” bolts.
This mount is useful if it is being installed as part of a larger camera rig system or larger cage.
I hope this helps you create even better mixed reality experiences, and happy coding!
Amazon wishlist for all the optional goodies that make life easy with this mount:https://www.amazon.com/gp/registry/wishlist/2CVA3M6A6YEED/ref=cm_wl_list_o_3
Three mounting options
All three of the brackets are 3D Printable on most consumer 3D Printers. With a build volume of just under 200mm95mm75mm, and two of the three are designed to print without any supports.
The center mount point is positioned at the HoloLens’ center of gravity at a height offset that should fit nearly every DSLR camera on the market today.
You will only need to remove the nose-piece before installing any of the mounts. You will need to drill each screw hole out to size after printing. I did this to enable you to use M5 machine screws if desired, or drill out to use 1/4”-20 screws. I used a #3 drill bit with very good results, but you should measure twice and drill once.
I highly recommend using either PETG or ABS as your print material. My mounts are all printed with Hatchbox PETG @ 250c on a e3dv6 hotend with .2mm layer heights. I used 50% infill and 3 perimeter layers with 8 layers top and bottom. This will produce an extremely rigid part.
Mount 1: Light and simple
The first mount option is for folks who want the absolute least weight. It has a single hot shoe screw mount. You will need to purchase a set of Velcro cable ties, a Tripod Screw hot shoe adapter and one 1/4”-20 nut. You will need to print this mount with supports. Print, insert into the cutouts on each arm of the HoloLens and use 4 cable ties through the cutouts to secure the arms to the mount securely. Ream the tripod mount hole with a drill bit. Press fit the nut in the cut-out (you may need to use a pair of pliers or a clamp to get the nut securely pressed into place) and then secure with the tripod screw hot shoe adapter.
Mount 2: Simple and flexible
The second mount option uses the same Velcro ties, but has a more traditional mounting plate configuration. It provides 1/4"-20 holes spaced 9mm on center alternating with 3/8”-16 holes. The tripod drop mount still provides a standard 1/4"-20 center hole with countersink for a nut. The drop mount area also features additional 1/4"-20 holes for more secure mounting to camera cage rigs as well as ARRI 3/8”-16 mounts with pogo pins for alignment.
This mount is useful if you want to mount other gear to the bracket, especially if you’re mounting to a camera cage. I use the internal volume to mount my Tascam audio recorder and wireless mic receiver.
You can optionally use the top mount plate with this mount for a super-secure and rigid rig. The top plate slots into the risers snugly. Secure the top to base with two 1/4" bolts through any of the internal holes in the cheese grid.
Mount 3: Heavyweight
This mount provides the most flexibility for professional operators. It moves the drop mount to a separate printable adapter and just provides the base plate with cheese grid. Similarly to mount 2, you can secure with Velcro straps or use the top mount place with 1/4” bolts.
This mount is useful if it is being installed as part of a larger camera rig system or larger cage.
I hope this helps you create even better mixed reality experiences, and happy coding!
Similar models
thingiverse
free

SlingStudio cam link
...e mount on your camera. to use put velcro ties through the two holes and strap around a tripod on the bottom center support pole.
thingiverse
free

Kinect mount to camera tripod with 1/4-20 Nut by nrp
... modified version.
kinect3c.stl is the original, for use with the attached .scad if you want to modify the thickness or nut size.
thingiverse
free

Tripod Mount for Ciclop Scanner by eussrh
...don't use too much pressure or you will break the acryllic. there are also a couple of cable clips for organizing the cables
thingiverse
free

Cold Shoe Mount 1/4-20 Adapter by techincaraibes
...r other camera mounts which typically use 1/4-20 threads.
i designed it to put on my gh5s cage to add the sennheiser avx adapter.
thingiverse
free

Arca Swiss Tripod Plate for Panasonic Camera by gregadamson
...ate for the handle bolt and maybe drill out the handle with a 1/4 inch bit.
this will also work for most other panasonic cameras.
thingiverse
free

Axis M3004 Tripod Mount by jmcskixc
...ra to the face of the mount. there are plenty of holes so you can get the camera clocked to the right angle for your application.
cg_trader
$8

GoPro Tripod Mount | 3D
... the bottom (standard tripod screw size). gopro tripod mount holder camera gadgets video home printing video camera camera tripod
thingiverse
free

Cold Shoe 1/4-20 Adapter by LeahDavidson
... microphone to a small mobile phone tripod, but it could be used to mount lights or anything else designed for a cold shoe mount.
thingiverse
free

GoPro tripod mount by roodee
...ill need a 1/4" screw nut for the bottom. the other screw and nut you can use from the equipment that comes with the camera.
thingiverse
free

DVR camera to Tripod mount
...ill need to provide a standard 1/4-20 nut to complete this assembly. i recommend gluing the nut into the mount for a secure fit.
Noen
thingiverse
free

Devil May Cry Noen Sign by Tartor82
...229x190mm
cry 254x228mm
led stinghttps://www.amazon.de/gp/product/b013fzhd7o/ref=ppx_yo_dt_b_asin_title_o06_s00?ie=utf8&psc=1
thingiverse
free

Monoprice Select Mini E3Dv6 Part Cooling Fan Attachment by noen
...ent by noen
thingiverse
simply removed the led holes from uswaterrockets original design to make for a simpler part cooling fan.
thingiverse
free

Intel Edison Smartwatch Case by noen
...and internal details coming soon!
first article on my process here: http://www.thetylergibson.com/intel-edison-smartwatch-case/
thingiverse
free

Ultra-slim nano sim carrier by noen
...t 200 microns or lower. if you find the tolerances too tight, enlarge the model by .5-1%. the sim cards should snap into place.
thingiverse
free

Cork insulation for Monoprice Select Mini 3D Printer by noen
...x11" letter sized sheet of paper and use it to cut out your foam and cork. attach together and insert under the bed, enjoy!
thingiverse
free

Panasonic GH4 Camera Cage by noen
...o use them without brass inserts.
i printed this with 85% infill and 3 perimeters with petg to produce an essentially solid part.
thingiverse
free

Raspberry Pi 2 Simple Enclosure by noen
...t is designed to lose 1-3 layers and still fit well.
providing the original 3dm source file, so feel free to adapt to your needs.
thingiverse
free

MP Select Mini Z-Axis Tapered Coupler by noen
...ied 3/4 nuts here for ease of use.
full guide on properly installing this coupler:https://www.youtube.com/watch?v=5kkyi7q0dso
thingiverse
free

Plywood Nested Bike Rack by noen
....
read more about the design and the reasons i built it here: http://www.thetylergibson.com/building-a-better-portable-bike-rack/
thingiverse
free

Rigidbot Big Acrylic Enclosure by noen
...antly less material, because it won't require splitting pieces (the rigidbotbig has pieces that are over 24" in length).
Hololens
3d_export
$30
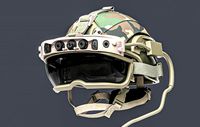
IVAS Headset HoloLens Goggles Military Helmet
...ivas headset hololens goggles military helmet
3dexport
thingiverse
free
HoloStand stand for Microsoft HoloLens by SystemUnderDesign
...ing on a tabletop. this stand is a remedy for that solution, and also functions as a display and resting place for your hololens.
thingiverse
free
Hololens Hard Hat mount (remix) by zimmer62
...s hard hat mount (remix) by zimmer62
thingiverse
i've made some changes to the hololens mount here to better suit our needs.
sketchfab
$20
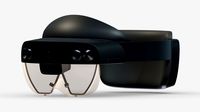
Microsoft Hololens 2
...hire me to do 3d model please touch me at:cgivn.studio thanks you! - microsoft hololens 2 - buy royalty free 3d model by frezzy3d
thingiverse
free
Hololens mounting tabs by LikeTheSoup
...abs with a 1.2mm outer shell and 30% infill, and there's plenty of "meat" for a screw to bite into and hold firmly.
thingiverse
free

DIY Hololens by FultonX
...f the tablet, but if anyone has one and is interested, they are but a few steps away from completing the diy hololens experience.
thingiverse
free
Hololens HardHat Clips by mblacklin
...rieforage and zimmer62.
i made some tweaks to the design, based largely on their ideas, to make the system work and print better.
free3d
$19
Microsoft Hololens (low poly)
...
===================
scene render used an hdri map (not included).
don't forget to rate the model, this is important for us.
thingiverse
free

Hololens Stand by BenBart
...little more sleek.
5/2/17 - another attempt at making it not print hollow on simplify 3d. (just did a boolean union in rhino3d.)
thingiverse
free
Hololens Spectator View Mount by jimmyd84
...nt off as much of the parts as possible instead of purchasing
ease of use.
quick interchangeable.
extra mounting for accessories.
Spectator
turbosquid
$30

Spectator's place
...r's place for download as max, obj, fbx, and unitypackage on turbosquid: 3d models for games, architecture, videos. (1312942)
3d_export
$10

Sports tribune for spectators
...er, it is recommended to install a version of at least 1.5, since the glossiness of materials is adjusted with pbr in mind."
turbosquid
$49

Indoor Sport Complex Spectator and Service Area
... available on turbo squid, the world's leading provider of digital 3d models for visualization, films, television, and games.
cg_studio
$39

Indoor Sport Complex Spectator and Service Area3d model
....3ds - indoor sport complex spectator and service area 3d model, royalty free license available, instant download after purchase.
3d_export
$70

Arenas tribune 3D Model
...hippodrome stadiums arena racecourse concert stadia stadium spectator area spectator seating seater bleacher bleachers terraces tier arenas tribune 3d...
3d_export
$60

Stadium seating areas collecti 3D Model
...model 3dexport stadiums arena concert stadia stadium spectator area spectator seating seater bleacher bleachers terraces tier stadium seating areas...
3d_export
$8

Soccer Playing Venue
...completely encircled by a structure with tiers so that spectator can stand or sit and watch the action.<br>football stadium...
3d_export
$49

Triathlon Transition Area 3D Model
...depo area bike rack seats grand stand grandstand podium spectator event venue swim run triathlon transition area 3d model...
3d_export
$25

Stadium Crowd Cheir 3D Model
...cheir 3d model 3dexport stadium crowd cheir bleacher stand spectator seat seating grandstand sport stadium bench gym school field...
3d_export
$50

Gym 05 Indoor Swimming Pool 3D Model
...furniture muscles bodybuilding wellness fitness aquatics lap swimming lanes spectator stands competitive olympics gym 05 indoor swimming pool 3d...
View
turbosquid
$9

View VIEW black coin
...oyalty free 3d model view view black coin for download as max on turbosquid: 3d models for games, architecture, videos. (1634125)
turbosquid
$9

View VIEW gold coin
...royalty free 3d model view view gold coin for download as max on turbosquid: 3d models for games, architecture, videos. (1634120)
turbosquid
$2

View
...del view for download as c4d, ma, 3ds, dae, fbx, obj, and stl on turbosquid: 3d models for games, architecture, videos. (1601008)
3d_ocean
$16

room view
...room view
3docean
balcony chair floor red room scene view
simple view of a room to outside
turbosquid
$15

Sea View
...w
turbosquid
royalty free 3d model sea view for download as on turbosquid: 3d models for games, architecture, videos. (1250643)
turbosquid
$15

View tower
...rbosquid
royalty free 3d model view tower for download as ma on turbosquid: 3d models for games, architecture, videos. (1189700)
turbosquid
$2

street view
...quid
royalty free 3d model street view for download as blend on turbosquid: 3d models for games, architecture, videos. (1231592)
3ddd
$1

Бра Global Views
...бра global views
3ddd
global views
бра global views, моделил по фото, текстуры не требуются.
3d_export
$8

Road Way View
...road way view is a bundle in which there are two poles and there is straight road going. its is basically giving a roadside view.
turbosquid
$6

Jacuzzi View
... available on turbo squid, the world's leading provider of digital 3d models for visualization, films, television, and games.
Mount
3d_export
free

mounting bracket
...mounting plate is the portion of a hinge that attaches to the wood. mounting plates can be used indoors, cabinetry and furniture.
turbosquid
$2

MOUNTING
... available on turbo squid, the world's leading provider of digital 3d models for visualization, films, television, and games.
turbosquid
free

Mounts
... available on turbo squid, the world's leading provider of digital 3d models for visualization, films, television, and games.
turbosquid
free

Mount Fuji
...fuji
turbosquid
free 3d model mount fuji for download as obj on turbosquid: 3d models for games, architecture, videos. (1579977)
3d_export
$5

Headphone mount LR
...headphone mount lr
3dexport
headphone mount l+r
turbosquid
$39

Mount rainier
...quid
royalty free 3d model mount rainier for download as fbx on turbosquid: 3d models for games, architecture, videos. (1492586)
turbosquid
$5

pipe mounting
...quid
royalty free 3d model pipe mounting for download as obj on turbosquid: 3d models for games, architecture, videos. (1293744)
turbosquid
$3

Mounting Tires
...uid
royalty free 3d model mounting tires for download as fbx on turbosquid: 3d models for games, architecture, videos. (1708511)
3d_export
$5

Magnetic GoPro Mount
...pro mount
3dexport
cool magnetic mount for gopro. allows you to mount the camera on flat metal surfaces and get exclusive shots.
turbosquid
$5

Stone Mount
...ty free 3d model stone mount for download as ma, obj, and fbx on turbosquid: 3d models for games, architecture, videos. (1370306)