Cults
Hobbes
by Cults
Last crawled date: 6 years, 1 month ago
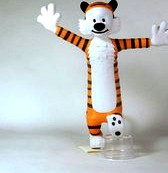
Hobbes, from the comic strip by Bill Watterson.
The comic strip Calvin and Hobbes follows the humorous antics of Calvin, a precocious, mischievous and adventurous six-year-old boy, and Hobbes, his sardonic stuffed tiger.
The full model is built using individual models of Calvin and Hobbes, therefore I created three separate Cults3D uploads:
For the final build using the individual Calvin and Hobbes models see:
https://cults3d.com/en/various/calvin-and-hobbes
For the Calvin model see:
https://cults3d.com/en/various/calvin
For the Hobbes model see:
https://cults3d.com/en/various/hobbes (this upload)
The fully completed model is 250mm tall after assembly.
Note: Hobbes is 240mm tall and is designed to fit into the log from the final build. His foot is flat on the bottom but he cannot stand by himself without the log.
Enjoy!
------------------------------------------------------------------
Print Settings
Printer:
FlashForge Creator X
Rafts:
Doesn't Matter
Supports:
No
Resolution:
.2mm
Infill:
10%
Notes:
See below notes for some very minor supports that are required
------------------------------------------------
Building the model
Colors (there are no multiple printed pieces)
White:
h_face
h_fur
h_left_foot
h_right_foot
h_left_hand
h_right_hand
..
Orange:
h_head
h_tail
h_body_top
h_body_bottom
h_leg_left
h_arm_left
..
Black:
h_ear_right
h_ear_left
h_nose
h_tail_tip
h_mouth
h_toe_1
h_toe_2
h_toe_3
h_toe_4
h_eyes
h_stripe_1 through h_stripe_32
..
Any color (hidden connectors)
h_head_bump
h_body_bump
--------------------------------------------------
Printing and assembly tips
1-Very minor supports are required for the following pieces:
. h_face requires supports only under the lowest portion of hair
. h_fur requires some very small supports by the collar
..
2-The stripes are designed to be a single layer thickness of .2mm, or less as long as they print solid on your machine.
..
3-Be sure to clean any first layer squish if you have any problem joining parts. The parts should fit nicely when printed cleanly.
..
Assembly tips:
-'Stripes! There had to be stripes!' I avoided creating this model for quite some time due to the stripes. I finally settled on a design:
. The stripes are printed flat, one layer high
. The parts that the stripes are glued to contain indents for stripe placement.
. Most of the stripes are slightly curved to help wrap around the surface.
-*Important: To make it simpler to glue flat stripes to a round surface, take a moment to curl the stripes like you would with a piece of ribbon. Using a flat edge, pull the stripe along the edge to make it curl. Pay special attention to the very ends and ensure the ends curl.
-Test the length of each stripe before gluing, due to printer differences, stripes may need to be trimmed a bit.
-Optionally, instead of using the 3D printed stripes, the stripes can be painted on using the indents as a guide.
-The diagram below will help in assembling the model and is quite straightforward.
-The model is meant to be glued together. I use E6000 glue. It is a nice clear tacky glue allowing for easy part positioning. The longer you let it sit before joining parts, especially for the stripes, the tackier it gets until it fully sets.
-The Hobbes model fits the log using the Cults3D links provided in the introduction
Similar models
cults
free

Calvin and Hobbes
...in the pictures section will help in assembling the model and is quite straightforward.
-the model is meant to be glued together.
cults
free

Calvin
...es, the tackier it gets until it fully sets.
-the calvin model fits the log using the cults3d links provided in the introduction.
cults
free

Snoopy
...itioning of the text characters.
3-refer to the assembly diagram for putting the model together. the model is meant to be glued.
cults
free

Rat
...irst glance it seems awkward.
-the model stands nicely on it's own, however a base is included for extra stability if needed.
cults
free

Dogbert
...nto the notch on the body above the nose and glued them into the glasses_arms. it all turned out quite simple to glue into place.
cults
free

Charlie Brown
...hand were it touches the stripe.
5-refer to the assembly diagram for putting the model together. the model is meant to be glued.
cults
free

Crocodile
...re no left/right differences.
-the model stands nicely on it's own, however a base is included for extra stability if needed.
cults
free

Linus van Pelt
...printer bed, you need to curl each individual hair similar to how you would curl a ribbon. be sure...
cults
free

Wally
...y previous models, you know who you are!). all parts should fit nicely and the only cleanup should be on the first layer, if any.
cults
$2

Pitcher
... generates sloping parts that require too many supports to remove,
therefore less easy than printing in 3 parts with no supports.
Calvin
cults
free
Calvin and Hobbes
...in the pictures section will help in assembling the model and is quite straightforward.
-the model is meant to be glued together.
cults
free
Calvin
...es, the tackier it gets until it fully sets.
-the calvin model fits the log using the cults3d links provided in the introduction.
Hobbes
cults
free
Calvin and Hobbes
...in the pictures section will help in assembling the model and is quite straightforward.
-the model is meant to be glued together.
cults
free
Calvin
...see: https://cults3d.com/en/various/calvin (this upload) for the hobbes model see: https://cults3d.com/en/various/hobbes the fully completed model is 250mm tall after assembly....
Comics
cults
free

comic dog belgium
...comic dog belgium cults belgium comics dog tintin snowy milou personnel works with...
cults
free

Comic Book Tabs
...comic book tabs cults comics comic_books dc_comics marvel_comics the abc tabs are the same...
cults
$3

Dory 3D Comic Fish
... the color information like you see on the photos. dory consists of 2 parts. once the comic fish and the second part is the base.
cults
free

Pickles - comic strip scene
...included below.
the completed model after assembly is 128mm x 189mm x 203mm high and none of the parts require supports!
enjoy!
cults
free

Magnet Tintin et Milou
...magnet tintin et milou cults belgium comics tintin best hero from belgium...
cults
free

Logo Flash!
...logo flash! cults flash logo super hero comics dc comics here is the flash logo for 3d...
cults
free

Spy vs Spy
...spy vs spy cults comics retro spy video_game inspired by spy vs. spy the...
cults
$1

Figurine Venom
...figurine venom cults venom spiderman marvel dc dc comics comics bd figurine keychain key holder figurine of venom,...
cults
$2

FROG FRIEND
...l
frog to support papers, pictures and notes.
it is inspired on a frog´s image. i gave it a comic style to make it more funny.
cults
free

Mjolnir
...hero 3d model of thor's hammer mjolnir from the comicsfilms. hope you like...
Cartoon
cults
$1

cartoon bust HD
...cartoon bust hd
cults
chest cartoon toys figurine
cartoon bust modeled in hd
cults
free

Cartoon Hand Rock
...ts
cartoon hand hands anet a6 duke doks human paint spray sculpture
https://www.youtube.com/watch?v=l81uands0ay
cartoon hands!!!
cults
free

Cartoon Hand Adams
...ts
cartoon hand hands anet a6 duke doks human paint spray sculpture
https://www.youtube.com/watch?v=l81uands0ay
cartoon hands!!!
cults
free

Cartoon Hand Like
...ts
cartoon hand hands anet a6 duke doks human paint spray sculpture
https://www.youtube.com/watch?v=l81uands0ay
cartoon hands!!!
cults
$2

3d cartoons printer nozzle
...nd / cartoon 3d printer nozzle
height of printing 20 cm
for printing it has been cut in 2 to facilitate the removal of media.
cults
$6

voiture cartoon
...voiture cartoon
cults
petite voiture pour enfant
imprimée en 1 bloc, les roues peuvent tourner
cults
free

cartoon phoenix
...anel pattern
stl,obj,jdp,rlf format.phoenix model of bas-relief.
follow me,you will get more free and cheap models.
best regards.
cults
$1

Cat cartoon style
...he "[wooden cat statue](https://skfb.ly/68ngn)" by 3dhdscan licensed under cc attribution. i cleaned the original scan.
cults
$1

Cartoon helicopter
...rsonalize: choose the colors of your filaments, print the parts separately (no need for support) and assemble (no need for glue).
cults
$3

cartoon woman figurine bust
...rintable model (example in photos with 17 cm high)
files in the format obj + tattoo image and logo for printing on blank decal.