Thingiverse
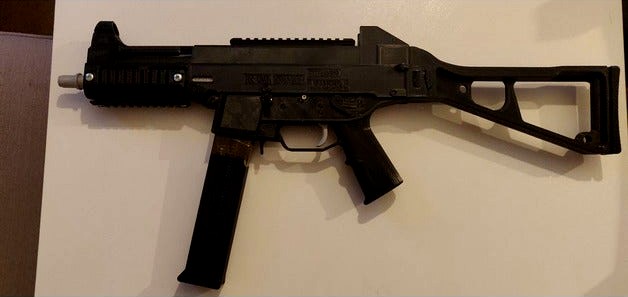
H&K UMP 45 (Prop) by AFlyingCosmonaut
by Thingiverse
Last crawled date: 3 years, 4 months ago
WORK IN PROGRESS
Modeled off of reference pictures, many dimensions are guesses.
This is intended to be a NON-Firing, but bolt operable, replica.
can be printed entirely in PLA (if possible, the charging handle and magazine spring is better printed in petg to retain its springyness)
you will need a large print bed, I printed mine on a 300x300mm print bed.
Test out the magazine spring, upper rear body and stock parts to see if your print area is large enough.
printed with supports, with roof and floor supports enabled.
0.2mm layer height, 20% infil
300x300mm bed was used,
Things to do:
Re-orientate STL files to match intended print orientation.
Re-design the spring rod to be printed horizontally and in less parts
Selector is a little loose, may need to adjust dimensions and/or spring length.
magazine spring is too weak to push up the bolt catch for empty magazines.
magazine needs work to improve feeding.
feeding and shell ejection still needs fine tuning, so dimensions for the barrel, bolt, magazine and extractor may change.
More adjustments as I continue.
You will need as of right now:
8x - M5x6x7 Threaded inserts
8x - M5x10 Pan head screw
3x - M4x10 Pan head screw
3x - M3x6 countersunk screw
1x - M2x10 screw (or anything else thin to use as a pin)
springs:
8x - 9.1x34.9 compression spring (Spring rod)
2x - 9.5x19.1 compression spring (Stock, Magazine release)
2x - 5.6x25 extension spring (Sear, Hammer)
1x - 5.6x20 extension spring (Trigger)
1x - 7.1x19.1 compression spring (Trigger lever)
1x - 7.1x12.7 compression spring (Rear sight)
you should be able to buy a spring kit from amazon which contains all these springs at various quantities, dimensions may vary slightly.
ASSEMBLY:
Lower body:
Remove any loose filament or imperfections on body parts that may prevent smooth operation.
Align lower body left/right and glue together.
Insert magazine release and magazine release spring, pin in place with magazine release pin
Glue bolt release button onto bolt release and pin in place using M2 screw.
Insert trigger spring into trigger, then insert trigger lever.
Insert trigger assembly into lower body and pin in place using body pin.
Insert index wheel into lower body, then insert spring + index plate alongside.
Insert slide into trigger assembly, then fix in place using selector Left/right.
Insert body pin above trigger assembly with trigger spring attached, then hook trigger spring onto trigger.
Screw sear spring onto sear with M3 countrersunk screw, then lock other end of sear spring into lowerbody with M3 countersunk screw and nut.
Insert body pin futherst forward for sear with hammer spring attached, then slide pin through sear and pin in place.
Screw hammer spring onto hammer with m3 countersunk screw then slide and pin inplace with body pin.
Insert unused body pin in the rear most hole.
Upper body:
Remove any loose filament or imperfections on body parts that may prevent smooth operation. especially where the charging handle tube goes. (good idea to test fit what you can before glueing)
Align Upper Body Front left/right and glue togther. (use side rail holes and front sight pin to help with alignment)
Insert front sight and pin in place with front sight pin.
Insert barrel collar into Upper Body Rear Left and glue in place with superglue.
Align Upper Body Rear left/right and glue together. (use the Barrel pin, Front body pin and Rear body pin to help with alignment)
Insert rear sight spring into rear sight notch mock and pin into upper body using rear sight pin, screw down using M4 screw
Stock:
Align Stock left/right and glue together.
Insert stock release button and stock release spring, and pin in place using stock release pin. (may need some sanding or lubricant for smooth operation)
Insert butt plate. Should be press fit, if loose add some glue.
Pin stock into upper body using stock pin.
Spring rod:
Using glue, apply glue and attach spring rod 1 and 2 using spring rod pin. (spring rod 2 is symetric)
prepare spring rod springs by ensuring they slide upand down the rod easily. (may need to bend the ends outward slightly to prevent scratching)
Insert spring ring, follwed by 8 spring rod springs, then screw on spring rod cap with M4 screw to complete spring rod assembly.
Bolt:
Align bolt left/right and glue together. Then slide extractor from rear of bolt towards the front, hook facing inwards. (will need to jiggle it a bit)
complete assembly:
Slide charging handle tude into Upper body assembly with the wider screw hole facing up.
Slide charging handle into chargine handle tube, then align charging handle tube screw hole with the opening on the front upper body, insert M4 screw and screw in place.
Press down hammer in lower body until sear engages, and place stock in a folded position.
Hook lower body onto upper body and swing up into place.
Holding both lower and upper body together, drop in bolt from the rear then insert spring rod assembly.
Insert buttplate, push down and insert rear body pin, locking upper,lower body and butt plate in place.
screw on handrail and top rail using M5 screws. M5 threaded inserts should be used if the screws don't bite.
Similar models
thingiverse
free
Cobra Crossbow Pistol 5-shot Repeating Magazine. by JohnEdwa
...ally, might need to disable or reduce skirt/brim to let some slicers (cura) to allow printing near the edges.
supports required.
thingiverse
free

Cylinder lock by sebastianobos
...in the cylinder. the cylinder will get locked inside thanks to its fins. when the two parts are aligned the key can be extracted.
thingiverse
free

Airsoft Shotgun (Gas) by linkkoz1
... body. slide it in or out, to lock or unlock the barrel.
congratulations! your airsoft shotgun is complete! have fun and be safe!
thingiverse
free

Calibrun Rival Reciever Chunky by haphazardlynamed
...her)
2x 5mm nuts
1x volute spring - harvested from bicycle quick-release wheel skewer rod** (used for internal dart tooth spring)
thingiverse
free

Front Sight Insert for NCStar Universal Rear Sight Tool by Tpierce89
...e stl file was created from the exact dimensions of the part. this allows him to use his rear sight tool on front sights as well.
thingiverse
free

Airsoft PPS XM26 - Bullpup Conversion Kit by DaXLR
... or filing so it's not too tight.
there you go! bullpup xm26. it works exactly the same as the stock xm, except much smaller.
thingiverse
free

AK74 & AKM Barrel Populating Alignment Jig by Crashin_Machines
...ssembled. remove the jig and press the assembly back into the front trunnion and pin it. that's it for this tool's use.
thingiverse
free

Functional Witcher Crossbow
...s tensions. remember to unstring the cord when not in use to maximize cord lifetime.
you're done! insert foam dart and enjoy.
thingiverse
free

Dovetail Iron Sights for .177 rifle
...he pins in place.
the rear sight may require a bit of adjustment in the slicer software to get the notches for elevation to work.
thingiverse
free

Red Ryder Top Sight Picatinny Adaptor by OmegaInvader115
...ck and take the sight raiser out of the rear iron, placing the wedge under the rear sight and then screwing back the stock screw.
Aflyingcosmonaut
thingiverse
free

2020 Frame Hook by AFlyingCosmonaut
...2020 frame hook by aflyingcosmonaut
thingiverse
a simple easy print hook to hold a scraper.
thingiverse
free
Tronxy x5s 10mm x 20mm Drag chain mount by AFlyingCosmonaut
... meter.
check mounting before purchase as it may differ from the one this is designed for.
for reference: https://amzn.to/3ivlbsf
thingiverse
free

Tronxy x5s Electronics Enclosure for Duet Wifi by AFlyingCosmonaut
...id
18 m4 nuts :
• 10 – 5x angle_bracket.stl
• 4 – 120mm fan
• 4 – duet wifi
5 m4 2020 t-slot nut (5x angle_bracket.stl)
Ump
thingiverse
free

UMP (Keychain) by Dantes_Inferno
... (keychain) by dantes_inferno
thingiverse
this is a ump keychain i made using blender. a like and collect is greatly appreciated
thingiverse
free

UMP 45 ACOG by TheSpikeyCactus
...ump 45 acog by thespikeycactus
thingiverse
ump 45 acog by wes [created on 3dtin]
thingiverse
free

UMP 45 ACOG by TheSpikeyCactus
...ump 45 acog by thespikeycactus
thingiverse
ump 45 acog by wes [created on 3dtin]
thingiverse
free

ump cookie cutter by jbelux
...ump cookie cutter by jbelux
thingiverse
cookie cutter
thingiverse
free

Airsoft UMP Tracer Adaptpr by Stupidsign
...irsoft tracer adaptor for vfc ump
need to file the burr from support in the clip lock slot otherwise the clip lock will very fit.
thingiverse
free

Airsoft G&G UMP (UMG) Silencer by alec09188
...airsoft g&g ump (umg) silencer by alec09188
thingiverse
airsoft g&g ump (umg) silencer
thingiverse
free

G36/UMP pin by T-san
...wn. works for g36 and ump. there are two version. one is flushed and one will extrude 4mm outside so it can be pushed out easier.
thingiverse
free

UMP midcap spring plug
...ump midcap spring plug
thingiverse
a plug for ump45 midcaps. use if you lost or somehow broke yours.
thingiverse
free

Airsoft G&G UMP (UMG) Muzzle brake by alec09188
...airsoft g&g ump (umg) muzzle brake by alec09188
thingiverse
airsoft g&g ump (umg) muzzle brake
thingiverse
free

Remix of alec09188 G&G UMP Silencer
...he ump 45 on the side of it.
this was a little tedious but i was able to get it done.
go to his design to get the locking piece.
K
thingiverse
free

k by Bigguy
...k by bigguy
thingiverse
the letter k for a vegas sign
thingiverse
free

K by kmk
...k by kmk
thingiverse
this is the letter "k" made using the makerbot machine. it is made in pink.
thingiverse
free

Letra K by Xbertus
...letra k by xbertus
thingiverse
letra k
thingiverse
free

Letter K by kelh88
...letter k by kelh88
thingiverse
this is the letter k
thingiverse
free

k money by kschwartz24
...k money by kschwartz24
thingiverse
k money $$$$
thingiverse
free

Part K by ZainK
...part k by zaink
thingiverse
part k
thingiverse
free

K CELL by shastasheen
...k cell by shastasheen
thingiverse
k cell
thingiverse
free

K-12 by Cristallino
...k-12 by cristallino
thingiverse
keychain k-12
thingiverse
free

K-state Wildcat
...k-state wildcat
thingiverse
k-state earrings
thingiverse
free

unown K abecedario
...unown k abecedario
thingiverse
unown k abecedario
Prop
thingiverse
free

Prop
...prop
thingiverse
needed
thingiverse
free

prop by ahven11
...prop by ahven11
thingiverse
prop
thingiverse
free

Props by FPV_Pilot
...props by fpv_pilot
thingiverse
props
thingiverse
free

65161 Prop
...65161 prop
thingiverse
test prop for the 65161 motor.
thingiverse
free

Prop by PuffedLipo
...prop by puffedlipo
thingiverse
quick upload of experimental prop
thingiverse
free

Prop Holder for 5045 Props by Kylellrc
...holder for 5045 props by kylellrc
thingiverse
i wanted something to hold my quad's props. so i created this holder for them.
thingiverse
free

Watch prop
...watch prop
thingiverse
watch to be used a movie prop, spray paint silver for finish
thingiverse
free

Bullet Prop
...bullet prop
thingiverse
this thing is not any specific caliber or replica, its just a sketch for prop.
thingiverse
free

Prop guard by touchthebitum
...ebitum
thingiverse
filalfex prop guard for this prop :
carbon airmodels swiss made 28x12 4 props
thanks anthony for the photo ;)
thingiverse
free

Rivets for props by ZiaKat
...rivets for props by ziakat
thingiverse
rivets for props .
45
thingiverse
free

Cap for aluminium profile 45*45 by Yachta
...cap for aluminium profile 45*45 by yachta
thingiverse
cap for aluminium profile 45*45
thingiverse
free

Equerre 45° by Printerforever
...equerre 45° by printerforever
thingiverse
equerre à 45°
dimensions 60x40 mm
fixing lug 45°
size 60x40 mm
thingiverse
free

ops 45 by davedpot
...ops 45 by davedpot
thingiverse
ops 45 model motor
thingiverse
free

45 Auto Reloading Tray - 45 ACP, 45 GAP, 45 WIN MAG by BexarArms
...high dimensional stability/low shrink factor, and a decently tuned printer is highly advised, as the tolerances are fairly tight.
thingiverse
free

45 Grad Anschlagwinkel by mmemoli
...45 grad anschlagwinkel by mmemoli
thingiverse
45 grad anschlagwinkel.
45 degrees angle.
thingiverse
free

45° Funnel by agrau
...45° funnel by agrau
thingiverse
45° funnel printed in petg for washing machine liquids
thingiverse
free

No 45 Badge Remix
...no 45 badge remix
thingiverse
remix of unabashednerd's no 45 / anti-trump badge.
thingiverse
free

.45 ACP by josefg
... as .45 auto) was designed by john moses browning in 1904. it was adopted as the standard chambering for colt's m1911 pistol.
thingiverse
free

Geodreieck taktil / Triange / Set Square 90-45-45 by JomMa
...se
geodreieck
unterricht für menschen mit sehbehinderung / blinde
triangle / set square (90-45-45)
use for the visually impaired
thingiverse
free

45 degree marker by gadaboutsteel
...45 degree marker by gadaboutsteel
thingiverse
45 degree makers