Thingiverse

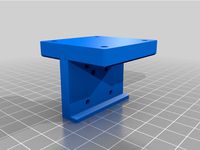
Hemera - Creator Pro Carriage
by Thingiverse
Last crawled date: 4 years, 3 months ago
This is a replacement carriage for the Flashforge Creator Pro
This is still a work in progress! But is currently being used in my machine!
This is a Single Extruder Modification it may or may not work with the factory firmware.
This is working in My machine which has a Duet2 board fitted
18-10-2020 : you may need to reduce the carriage scale by 1% if your carriage binds on the left side of the rails (when sliding it back and forth once clipped onto the bearings)
NOTE: check for binding before you attach the belt as zipping the carriage back and forth with the belt attached will generate current via the stepper motor and may back feed into the control board! (not a good thing)
You will need to remove the factory carriage first.
The Hemera Carriage will clip onto the existing rails and bearings.
connect the belts to the carriage via the belt locks (2) the belt will have a twist to vertical
This is required so there is enf room for the extruder assembly to fit between the rails.
There are 4 captured M3 nuts to be fitted underneath.
One bolt on the rear mount ( L bracket ) is used to hold the bracket down to the carriage via the outer screw holding the right hand belt lock.
The front L bracket once everything else is in place (including the Extruder Assembly) gets CA glued into place, This becomes a permanent part of the carriage.
( The rear L bracket cant be glued as it is needs removal for any belt maintenance)
Make sure your M3 bolts are not too long for the mounting of the extruder assembly, maybe do a pre-install assembly to check for bolt lengths first.
I may or may not post a hardware list.
3 x M3 12mm
1 x M3 16mm
4 x M3 nut
Bolts for extruder attachment are included with the Hemera
on assembly the extruder would be fitted from the bottom up.
allowing the cables to pass on the left of the carriage between the rails.
*** Please hang fire on printing this until i design the endstop flag as it will collide with the X stepper motor.
Alternatively print a calibration cube and glue it to the carriage so the endstop is triggered earlier.
Credit goes to https://www.thingiverse.com/thing:1350343
as I used his model to inspire the factory bearing support and some clearances.
I did use his model with an E3D for some time before purchasing the Hemera.
Thanks Mate it is a well designed piece of kit.
Similar models
thingiverse
free

E3D Hemera Mount for FFCP
...uire (easy) drilling of
1x 3.5[mm] hole, to fit allen m3x30 bolt.
use m3 nyloc nuts to secure the mount to the extruder carriage.
thingiverse
free

Universal E3D Hemera MGN12 Bracket with Gates PowerGrip GT2 Belt Clip
...ccess that hole that was drilled in the 'x axis' bar. this is required to install the bracket without removing any parts.
thingiverse
free

X5S MGN12 - H Linear Rail Mod by DKDaigle
... the x carriage before attaching them in the front.
the hurricane mount will match up to the front end of the v6 mount for sure.
thingiverse
free

Da Vinci 1.0 E3d Titan + V6 Direct Drive "Coyote" Carriage v2 by Debio
...offer feedback and/or call me nasty names at http://www.soliforum.com/topic/15009/e3d-titan-v6-direct-drive-coyote-carriage-beta/
thingiverse
free

Simple Hemera Mount for Hypercube Evolution
...rew).
i haven't tested this very extensibly, so proceed with caution - it might not fit perfectly with your individual setup.
thingiverse
free

Prusa i3 z endStop by wayneo
...nd basically added a box to house the z axis micro switch, adjustment is made via the m3 bolt which is situated in the x carriage
thingiverse
free

X carriage mounted extruder filament guide by jwass
...to the bearing mount to go from your spool to the guide to keep your filament from touching your work surface an picking up dirt.
thingiverse
free

Prusa I3 X-carriage (Wades) by rball716
... for press fit bearings and a better fit for the belt. the platform is slightly higher and overall works better than x-carriage 2
thingiverse
free

Wave Belt tensioner for Flying Bear Tornado by Sadcrow
...t that goes by the back of the extruder carriage, more or less alined with the carriage when its in the middle of the x movement.
thingiverse
free

X Bracket (SCS 8LUU) by Bob68
...uder brackets. 4mm x 12mm long bolts are used for the linear bearings and 3mm x 25mm or longer bolts and nuts to fasten the belt.
Hemera
3ddd
$1

Hemera
...d
круглое , напольные
зеркало hemera;
designer:grace feyock
dimensions:46 w x 46 h x 1 d
3ddd
$1

Cофа (MOS)
...cофа (mos) 3ddd угловой hemera l-shape sofa. смоделена по реальным...
3d_sky
free

PROFI Hemera
...profi hemera
3dsky
hemera mirror;
designer: grace feyock
dimensions: 46 w x 46 h x 1 d
thingiverse
free

E3D Hemera Model
...e3d hemera model
thingiverse
official mounting cad for designing your own custom mounts for the e3d hemera.
thingiverse
free

Hemera Troodon mount by vonsy
...hemera troodon mount by vonsy
thingiverse
hemera support for troodon
thingiverse
free

BLTouch Mount for Hemera
...bltouch mount for hemera
thingiverse
attach to hemera heat sink body with 3m vhb tape flush to the top edge.
thingiverse
free

X5S MGN12 Hemera by Festivejelly
... mounting solution for the e3d hemera on a mgn12 rail.
assemble and screw the hemera into the mount before putting onto the rail.
thingiverse
free

Hemera Mount for 2020 (2040)
...hemera mount for 2020 (2040)
thingiverse
2020 mount for the e3d hemera (hermes)
thingiverse
free
MGN12 Toprail mount for Hemera
...mgn12 toprail mount for hemera
thingiverse
hemera mount for mgn12 rails on top like the am8
thingiverse
free

E3D Hemera Blower Duct
...e3d hemera blower duct
thingiverse
blower duct & mount. fits e3d hemera extruder
Carriage
archibase_planet
free

Carriage
...arriage
archibase planet
perambulator baby carriage pram
carriage n250908 - 3d model (*.gsm+*.3ds) for interior 3d visualization.
3d_export
free

carriage
...carriage
3dexport
old fashion carriage model, more files here:
turbosquid
$140

Carriage
...urbosquid
royalty free 3d model carriage for download as max on turbosquid: 3d models for games, architecture, videos. (1482052)
turbosquid
$25

Carriage
...urbosquid
royalty free 3d model carriage for download as max on turbosquid: 3d models for games, architecture, videos. (1285944)
3d_export
free

carriage
...carriage
3dexport
game cart
3d_ocean
$15

Barrel Carriage
...ieval oak old transport wheels wine wood
this model contains a barrel and a carriage. it is a medieval type of wood oak carriage.
turbosquid
$40

Carriage
...ty free 3d model carriage for download as obj, fbx, and blend on turbosquid: 3d models for games, architecture, videos. (1290094)
turbosquid
free

Carriage
...yalty free 3d model carriage for download as ma, obj, and fbx on turbosquid: 3d models for games, architecture, videos. (1239157)
3d_export
$5

Medieval carriage
...medieval carriage
3dexport
medieval carriage in fairy style
turbosquid
$58

Carriage
...d model carriage with scene for download as max, obj, and fbx on turbosquid: 3d models for games, architecture, videos. (1276262)
Creator
3ddd
$1

CREATOR
... молдавия
круглая кровать молдавской мастерской creator.диаметр спального места - 1900мм,материалы настроены.
turbosquid
$75

Creators Realm
... available on turbo squid, the world's leading provider of digital 3d models for visualization, films, television, and games.
3ddd
$1

LEGO Creator Part 2
...
lego , конструктор , машина
lego creator №6753
turbosquid
free

Game Creator Pack
... available on turbo squid, the world's leading provider of digital 3d models for visualization, films, television, and games.
3ddd
$1
LEGO Creator №6753 Part 3
...
lego , конструктор , машина
lego creator №6753
3ddd
$1

LEGO Creator №6753 Part 1
...
lego , конструктор , машина
lego creator №6753
turbosquid
$29

Train Track Creator Pro
... available on turbo squid, the world's leading provider of digital 3d models for visualization, films, television, and games.
3d_ocean
$39

Train Track Creator Pro
...n tracks, for video game or rendering in a matter of minutes. all the models in this pack are low poly with high resolution te...
turbosquid
$7

FPS Creator Reloaded Rock Pack 1
... available on turbo squid, the world's leading provider of digital 3d models for visualization, films, television, and games.
3ddd
$1
Декоративные элементы BV Decor CREATOR III часть
...ментов и декорирования стен.
множество вариантов для вашей фантазии.https://bvdecor.com/es/category/list/cat/creator-es
Pro
turbosquid
$29

Pro
...ree 3d model mac pro for download as obj, c4d, fbx, and blend on turbosquid: 3d models for games, architecture, videos. (1505782)
turbosquid
$15

Apple Mac Pro and Pro Display
...ee 3d model apple mac pro and pro display for download as max on turbosquid: 3d models for games, architecture, videos. (1417078)
3d_export
$5

iphone 13 pro max and pro
...3 pro max and 13 pro the model is made in four colors (graphite, gold, silver, and blue), all of which are attached in the files.
3d_export
free

sapphire pro
...sapphire pro
3dexport
sapphire pro 3d printer head mask
3d_export
$4

macbook pro
...macbook pro
3dexport
macbook pro 13" inch 2020 years model
3ddd
free

GentleLase Pro
... syneron , candela
gentlelase pro аппарат для лазерной эпиляции
turbosquid
$25

PRO frame
...rbosquid
royalty free 3d model pro frame for download as max on turbosquid: 3d models for games, architecture, videos. (1148329)
turbosquid
$5

Alien pro
...osquid
royalty free 3d model alien pro for download as blend on turbosquid: 3d models for games, architecture, videos. (1678446)
turbosquid
$5

iphone11 pro
...uid
royalty free 3d model iphone11 pro for download as blend on turbosquid: 3d models for games, architecture, videos. (1562707)
3ddd
$1

Mac Pro (appel)
...mac pro (appel)
3ddd
компьютер , apple
mac pro