Thingiverse
Heated Bed Guide for the Mega Zero v1.0 (Melzi & Mini MZ) by djos_1475
by Thingiverse
Last crawled date: 4 years, 5 months ago
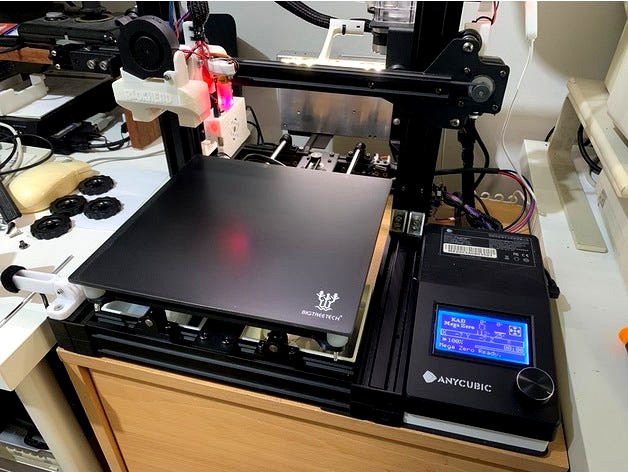
Ladies and Gents, This is my Heated Bed Upgrade Guide for the Mega Zero v1.0!
This is in 2 parts, one for the SKR Mini MZ (the easy version) and the Advanced version for the Stock Melzi Board.
UPDATED: I've now included a compatible "PEI Spring Steel Build Plate" option.
PS, I highly recommend you install a Browser extension like "Imagus" (for Firefox) as this lets you see the Images by hovering your Mouse pointer over them.
Prerequisites for both Board Types:
1/ A Proper Power Supply - the Stock PSU cannot supply the required Current. The Mean Well LRS-350-12 is my recommended choice.https://www.digikey.com.au/product-detail/en/mean-well-usa-inc/LRS-350-12/1866-3344-ND/7705030
2/ ABS Printed Bed adapter Brackets - I got these printed out by a local 3D printing Specialist, I don't recommend using other print materials or you'll have serious issues with warping due to the radiant heat from the bed or heat transfer via metal springs.https://mk0helpcentertej4mtv.kinstacdn.com/wp-content/uploads/2021/01/TH3D_MegaZero_HeatedBedBracket.zip
orhttps://www.thingiverse.com/thing:4793382
3/ 4x M3 x12mm Bolts and nuts
4/ 4x M3 Wing-nuts or Knurled M3 Thumb screw-nuts to replace the Bed Leveling wheels (they wont fit anymore)https://www.amazon.com.au/gp/product/B07WJZGTVM/ref=ppx_yo_dt_b_asin_image_o00_s00?ie=UTF8&psc=1
5/ A Heated bed and Build Plate (the 220mm kit includes the glass but it's too small)
BTT Ultrabase Heated Bed Platform - 12V, 220mm Kit
BTT Ultrabase Heated Bed Glass - 235x235mmhttps://www.aliexpress.com/item/32926193038.html?spm=a2g0s.9042311.0.0.6ba04c4d5Logma
OR
If you prefer a PEI Spring Steel Build Plate, you could easily swap in this part without any Issue. The Magnetic Bed base come with adhesive so you won't need the thermal tape. You still need the "BTT Ultrabase Heated Bed Platform - 12V, 220mm Kit".
BTT PEI Spring Steel Build Plate and magnetic basehttps://www.aliexpress.com/item/1005001500335234.html?spm=a2g0s.9042311.0.0.27424c4dpf0meX
6/ 0.2mm Thermal Adhesive tape. You could use larger sheets of adhesive tape, however, they are a lot thicker @ 0.5mm (the 235mm glass does not include thermal adhesive tape).https://www.amazon.com.au/gp/product/B07WNRL4BN/ref=ppx_yo_dt_b_asin_image_o06_s00?ie=UTF8&psc=1
7/ Cable Strain Relief for the Print bed Cabling:https://www.thingiverse.com/thing:4793382
8/ Cable Ties / Zip ties
Either 2.6mm wide or 3.5mm wide
9/ Cable Management Clips (highly recommended):https://www.thingiverse.com/thing:4144671
Bed Installation (Both Boards):
1/ Install the new Power Supply using your preferred method:
IMO rear mount is Ideal as it won’t prevent you from upgrading to Dual Z-screws.
Here are 2 ideal options:
https://www.thingiverse.com/thing:4766416
orhttps://www.thingiverse.com/thing:4792529
2/ Remove old Bed by removing the leveling wheels
3/ Install Adhesive Thermal tape onto Heated Bed:
a/ Clean the Aluminium plate with Isopropyl alcohol to make sure it’s 100% clean
b/ Apply adhesive tape onto Aluminium plate - try to get each row as close to the previous row as possible without overlapping or you’ll have heat transfer issues.https://cdn.thingiverse.com/assets/d6/47/9b/ea/d7/2021-03-12_14.02.12.jpghttps://cdn.thingiverse.com/assets/b0/83/08/e3/1e/2021-03-12_14.05.56.jpg
c/ trim the excess tape off with scissorshttps://cdn.thingiverse.com/assets/52/a8/1a/3f/05/2021-03-12_14.10.51.jpg
d/ Put glass plate on a flat surface upside down and clean the bottom of the Glass plate with Isopropyl alcohol to make sure it’s 100% cleanhttps://cdn.thingiverse.com/assets/2a/fb/86/57/74/2021-03-12_14.14.00.jpg
e/ peel off the backing tape and very carefully place the Aluminium plate in the X & Y centre of the Glass plate. Press down firmly to ensure it goes on properly.https://cdn.thingiverse.com/assets/f4/3c/ab/ab/4a/2021-03-12_14.17.23.jpghttps://cdn.thingiverse.com/assets/e7/e2/55/b5/57/2021-03-12_14.23.27.jpghttps://cdn.thingiverse.com/assets/93/c7/28/c2/bf/2021-03-12_14.25.03.jpghttps://cdn.thingiverse.com/assets/33/ab/61/11/6d/2021-03-12_14.25.27.jpg
4/ Install ABS Printed Bed adapter Brackets with smooth side down using the 4x M3 x12mm Bolts and nuts. I recommend putting the nuts on top as it’s easier to tighten these with your Alan Key on the bottom and hex spanner on top. Don’t tighten fully yet (do it after Bed is installed).https://cdn.thingiverse.com/assets/51/c8/a7/f9/37/2021-03-13_15.04.11.jpghttps://cdn.thingiverse.com/assets/9f/35/74/a4/4d/2021-03-13_15.04.04.jpg
5/ Install Cable Management bracket onto rear Bed adapter bracket with Superglue. I found the best location was in-line with the left Y-rail.
You can do this later, but it's easier without the bed in the way.https://cdn.thingiverse.com/assets/a3/25/49/3e/6d/2021-03-14_10.25.35.jpghttps://cdn.thingiverse.com/assets/57/81/a3/cc/41/2021-03-14_10.25.43.jpg
6/ Install Bed into Printer – use either Springs or Silicone Mounts and either M3 Wing-nuts or Knurled M3 Screw-nuts.https://cdn.thingiverse.com/assets/06/1f/d3/a2/7d/2021-03-13_15.05.35.jpg
Tighten fully the Bed Adapter fixings (ensures good alignment) and remove the protective plastic from the top of the glass bed:https://cdn.thingiverse.com/assets/ab/8e/d3/ef/7f/2021-03-13_15.50.37.jpg
7/ Run the heated bed cable down and under the V-rails (as shown in pics below).https://cdn.thingiverse.com/assets/67/54/9f/f2/54/2021-03-13_15.29.22-1.jpghttps://cdn.thingiverse.com/assets/ae/94/d7/8e/75/2021-03-13_15.29.06.jpg
Use a zip-tie to fix the cable bundle to the Cable Strain Relief Bracket.https://cdn.thingiverse.com/assets/8b/55/e2/00/af/2021-03-14_11.03.52.jpghttps://cdn.thingiverse.com/assets/af/aa/29/68/f4/2021-03-14_11.04.03.jpg
I used a Cable Management Clip and Zip-tie to fix the cables to the right side of the chassis rail. Make sure there is enough cable for the bed to move through its full range of motion.https://cdn.thingiverse.com/assets/aa/80/ce/35/50/2021-03-14_15.51.39.jpghttps://cdn.thingiverse.com/assets/95/cb/c2/07/5a/2021-03-13_15.29.13.jpg
Electrical Installation (SKR Mini MZ):
1/ Install Bed wiring as per the SKR Mini MZ documentation.
2/ Install KAD Mega Zero FWhttps://github.com/kad/Marlin/wiki#installing-firmware
3/ PID Autotune the Bed temps:
(use Octoprint Terminal)M303 E-1 S60 U1
4/ Re-level the Bed while at printing Temps via which ever process you use.
5/ Enjoy your 3D Printer!https://cdn.thingiverse.com/assets/06/a9/3d/cf/52/2021-03-13_19.45.01.jpg
Electrical Installation (Anycubic Melzi Board)
If you aren’t competent with Soldering, just buy the SKR Mini MZ:
Items Required:
Infineon “PG-TO252-3-11” in "TO-252" format or compatible Mosfet (the external modules are a waste of time and quite unnecessary if you can solder).https://www.digikey.com/en/products/detail/infineon-technologies/IPD25N06S4L30ATMA2/6109254(Updated the above - I used the wrong links)
6 Pin Terminal Blockhttps://www.digikey.com.au/product-detail/en/amphenol-anytek/VI0601550000G/609-3931-ND/2261342
Installation:1/ De-solder the stock 2-pin terminal from the PCB (it’s junk and they are usually installed crooked)
2/ Install an Infineon “IPD036N04L G” Mosfet onto the blank space Marked as “01”.
3/ Install 6 Pin terminal block (don’t do this before the Mosfet or you wont have much room to install the Mosfet).https://cdn.thingiverse.com/assets/5a/a0/27/34/e7/2021-03-13_19.11.55-1.jpg
4/ Install the wiring as per the PCB silk screen on the bottom of the board. (I took a photo so I didn’t forget).
Bed Thermistor connects to "T1".https://cdn.thingiverse.com/assets/49/9a/d5/d9/2d/2021-02-24_14.28.59.jpghttps://cdn.thingiverse.com/assets/f9/98/71/de/3e/2021-03-13_19.33.27.jpg
5/ Install KAD Mega Zero FWhttps://github.com/kad/Marlin/wiki#installing-firmware
6/ PID Autotune the Bed:
(use Octoprint Terminal)M303 E-1 S60 U1
7/ Re-level the Bed while at printing Temps via which ever process you use.
8/ Enjoy your 3D Printer!https://cdn.thingiverse.com/assets/06/a9/3d/cf/52/2021-03-13_19.45.01.jpg
PS, a Huge Thanks goes to @Ivader for his excellent KAD Mega Zero (Marlin) Firmware, I tip my hat to you sir!
https://youtu.be/Xhmoj4iE-E8