Thingiverse
HC Maker 7 Y axis bed stabiliser by scottypitcher
by Thingiverse
Last crawled date: 3 years, 3 months ago
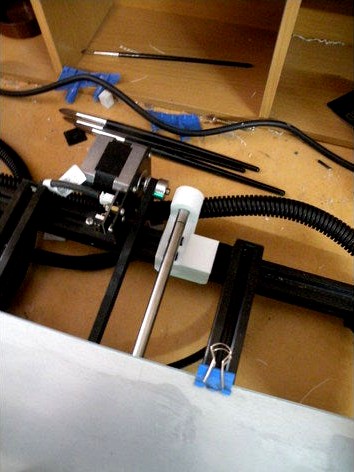
The HC Maker 7 is a large format printer with a 315x315 build plate. Unfortunately the Y carriage rolls back and forward on a set of six V wheels with quite a small wheel base (approx 50mm). This makes the whole built plate quite unstable and when printing it does rock up and down quite a lot during Y axis movements.
Additional Parts Needed:
2 x LM8UU linear bearings.
approx 470-480mm SS 8mm smooth rod
5 x M3 hex nuts
5 x M3x12 pan head machine screws
My friend who owns this printer wanted the probelm corrected and I suggested a new carriage with wider wheel base and replacing the four T profile extrusions that make up the Y frame with much longer ones. He didn't want this so in the end I came up with this compromise solution.
A top and bottom bearing block which bolt together across the 3mm steel carriage plate with M3 nuts and bolts. A pair of M8 linear bearings are pushed into each end of the bottom block. This grips the steel carriage plate rigidly. Note that the rectangular plate in the centre of the bearing block assembly is designed to fit snugly into the same shaped hole on the right hand side of the steel carriage plate.
Two end blocks (only 1 pattern: the rear piece mirrors the front piece) are mounted on the front and back T extrusions just to the right of the Y belt. You have to unbolt the right hand side of the frame and the right hand Y carriage T extrusion and then slide the end blocks onto the T extrusion. They are a tight fit but should slide on with a little force. Leave the frame disassembled under the end of step 3!
Cut a piece of 475mm SS 8mm smooth rod and slide this through the linear bearings and through to the rear end block. It won't go in without a fair amount of force. With the frame still disassembled from step 2, I used a long "F" ratchet clamps with each end of the jaws pressing on the opposite outside faces of the end block behind the smooth rod hole. Gently and carefully tightening the clamp will push the smooth rod into the end blocks and bring the T extrusions at the right hand side back together. Once it's all back in place just screw everything together. Note that the end blocks will self locate once you slide the Y carriage back and forward. If the smooth rod is inserted to the correct length the end blocks will remain where they are.
Now when you print you'll notice that the hot bed doesn't rock back and forward when the Y axis moves. It's not a perfect solution, we would have rebuilt the printer for that, but the linear bearings provide enough stabilisation for a good solution.
Similar models
thingiverse
free
Carriage Block MGN12H Prusa Mk3 Bear by Zen3Dhu
...
thingiverse
mgn12h carriage block for full bear mk3 y-axis lineal rails mgn12
mgn12c carriage block: bear 2.1 linear rail addon
thingiverse
free

3030 Extruded Aluminum Y Carriage Block for 10mm Linear Rod by BryanAnnas
...t check tolerances.
gcode is for a pursa i3 mk2s
filament settings: pla
linear advance k value 45 (if you have updated firmware)
thingiverse
free

Duplicator i3 Y Axis Skew Correction by dotPhoenix
...a piece of glass or metal z axis braces similar to https://www.thingiverse.com/thing:921948 square with a wide, flat flange such...
thingiverse
free

Ender 3 Pro z-axis rod stabilization bearing
...e bearing to the exact right spot for vertical accuracy- bearing is designed to keep the rod the correct distance from the frame.
thingiverse
free

Zam Kossel Alt. by norzam
...
--
20mm aluminium extrusion
8mm smooth rod instead of linear guide
or
15mm aluminium extrusion
8mm smooth rod
carriage
thingiverse
free

Y-Axis End Stop holder 8mm bushing by PeteyPub
...motion ball bearing cnc slide bushing
2 - 8mm stainless steel rods
this y-axis switch holder mounts under the aluminum bearing.
thingiverse
free

new K8200 Z AXIS rod follower by barnwell
...ring on the right end of the z axis with 2 624 ball bearings. this stops the binding of the linear bearing as the z axis goes up.
thingiverse
free

Y-guide float straps by NozzleClog
... thanks to dingoboy71 and jace1969 for bringing up this whole floating bearing deal. always fun to try out different solutions...
grabcad
free

Shapeoko 3 Linear Rail Carriage Plates
...um stock for adapter plate (atp-5)
0.5" aluminum stock for motor spacer and mount
https://www.thingiverse.com/thing:4183138
thingiverse
free

X-Z axis plate -right side - with DC motor mount by unix_guru
...ount by unix_guru
thingiverse
right side x/z axis plate to mount z-axis linear bearings, x-axis rods, and x-axis dc servo motor.
Scottypitcher
thingiverse
free

HC Maker 7 foot extenders by scottypitcher
... the mounting blocks on the frame sit about 5mm below the feet, so i had to extend the feet slightly, hence these feet extenders.
thingiverse
free

Tp-link AC1600 (Archer VR1600v v2) wall mount bracket by scottypitcher
...k.
the model was produced with openscad. flip it upside down to print without suports.
the holes will take 6g countersunk screws.
thingiverse
free

HC Maker 7 Z frame supports by scottypitcher
...or the hc maker 7 model. you will have to comment that out to get it to render. i will upload the model separately at some stage.
thingiverse
free

HC Maker 7 LCD case by scottypitcher
... rear of the base and screwing them up tight.
fit the knob back to the control shaft on the top cover and fix in place.
---fin---
Stabiliser
turbosquid
free

stabilisers
... available on turbo squid, the world's leading provider of digital 3d models for visualization, films, television, and games.
turbosquid
$2

Voltage stabiliser
... available on turbo squid, the world's leading provider of digital 3d models for visualization, films, television, and games.
3ddd
$1

Kuki chair by Zaha Hadid for Sawaya & Moroni
...seat and curve around droplet shaped holes in each side. the chair was unveiled at the sawaya & moroni showroom in milan 2013
3d_export
$50

Tank Oplot-M Main Battle Tank Ukraine 3D Model
... submachine gun.the model consists of a plurality of individual objects. turrets, guns, machine gun, scope, and more independent.
thingiverse
free

Stabiliser Bar by RazorWire65
...g the seating of the filament reels uneven on the bearing. two stabiliser bars between the two threaded rod corrects this issue.
thingiverse
free

Samsung remote stabiliser by MathiasWi
...samsung remote stabiliser by mathiaswi
thingiverse
i just made this stabiliser for my samsung remote.
thingiverse
free

Shoulder Stabilisation Brace by phx
...shoulder stabilisation brace by phx
thingiverse
custom shoulder stabilisation brace built from 3d scanned patient data.
thingiverse
free

i3 MEGA - body stabiliser by new_POPE
...own
grab printer from stabilisers
use screws for stick stabilisers to the base (wood plate in my case)
happy stabilised printing!
thingiverse
free

Pin Art Stabiliser by burtyb
...iser by burtyb
thingiverse
with only a few pins pushed in the pin art normally falls backwards, prevent it with this stabiliser.
thingiverse
free

Rapman Extruder Stabilisator (stabiliser) by Bundes-Metal-Minister
...einfacher stabi fã¼r den rapman extruder, da der zu wackelig konstruiert ist und bei hohen druckgeschwindigkeiten stark schwankt.
Hc
turbosquid
$37

HC-landFL-max
... available on turbo squid, the world's leading provider of digital 3d models for visualization, films, television, and games.
turbosquid
$20

HC-PV-1000
... available on turbo squid, the world's leading provider of digital 3d models for visualization, films, television, and games.
3ddd
free

Кровать GIANFRANCO FERRE' HC
...кровать gianfranco ferre' hc
3ddd
gianfranco ferre
кровать gianfranco ferre' hc
3ddd
$1

Комод GIANFRANCO FERRE' HC
...anfranco ferre' hc
3ddd
gianfranco ferre , комод
комод gianfranco ferre' hc
design_connected
$11
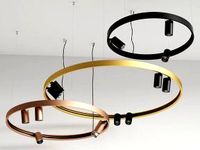
Superloop HC MDL Pendant Lamp
...superloop hc mdl pendant lamp
designconnected
delta light superloop hc mdl pendant lamp computer generated 3d model.
design_connected
$11

Superloop S HC MDL Pendant Lamp
...superloop s hc mdl pendant lamp
designconnected
delta light superloop s hc mdl pendant lamp computer generated 3d model.
3ddd
$1
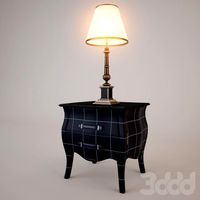
Прикроватная тумба GIANFRANCO FERRE' HC
... настольный светильник
прикроватная тумба gianfranco ferre' hc плюс прикроватная лампа
turbosquid
$50

AN-M8 HC Smoke Grenade LP
... available on turbo squid, the world's leading provider of digital 3d models for visualization, films, television, and games.
cg_studio
$99
U.S. Coast Guard HC/1303d model
....lwo .ma .max .obj .xsi .c4d - u.s. coast guard hc/130 3d model, royalty free license available, instant download after purchase.
3ddd
$1
Faber INCA Smart HC
... faber
вытяжка кухонная фирмы faber.
в архиве модели шириной 702 и 522 миллиметра. пользуйтесь!
Axis
3ddd
$1

Мария Axis
...
3ddd
кухня , классическая , axis
модель кухни.
3d_export
$22

Axis robot 6-axis robotic arm
...ing parts drawings, standard parts purchased parts list, can be produced directly according to the drawings, welcome to download!
3ddd
free

Versatile Axis
...ddd
nexus , плитка
http://bvtileandstone.com/ceramic-porcelain/versatile-axis/
3d_export
$19

robot 2 axis
...robot 2 axis
3dexport
robot 2 axis
turbosquid
$40

Axis R5F
... available on turbo squid, the world's leading provider of digital 3d models for visualization, films, television, and games.
turbosquid
$40

Axis S5F
... available on turbo squid, the world's leading provider of digital 3d models for visualization, films, television, and games.
turbosquid
$30

Axis Athlon
... available on turbo squid, the world's leading provider of digital 3d models for visualization, films, television, and games.
turbosquid
$10

Linear Axis
... available on turbo squid, the world's leading provider of digital 3d models for visualization, films, television, and games.
3d_export
$15

drawing axis
...drawing axis
3dexport
simple rendering of the scene file
3ddd
$1

versatile axis ARC
...versatile axis arc
3ddd
versatile , плитка
versatile axis arc red dot design award
Y
turbosquid
$1

Tetera y Galletas y Caf
... available on turbo squid, the world's leading provider of digital 3d models for visualization, films, television, and games.
3ddd
$1

Смеситель Y-CON
...смеситель y-con
3ddd
смеситель , y-con
смеситель y-con
3ddd
$1

Y-Chair
...y-chair
3ddd
tom dixon
y-chair designed by tom dixon,
3ds max + obj, corona
3ddd
$1

Y Chair compilation
....net/products/us/y-chair-sled-base
y chair swivel basehttp://www.tomdixon.net/products/us/y-chair-swivel-base
turbosquid
$190

Y-8
...y-8
turbosquid
royalty free 3d model y-8 for download as max on turbosquid: 3d models for games, architecture, videos. (1658891)
turbosquid
$7

Bench Y
...turbosquid
royalty free 3d model bench y for download as obj on turbosquid: 3d models for games, architecture, videos. (1488746)
turbosquid
$15

bonePile Y
...oyalty free 3d model bonepile y for download as blend and obj on turbosquid: 3d models for games, architecture, videos. (1546374)
turbosquid
$7

Y for Yarn
...d
royalty free 3d model y for yarn model for download as max on turbosquid: 3d models for games, architecture, videos. (1699732)
turbosquid
$2

FONT Y
...quid
royalty free 3d model font y for download as ma and obj on turbosquid: 3d models for games, architecture, videos. (1549457)
3ddd
$1

WOOD-y
...wood-y
3ddd
wooden guy
7
turbosquid
$6
Rock 7-7
...urbosquid
royalty free 3d model rock 7-7 for download as obj on turbosquid: 3d models for games, architecture, videos. (1647866)
turbosquid
$8
Rock 7-7
...id
royalty free 3d model rock 7-7 for download as ma and fbx on turbosquid: 3d models for games, architecture, videos. (1693416)
design_connected
$16
No 7
...no 7
designconnected
sibast no 7 computer generated 3d model. designed by sibast, helge.
3ddd
$1
Team 7
...team 7
3ddd
team 7
моделилось с кталога team 7
3d_export
$5
hinge 7
...hinge 7
3dexport
hinge 7
turbosquid
$9
IS-7
... available on turbo squid, the world's leading provider of digital 3d models for visualization, films, television, and games.
turbosquid
$12

Calligraphic Digit 7 Number 7
...hic digit 7 number 7 for download as max, obj, fbx, and blend on turbosquid: 3d models for games, architecture, videos. (1389338)
3ddd
free
team 7
...team 7
3ddd
team 7
стол фабрики team 7.
типы размеров /900,1000/x/1750,2000,2250/x/750/
раздвигается +600 или +1200
3ddd
$1

PLANTS 7
...plants 7
3ddd
цветы , горшок
plants 7.. hope u all enjoying the series
3ddd
$1

Pillows #7
...pillows #7
3ddd
подушка , pillows
pillows #7
3ds max 2011,fbx + textures
Bed
3ddd
$1

bed
...bed
3ddd
bed , постельное белье
bed
3ddd
$1

bed
...bed
3ddd
bed , постельное белье
bed
3ddd
$1

bed
...bed
3ddd
bed , постельное белье
bed
3ddd
$1

bed
...bed
3ddd
bed , постельное белье
bed
3ddd
$1

bed
...bed
3ddd
bed , постельное белье
bed
3ddd
$1

bed
...bed
3ddd
bed , постельное белье
bed
3ddd
free

bed
...bed
3ddd
bed , постельное белье
bed
3ddd
free

bed
...bed
3ddd
bed , постельное белье
bed
3ddd
$1

Bed
...bed
3ddd
bed , постельное белье , постель
bed
3d_export
$7

bed adairs bed
...rs bed
3dexport
bed adairs bed in modern style. if you want a smoother surface, please turn on turbosmooth in the modifier list.
Maker
3d_ocean
$17
Coffee Maker
...coffee maker
3docean
breakfast coffee drip electric maker morning
detailed coffee maker and a plug.
3ddd
$1
coffee maker
...coffee maker
3ddd
кофемашина
coffee maker
3d_export
$10
chapati maker
...chapati maker
3dexport
it is a indian traditional chapati maker
archibase_planet
free
Coffee maker
...aker
archibase planet
percolator coffee-machine coffee maker
coffee maker - 3d model (*.gsm+*.3ds) for interior 3d visualization.
archibase_planet
free
Coffee maker
...aker
archibase planet
percolator coffee-machine coffee maker
coffee maker - 3d model (*.gsm+*.3ds) for interior 3d visualization.
archibase_planet
free
Coffee maker
...aker
archibase planet
percolator coffee-machine coffee maker
coffee maker - 3d model (*.gsm+*.3ds) for interior 3d visualization.
archibase_planet
free

Сoffee maker
...er
archibase planet
coffee maker percolator coffee-machine
сoffee maker n020112 - 3d model (*.3ds) for interior 3d visualization.
archibase_planet
free
Coffee maker
...aker
archibase planet
coffee maker percolator coffee-machine
coffee maker - 3d model (*.gsm+*.3ds) for interior 3d visualization.
3ddd
$1

Juice Maker
...juice maker
3ddd
соковыжималка
fully detailed kenwood juice maker
archibase_planet
free
Coffee maker
...hibase planet
coffee maker percolator coffee-machine
coffee maker n140611 - 3d model (*.gsm+*.3ds) for interior 3d visualization.