GrabCAD
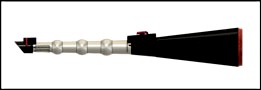
Harry Vader's fully armed and operational Elder Light Saber Wand
by GrabCAD
Last crawled date: 1 year, 11 months ago
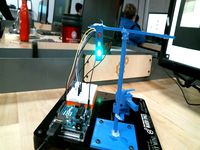
This is an iteration of a previous design that is printed with hollow parts to allow the installation of electronics. There is a 9 volt battery, power switch, keyboard key switch (Cherry brand), dual red/blue LED, and an Arduino Pro Mini (5VDC) tucked inside. I posted a video on YouTube on how to safely operate the wand/saber without casting spells on yourself or lopping off your own arm. (see below)
Update : added files for a roomier handle with a threaded pommel - a sturdier seal and more room for the electronic doohickeys.
Attributions :
Adriano Cazzarotto : RGB LED : https://grabcad.com/library/led-rgb-5mm-1
Pamir : Arduino Pro Mini : https://grabcad.com/library/arduino-pro-mini-1
Oliver Darvas : 9 Volt Battery : https://grabcad.com/library/9-volt-battery-2
Kevin Yu : Cherry Switch : https://grabcad.com/library/cherry-mx-switches-mx-1
Mini Switch resized from a McMaster Carr item.
B.O.M. :
Power switch : http://www.microcenter.com/product/465454/miniature-snap-in-nylon-illuminated-rocker---red-switch
Arduino Pro Mini (5VDC logic) : http://www.microcenter.com/product/486546/arduino-pro-mini-board
Dual LED : http://www.microcenter.com/product/390134/led---dual-color-5mm-super-fresh-red-super-blue-3-pack
Cherry switch : https://www.amazon.com/gp/product/B077TK5DL9/ref=oh_aui_detailpage_o00_s00?ie=UTF8&psc=1
Keycaps (not exact match) : https://www.amazon.com/gp/product/B077C287J2/ref=oh_aui_detailpage_o01_s00?ie=UTF8&psc=1
9 Volt Battery Leads : http://www.microcenter.com/product/497120/9v-battery-clip
Super-Duper Glue : https://www.amazon.com/Bob-Smith-Industries-BSI-157H-Insta-Set/dp/B0166FFCHS/ref=sr_1_1_sspa?s=industrial&ie=UTF8&qid=1535459641&sr=1-1-spons&keywords=bob+smith+industries&psc=1
You'll also need one 10K pull down resistor for the push button input on the Pro Mini, and two 1K resistors for the LEDs.
Assembly and Programming :
Started assembly by gluing in the dual LED into the 'silencer' part (prewired with 1K resistors in line with positive leads). Fed the wires through the barrel and glued the barrel to the silencer. Glued the Cherry switch into the trigger part (prewired) and then glued the barrel to the trigger assembly. The little power switch in the handle just snaps in (prewired) and the handle is then glued to the trigger. All the electronics are then wired together and stuffed into the handle (after programming the arduino). The pommel is a snap in fit to finish.
Update : added a new version of the handle and pommel with threads. This handle allows more room for the electronics (yay!).
Update : added code for 3-color LED wand with 6 modes. This program cycles through the six modes each time you press the cherry switch, and the light show is always active - no timeout. I found out that the mini regards high and low states as opposite the voltage being applied to the inputs, which is irritating, but it's not a show-stopper so I left the code as-is. As a result, the wand will wake up in mode 1 instead of mode 0 - no biggie, but there it is.
Update : added basic schematic for 3-color LED version. Note that the 3-color LED has positive 5VDC as the common lead, unlike the dual color LED. You'll have to confirm the polarities on whatever LEDs that you use.
The following arduino code has two flavors - one for a dual-color LED and one for a 3-color LED. Use only one or the other - the code is clearly separated between the two.
Arduino Pro Mini Program for dual-color LED:
//harryVader.ino
// constants won't change. They're used here to set pin numbers:
const int buttonPin = 9; // the number of the pushbutton pin
const int ledPin = 13; // the number of the LED pin
const int blueLed = 6;
const int redLed = 5;
// variables will change:
int buttonState = 0; // variable for reading the pushbutton status
int buttonCount = 0;
int x = 0;
int buttonPressed = 0;
int buttonOff = 0;
int loopCount0 = 0;
int loopCount1 = 0;
int loopCount2 = 0;
int loopCount3 = 0;
// Setup function runs once when you press reset or power the board
void setup()
{
// initialize digital pin LED_BUILTIN as an output.
pinMode(ledPin, OUTPUT);
pinMode(blueLed, OUTPUT);
pinMode(redLed, OUTPUT);
pinMode(buttonPin, INPUT);
Serial.begin(9600);
}
// MAIN LOOP function runs over and over again forever
void loop()
{
// read the state of the pushbutton value:
buttonState = digitalRead(buttonPin);
digitalWrite(ledPin,buttonState);
// check if the pushbutton is pressed. If it is, the buttonState is HIGH:
if ((buttonState == LOW) and (buttonPressed == 0))
{
buttonPressed = 1;
buttonOff = 0;
//buttonCount = buttonCounter(x);
buttonCount++;
if (buttonCount > 3)
{
buttonCount = 0;
Serial.println("Button counter reset!");
}
//Set loopCounters
if (buttonCount == 0)
{
loopCount0 = 255;
loopCount1 = 0;
loopCount2 = 0;
loopCount3 = 0;
}
if (buttonCount == 1)
{
loopCount0 = 0;
loopCount1 = 40;
loopCount2 = 0;
loopCount3 = 0;
}
if (buttonCount == 2)
{
loopCount0 = 0;
loopCount1 = 0;
loopCount2 = 20;
loopCount3 = 0;
}
if (buttonCount == 3)
{
loopCount0 = 0;
loopCount1 = 0;
loopCount2 = 0;
loopCount3 = 60;
}
Serial.println("Button pressed...");
Serial.print("number of button pushes: ");
Serial.println(buttonCount);
delay(60);
}
//Set button-OFF flag when button is released
if ((buttonState == HIGH) and (buttonOff == 0))
{
buttonPressed = 0;
buttonOff = 1;
Serial.println("Button is OFF...");
delay(60);
}
//Reset Loop Counters
if (buttonCount != 0)
{
loopCount0 = 0;
}
if (buttonCount != 1)
{
loopCount1 = 0;
}
if (buttonCount != 2)
{
loopCount2 = 0;
}
if (buttonCount != 3)
{
loopCount3 = 0;
}
//Mode Zero
if (loopCount0 > 0)
{
analogWrite(blueLed, loopCount0);
analogWrite(redLed, (255-loopCount0));
delay(70); // wait for a second
//analogWrite(blueLed, (255-loopCount0));
//analogWrite(redLed, loopCount0);
//delay(10);
loopCount0 = (loopCount0-5);
if (loopCount0 != 0)
{
Serial.print(loopCount0);
Serial.print(" ");
}
else
{
Serial.println(loopCount0);
}
}
//Mode One
if (loopCount1 > 0)
{
digitalWrite(blueLed, HIGH);
digitalWrite(redLed, LOW);
delay(18); // wait for a second
digitalWrite(blueLed, LOW);
digitalWrite(redLed, HIGH);
delay(18);
--loopCount1;
if (loopCount1 != 0)
{
Serial.print(loopCount1);
Serial.print(" ");
}
else
{
Serial.println(loopCount1);
}
}
//Mode Two
if (loopCount2 > 0)
{
digitalWrite(blueLed, HIGH);
digitalWrite(redLed, LOW);
delay(100); // wait for a second
digitalWrite(blueLed, LOW);
digitalWrite(redLed, HIGH);
delay(100);
--loopCount2;
if (loopCount2 != 0)
{
Serial.print(loopCount2);
Serial.print(" ");
}
else
{
Serial.println(loopCount2);
}
}
//Mode Three
if (loopCount3 > 0)
{
digitalWrite(blueLed, HIGH);
digitalWrite(redLed, HIGH);
delay(10); // wait for a second
digitalWrite(blueLed, LOW);
digitalWrite(redLed, LOW);
delay(20);
--loopCount3;
if (loopCount3 != 0)
{
Serial.print(loopCount3);
Serial.print(" ");
}
else
{
Serial.println(loopCount3);
}
}
//Turn OFF LEDs if all loopCounters are zeroed
if ((loopCount1 == 0) and (loopCount2 == 0) and (loopCount3 == 0))
{
//digitalWrite(ledPin, LOW);
digitalWrite(redLed, LOW);
digitalWrite(blueLed, LOW);
//delay(30);
}
// end main loop
}
-----------------------------------------------
Program for 3-color 6-mode wand :
//darthPotter_01.ino
// constants won't change. They're used here to set pin numbers:
const int ledPin = 13; // the number of the LED pin
const int buttonPin = 3; // the number of the pushbutton pin
const int redLed = 11;
const int greenLed = 10;
const int blueLed = 9;
// variables will change:
int x = 0;
int redBrightness = 0; // how bright the red LED is
int greenBrightness = 0; // how bright the green LED is
int blueBrightness = 0; // how bright the blue LED is
int fadeAmount = 3; // how many points to fade the LED by
int buttonState = 0; // variable for reading the pushbutton status
int buttonCount = 0;
int buttonPressed = 0;
int buttonOff = 0;
int loopCount = 0;
//modeLocks are for one-shot code
int modeLock0 = 0;
int modeLock1 = 0;
int modeLock2 = 0;
int modeLock3 = 0;
int modeLock4 = 0;
int modeLock5 = 0;
// Setup function runs once when you press reset or power the board
void setup()
{
// initialize digital pin LED_BUILTIN as an output.
pinMode(ledPin, OUTPUT);
pinMode(blueLed, OUTPUT);
pinMode(redLed, OUTPUT);
pinMode(greenLed, OUTPUT);
pinMode(buttonPin, INPUT);
analogWrite(redLed, 255);
analogWrite(blueLed, 255);
analogWrite(greenLed, 255);
Serial.begin(9600);
delay(1500);
}
// MAIN LOOP function runs over and over again forever
void loop(){
// read the state of the pushbutton value:
buttonState = digitalRead(buttonPin);
// output to on board led
digitalWrite(ledPin,buttonState);
// check if the pushbutton is pressed. If it is, the buttonState is HIGH:
if ((buttonState == LOW) and (buttonPressed == 0))
{
buttonPressed = 1;
buttonOff = 0;
buttonCount++;
loopCount=0;
Serial.println(buttonCount);
if (buttonCount > 5)
{
buttonCount = 0;
Serial.println("Button counter reset!");
}
Serial.println("Button pressed...");
Serial.print("number of button pushes: ");
Serial.println(buttonCount);
delay(60);
}
//Set button-OFF flag when button is released
if ((buttonState == HIGH) and (buttonOff == 0))
{
buttonPressed = 0;
buttonOff = 1;
Serial.println("Button is OFF...");
delay(60);
}
//begin mode 0
//all lights on - zero is full ON
if (buttonCount == 0 && modeLock0 == 0){
//unlock mode 5
if (modeLock5==1){
modeLock5=0;
}
if (redBrightness>0){
redBrightness=0;
}
if (greenBrightness>0){
greenBrightness=0;
}
if (blueBrightness>0){
blueBrightness=0;
}
analogWrite(redLed, redBrightness);
analogWrite(greenLed, greenBrightness);
analogWrite(blueLed, blueBrightness);
modeLock0 = 1;
//delay(60);
}
// begin mode 1
if (buttonCount == 1){
//unlock mode 0
if (modeLock0==1){
modeLock0 = 0;
}
//initialize mode 1
if (modeLock1 == 0){
loopCount = 0;
fadeAmount = 5;
redBrightness = 0;
greenBrightness = 0;
blueBrightness = 0;
modeLock1 = 1;
}
// set the brightness of redLed
analogWrite(redLed, redBrightness);
//Serial.print(redBrightness);
// change the brightness for next time through the loop:
redBrightness = redBrightness + fadeAmount;
// reverse the direction of the fading at the ends of the fade:
if (redBrightness <= 0 || redBrightness >= 255) {
fadeAmount = -fadeAmount;
}
if (redBrightness == 80) {
analogWrite(blueLed, 120);
}
else{
analogWrite(blueLed, 255);
}
if (redBrightness == 180) {
analogWrite(blueLed, 160);
}
else{
analogWrite(blueLed, 255);
}
if (redBrightness == 230) {
analogWrite(greenLed, 120);
}
else{
analogWrite(greenLed, 255);
}
if (redBrightness == 60) {
analogWrite(greenLed, 160);
}
else{
analogWrite(greenLed, 255);
}
// wait for 20 milliseconds to see the dimming effect
delay(20);
}
// end mode 1
// begin mode 2
if (buttonCount == 2){
//unlock mode 1
if (modeLock1 == 1){
modeLock1 = 0;
}
//initialize mode 2
if (modeLock2 == 0){
loopCount = 0;
fadeAmount = 5;
redBrightness = 0;
greenBrightness = 0;
blueBrightness = 0;
modeLock2 = 1;
}
// set the brightness of greenLed
analogWrite(greenLed, greenBrightness);
//Serial.print(redBrightness);
// change the brightness for next time through the loop:
greenBrightness = greenBrightness + fadeAmount;
// reverse the direction of the fading at the ends of the fade:
if (greenBrightness <= 0 || greenBrightness >= 255) {
fadeAmount = -fadeAmount;
}
if (greenBrightness == 80) {
analogWrite(blueLed, 120);
}
else{
analogWrite(blueLed, 255);
}
if (greenBrightness == 180) {
analogWrite(blueLed, 160);
}
else{
analogWrite(blueLed, 255);
}
if (greenBrightness == 230) {
analogWrite(redLed, 125);
}
else{
analogWrite(redLed, 255);
}
if (greenBrightness == 60) {
analogWrite(redLed, 165);
}
else{
analogWrite(redLed, 255);
}
// wait for 20 milliseconds to see the dimming effect
delay(20);
}
// end mode 2
// begin mode 3
if (buttonCount == 3){
//unlock mode 2
if (modeLock2 == 1){
modeLock2 = 0;
}
//initialize mode 3
if (modeLock3 == 0){
loopCount = 0;
fadeAmount = 5;
redBrightness = 0;
greenBrightness = 0;
blueBrightness = 0;
modeLock3 = 1;
}
// set the brightness of blueLed
analogWrite(blueLed, blueBrightness);
// change the brightness for next time through the loop:
blueBrightness = blueBrightness + fadeAmount;
// reverse the direction of the fading at the ends of the fade:
if (blueBrightness <= 0 || blueBrightness >= 255) {
fadeAmount = -fadeAmount;
}
if (blueBrightness == 80) {
analogWrite(redLed, 120);
}
else{
analogWrite(redLed, 255);
}
if (blueBrightness == 180) {
analogWrite(redLed, 160);
}
else{
analogWrite(redLed, 255);
}
if (blueBrightness == 230) {
analogWrite(greenLed, 125);
}
else{
analogWrite(greenLed, 255);
}
if (blueBrightness == 60) {
analogWrite(greenLed, 165);
}
else{
analogWrite(greenLed, 255);
}
// wait for 20 milliseconds to see the dimming effect
delay(20);
}
// end mode 3
// begin mode 4 ramp up and down with overlap
if (buttonCount == 4){
//unlock mode 3
if (modeLock3 == 1){
modeLock3 = 0;
}
//initialize mode 4
if (modeLock4 == 0){
loopCount = 0;
fadeAmount = 5;
redBrightness = 0;
greenBrightness = 0;
blueBrightness = 255;
modeLock4 = 1;
}
loopCount++;
if (loopCount>=307){
loopCount=0;
}
//ramp red up
if (loopCount < 52){
if (redBrightness < 255){
redBrightness = redBrightness + fadeAmount;
}
analogWrite(redLed, redBrightness);
}
//ramp blue down
if (loopCount > 51 && loopCount < 103){
if (blueBrightness>=fadeAmount){
blueBrightness = blueBrightness - fadeAmount;
}
analogWrite(blueLed, blueBrightness);
}
//ramp green up
if (loopCount > 102 && loopCount < 154){
if (greenBrightness<255){
greenBrightness = greenBrightness + fadeAmount;
}
analogWrite(greenLed, greenBrightness);
}
//ramp red down
if (loopCount > 153 && loopCount < 205){
if (redBrightness>=fadeAmount){
redBrightness = redBrightness - fadeAmount;
}
analogWrite(redLed, redBrightness);
}
//ramp blue up
if (loopCount > 203 && loopCount < 256){
if (blueBrightness<255){
blueBrightness = blueBrightness + fadeAmount;
}
analogWrite(blueLed, blueBrightness);
}
//ramp green down
if (loopCount > 254 && loopCount < 307){
if (greenBrightness>=fadeAmount){
greenBrightness = greenBrightness - fadeAmount;
}
analogWrite(greenLed, greenBrightness);
}
delay(20);
}
// end mode 4
// begin mode 5 flash fast in sequence
if (buttonCount == 5){
//unlock mode 4
if (modeLock4 == 1){
modeLock4 = 0;
}
loopCount++;
if (loopCount >= 30){
loopCount = 0;
}
//turn red on
if (loopCount < 15){
analogWrite(redLed, 255);
}
else{
analogWrite(redLed, 0);
}
//turn green on
if (loopCount > 9 && loopCount < 25){
analogWrite(greenLed, 255);
}
else{
analogWrite(greenLed, 0);
}
//turn blue on
if (loopCount > 19 || loopCount < 5){
analogWrite(blueLed, 255);
}
else{
analogWrite(blueLed, 0);
}
delay(5);
}
// end mode 5
}
// end main loop
Similar models
thingiverse
free

Easy Pump arduino stepper by mochr
...delaymicroseconds(300); // wait 1/2 a ms
}
delay(1000); // pause one second
}
else {
digitalwrite(6, high); // set enable low
}
}
grabcad
free

Easy Pump arduino stepper
...aymicroseconds(300); // wait 1/2 a ms
}
delay(1000); // pause one second
}
else {
digitalwrite(6, high); // set enable low
}
}
thingiverse
free

Motion sensing night light by SteveOst
...talwrite(led1,low);
digitalwrite(led2,low);
}
serial.println("motion");
serial.print(motionvalue);
}
else
{
delay(300);
grabcad
free

Automatic Slide Gate Maket
...lwrite (dcl,low);
}
if(limitkanan==1 && hasilkiri==1){
digitalwrite (dcr,low);
digitalwrite (dcl,high);
}
}
thingiverse
free

FidgetReactionTimeTester (alcohol check?) by WillemvD
...to test it yet.
trouble with placing the batteries?
heat the pushpins with a soldering iron and push them slightly into the wall.
thingiverse
free

Android Netrunner click tracker by dwjmeijer
...it in action: https://www.youtube.com/watch?v=8vfgded7kwc requires an arduino micro or similar i used a pololu a-star* 328pb micro, the cheapest...
thingiverse
free
3DX TRAFFIC LIGHT
...digitalwrite(ledg, low);
digitalwrite(ledy, high);
delay(3000);
digitalwrite(ledr, high);
digitalwrite(ledy, low);
delay(1000);
}
thingiverse
free
Wheel of Fortune by WillemvD
...yservo.write(pos); delay(15); }
delay(2000);
for (pos = 180; pos >= 0; pos -= 1) { myservo.write(pos); delay(15); }
}
}
thingiverse
free

Chromotherapy Christmas House by STEMaker
...e(9, low);
digitalwrite(10, low);
digitalwrite(11, low);
}
// slight delay so it doesn't rotate color too quicky
delay(33);
}
thingiverse
free
3D printed induction motor controller with arduino by robogio
...write(b, high);
digitalwrite(c, high);
digitalwrite(d, low);
digitalwrite(e, high);
digitalwrite(f, low);
delaymicroseconds(t);
}
Elder
turbosquid
$79

Elder God
...rbosquid
royalty free 3d model elder god for download as c4d on turbosquid: 3d models for games, architecture, videos. (1616087)
turbosquid
$2

elder pistol
...
royalty free 3d model elder pistol (obj) for download as obj on turbosquid: 3d models for games, architecture, videos. (1327837)
turbosquid
$15

Black elder
...y free 3d model black elder for download as max, obj, and fbx on turbosquid: 3d models for games, architecture, videos. (1181078)
turbosquid
$20

Elder dragon
... available on turbo squid, the world's leading provider of digital 3d models for visualization, films, television, and games.
turbosquid
$19

Elder Sword
... available on turbo squid, the world's leading provider of digital 3d models for visualization, films, television, and games.
turbosquid
$10

Elder Scroll
... available on turbo squid, the world's leading provider of digital 3d models for visualization, films, television, and games.
turbosquid
$10

ELDERS~2.3DS
... available on turbo squid, the world's leading provider of digital 3d models for visualization, films, television, and games.
turbosquid
$50

The East elder shoemaker
...el the east elder shoemaker for download as max, obj, and fbx on turbosquid: 3d models for games, architecture, videos. (1153541)
turbosquid
$1

Elder Sword 2012
... available on turbo squid, the world's leading provider of digital 3d models for visualization, films, television, and games.
3d_export
$25

The Elder Wand 3D Model
...y potter deathly hallows hp dumbledore boy wizard voldemort horcruxes magic
the elder wand 3d model leah apanowicz 38058 3dexport
Wand
3d_export
$5

fairy wand - magic wand - nature wand - flower wand
...airy wand - magic wand - nature wand - flower wand
3dexport
fairy wand / magic wand / nature wand / flower wand high poly models
turbosquid
$20

Wand
... available on turbo squid, the world's leading provider of digital 3d models for visualization, films, television, and games.
3d_export
$6

wood wand
...rved last year. i modelled it in blender and textured it in quixel mixer. 4k maps: albedo, roughness, normal, metalness, emission
turbosquid
free

Magic Wand
...wand
turbosquid
free 3d model magic wand for download as fbx on turbosquid: 3d models for games, architecture, videos. (1709285)
turbosquid
$11

Skull Wand
... free 3d model skull wand for download as blend, obj, and fbx on turbosquid: 3d models for games, architecture, videos. (1520687)
turbosquid
free

Magic Wand
... available on turbo squid, the world's leading provider of digital 3d models for visualization, films, television, and games.
turbosquid
free

Magic wand
... available on turbo squid, the world's leading provider of digital 3d models for visualization, films, television, and games.
turbosquid
free

Magic Wand
... available on turbo squid, the world's leading provider of digital 3d models for visualization, films, television, and games.
3d_export
$12

Magic wand 3D Model
...magic wand 3d model
3dexport
wand magic 3d model
magic wand 3d model happy3d 3420 3dexport
3d_ocean
$5

Magician Hat and Wand
...and has 256 quad polygons. use subdivision to increase render detail and to smooth geometry. the object has the materials defi...
Vader
3ddd
$1

Darth Vader Lamp
...darth vader lamp
3ddd
darth vader
darth vader lamp.
3d_export
$7

darth vader
...darth vader
3dexport
darth vader 3d model good quality for animation
3d_ocean
$4

Darth Vader LightSaber
...ean
darth darth vader lightsaber red sci-fi star wars vader weapons
this is red colored lightsaber of darth vader from star wars.
3d_ocean
$12

Darth Vader
...poly lebedev low poly model polygonal render star wars starwars
sub-d darth vader,modeled in cinema4d r16.low and high poly model
3d_export
$6

darth vader pot
...darth vader pot
3dexport
darth vader pot 3d model stl file
turbosquid
$10

Vader Head
...ee 3d model vader head for download as max, 3ds, fbx, and obj on turbosquid: 3d models for games, architecture, videos. (1618545)
3d_export
$12

pencil stand darth vader
...pencil stand darth vader
3dexport
pencil stand darth vader
3ddd
free

Darth Vader Alarm Clock
... будильник , часы
будильник darth vader alarm clock
стек не свернут.
3d_export
$10

Toyota Vader 3D Model
...del
3dexport
toyota corolla tuning tune car auto port vader black dark race mod coupe
toyota vader 3d model daemon 19384 3dexport
3d_export
$5

Darth Vader
...darth vader
3dexport
this model includes textures, materials, scan, skeleton and 3d model
Saber
3d_export
$5

saber
...saber
3dexport
saber
3d_export
$5

saber
...saber
3dexport
saber from the middle east of the sultans of the 15th century
3ddd
free

Table | Saber
...table | saber
3ddd
saber , трюмо
стол фирмы saber
turbosquid
$10
Saber
... free 3d model saber for download as blend, 3ds, obj, and fbx on turbosquid: 3d models for games, architecture, videos. (1659141)
turbosquid
$23
saber
... available on turbo squid, the world's leading provider of digital 3d models for visualization, films, television, and games.
turbosquid
$5

saber
... available on turbo squid, the world's leading provider of digital 3d models for visualization, films, television, and games.
turbosquid
free
Saber
... available on turbo squid, the world's leading provider of digital 3d models for visualization, films, television, and games.
turbosquid
free

Saber
... available on turbo squid, the world's leading provider of digital 3d models for visualization, films, television, and games.
3d_export
$5
Saber 3D Model
...saber 3d model
3dexport
lightsaber saber light
saber 3d model dimon3ds 50057 3dexport
3d_export
$12

Green fire saber
...green fire saber
3dexport
fantasy green fire saber
Harry
3ddd
$1

Harry Bertoia
...harry bertoia
3ddd
harry bertoia , стул
стул harry bertoia
design_connected
$11

Harri Koskinen
...harri koskinen
designconnected
nextmaruni harri koskinen chairs computer generated 3d model. designed by harri koskinen.
3ddd
$1

Полка Meridiani Harris
...ris
коллекция: harris
http://www.archiproducts.com/ru/продукты/76119/harris-настенныи-шкаф-harris-настенныи-шкаф-meridiani.html
3d_export
$12

harris armchair
...harris armchair
3dexport
harris armchair dimensions:(h)80cm×(w)82cm×(d)88cm
3d_export
$30

Chess Harry Potter
...chess harry potter
3dexport
chess harry potter
turbosquid
$28

Harry Soft
...turbosquid
royalty free 3d model harry soft for download as on turbosquid: 3d models for games, architecture, videos. (1346835)
3d_ocean
$65

Harry Miller 1929
...harry miller 1929
3docean
harry miller 1929 – 3dsmax2010, vray.
3d_export
$20

harry potter
...d for ease of scene management.<br>model is centered in 3d space, each part are arranged in heirarchy and parented objects.
3ddd
$1

Ligne roset | Harry
...ligne roset | harry
3ddd
ligne roset
ligne roset harry
3ddd
$1

Реплика Harry Bertoia
...реплика harry bertoia
3ddd
harry bertoia
стек не свернут, моделилось по фото. polys: 64620.
Operational
3d_export
$5

Operating table
...operating table
3dexport
operation table<br>renderen in cycles<br>obj. and fbx files included
turbosquid
$49

Surgical operations:
...free 3d model surgical operations: for download as ma and obj on turbosquid: 3d models for games, architecture, videos. (1261516)
turbosquid
$15

operating chair.max
... available on turbo squid, the world's leading provider of digital 3d models for visualization, films, television, and games.
3d_ocean
$29
Operating table
... all applied materials: - textures formats: tif (x9), psd (x5) - textures size: x1024 (x7), x2048 (x5) - materials types: stan...
3ddd
$1
Coin Operated Telescope
...perated telescope
3ddd
бинокль , телескоп
north american classic coin operated telescope
3d_export
$15

operator and
...export to game engines. easy editable models and ready for texturing. rig and animation ready. good retopology. easy file access.
3d_ocean
$20
Operating Lamp
... higher and many others. formats *.max scanline *.max vray *.max mentalray *.c4d advanced render *.c4d cinema 4d vray *.obj *.fbx
3d_ocean
$28

Operating Table
... higher and many others. formats *.max scanline *.max vray *.max mentalray *.c4d advanced render *.c4d cinema 4d vray *.obj *.fbx
cg_studio
$50

Operating room3d model
...perating room3d model
cgstudio
.max - operating room 3d model, royalty free license available, instant download after purchase.
cg_studio
$50

Operating room3d model
...perating room3d model
cgstudio
.max - operating room 3d model, royalty free license available, instant download after purchase.
Armed
archibase_planet
free

Arm
...ase planet
arm hand right hand skeleton
arm human skeleton right arm n030515 - 3d model (*.gsm+*.3ds+*.max) for 3d visualization.
3ddd
$1

arm chair
...arm chair
3ddd
arm chair , пуф
arm chair
turbosquid
$5

arm
...arm
turbosquid
royalty free 3d model arm for download as obj on turbosquid: 3d models for games, architecture, videos. (1306158)
turbosquid
free

Arm
...arm
turbosquid
free 3d model arm for download as obj and fbx on turbosquid: 3d models for games, architecture, videos. (1346955)
turbosquid
$29

Arm
...osquid
royalty free 3d model arm for download as obj and fbx on turbosquid: 3d models for games, architecture, videos. (1382436)
3d_export
$5

coat of arms
...coat of arms
3dexport
coat of arms
3ddd
$1

ARM SOFA
...arm sofa
3ddd
arm sofa
3ddd
$1

Arm chair
...arm chair
3ddd
arm chair
3ddd
$1

Arm chair
...arm chair
3ddd
угловое
arm chair
3ddd
$1
ARM CHAIR
...arm chair
3ddd
arm chair clothes
Fully
turbosquid
$50

Drone fully rigged
...
royalty free 3d model drone fully rigged for download as max on turbosquid: 3d models for games, architecture, videos. (1282280)
turbosquid
$12

FULLY PARAMETRIC CHAIR
...alty free 3d model fully parametric chair for download as rvt on turbosquid: 3d models for games, architecture, videos. (1280209)
turbosquid
$10

firetruck-fully-rigged
...yalty free 3d model firetruck-fully-rigged for download as ma on turbosquid: 3d models for games, architecture, videos. (1653811)
turbosquid
$6

Fully rigged character
...ty free 3d model fully rigged character for download as blend on turbosquid: 3d models for games, architecture, videos. (1486076)
turbosquid
$3

Fully Rigged shark
...ee 3d model fully rigged 3d shark model for download as blend on turbosquid: 3d models for games, architecture, videos. (1517695)
turbosquid
$75

Fully Customizable Hospital
... available on turbo squid, the world's leading provider of digital 3d models for visualization, films, television, and games.
turbosquid
free

Fully Rigged Link
... available on turbo squid, the world's leading provider of digital 3d models for visualization, films, television, and games.
design_connected
$16

Troy W Fully Covered
...troy w fully covered
designconnected
magis troy w fully covered computer generated 3d model. designed by wanders, marcel.
cg_studio
$99

Pepe fully rigged3d model
...ully rigged3d model
cgstudio
.max - pepe fully rigged 3d model, royalty free license available, instant download after purchase.
3d_export
$60

Ankylosaur 8K - fully animated
...ankylosaur 8k - fully animated
3dexport
Light
archibase_planet
free

Light
...light
archibase planet
lamp lighting light
light - s2 - 3d model for interior 3d visualization.
archibase_planet
free

Light
...light
archibase planet
light luminaire lighting
light l0465 - 3d model (*.gsm+*.3ds) for interior 3d visualization.
3d_export
$5

lighting
...lighting
3dexport
lighting
3d_export
$5

lighting
...lighting
3dexport
lighting in livingroom
turbosquid
$3

Lighting Tree with Lights
...d model lighting tree with lights for download as max and 3ds on turbosquid: 3d models for games, architecture, videos. (1585507)
archibase_planet
free

Light
...light
archibase planet
luster lighting solution
light - s - 3d model for interior 3d visualization.
archibase_planet
free

Light
...light
archibase planet
luster lamp lighting
light 1 - 3d model for interior 3d visualization.
archibase_planet
free

Lights
...lights
archibase planet
surgical lights surgical lamp
surgical lights (floor) - 3d model for interior 3d visualization.
archibase_planet
free

Light
...light
archibase planet
lighting luminaire candlelight
light l0463 - 3d model (*.gsm+*.3ds) for interior 3d visualization.
3d_export
$18

street light-lighting-light-xia bing
...
3dexport
street light-lighting-light-xia bing<br>max 2015 v-ray 3 max 2015<br>textures<br>all files in zip...