Thingiverse
Harbor Freight Free Flashlight Mod by Phistterbut_Inc
by Thingiverse
Last crawled date: 3 years ago
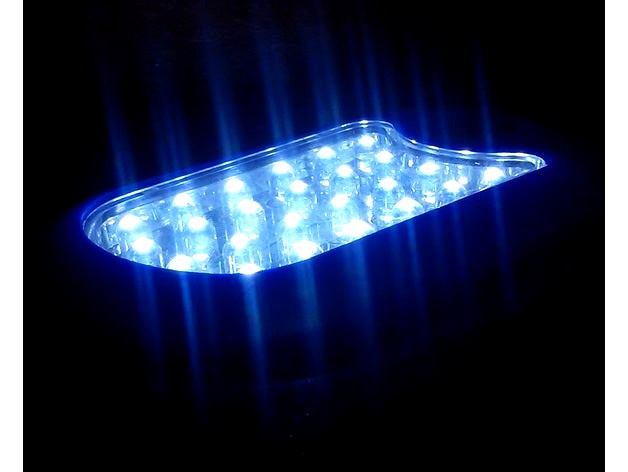
UPDATE 1: I've had the large face of LEDs on for a while and they get PRETTY DAMN HOT. I would increase the value of the current limiting resistor from the 1.5 ohm to a greater value.
UPDATE 2: Math shows that 2.5 ohms should be a good value for the resistor and should limit the current to each to around 50 mA. I said, SHOULD. Don't quote me on that, haven't replaced mine yet.
UPDATE 3: Seems that HF has changed up the flashlight a bit. In lieu of twenty some odd LEDs, the newest style has three front facing and one strip LED on top. This thing won't work for the updated version, sad day. They did however change the board a bit.
Update 4: Since they've changed the flashlight they give out for free, this thing is obsolete. I won't delete it in case anyone still has one but I recommend this mod for the new style
Now and then Harbor Freight sends me spam mail, tons and tons of spam. They send these coupons for a buy an item get a crap flashlight for free. Well, I got to looking at the thing and decided it's ugly and nearly useless as is. Rather than be both, I improved the use, but not the looks.
This design calls for an 18650 cell and a 5v battery charger circuit as pictured. I've got a ton of these boards and quite a few cells, so I tossed this together. It uses six screws from the original to hold it together and reuses the magnet (if you can call it that) at the bottom. Should be clear from the photos and board labels how to put it together.
Make sure the screws don't get cockeyed in their respective holes. Had that happen a couple times, but it's an easy fix.
Also, the value of the current limiting resistor should be 1.5 ohms, replace with an 1.5 ohm resistor if it's out of spec, or lower than 1.5 ohms.
Place a bit of tape over the positive terminal of the battery as to prevent shorts.
What's pictured was printed in PETG so don't complain when your PLA print breaks, just use stronger materials.
I tried to capture the difference in brightness between the stock one using 3 AAA batteries and the modded version, but that was quite a fools errand. This version is brighter and should last longer than the stock batteries.
Don't solder directly to the terminals of the battery, that will likely damage it.
These battery charging boards I bought don't allow any current to flow from the battery until they're plugged into a 5v micro-USB power source first. Something to keep in mind when you're wondering why it doesn't work. Keep the wire legs very short on the back and remove just enough material from the overhanging bit that keeps the board in place. Remove just enough to where the board will rest in place, then apply a small amount of CA glue to keep it there.
Similar models
thingiverse
free

3 AAA LED flashlight 14500 battery adapter by superpirson
...batteries almost surely won't work in your led flashlight. similary, if placed inside a device meant for aa batteries,...
thingiverse
free

Cup Light by Coil_B
...tion glass, it doesn't have the bcdc on the side, i will leave the bcdc off in case evilution wants to put his design on here
thingiverse
free

Flashlight by Mato
...parallel)
1x18650 lithium ion battery (from old laptop battery)
1xtp4056 lithium ion battery charger
1x switch
hope you like it.
thingiverse
free

Fibonacci Spiral Night Light by elwood127
...s upside down. it is correct now. thanks.
i would change the 68 ohm resistor for a 470 ohm. led's started to dim over time .
thingiverse
free

Part Lamp by elwood127
... final led negative connecting to the ground from the power supply. sorry, i forgot to convert the stl to metric. good to go now.
thingiverse
free

led-lit snowflake by stellarinnovation
...picture (soldered to the cathode of the led). other similar values will also work for +5v (usb) and a...
thingiverse
free

TrackIR Headset for FreeTrack Software by MelihKa
...ge.
polymorph plastic melt in hot water and molded by hand over leds as diffuser.
it's working perfect with hacked ir webcam.
thingiverse
free

Connectors for Harbor Freight Flashlight to LED Strip Conversion by benbrandt22
...s #8 size bolt.
i've also included the battery box i designed for this project (seen in the video), as requested by a viewer.
thingiverse
free

Usb flashlight by S3rialMak3r
...eds. i printed it without support and it tooks me 35 minuts. print it 2 times to have the bottom and the top. hope you like it :)
thingiverse
free

Snap Together AAA Battery Holder and LED/Resistor Mount
...e batteries in series for electronic projects.
i also included an led/resistor mount that snaps onto two of the battery holders.
Harbor
3d_export
$65

Harbor
...harbor
3dexport
simple rendering of the scene file
3d_export
$65

harbor
...harbor
3dexport
simple rendering of the scene file
3d_export
$65

harbor
...harbor
3dexport
simple rendering of the scene file
3d_export
$65

harbor
...harbor
3dexport
simple rendering of the scene file
3d_export
$65

harbor
...harbor
3dexport
simple rendering of the scene file
3d_export
$65

harbor
...harbor
3dexport
simple rendering of the scene file
3d_export
$17

harbor crane
...harbor crane
3dexport
3d_export
$10

crane harbor
...crane harbor
3dexport
model of the old port crane. enjoy.
turbosquid
free

Pearl Harbor Scene
... available on turbo squid, the world's leading provider of digital 3d models for visualization, films, television, and games.
turbosquid
$25

Harbor Oil Painting
...ainting for download as max, max, 3ds, dwg, fbx, obj, and stl on turbosquid: 3d models for games, architecture, videos. (1626246)
Freight
3d_export
free

freight elevator
...freight elevator
3dexport
freight elevator
3d_export
$7

freight wagon
...freight wagon
3dexport
turbosquid
$7

Freight Wagon
... model freight wagon for download as blend, obj, fbx, and dae on turbosquid: 3d models for games, architecture, videos. (1542176)
turbosquid
$79

Freight Car
... available on turbo squid, the world's leading provider of digital 3d models for visualization, films, television, and games.
turbosquid
$25

Freight Container
... available on turbo squid, the world's leading provider of digital 3d models for visualization, films, television, and games.
turbosquid
$10

Freight crates
... available on turbo squid, the world's leading provider of digital 3d models for visualization, films, television, and games.
turbosquid
$3

Freight carriage
... freight carriage for download as 3ds, obj, fbx, dae, and stl on turbosquid: 3d models for games, architecture, videos. (1496301)
turbosquid
$3

Freight roughneck
...freight roughneck for download as 3ds, obj, fbx, dae, and stl on turbosquid: 3d models for games, architecture, videos. (1496231)
3d_ocean
$7

Freight Crane
... low polygonal model, easy to animate. - poly count: 1124 - formats: max /obj /fbx/3ds/dxf - high detail was preserved with 20...
turbosquid
$10

Wagon - Freight
... - freight for download as 3ds, lwo, obj, blend, dae, and stl on turbosquid: 3d models for games, architecture, videos. (1218059)
Flashlight
3d_export
$5

Flashlight
...flashlight
3dexport
flashlight
3d_ocean
$6
Flashlight
...flashlight
3docean
beam flashlight light
hello! is pleased to present you my new project-flashlight
3d_export
free
Flashlight
...flashlight
3dexport
the most common portable flashlight.
3d_export
$10

flashlight
...flashlight
3dexport
3d model of a flashlight for horror video games or other
3d_export
$15
flashlight
...flashlight
3dexport
low poly model - flashlight, modeling in blender, texturing in substance painter
turbosquid
$2
Flashlight
...squid
royalty free 3d model flashlight for download as blend on turbosquid: 3d models for games, architecture, videos. (1686591)
turbosquid
$1

Flashlight
...squid
royalty free 3d model flashlight for download as blend on turbosquid: 3d models for games, architecture, videos. (1434506)
turbosquid
$10
Flashlights
...ree 3d model flashlights for download as fbx and unitypackage on turbosquid: 3d models for games, architecture, videos. (1286431)
turbosquid
$5

flashlight
...yalty free 3d model flashlight for download as , fbx, and obj on turbosquid: 3d models for games, architecture, videos. (1657266)
turbosquid
free
Flashlight
...
royalty free 3d model flashlight for download as max and obj on turbosquid: 3d models for games, architecture, videos. (1272424)
Inc
3d_export
$5

doofenshmirtz evil inc
...doofenshmirtz evil inc
3dexport
doofenshmirtz evil inc
design_connected
$39

Alison Black Inc
...alison black inc
designconnected
minotti alison black inc computer generated 3d model. designed by dordoni, rodolfo.
3d_export
$39

boo monsters inc
...boo monsters inc
3dexport
3ddd
$1

UTTERMOST INC. USA 08089
...uttermost inc. usa 08089
3ddd
uttermost
зеркало панно модель 08089 производитель uttermost inc. usa d 760 mm
3d_export
$5

Canon Inc logo 3D Model
...export
canon camera store brand inc company image imaging optical optics logo 3d
canon inc logo 3d model goyamasta 39638 3dexport
3ddd
free

Nautical Life Ring Decor / Ohio Wholesale Inc.
...ательный круг , ohio wholesale inc
декоративный спасательный круг от ohio wholesale inc.
turbosquid
$17

Life Ring Ohio Wholesale Inc
...odel life ring ohio wholesale inc for download as max and fbx on turbosquid: 3d models for games, architecture, videos. (1202262)
3ddd
$1

Hand-Carved Sperm Whale / Sunny Wood Design Inc.
... кит , sunny wood design inc
настенный декор из дерева от sunny wood design inc.
3ddd
$1

Hand-Carved Sperm Whale / Sunny Wood Design Inc.
... кит , настенный
настенный декор в виде кита от sunny wood design inc.
3ddd
$1

Hand-Carved Sperm Whale / Sunny Wood Design Inc.
... кит , настенный
настенный декор из дерева в виде кита от sunny wood design inc.
Mod
design_connected
$13

MOD. 4233 - MOD. 4234 Table Lamp
...mod. 4233 - mod. 4234 table lamp
designconnected
arcahorn mod. 4233 - mod. 4234 table lamp computer generated 3d model.
design_connected
$11

MOD.1095
...mod.1095
designconnected
mod.1095 computer generated 3d model. designed by sarfatti, gino.
3ddd
$1

fireplaces mod Spec
...fireplaces mod spec
3ddd
камин
fireplaces mod spec 180x90x125h
3ddd
free

Flos Mod. 2129
... mod
фабрика: flos
модель: mod. 2129
описание: подвесной светильник, металл, белый, черный.
сайт: www.flos.com
turbosquid
$32

MOD A 001
... available on turbo squid, the world's leading provider of digital 3d models for visualization, films, television, and games.
turbosquid
$29

Maars Mod
... available on turbo squid, the world's leading provider of digital 3d models for visualization, films, television, and games.
turbosquid
$15

Mod 70..
... available on turbo squid, the world's leading provider of digital 3d models for visualization, films, television, and games.
turbosquid
$10

MOD Sofa
... available on turbo squid, the world's leading provider of digital 3d models for visualization, films, television, and games.
turbosquid
$1

Mod-Lite
... available on turbo squid, the world's leading provider of digital 3d models for visualization, films, television, and games.
turbosquid
$1
pc mod
... available on turbo squid, the world's leading provider of digital 3d models for visualization, films, television, and games.
Free
design_connected
$13

Free
...free
designconnected
parri design free armchairs computer generated 3d model. designed by marco maran.
turbosquid
$5

Free
... available on turbo squid, the world's leading provider of digital 3d models for visualization, films, television, and games.
turbosquid
$5

free
... available on turbo squid, the world's leading provider of digital 3d models for visualization, films, television, and games.
turbosquid
free
Free
... available on turbo squid, the world's leading provider of digital 3d models for visualization, films, television, and games.
design_connected
free
Free barstool
...free barstool
designconnected
free 3d model of free barstool by kristalia designed by graffeo, monica.
3d_export
$5
free mixamo
...free mixamo
3dexport
free mixamo
3d_export
free

free rocks
...free rocks
3dexport
free price rock
turbosquid
free

Free Free Standing Punching Bag
... available on turbo squid, the world's leading provider of digital 3d models for visualization, films, television, and games.
turbosquid
free
character free
...urbosquid
free 3d model character free for download as blend on turbosquid: 3d models for games, architecture, videos. (1321193)
turbosquid
free

Royalty free
...
turbosquid
free 3d model royalty free for download as blend on turbosquid: 3d models for games, architecture, videos. (1403146)