Thingiverse
Happy 4th of July - PyroPro WebControlled Fireworks Board by SoPro
by Thingiverse
Last crawled date: 4 years, 7 months ago
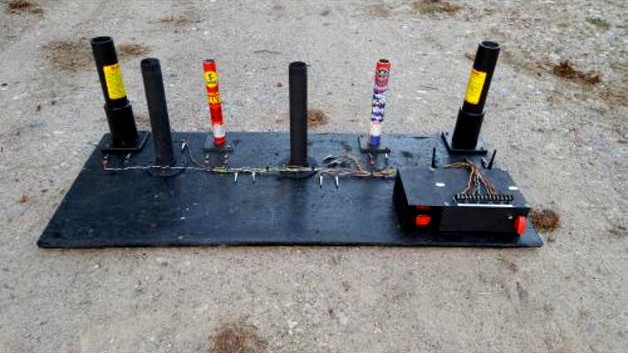
This is a standalone board used to safely detonate fireworks from any web enabled device. You simply stage all of your fireworks on the board, connect one of the premade ignitors to one of the channel outputs and the fuse of the firework, connect smart device to the internal wireless router, pull up the control website, and fire each firework by remote web control. This is by far the safest way I have ever seen for an amateur to set off larger fireworks. Also it has the added benefit of turning simple/cheaper fireworks into a small backyard show. So instead of lighting off one at a time I can sequence 8 different fireworks when and how I want.
I normally start by setting off a fountain at the base of the board to act as a little background, fire a Roman candle from one of the steel tubes for a little upward amusement, mix in some sky rockets and artillery shell or 2, and keep it going. Always seems to be a crowd pleaser.
About 10 years ago I moved from a state with almost no fireworks to a state that I could obtain just about anything. When lighting off certain types of large fireworks such as artillery shells and sky rockets there was an apparent need to have the tubes and launch supports mounted to a solid structure. So the idea for an actual board and some 2 ½ steel tubes (for stick launched fireworks) mounted to the board was born. A few years later we started experiencing some boredom in having to hand light each of the fireworks.
I decided to pursue some electronic detonation as a result. The first issue was the igniters. The most common used for model rockets were very pricy and hard to find in bulk. I did a little research online and found a couple people having success with pencil graphite so I started experimenting using an 18V drill battery for my power source. I ended up perfecting the igniters a year later. The process is pretty straight forward and only requires some super glue, cat5e solid wire and cheap no2 pencils. The graphite is carefully removed from the pencil using wire dykes and a razor blade and then broken into ½” sections. From there the Cat5e wire is stripped about 1” and either strand wrapped around the opposite side of the graphite. From there 1 small dab of super glue is used on each side of the wrapped wire. I can currently hand make about 20 igniters in 10 minutes. Note: I noticed the cheaper the pencil the better the ignition. This is because the cheaper pencil graphite pieces are less dense and not only heat up under current but crackle which assists in lighting the firework fuses.
Once the ignitors were figured out an electronic detonation system was developed. I originally started with 6 channels and used a small 2 gang outlet box to house all of the relays. The detonator consisted of a small plastic box with an arm switch, arm light, and 6 PCB buttons. I used RJ45 jacks on both the board mounted control box and the actual detonator. A 100’ spool of cat5e patch cable was used to connect the detonator to the control box and to keep me out of harm’s way.
2 years ago I decided to cut the cord and develop the wireless detonation system that was used this year. I wanted to not only be wireless but to also be able to control the unit securely using my smartphone, tablet or laptop. I used an Arduino Uno, Ethernet shield, some 74HC595 shift registers, 5v relays and a WRT500G router to accomplish this task.
The battery router, voltage regulators, and Arduino parts were laid out and a design for custom control box was made. I fabed the box out of 20Guage sheet metal to act as a shroud from the sparks and powered. I finished the box off with high temp engine paint to try and protect from oxidation. A custom circuit board was made to fit and then the programming started.
I wanted to make use of AJAX feedback for this project so I could tell which state each of the control channels was in at any time. I wrote a simple HTML site loaded on a 2GB SD card for temp readout, master arm button, and firing channels. Each of the firing channels is on a 3 second delay so once the channel has fired it turns off automatically to prevent any shorts. I wanted this to be a really safe control system as I would be putting my face next to each of the tubes well loading so could not accept any accidential misfires. So joining to the wireless network is WPA2 password protected, there is a main power switch on the control box, the software has a master arm button, and the controller starts by grounding all pins. So there is absolutely no power going to any of the firing channels unless everything is connected and switched to armed.