Thingiverse

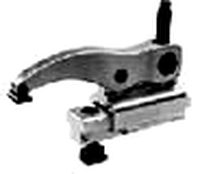
Handy, a Bicycle Assistive Device by pbeyl
by Thingiverse
Last crawled date: 3 years, 4 months ago
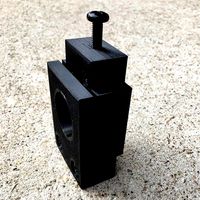
This is an assistive device to help a person with a hand limb difference to cycle with more confidence and stability.
Disclaimer
This is not a medical device and is provided as is with no warranty of any kind. Usage of this design is completely at own risk and the provided without any warranty. It is provided "as is" without warranty of any kind, either expressed or implied, including, but not limited to, the implied warranties of merchantability and fitness for a particular purpose. The entire risk as to the quality and performance of the device is with you.
Overview
I made this for my son to allow him to ride with more confidence while mountain biking. The majority of the device is printed however I also make use of orthoplastic for safety and comfort.
The orthoplastic is a very interesting material which can be easily molded into shape using warm water and a hair dryer. Cycling will at times require a person to remove their hand from a handlebar to avoid serious injury.
The orthoplastic enables the user to clip their limb into the mold and secure in place but will allow the limb slip out under excessive force to prevent serious injury like broken bones. This part will be unique for every person and probably requires some experimenting with what will work well for the individual.
Parts required
1 x Handle Bar Clamp (handle bar clamp.stl)
1 x Hand Support (hand support.stl)
2 x M6 x 30mm Hex Socket Cap Bolts
3 x M6 Nuts
1 x M6 square nut (insert into the hand support)
4 x M3 x 6mm Countersunk bolts
4 x M3 Nylock nuts
1 x M6 lock washer
1 x 250mm x 200mm x 1.6mm Orthoplastic Sheet
Orthoplastic can be found at suppliers of occupational therapy products. In South Africa I have been able to source Rolyan Aquaplast from www.hitechtherapyonline.co.za
Alternatively work with your occupational therapist to get the cup made.
Printing
The Handle Bar Clamp needs to be strong, I am still experimenting with plastic type, wall thickness and infill but the following seems to offer adequate strength slicing with cura and printing in PLA.
Layer Height: 0.2mm
Infill Density: 30%
Infill Pattern: Triangles
Wall Count: 3
Print with support everywhere
Once printing is complete, clean out all support material using a small pliers and sharp utility knife.
Assembly
Use boiling water to mold the orthoplastic hand cup.
Use boiling water to soften the hand support and mold to the shape of the hand.
Insert the M6 square nut into the hand support.
Mount the orthoplastic cup to the support using a M3 drill to make holes and fasten with the M3 bolts and nuts.
Insert the M6 bolt into the ball and fasten with M6 nut, ensure the nut is fitted in the space provided inside the ball.
Screw another M6 nut onto the bolt and then the M6 lock washer.
Screw the M6 bolt into the bottom of the hand support assemble to mate with the square nut and tighten with a wrench.
Add the other M6 Bolt and Nut to the clamp c section.
That completes assembly of the device, now remove the handle bar grip from the bicycle and mount the clamp onto the handlebar.
I included the fusion 360 design file should you wish to modify or make any improvements to the design. Enjoy!
Similar models
thingiverse
free

Bike Handlebar storage for M4 nut and bolt by lovablenachos
...h supports as seen in the picture, it makes it stronger for pulling it out the handle bar.
i printed at 100% infill for strength.
thingiverse
free

Handlebar Cupholder by zborschuk
...ing 2 10mm m3 bolts, 1 12mm m3 bolt and 3 m3 locknuts. there are files for 7/8", 1" and 1.5" diameter handlebars.
thingiverse
free

Hand motion camera slider by egrojyos
...teel inox smooth rod
m6 threaded rod
2 x m6 nut
3 x m6 self-locking nut
2 x d6 washers
2 x m3 bolt
2 x m3 nut
2 x 626 zz bearings
thingiverse
free

Handlebar Clamp by Ender3D
...ndlebar clamp designed for a 1 inch bar. (about 25mm).
uses 4mm bolts and nuts.
has a flat top to mount things like a phone case.
thingiverse
free
Steer Tube Cutting Guide by jonseejon
...nsert.
use a flat blade screwdriver to prevent the retainer from rotating.
finish threading the m6 x 35mm bolt into the retainer.
thingiverse
free

Build Plate Leveling Tools for Wanhao D7 by ts2a
...1 x top.stl
1 x bottom.stl
1 x knob.stl
1 x jig.stl
and you need these,
4 x m3 10mm bolts
1 x m6 nut
1 x m6 bolt 65mm
1 x m10 nut
thingiverse
free

Adjustable Filament Spool by FedorZa
...o 180mm
need to print:
8 x handle
4 x center
2 x side
1 x clip
also it require 8 x m3*10mm bolts and hex nuts (or heated inserts)
thingiverse
free

Griffschraube handle screw for M6 Mutter nut
...ndle screw for m6 mutter nut
thingiverse
hand screw for m6 (10x10mm) nut/bolt
what you need is a m6 nut or m6 a hex bolt 10x10mm
thingiverse
free

idbox! Center Arm by idbox325
...x 1 (unsprung mounting portion)
m3 bolt & nut 20-25mm x 1
rale:
m6 hexagon bolt & laurette nut
m3 bolt & nut 20mm x 2
cg_trader
$3

hand motion camera slider | 3D
... nut
2 x d6 washers
2 x m3 bolt
2 x m3 nut
2 x 626 zz bearings slider camera timelapse sj4000 gopro gadgets video
Pbeyl
thingiverse
free

Large Dice (50mm) by pbeyl
...arge dice (50mm) by pbeyl
thingiverse
needed some large dice so i quickly created this design. it's dimensions is 50x50x50mm
thingiverse
free

Customisable Knob Maker by pbeyl
...ic bolt or nut in a 3d printed knob. its simple but works really well.
here is a customiser to allow creating these knobs. enjoy!
thingiverse
free

Watch Mount for Bike by pbeyl
...arbon fiber handlebar has a 32mm circumference but then flare out in the form of a spherical oval cone with max diameter of 40mm.
thingiverse
free

M22 Screw on Cap by pbeyl
... the elements, adding a rubber washer to the inside of the cap should help provide some additional protection from water as well.
thingiverse
free

Wind Chime by pbeyl
...you can build your own, just need to add five different lengths of aluminum tubing, a hammer weight and some fishing line, enjoy!
thingiverse
free

ActionCam Handle GoPro Compatible by pbeyl
... here in petg 0.8mm shell thickness, 100% infill at 0.1mm layer height. you will have to glue the two pieces together post print.
thingiverse
free

TomTom Bandit Strap Mount by pbeyl
...s quite strong and functional.
i used a little adhesive foam tape to complete the part, however this did not even seem necessary.
thingiverse
free

iPad Mini 2 Wall Mount by pbeyl
...mplete object size in a single print, print the left and right sides independently and use 1.25mm wire/rod to join the two sides.
thingiverse
free

Mini Tripod GoPro Ballhead w Knob by pbeyl
...verhang included, simply cut this away with a sharp knife post print. alternatively use the design without the overhang supports.
thingiverse
free

Simple Pipe Reducer - Customizable by pbeyl
...s on each side.
open in customizer and provide your own settings.https://www.thingiverse.com/apps/customizer/run?thing_id=2461538
Handy
3d_ocean
$15

Handy Drill
...a low poly-mesh . the model is provided with multiple uvw channels, textures and materials, including normals, reflection, glo...
turbosquid
$2

Handy Iron
...turbosquid
royalty free 3d model handy iron for download as on turbosquid: 3d models for games, architecture, videos. (1706341)
turbosquid
$20

handi.3ds
... available on turbo squid, the world's leading provider of digital 3d models for visualization, films, television, and games.
3ddd
$1

Sits Handy coffee
... плед , ваза
3d - модель кофейных столиков sits handy coffee.
turbosquid
$5

Handy Smurf Toy
...osquid
royalty free 3d model handy smurf for download as obj on turbosquid: 3d models for games, architecture, videos. (1236650)
turbosquid
$7

Mezzo Handy Armchair
... model mezzo handy armchair for download as max, obj, and fbx on turbosquid: 3d models for games, architecture, videos. (1494549)
turbosquid
$8

Washbasin Ceramica Cielo Handy
...hbasin ceramica cielo handy for download as max, obj, and fbx on turbosquid: 3d models for games, architecture, videos. (1284066)
3d_export
$10

Handy armchair mezzo collection
...s: 2 render:v-ray formats: 3ds max 2015, obj, fbx link:https://www.mezzocollection.com/en/products/upholstery/armchair/handy-148/
3d_export
free

handy paper pin
... hand shape pin can be used to hold any piece of paper as a reminder note.<br>you can see the dimension in the last picture
3d_export
$20

pk8 chair
...pk8 chair 3dexport very handy in the dining. (there is room for...
Bicycle
3d_export
$15

bicycle
...bicycle
3dexport
simple bicycle
3ddd
$1
bicycle
...bicycle
3ddd
велосипед
bicycle
archibase_planet
free

Bicycle
...ibase planet
bicycle bike cycle two-wheeled bicycle
bicycle n080115 - 3d model (*.gsm+*.3ds+*.max) for exterior 3d visualization.
archibase_planet
free
Bicycle
...bicycle
archibase planet
bicycle cycle bike
bicycle n120411 - 3d model (*.3ds) for 3d visualization.
3d_export
$10
Bicycle
...bicycle
3dexport
bicycle toy or technique for children.
3d_export
$5
bicycle
...bicycle
3dexport
this is 3d model toy bicycle,
archibase_planet
free

Bicycle
...bicycle
archibase planet
bicycle cycle bike
bicycle n270309 - 3d model (*.3ds) for interior 3d visualization.
archibase_planet
free
Bicycle
...bicycle
archibase planet
bicycle cycle bike
bicycle n090211 - 3d model (*.3ds) for exterior 3d visualization.
archibase_planet
free
Bicycle
...bicycle
archibase planet
bicycle cycle bike
bicycle n011211 - 3d model (*.3ds) for exterior 3d visualization.
archibase_planet
free

Bicycle
...bicycle
archibase planet
bicycle cycle bike
bicycle n120608 - 3d model (*.gsm+*.3ds) for interior 3d visualization.
Assistive
turbosquid
$120

Robot Assistant
...id
royalty free 3d model robot assistant for download as max on turbosquid: 3d models for games, architecture, videos. (1381212)
3d_export
$5

painting assistant
...painting assistant
3dexport
draw samples
3d_export
$5

assistive cane
...assistive cane
3dexport
aristocratic cane for characters
3d_export
$10
Assist bike 3D Model
...assist bike 3d model
3dexport
assist bike
assist bike 3d model modelix 59218 3dexport
turbosquid
$69

computer assistant character
... available on turbo squid, the world's leading provider of digital 3d models for visualization, films, television, and games.
turbosquid
$1

Robot Assistant
...d
royalty free 3d model 3d robot human for download as blend on turbosquid: 3d models for games, architecture, videos. (1599434)
turbosquid
$30

Galaxy Assistant's Stool
... available on turbo squid, the world's leading provider of digital 3d models for visualization, films, television, and games.
3d_export
$15

Prototype version of the robot assistant
...ersion of the robot assistant, designed to help a person in a variety of tasks, both in helping in the garden and in armed escort
turbosquid
$69

Droid Assistant
... robot guard for download as blend, dae, fbx, obj, stl, and x on turbosquid: 3d models for games, architecture, videos. (1624852)
turbosquid
free

Free Realistic Grass Assistant
...3d model free realistic grass assistant for download as blend on turbosquid: 3d models for games, architecture, videos. (1454100)
Device
3ddd
$1
device
...device
3ddd
device
3ddd
$1

device
...device
3ddd
device
turbosquid
$25

Device
...royalty free 3d model device for download as ma, max, and obj on turbosquid: 3d models for games, architecture, videos. (1431298)
archive3d
free

Device 3D Model
...device 3d model
archive3d
equipment device
device- 3d model for interior 3d visualization.
archive3d
free
Device 3D Model
... model
archive3d
device
device n050608 - 3d model (*.gsm+*.3ds) for interior 3d visualization.
archive3d
free
Device 3D Model
...e 3d model
archive3d
device gear
device - 3d model (*.gsm+*.3ds) for interior 3d visualization.
turbosquid
$24

ICG Device
...turbosquid
royalty free 3d model icg device for download as on turbosquid: 3d models for games, architecture, videos. (1692389)
3d_export
$5
rope tighten device
...rope tighten device
3dexport
rope tighten device
3d_export
$5
front clamping device
...front clamping device
3dexport
front clamping device
archive3d
free
Device 3D Model
...e3d
device kitchen ware
device n130208 - 3d model (*.gsm+*.3ds) for interior 3d visualization.