Thingiverse
Halter für Typ 2 Stecker - Holder for type 2 plug by Fredle1957
by Thingiverse
Last crawled date: 2 years, 10 months ago
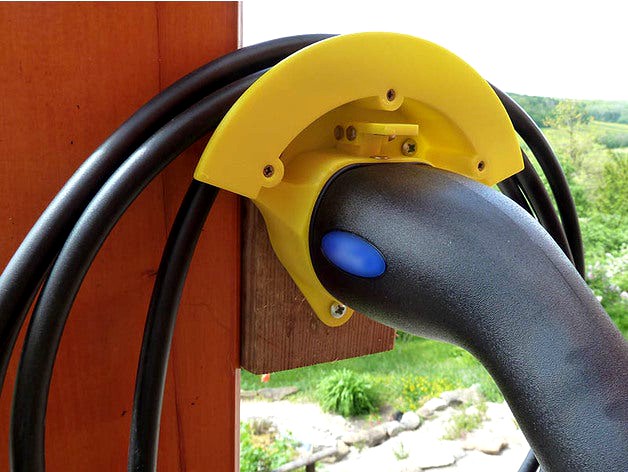
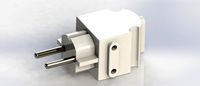
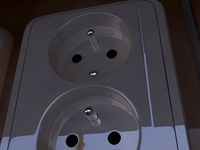
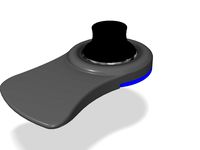
Halter für Typ 2 Stecker
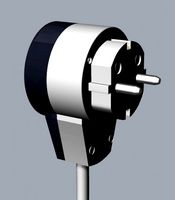
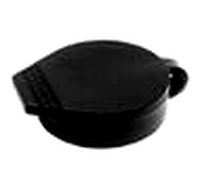
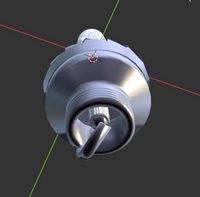
Mit dieser Halterung kann der Typ 2 Stecker neben der Wallbox an der Wand fixiert und das Kabel aufgewickelt werden. Der Halter besteht aus fünf Einzelteilen. Der Aufnahme für den Typ 2 Stecker mit dem dazugehörigen Rand für den Kabelring. Die Verriegelung besteht aus drei Teilen, dem Riegel, der Riegelaufnahme und dem Kipphebel.
Zusätzlich werden folgende Einzelteile benötigt: 2 Neodym-Magnete 8x3mm 3 Universalschrauben 2,5x12mm, 2 Schrauben M2x20mm mit Muttern und Klebstoff.
Nach dem Druck der Teile werden die Magnete in den Halter und den Kipphebel gedrückt und verklebt. ACHTUNG! Die Magnete müssen sich abstoßen, der Kipphebel muss nach oben gedrückt werden.
Als nächstes wird die Kippmechanik mit den beiden M3-Schrauben verschraubt. Dann wird die Kippmechanik in den Halter gelegt und vorne mit etwas Klebstoff fixiert. Als letzten Schritt wird der Rand für den Kabelring mit den Universalschrauben am Halter befestigt.
Mit Hilfe der Fotos dürfte der Zusammenbau kein Problem sein.
Holder for type 2 plug
With this bracket, the type 2 plug can be fixed to the wall next to the wallbox and the cable can be wound up. The holder consists of five individual parts. The receptacle(Aufnahme) for the type 2 plug with the associated edge(Kabelaufnahme Rand) for the cable ring. The lock consists of three parts, the bolt(Riegel), the bolt holder(Riegelaufnahme) and the rocker arm(Kipphebel).
The following items are also required: 2 neodymium magnets 8x3mm 3 universal screws 2.5x12mm, 2 screws M2x20mm with nuts and adhesive.
After the parts have been printed, the magnets are pressed into the holder and the rocker arm and glued together. DANGER! The magnets must repel each other, the rocker arm must be pushed up.
Next, screw the tilt mechanism with the two M3 screws. Then the tilt mechanism is placed in the holder and fixed at the front with a little glue. As a last step, the edge for the cable ring is attached to the holder with the universal screws.
With the help of the photos, assembly shouldn't be a problem.
https://youtu.be/90ch7Igr7oA
Similar models
thingiverse
free

Halter für Typ 2 Stecker - Holder for type 2 plug by Fredle1957
...holder with the universal screws.
with the help of the photos, assembly shouldn't be a problem.
https://youtu.be/90ch7igr7oa
thingiverse
free

TomTom plug holder for motorcycles by XrControl
...halter.
die version mit dem flachen boden lässt sich ohne supports sehr einfach drucken.
bitte mit 0,2mm und max. 60mm/s drucken.
thingiverse
free

Filament-Guide, Filamentführung Genius by Hans-G
...de 5 mm). finally, the old holder of the sensor is fixed as filament guide at the top of the holder with the corresponding screw.
thingiverse
free

Filament-Guide, Filamentführung Sidewinder X1 by Hans-G
...de 5 mm). finally, the old holder of the sensor is fixed as filament guide at the top of the holder with the corresponding screw.
thingiverse
free

Iron Man Arc Reactor Stand with Batteriepack by Cz1995
...die 2 aa batterien kann im boden versteckt werden. der deckel wird mit 2 schrauben 10x3mm. die füße werden aus tpu gedruckt (3x).
thingiverse
free

Spectrum DX-9 FPV Monitor holder for Boscam RX-LCD5802 Diversity Monitor by Guenter
...er vorsichtig festgeschraubt. damit werden die senkkopfschrauben fixiert und drehen sich beim anschrauben des monitors nicht mit.
thingiverse
free

OralB Steckdosenhalter für el. Zahnbürste by Blauhand
...ker der gesamte oralb halter gut fixiert ist und einer durchführung für einen kabelbinder, mit dem das kabel fixiert werden kann.
thingiverse
free

Bauhilfe für Heling by Paratwa66
...hoben. das teil wird in den halter eingeschoben werden und ermöglicht die drehung um 9 grad, der rumpf wird immer sicher fixiert.
thingiverse
free

Xiaomi 365 M1S Bügelschlosshalter by Burgman1971
...enker abbauen, und den halter mit der gummizwischenlage von oben auf das rohr setzen, und bis unterhalb der bowdenzüge fixieren.
thingiverse
free

Bosch Cookit Halter für Schneidscheiben by Treckerbastler87
...konnte ich nicht überprüfen ob die pommes-scheibe passt! die restlichen scheiben habe ich überprüft und sie passen in den halter.
Fredle1957
thingiverse
free

7-Hole Plate by Fredle1957
...an be built. there is also a version that is not so stable but can be printed faster.
https://www.youtube.com/watch?v=zcsk7b-9wtw
thingiverse
free

Balconies and Bridges by Fredle1957
...eally needed. due to the close arrangement of the connections, screwing is difficult.
https://www.youtube.com/watch?v=siluhz8mrkm
thingiverse
free

Variable column by Fredle1957
... placed.
if a high column (see bild 7) is required, spacers can be used to stabilize.
https://www.youtube.com/watch?v=-wvufthwtpu
thingiverse
free

Forward-back switch (Vor-Zurück-Weiche) by Fredle1957
...es gibt zwei versionen, einen rechten und einen linken abzweig.
https://www.youtube.com/watch?v=3lvpktp10n4&feature=youtu.be
thingiverse
free

Funnel tower - Trichterturm by Fredle1957
...rungen (ohne und mit ablenkung für die kugel) und kann beliebig oft verwendet werden.
https://www.youtube.com/watch?v=bkj_wva7g28
thingiverse
free

Spiral channel - Spiralförmige Rinne by Fredle1957
...ne ausgängen. die genaue funktion und der aufbau kann in dem video angeschaut werden.
https://www.youtube.com/watch?v=luntx0urk7k
thingiverse
free
Halter für Typ 2 Stecker - Holder for type 2 plug by Fredle1957
...holder with the universal screws.
with the help of the photos, assembly shouldn't be a problem.
https://youtu.be/90ch7igr7oa
Stecker
thingiverse
free

T Stecker/hochstrom by boarder_line
...t stecker/hochstrom by boarder_line
thingiverse
alle meine zeichnungen sind learning by doing ;)
schutzkappe für t stecker
thingiverse
free

4mm Goldkontackt Stecker halter by superlumpi77
...4mm goldkontackt stecker halter by superlumpi77
thingiverse
4mm goldkontackt stecker halter
thingiverse
free

KUKA EMD Stecker Führung by YaStein
...g by yastein
thingiverse
guide zum schnelleren einstecken des steckers in das kuka emd.
benutzte schrauben/used screws:
2,5x12mm
thingiverse
free

T Stecker/hochstrom by boarder_line
... meine v2. viel spaß
alle meine zeicnungen sind learning by doing ;)
http://www.thingiverse.com/thing:1396919/#files (v1)
thingiverse
free

Stecker 4mm XT-60 Style by Toni1991
...stecker 4mm xt-60 style by toni1991
thingiverse
stecker für 4mm gold kontakte im xt60 style um eine verpolung zu vermeiden
thingiverse
free

Kappe für XT30 Stecker by SirThommes
...ist support nicht notwendig. etwas brim (5-10 linien) für eine bessere betthaftung sind von vorteil.
ein kleines danke wäre nett!
thingiverse
free

ATARI SIO Stecker by oobdoo
...helt verwendet. den kabelklemmer habe ich als einzelnes bauteil entworfen, damit man unterschiedliche durchmesser verwenden kann.
thingiverse
free

Steckerklemmer für ein ATARI SIO-Stecker by oobdoo
...cker by oobdoo
thingiverse
klemmsystem für einen atari sio-stecker, wenn der molex crimpkontakt nicht auf position bleiben will.
thingiverse
free

13-poliger Stecker-Halter, Plugholder by MarkusWW
...se
halter für den 13-poligen stecker.
befestigt mit einer m8-schraube.
falls sich das pla verformt, werde ich es in asa drucken.
thingiverse
free

backspase.fm stecker magnet by T_Uehara
...ngiverse
the base to make the φ75 sticker a magnet.
5 8*3mm magnets are needed.
this sticker is a novelty goods of backspace.fm.
Halter
turbosquid
$13

AngelRED Couture Halter Dress
... available on turbo squid, the world's leading provider of digital 3d models for visualization, films, television, and games.
turbosquid
$34

Halter neck gown with high slit
...for download as blend, pac, 3ds, dae, fbx, gltf, stl, and obj on turbosquid: 3d models for games, architecture, videos. (1591241)
3d_export
$12

Dumbbell 3D Model
...free weight adjustable spinlock exercise body building muscle training halters barbell dumbbells fitness plates workout lifting dumbbell 3d model...
thingiverse
free

Forstnerbohrer-Halter
...forstnerbohrer-halter
thingiverse
forstnerboher-halter
thingiverse
free

Multimeter Halter
...multimeter halter
thingiverse
multimeter halter
thingiverse
free

halter by fablab_lueneburg
...halter by fablab_lueneburg
thingiverse
halter für gleiter
thingiverse
free

Handtuch Halter by hw755
...handtuch halter by hw755
thingiverse
handtuch halter oder waschlappen halter
thingiverse
free

Ultraschallreiniger Halter
...ultraschallreiniger halter
thingiverse
ultraschallreiniger halter / holder for ultrasonic bath
model vgt-800
3d_sky
free

Halter dress.
...halter dress.
3dsky
dress mannequin
halter dress and blouse. mannequin presented in two poses.
thingiverse
free

Hygrometer Halter by K3Design85
...hygrometer halter by k3design85
thingiverse
hygrometer halter
Typ
3ddd
$1

Полотенцесушитель Mika Typ So
...полотенцесушитель mika typ so
3ddd
792х820h
3ddd
free

Callao TYP 4 Luxus / Ottofond
... luxus / ottofond
3ddd
ottofond , ванна
ванна ottofond callao typ 4 luxus. 170х80х46 см.
turbosquid
$10

Electrosvit typ 24 401
...electrosvit typ 24 401 for download as max, max, fbx, and obj on turbosquid: 3d models for games, architecture, videos. (1654145)
3d_export
$99

Porsche Typ 754 3D Model
... classic coupe 2+2 porsche typ 754 911 concept prototype old 1959 1961 antique
porsche typ 754 3d model desmonster 95508 3dexport
turbosquid
$20

Silage-Schiebeschild Typ SSH-2800
... available on turbo squid, the world's leading provider of digital 3d models for visualization, films, television, and games.
3d_export
$39

Volkswagen Typ 82 Kuebelwagen 3D Model
...agen 3d model
3dexport
ww ii german militaty field car vw kubelwagen
volkswagen typ 82 kuebelwagen 3d model du-mont 1587 3dexport
3ddd
$1

Leica S (typ 006)
... фотоаппарат
texture resolution 4096 * 4096
poly:
without smoothing 78915
with smoothing 605436
coordinates of model: 0,0,0
humster3d
$75

3D model of Audi 50 (Typ 86) 1974
...tailed 3d model of audi 50 (typ 86) 1974 in various file formats. all our 3d models were created maximally close to the original.
humster3d
$75

3D model of Volkswagen Sharan (Typ 7N) 2010
...model of volkswagen sharan (typ 7n) 2010 in various file formats. all our 3d models were created maximally close to the original.
humster3d
$75

3D model of Auto Union Typ C 1936
...tailed 3d model of auto union typ c 1936 in various file formats. all our 3d models were created maximally close to the original.
Plug
3d_export
$5
plug
...plug
3dexport
3d_export
$5
plug cover
...plug cover
3dexport
plug cover
3d_export
$5
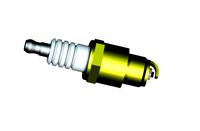
spark plug
...spark plug
3dexport
spark plug
3d_export
free
spark plug
...spark plug
3dexport
spark plug
turbosquid
$30

plug
... available on turbo squid, the world's leading provider of digital 3d models for visualization, films, television, and games.
turbosquid
$15

plug
... available on turbo squid, the world's leading provider of digital 3d models for visualization, films, television, and games.
turbosquid
$10
Plug
... available on turbo squid, the world's leading provider of digital 3d models for visualization, films, television, and games.
turbosquid
$10

Plug
... available on turbo squid, the world's leading provider of digital 3d models for visualization, films, television, and games.
turbosquid
$1

Plug
... available on turbo squid, the world's leading provider of digital 3d models for visualization, films, television, and games.
turbosquid
free
plug
... available on turbo squid, the world's leading provider of digital 3d models for visualization, films, television, and games.
Für
turbosquid
free
Brot für die Welt
... available on turbo squid, the world's leading provider of digital 3d models for visualization, films, television, and games.
thingiverse
free

Brillenhalter V3 für 1 Brille für Doppelklebeband by piepsvo
...brillenhalter v3 für 1 brille für doppelklebeband by piepsvo
thingiverse
brillenhalter v3 für 1 brille für doppelklebeband
thingiverse
free
Halterung für 3DConnexion SpaceNavigator für Notebooks by herbert_b1
...ung für 3dconnexion spacenavigator für notebooks by herbert_b1
thingiverse
support for 3dconnexion spacenavigator for notebooks
thingiverse
free

Deckplatte für Playmobil Möbel (Schrank für Herd etc) by charly52
...kplatte für playmobil möbel (schrank für herd etc) by charly52
thingiverse
deckplatte für playmobil möbel (schrank für herd etc)
thingiverse
free

Haken für Kederschiene 7mm für Dtbd-Dachzelt by Paku_ia
...dtbd-dachzelt by paku_ia
thingiverse
haken für ddbd-dachzelt. zur montage wir die haken einfach in die kederleiste eingeschoben.
thingiverse
free

Öse für Kederschiene 7mm für Dtbd-Dachzelt by Paku_ia
...ia
thingiverse
besfestigungsöse für ddbd-dachzelt. zur montage wir die befestigungsöse einefach in die kederleiste eingeschoben.
thingiverse
free

Case für REPRAP_DISCOUNT_FULL_GRAPHIC_SMART_CONTROLLER by Rolfiklein
..._full_graphic_smart_controller by rolfiklein
thingiverse
gehäuse für das weit verbreitete grafik display mit schalter für licht.
thingiverse
free
Haken für Dusche by Pascal_1966
...haken für dusche by pascal_1966
thingiverse
haken für dusche
thingiverse
free

Printhalterung für Schaltschrank by nikibalboa
...printhalterung für schaltschrank by nikibalboa
thingiverse
platinenaufnahme für schienenmontage
thingiverse
free

Adapter für Schläuche by jensatweb
...adapter für schläuche by jensatweb
thingiverse
adapter für poolschläuche
Holder
archibase_planet
free

Holder
...holder
archibase planet
holder toilet paper holder
holder paper n070712 - 3d model (*.gsm+*.3ds) for interior 3d visualization.
archibase_planet
free

Holder
...e planet
holder rack toilet paper holder
holder toilet roll n240715 - 3d model (*.gsm+*.3ds+*.max) for interior 3d visualization.
archibase_planet
free

Holder
...holder
archibase planet
pen holder support prop
pen holder - 3d model for interior 3d visualization.
archibase_planet
free

Holder
...holder
archibase planet
pole post holder
сhurch cross pole holder - 3d model for interior 3d visualization.
archibase_planet
free

Holder
...holder
archibase planet
holder bathroom ware
shower holder - 3d model (*.gsm+*.3ds) for interior 3d visualization.
archibase_planet
free

Holder
...oilet paper holder
holder paper devon&devon; time black n241113 - 3d model (*.gsm+*.3ds+*.max) for interior 3d visualization.
archibase_planet
free

Holder
...holder
archibase planet
holder hanger hanger for towel
holder 7 - 3d model (*.gsm+*.3ds) for interior 3d visualization.
archibase_planet
free

Holder
...holder
archibase planet
holder hanger hanger for towel
holder 3 - 3d model (*.gsm+*.3ds) for interior 3d visualization.
archibase_planet
free

Holder
...holder
archibase planet
holder towel rack towel-horse
holder - 3d model (*.gsm+*.3ds) for interior 3d visualization.
archibase_planet
free

Holder
...lder
archibase planet
holder hanger hanger for towel
holder towel n250912 - 3d model (*.gsm+*.3ds) for interior 3d visualization.
Type
3d_export
$5

s type
...s type
3dexport
s type formats max 3ds obj stl
3d_export
$5

l-type conveyor
...l-type conveyor
3dexport
l-type conveyor
3d_export
$5

volkswagen type 2
...volkswagen type 2
3dexport
volkswagen type 2
turbosquid
$150
RBC types
...osquid
royalty free 3d model rbc types for download as blend on turbosquid: 3d models for games, architecture, videos. (1343563)
turbosquid
$1

B-Type
...urbosquid
royalty free 3d model b-type for download as blend on turbosquid: 3d models for games, architecture, videos. (1609608)
3ddd
$1

shoes type A
...shoes type a
3ddd
туфли
shoes
turbosquid
$39

R-type
...oyalty free 3d model r-type for download as max, obj, and fbx on turbosquid: 3d models for games, architecture, videos. (1303675)
turbosquid
$5
melon type
...ee 3d model melon galia type for download as ma, fbx, and obj on turbosquid: 3d models for games, architecture, videos. (1557188)
3d_export
free

three different type
...three different type
3dexport
three different type: mace, axe, sword
turbosquid
$49

Types of Placentation
... available on turbo squid, the world's leading provider of digital 3d models for visualization, films, television, and games.
2
design_connected
$11

No 2
...no 2
designconnected
sibast no 2 computer generated 3d model. designed by sibast, helge.
turbosquid
$6

Cliff Rock 2-2
...uid
royalty free 3d model cliff rock 2-2 for download as obj on turbosquid: 3d models for games, architecture, videos. (1619161)
turbosquid
$29

Book variation 2 2
...3d model book variation 2 2 for download as max, obj, and fbx on turbosquid: 3d models for games, architecture, videos. (1366868)
turbosquid
$22

Classic baluster (2) (2)
...assic baluster (2) (2) for download as max, obj, fbx, and stl on turbosquid: 3d models for games, architecture, videos. (1483789)
turbosquid
$99

Smilodon 2 Pose 2
... available on turbo squid, the world's leading provider of digital 3d models for visualization, films, television, and games.
turbosquid
$20

Barrel Barricade 2-2
... available on turbo squid, the world's leading provider of digital 3d models for visualization, films, television, and games.
turbosquid
$6

Wall Trophy (2) (2)
... available on turbo squid, the world's leading provider of digital 3d models for visualization, films, television, and games.
turbosquid
free

Tire label 2 of 2
... available on turbo squid, the world's leading provider of digital 3d models for visualization, films, television, and games.
3ddd
$1

Кровать, 2 тумбочки, 2 светильника
...кровать, 2 тумбочки, 2 светильника
3ddd
кровать, 2 тумбочки, 2 светильника
нормальное качество
формат 3ds max
без текстур
3ddd
free

Кровать, 2 тумбочки, 2 светильника
...кровать, 2 тумбочки, 2 светильника
3ddd
кровать, 2 тумбочки, 2 светильника
нормальное качество
формат 3ds max
без текстур