Thingiverse

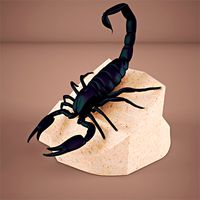
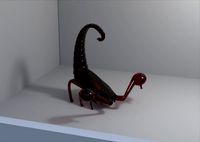
Halloween Scorpion Pumpkin by Ellindsey
by Thingiverse
Last crawled date: 3 years, 4 months ago
This is definitely just a harmless little Halloween jack-o-lantern. No reason to ever think it's anything else. Don't worry about turning your back on it.
This was inspired in part by Megawillbot's Halloween Pumpkin Spider Transformer, though the actual design was drawn completely from scratch. I wanted to make a design that was a bit more mechanically ambitious, and then the idea of making the stem into the stinger of a scorpion struck me, and the rest of the design followed from there.
Admittedly, it's not a very accurate scorpion. Wrong number of legs, and the legs are way too long, and the shape of the body isn't right either. But it does make a very nice pumpkin.
There's probably enough space behind the face plate where someone could stick in some LEDs and a battery, if you wanted to make it light up.
To assemble:
Note - this is a somewhat challenging model to assemble, with a lot of parts, and a lot of tight-fitting pins to hold the parts of the toy together. You may also have to clean up a lot of support off the oddly-shaped pieces as not much here has good flat sides.
Print the following:
24 Short Pin
6 Leg Lower
6 Leg Upper
6 Leg Inner
2 Elbow Pin
1 Long Pin
1 Body Frame Left
1 Body Frame Right
1 Body Link Front
1 Body Link Rear
1 Bottom
1 Claw Finger Left
1 Claw Finger Right
1 Claw Left
1 Claw Right
1 Face
1 Head Link
1 Stem
1 Tail 1
1 Tail 2
1 Tail 3
Assemble the three tail segments and the Stem, using three Short Pins to join them together.
Assemble the claws, making each from one Claw, one Claw Finger, and one Elbow Link. Note that the Elbow Link is not symmetrical, the shorter side goes into the claw.
Assemble six legs, each made up of one Upper, one Lower, and one Inner, joined by two Short Pins each. The Leg Inner piece is symmetrical so you don't need to worry about orientation.
Join the Head Link to the Body Link Front with one Short Pin. Note that while the Head Link is symmetrical, the Body Link Front isn't, and you will want to connect the Head Link to the shorter side of it.
Press the Body Link Front and the Body Link Rear into the Body Frame Right part as shown. Make sure the parts are orientated properly.
Connect the remaining hole on the Body Frame Right onto the pin on the inside right of the Face. I find it's best to come in from an angle and then rotate it into the final orientation as you press the pin into the hole.
Press the Body Frame Left onto the face and the two Body Link parts as shown in the diagram.
Rotate the Head Link forward into the slot on the Face and secure in place with a Short Pin.
Attach the Bottom piece to the remaining hole on the Body Link Front part with a Short Pin.
Connect the Tail to the body assembly with the Long Pin. Note that the Long Pin goes through the tail, through the Body Link Rear, and through the remaining hole on the Bottom part.
Press the two Claws into the holes on the underside front of the Face, connecting with the Elbow Pins.
Attach the legs to the body frame. Connect the front pair of legs first, then the middle pair, then the rear pair. If you try it in any other order you won't be able to get the pins in.
Enjoy.
Update 10-17-2020: After some experimenting, I uploaded new versions of a few of the parts in a different orientation that may be easier to print, with less support material needed.
Updated 10-21-2020: I have created a new version of the Face piece which requires a lot less support material, and which also closes up the two holes under the eyes. This piece also requires you to print out the Elbow Pin V2 instead of the original ones, as well as the new T-pin part. The Body Frame left and right parts connect to the T-pin, which then presses into the new Face part.
I have also made a modified version of the Body Link Front part which should be less likely to break during assembly.
Updates 10-22-2020: I created new versions of the tail pieces which require much less in the way of support material to print, so they'll be easier to clean and assemble after printing.
Similar models
cults
free

Scorpio - Scorpio-
...ect to the printer or stl files with scale 1/10 th
great care must be taken to deburring and adjusting the ball joints.
a +
nop21
thingiverse
free

Articulated Giant Isopod by itbefred
...eparate head joint files with kawaii faces ≧◡≦
https://youtu.be/o8kpcsfhpt8
enjoy!
edit: split up leg parts into 3 separate files
cg_trader
$3

Beech Starship | 3D
...body rear
-body connection part
-front left wing
-front right wing
-left fan
-right fan
-left wing
-right wing
-mount
-full model
3dwarehouse
free

Hammerlock Connecting Link
.... a cross hair has been left through the pin hole on a single half link to allow the piece to be rotated more easily if required.
thingiverse
free

Parted Japdos by 7Fish
...body
talon arm x2 to body
talon hub x2 to talon arm each
talon 03 x8 to talon hub
talon 02 x8 to talon 03
talon 01 x8 to talon 01
thingiverse
free

Animatronic Scorpion (basic) by Alexan5er
... with arduino plus proximity sensor . (optional) rotate parts when printing. laser cut simple body to hold servo, tail and claws.
grabcad
free

Team Conscience Proposal for Helix Trainer Casing Design
...structure shared by helix trainer is left unchanged with this concept. attached zip files have cad models for both configurations
grabcad
free

Chain Link assembly
...abcad
a basic design of linking parts to form a chain-type assembly
the parts include a chain link, a long pin, and a short pin.
thingiverse
free

Alien Queen (WIP) by dazzadazzadazzadazza
... need supports for anything over 85 degree angle and if possible slap in the support to model spacing of 1mm for ease of removal.
thingiverse
free

Jumping Kangaroo Pull Toy 1/2 Size by Ukesman
... rotate on a smooth surface due to the friction of the legs.
model based on plan by david wakefield in how to make animated toys.
Ellindsey
thingiverse
free

Theobromine molecule by Ellindsey
...onds and atoms.
you can scale this fairly freely, the one i printed out was scaled at about 75% of the model i've uploaded.
thingiverse
free

Spice jar cap with holes by Ellindsey
...ice jars. snaps onto the cover of the jar just like the original did. the jar came as part of a high mountain jerky making kit.
thingiverse
free

Matt Smith Head for TARDIS Transformer V2 by Ellindsey by cymon
...e more room inside the body so his head could be a little more proportional that'd be great, but if not that's okay too.)
thingiverse
free

Hello Kitty Tardis Transformer mod by Ellindsey
...and i had an entire reel of pink just sitting there unused.
and while i was recoloring it, i decided to make a new head for it.
thingiverse
free

Helix Fossil by Ellindsey
... not sure which eevee evolution to pick, or if you should wait for lapras instead? helix fossil has your answers.
praise helix
thingiverse
free

Pai Sho tiles by Ellindsey
...s many tiles as you need, make a board yourself and play. i don't have plans for a board here, but they're easy to find.
thingiverse
free

Openable Detailed Dalek by Ellindsey
...to print.
this was drawn in solidworks, with meshmixer used for sculpting details on the mutant and generating custom supports.
thingiverse
free

Modular shower shelves by Ellindsey
... and don't want to get dehydrated.
these should all print without support, there a few overhangs but they're not too bad.
thingiverse
free

Drew's Rostock - Skeleton Head by Ellindsey
...an't print this part and use it on a standard rostock without changing the geometry of the rest of the printer appropriately.
thingiverse
free

Bugatti 100P mini snap-together by Ellindsey
...opellers or landing gear, as they wouldn't be printable at this scale anyway, but those will be on the larger finished model.
Scorpion
3d_ocean
$14
Scorpion
...scorpion
3docean
3d model scorpion
scorpion 3d model
3d_export
$5
Scorpion
...scorpion
3dexport
glass scorpion
turbosquid
$24

scorpion / wood scorpion
...lty free 3d model scorpion / wood scorpion for download as ma on turbosquid: 3d models for games, architecture, videos. (1319761)
archibase_planet
free

Scorpion
...scorpion
archibase planet
scorpion arachnida animals
scorpio - 3d model for interior 3d visualization.
archibase_planet
free

Scorpion
...scorpion
archibase planet
scorpion arachnida
scorpio n050808 - 3d model (*.gsm+*.3ds) for interior 3d visualization.
turbosquid
$59

Scorpion
...urbosquid
royalty free 3d model scorpion for download as max on turbosquid: 3d models for games, architecture, videos. (1378471)
turbosquid
$1

scorpion
...urbosquid
royalty free 3d model scorpion for download as c4d on turbosquid: 3d models for games, architecture, videos. (1288349)
turbosquid
free

Scorpion
...d
royalty free 3d model scorpion for download as obj and fbx on turbosquid: 3d models for games, architecture, videos. (1298317)
turbosquid
$69

Scorpion
... available on turbo squid, the world's leading provider of digital 3d models for visualization, films, television, and games.
turbosquid
$59

Scorpion
... available on turbo squid, the world's leading provider of digital 3d models for visualization, films, television, and games.
Pumpkin
3d_ocean
$5

Pumpkin
...pumpkin
3docean
autumn farm halloween orange pumpkin vegetables
a pumpkin
3d_export
$5

pumpkins
...pumpkins
3dexport
pumpkins, with key shapes
3d_ocean
$5

Pumpkin
...pumpkin
3docean
autumn bumps farm green halloween harvest orange pumpkin vegetable
another pumpkin
archibase_planet
free

Pumpkin
...pumpkin
archibase planet
pumpkin gourd squash
pumpkin - 3d model (*.gsm+*.3ds) for interior 3d visualization.
3d_export
free

pumpkin
...a candle. the archive contains texture, blend, stl and obj files, as well as high poly pumpkin, worm and candle models in zbrush.
3d_ocean
$4

Pumpkin
...(.obj) and (.3ds) .images previews were rendered with blender internal render(cycles). format:(.3ds)/(.obj)/(.blend) .blender:...
3d_ocean
$5

Pumpkin
...pumpkin
3docean
halloween pumpkin
- poly count:654 - formats: max /obj /fbx - 512x512 textures
turbosquid
$7

pumpkin
...in
turbosquid
royalty free 3d model pumpkin for download as on turbosquid: 3d models for games, architecture, videos. (1344450)
turbosquid
$55

Pumpkins
...urbosquid
royalty free 3d model pumpkins for download as max on turbosquid: 3d models for games, architecture, videos. (1339897)
turbosquid
$29

Pumpkin
...turbosquid
royalty free 3d model pumpkin for download as max on turbosquid: 3d models for games, architecture, videos. (1464572)
Halloween
3d_export
$6

Halloween
...halloween
3dexport
halloween
3d_ocean
$49

Halloween
... grave halloween horror justtomas lexterior pumpkin scary spooky tomb tombstones zombie
halloween by justtomas .c4d r12 .obj .3ds
3ddd
$1

Halloween
...halloween
3ddd
модель персонажа halloween. программа - 3ds max 2011 + v-ray. рендер - v-ray, текстуры присутствуют!
3ddd
$1

Часы Halloween
...часы halloween
3ddd
часы , halloween
часы
3d_ocean
$6

Halloween Pumpkin
...halloween pumpkin
3docean
autumn eyes face glow glowing halloween monster pumpkin vegetables
a halloween pumpkin
3d_export
$5

halloween pumpkin
...halloween pumpkin
3dexport
halloween pumpkin - made in blender
turbosquid
$20

Halloween
... available on turbo squid, the world's leading provider of digital 3d models for visualization, films, television, and games.
3d_export
$5

pumpkin for halloween
...pumpkin for halloween
3dexport
pumpkin for halloween. theme art with landscape and the chest.
3d_export
$5

Skullbowl halloween
...skullbowl halloween
3dexport
skullbowl halloween<br>.stl
3d_export
$6

Halloween Fantasy
...fantasy
3dexport
halloween fantasy. a pumpkin, a cage with a rigged bat, a candlestick with candles and a little bit of cobwebs.