Thingiverse
Guardian Robot by steveut
by Thingiverse
Last crawled date: 3 years ago
Guardian Robot
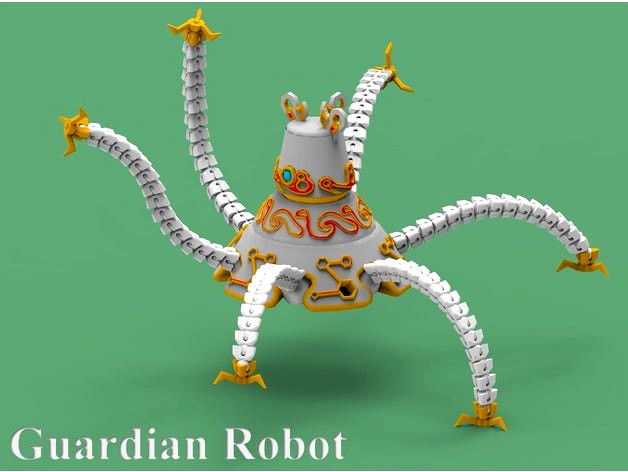
After printing the Maker Figure my son and I sat down to design our own robot. During our concept generation session it quickly became apparent that my son, who is four, was asking me to design a robot that looked very similar to one from a video game he had seen. With that drawing as a template we built a few prototypes of the body and legs before settling on the parts that have been uploaded. According to my son, It's perfect, exactly what I wanted. We hope the maker community enjoys it as well.
Community
noodleyfelix Adapters to flip the leg segment orientation.
Carlos_R Adapter for a 5 mm LED. Check out his awesome build video!
Sonoranguy Modified the feet to remove the rotating claws. The rotating claws can be flimsy which this would fix.
Guardian Leg Segment Check out this improved version of the guardian leg. It no long snaps in, but looks much closer to the original.
Geirskogul Do not use carbon or transparent ABS for the leg segments. Transparent ABS has acrylic in it and it too brittle.
Remixes
Hackable - This remix provides a bunch of space and hooks for electronics such as LEDs and servos.
Details Separate - This separates the details and the robot body to allow for dual extrusion printing.
Inspiration
The PCB Workstation with Articulating Arms provided the inspiration for the robot arms.
Design
My goal was to print the robot in as few parts as possible while ensuring that all of the joints printed cleanly.
Body
I kept kept the hip joints as part of the body, even though the resulting hips were looser then desired, because I liked the integrated design and the challenge of printing everything in a single shot. The head rotates in the same manner as the Maker Faire bot. To improve print time and material usage, I hollowed out the model being careful to minimize overhangs. Most of the model has wall thicknesses of 2-3 mm where possible.
Arms
The arms took a few tries to get right. I ended up printing the arm segments separately so that the sections could be snapped in for a tighter fit than would be possible if they were printed in a single shot. Finding appropriate dimensions for the engagement required trial and error to find segments that did not fall apart easily and still rotated smoothly. Variables to consider here were the wall thickness, engagement depth, and ball diameter. The claws use simple cone hinges providing smooth motion.
To Print
Print 1 Body, 6 Claws, and 90 Segments.
I used a raft and no support to build these parts. The Segment is printed with the ball rotated to be on top and the Claw is rotated to be printed with the claw on the bottom. Print the body with the head rotated to be on top.
Once printed, the head and hip joints rotated smoothly with minimal sticking.
Optional Files
I've uploaded body_120dia_botwg which should allow the Guardian to be printed on a bed with dimensions of 120 x 120 x 120. This was modified by cutting a small portion off the OD of the original.
Caution
Reducing the size may cause the parts to freeze or prove brittle. I used a minimal gap to allow the parts to rotate and a minimal wall thickness to conserve material.
Future Work
As with any project, there is always more to do an improve upon. Here is a my current list.
Complete I left the arms hollow for the potential to add a string or elastic band.
Complete Increase the claw size (almost double).
Complete Create a model with snap in hip joints to provide more friction. [I built this and it worked... however the model required significant tweaking from standard print settings. In order to keep this easy to print, I removed this feature. You can freeze the hips in place with a dab of super glue.]
Complete Add an access hatch to the head and or base for electronics (LEDs) See this remix.
I need to redesign the claws to be more robust. The current hinge fails to easily.
Similar models
thingiverse
free

Cute Robot by ciberjedi
...make them as long as you like. for the arms, the more you print, the more the robot can reach in front and behind itself.
enjoy!
thingiverse
free

Guardian Robot, Hackable by steveut
...material does not seem to work well.
base_plain_thru
base_cover
base_detail_thru_asm
head_plain_thru
head_details_thru_asm
hips_6
thingiverse
free

Guardian leg Segment by Pyrofer
...ly and lock the leg from wobbling. the whole leg is then able to be posed and 4 legs can take the guardians weight, maybe 3 even.
cg_trader
$40

Son of the Snake Redemptor Guardian | 3D
....
stl format file divided into:
legs right and left
hips
right arm
left arm
torso
power claws
gauntlet
little gauntlets
shoulders
cg_trader
$3

robot-parts | 3D
...xtures and colours.
above set contains :
1)head
2)body
3)arms with hands
4)joints
5)legs
these parts can be used to make robots.
grabcad
free

Maker Bot
...rter arms as wrists to the end of the arms. construct the clips with the u-spring in the middle and snap the clips to the wrists.
thingiverse
free

Robot by mtairymd
...e two rotating joints. see animation my kids put together for some cool robot dance moves :).
video: https://youtu.be/ozm4ms8-kp4
grabcad
free

Mechanical Robot
...e two rotating joints. see animation my kids put together for some cool robot dance moves :).
video: https://youtu.be/ozm4ms8-kp4
thingiverse
free

Big Robot Toy by rbuckland
...corn connectors come from popcorn joint - https://www.thingiverse.com/thing:194240
i have supplied the sketchup (2016) file also.
thingiverse
free

Robot Clock by KevinMT
...ngiverse.com/thing:1545926
link to my partner that helped me design the clock: http://www.thingiverse.com/andyisthebest233/about
Steveut
thingiverse
free

Guardian Robot, with Details Separate by steveut
...ess, so i've uploaded a variety of stl files. i would appreciate any feedback with how this works and what files are useful.
thingiverse
free

Sensei's Divining Top with Scroll Work, MTG by steveut
...modifications
redesigned the ratcheting mechanism
added voids to minimize material needed
added scroll work and detailed features
thingiverse
free

Nasa Space Fabric by steveut
...bly over a 100 x 100 mm area: simnas6_2x_asm.stl
equilateral triangle
segment: triangle_nascha.stl
assembly: triangle_hexpat.stl
thingiverse
free
Guardian Robot, Hackable by steveut
...material does not seem to work well.
base_plain_thru
base_cover
base_detail_thru_asm
head_plain_thru
head_details_thru_asm
hips_6
thingiverse
free

Guardian Lid w/ Switch Mount by marnoot
...lid (https://www.thingiverse.com/thing:2538732), but adds back-in the switch mount from steveut#39;s bottom cover for the hackable guardian from zelda: breath...
Guardian
3d_export
$19

guardian
...guardian
3dexport
guardian
turbosquid
$30

Guardian
... available on turbo squid, the world's leading provider of digital 3d models for visualization, films, television, and games.
turbosquid
$30

GUARDIAN
... available on turbo squid, the world's leading provider of digital 3d models for visualization, films, television, and games.
turbosquid
$25

Royal guardian
...osquid
royalty free 3d model royal guardian for download as on turbosquid: 3d models for games, architecture, videos. (1629146)
turbosquid
$15

Straw guardians
...id
royalty free 3d model straw guardians for download as fbx on turbosquid: 3d models for games, architecture, videos. (1497912)
3d_export
$10

Guardian nft coin
...guardian nft coin
3dexport
this nft coin crypto guardian deepcoin dpc
turbosquid
$35

Guardian Lion
...3d model guardian lion for download as max, max, obj, and fbx on turbosquid: 3d models for games, architecture, videos. (1539164)
turbosquid
$19

Robot Guardian
... available on turbo squid, the world's leading provider of digital 3d models for visualization, films, television, and games.
turbosquid
$13

The Guardian Of Nature
... available on turbo squid, the world's leading provider of digital 3d models for visualization, films, television, and games.
turbosquid
$10

Guardian Spaceship
... available on turbo squid, the world's leading provider of digital 3d models for visualization, films, television, and games.
Robot
3d_ocean
$20

Robot
...robot
3docean
character metal robot robot robotic white
robot model for 3dsmax 2009 and greater
3d_ocean
$45
Robot
...robot
3docean
fighing machine robot
a fighting robot from the scrapyard.
3d_ocean
$18
Robot
...robot
3docean
machin robot science fiction
high poly robot.
3d_export
$7

Robot
...robot
3dexport
robot
3d_export
$5
robot
...robot
3dexport
robot
3d_export
free

Robot
...robot
3dexport
robot
turbosquid
$10

Robot/ Alien Robot
...
royalty free 3d model robot/ alien robot for download as max on turbosquid: 3d models for games, architecture, videos. (1442828)
3d_export
$5

robot
...robot
3dexport
robot in blender
3ddd
$1
robot
...robot
3ddd
робот
robot
3ddd
$1

Robot
...robot
3ddd
робот
robot