Thingiverse
Grand piano with moving parts
by Thingiverse
Last crawled date: 4 years, 2 months ago
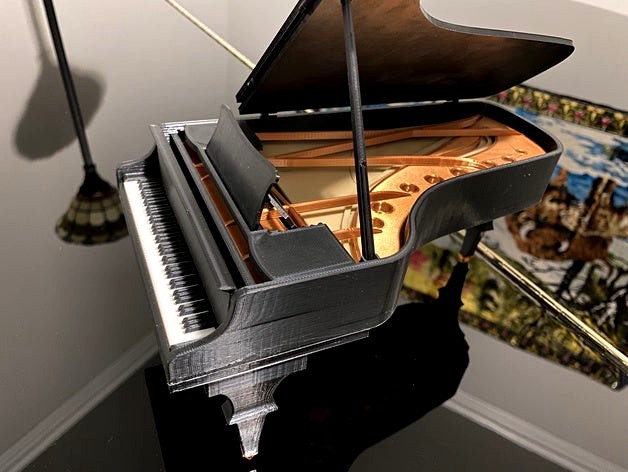
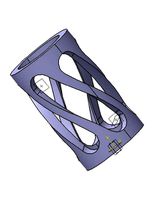
I love Larrym95's grand piano model, but the model is incomplete (no hinges, no wheels, etc.) and the designer isn't responding. So I took things in my own hands and revised the model to feature fully printed moving parts. I also made numerous improvements and fixes. The model is now nearly perfect. I also borrowed a piano bench from robertkyu.
Printing instruction:
The model should be printed in PLA in four colors: black keys, white keys, paint color (usually black or white, but you can be creative), silk copper, and wood color (you can also use food PLA but I'm not a big fan of the stringy brittle filament). A few parts should be printed multiple copies as indicated in the part names. I list the silk copper and wood color parts below; the rest are black, white and paint (either black or white or any color of your choice):
Wood color: sound board, bridge
Silk copper: brace, pedal rods, pedals, plates, wheels
I also include my printing layout files in 3MF for a black piano at 85% size for my Prusa i3 MK2S. There are two files for black, one for copper and one for wood. White is not included because there is only one part (white keys).
The case is the longest part at 289mm. If your printer bed is not large enough, you can scale everything down, but I highly recommend printing as large as possible. I printed at 85% limited by my 250mm bed. The printed hinges may become fused if you scale down too much. Layer height of 0.15mm or lower is recommended. If scaled down to 80% or below, 0.1mm layer height is recommended.
Most parts must be printed without support. The three exceptions are the case (for one horizontal board), the wheels (support everywhere) and the bench (support touching bed only). The case has two patches at the front to prevent peeling. Cut them clean after printing.
Assembly will take a bit of thinking. I included some pictures as guidelines. Glue is needed. I recommend shoe glue (E6000) over super glue because the super glue vapor may smoke your black part white. If this happens, a bit of body lotion or cream will remove the white mark.
In general, assemble in the following order: assemble the sound board, glue the sound board into the case, glue on the plate and brace onto the sound board, install the lid and key lid, assemble the keyboard, glue the bottom and keyboard, glue the bottom parts (legs, wheels, pedals, etc.), install the music rack.
Print & enjoy! BTW I'm open to commissions on making this model.
https://www.youtube.com/watch?v=MPW-cW88PAw
Similar models
3dwarehouse
free

Piano
... and wood piano with black keys #awesome #baby_piano #glass #grand_piano #instruments #keyboard #music #noise #piano #sound #wood
3d_ocean
$19
Musical Keyboard
...musical instrument notes piano piano keyboard power sound white keys
this is a model of a mq-6108 electronic keyboard. greetings.
3dwarehouse
free

Fender Rhodes **Update**
...k #chick #corea #electric #fender #grey #hancock #herbie #intstrument #keyboard #keys #knob #music #musical #pedal #piano #rhodes
3dwarehouse
free

Grand Piano
...o #instrument #key #keyboard #lid #lyre #music #musical #musical_instrument #pedal #piano #sostenuto #una_corde #white #white_key
3dwarehouse
free

Black Key (For Piano/Keyboard)
...black key (for piano/keyboard)
3dwarehouse
a black key for a keyboard or a piano. #black_key_piano
cg_trader
$7

Piano
...mate it. piano music strings classic classicalmusic concert keyboard musical instrument key sound orchestra theatre yamaha sports
3dwarehouse
free

Upright Piano
...piano. #chord #grand #harpsichord #instrument #jon #keyboard #keys #kimball #music #musical #pedal #piano #strings #upright #wood
3dwarehouse
free

Octave
...octave
3dwarehouse
these keys repeat to complete a piano keyboard. the white keys need cutouts to make space for the black keys.
thingiverse
free

YAMAHA KX88 Black Key replacement by teinturman
...happy with the result. the new key is very similar to the original one, obviously you'd better print it...
thingiverse
free

Chorder by vance
...down. the part also has tabs on the outer sections so that, if the keyboard is tilted toward the player, it won't slide off.
Piano
3d_ocean
$16

Piano
...nd piano keyboard keyboard notes music music instruments musical piano piano
animatable piano 3d done in 3ds max. easily editable
3d_ocean
$19

piano
...piano
3docean
classic music instrument music piano
the piano
archibase_planet
free

Piano
...ano
archibase planet
musical instrument piano upright piano
piano n021210 - 3d model (*.gsm+*.3ds) for interior 3d visualization.
3ddd
free

piano
...piano
3ddd
пианино
piano
3d_ocean
$17

Piano
...piano
3docean
music piano
piano 3d model - .ma - .obj texture is not included in the book.
turbosquid
$7

piano, piano and people
...del piano, piano and people for download as max, obj, and dwg on turbosquid: 3d models for games, architecture, videos. (1481077)
3d_export
$5

piano
...piano
3dexport
piano for 3d printing.
archibase_planet
free

Piano
...piano
archibase planet
electronic piano piano
sintezator 2 - 3d model for interior 3d visualization.
archibase_planet
free

Piano
...piano
archibase planet
piano musical instrument
piano poliact - 3d model for interior 3d visualization.
archibase_planet
free

Piano
...piano
archibase planet
piano musical instrument
piano schiller - 3d model (*.gsm+*.3ds) for interior 3d visualization.
Grand
3ddd
$1

GRAND (Grand)
...grand (grand)
3ddd
grand , угловой
мягкий уголок мебельной фабрики grand (модель grand)
3ddd
$1

Grand
...
grand , katrin , круглая
кровать фабрики grand
3ddd
$1

Grand / Retto
...grand / retto
3ddd
grand , угловой
диван от grand коллекция retto
3ddd
$1

Grand toilet
...nd , rosa , унитаз
унитаз гранд / grand тм rosa
3ddd
$1

Умывальник Grand
...умывальник grand
3ddd
умывальник , grand
умывальник grand 755 х 465 мм со смесителем
3d_export
$80

grand piano
...grand piano
3dexport
grand piano detailed
3ddd
$1

KREDO (Grand)
... kredo , угловой
диван в столовую фабрики мягкой мебели grand (модель kredo)
3ddd
$1

Insolito grande
...insolito grande
3ddd
insolito
insolito grande
240х85х73
3ddd
$1

Grand royal
...grand royal
3ddd
grand royal под tv
3ddd
free

Grande Forge
...grande forge
3ddd
grande forge
gf bed
Moving
3d_ocean
$12

PS Move
...ps move
3docean
move playstation ps ps move
ps move
3ddd
$1

Arketipo MOVING
...arketipo moving
3ddd
arketipo , moving
arketipo moving
turbosquid
$2

Move
...del move for download as c4d, ma, 3ds, dae, fbx, obj, and stl on turbosquid: 3d models for games, architecture, videos. (1601005)
3ddd
$1

Bellus Move
...bellus move
3ddd
bellus
диван bellus move
3ddd
$1

Arketipo Moving
... moving , угловой , модульный
диван
turbosquid
$50

Moving Light
... available on turbo squid, the world's leading provider of digital 3d models for visualization, films, television, and games.
turbosquid
free

moving water
... available on turbo squid, the world's leading provider of digital 3d models for visualization, films, television, and games.
turbosquid
$1

Move Cursor
...el 3d move cursor for download as max, 3ds, dxf, fbx, and obj on turbosquid: 3d models for games, architecture, videos. (1626504)
3ddd
$1

Кровать Move collezione Genius
...collezione genius
3ddd
move , genius
кровать фабрики move. размеры (дхгхв):
237x172x75см
turbosquid
$18

Sofa Lider Move
...id
royalty free 3d model sofa lider move for download as max on turbosquid: 3d models for games, architecture, videos. (1433350)
Parts
3d_export
$5
Parts
...parts
3dexport
parts
3d_export
$5

Part
...part
3dexport
part
3d_export
$5

Part
...part
3dexport
machine part
3d_export
$65
Part
...part
3dexport
simple rendering of the scene file
3d_export
$65

Part
...part
3dexport
simple rendering of the scene file
3d_export
$30

fan part
...fan part
3dexport
this is a part of fan of pedastal
3d_export
$10
machine parts
...machine parts
3dexport
3d part modeling work ,contact for 3d work
turbosquid
$59

Mechanical Part
...id
royalty free 3d model mechanical part for download as c4d on turbosquid: 3d models for games, architecture, videos. (1410833)
turbosquid
$17
Road parts
...bosquid
royalty free 3d model road parts for download as 3ds on turbosquid: 3d models for games, architecture, videos. (1192967)
turbosquid
$9

Cutter Parts
...squid
royalty free 3d model cutter parts for download as stl on turbosquid: 3d models for games, architecture, videos. (1220010)