Thingiverse

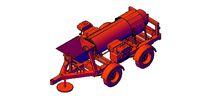
gold rush MSI S7 Trommel G scale 1:22 by caj
by Thingiverse
Last crawled date: 3 years, 1 month ago
parts needed
i do not have a power box for this yet have a idea where i want it but have not started on it as yet i want to start on the radial stacker before the power box so essentially this thing is done for now
1 12v battery
about 4 switches
1 gm9 hobby gear box single shaft preferable but will fit a dual shaft box
8 23/64x1-3/8 springs
3 hobby motors numbers are in the shaker motor folder
1 12v marine water pump
1 LM2596 DC-DC convert to convert 12v battery to 3v for shaker motors
for dry play you can use kitty litter this works realy well through the system
for dry and wet play i recommend plastic pellets again i think catgenie pellets would work perfectly and it is multiple colors to resemble pay dirt i am going to use all my recycled abs with my pelatizer to make pellets and rocks and i might buy some catgenie pellets
included is a rock generator for open scad to make small rocks larger than the screens to demonstrate the separation out the front of this thing
this tromell is designed to be taken apart so only glue parts described below
all diagrams are in the parts folders
for glue i use acetone to combine all parts esp the spray bars this makes these water tight
print stair parts and glue together use heat shrink tubing to connect the rails
print frame parts and glue according to diagram using I Beam joints make 2 frames
print 12 cross I Beams
print 24 90deg I Beam connector
print tumbler parts glue all parts except drive gear use 4 small grub screws to lock this down
print tumbler spray bars parts glue together do not glue the support arms to the spray bars glue the back support to the shaker shoot according to the diagram
print the tumbler screens using PLA
print all shoot parts and glue half's together
in this folder print shaker motors you will nead 3 of these
print 2 roller motor blocks with hydrolic motor and 2 motor blocks with out hydrolic motor
just press fit the rollers to the blocks with the shafts
print all shaker parts glue floor half's and shaker half's together
print all shaker spray parts glue spray parts according to diagram do not glue this assembly to the spray bar supports the spray bars just sit on top of this
glue spray bar supports do not glue these to the floor this just fits in the holes
insert 6 i Beam cross members through the motor blocks and motor rollers
insert 1 I Beam cross member though the shoot shaker
press fit 90deg I Beam connectors to the ends of all cross member I Beams do not glue
set 1 side frame down flat and glue one side of the 90 deg i beam connectors to the frame use a re posonable glue for the first fittings as you will be having to re-position a few times for fit i use multi-purpose cement that i found at walmart this stuff just holds realy well for a permanent fit and if nead be can be removed you can also use a hot glue gun this probably would work better if i had thought about this earlier i would have used the glue gun as it sets fast and hard
then glue the other side frame to the 90deg connectors
the shaker deck just slides on top to lock the back half's together and the front shoot just slides on to lock the front half's
glue the grizzly bars hinge to the side frame according to diagram
to use the water jets there is everything needed to connect these in the water pump folder using 1/2 in hose and 8mm id hoses and the ball valves are include so every thing is there all that neads to be done is to put them together ??
i do not have any place to use the water jets so cant completely test these each water bar has ben tested individually and that is all i can do if you do have a place to set this up with water please please please post a picture this would make my dreams come true with this thing
Similar models
thingiverse
free

CatGenie Parts, Impeller and Bumper Wheel by oryweaver
...into two parts and gluing it with uv glue. i also used uv glue to get it to stick to the shaft. the bumper wheel was much easier.
thingiverse
free

Modular Enclosure Frame by saltmera
... brackets.
added a corner block connector because i forgot when designing the others.
added a 100mm frame bar and 50mm frame bar.
thingiverse
free

Radial Stacker 1-22 G Scale by caj
...
with acetone
use regular glue on the rest of the parts that nead gluing
there are diagrams in each folder for assembly reference
thingiverse
free

LNS Technologies 150A Injection Molding Machine Material Funnel by Zoti
...the shoot. you can use it with just the funnel or the cylinder to hold more material in. you don't need to glue the cylinder.
thingiverse
free

Tricorder Frame by Emtwo
...at.
note: i printed everything in this post. if you choose to print this, it will all print and it will all fit together. enjoy.
thingiverse
free

filawinder replacement frame parts by caj
... a much more solid
also the filament tensinon feed has supports and a ptfe tube stop to keep it from being pulled into the spool
thingiverse
free

OneWheel Pint Fender
...d.
glue the two halves together using superglue, epoxy or weld with a 3d printer pen. i finished mine by sanding and spray paint.
thingiverse
free

Magic Shaker by JohnPaul8
...ate and pattern functions i was able to create a functional design. this is also my first print with two parts that fit together!
thingiverse
free

TUSH - Spool Holder Frame by matsonic
...le to move them. so i made this frame that fits and locks the parts together, very easy and fast to print.
designed in fusion 360
thingiverse
free

Word Clock by mrownership
...nt epoxy was drying i used a blow torch to git rid of all the bubbles.
http://imgur.com/a/gazrc
...rest of summary coming soon...
Trommel
3d_export
$5

Mobile trommel screen
...mobile trommel screen
3dexport
mobile trommel screen
turbosquid
$50
Trommel 2 Line Axles
... available on turbo squid, the world's leading provider of digital 3d models for visualization, films, television, and games.
sketchfab
$10

Trommel commode - Georg Britsch
...furniture
size: h-87 x w-37×37 x d-34 cm
code: ko-025 - trommel commode - georg britsch - buy royalty free 3d model by artium3d
thingiverse
free

Scale rc Wash plant / trommel parts by Reincrh
... designed by seafax (https://www.thingiverse.com/seafax/designs)
and can be found here:
https://www.thingiverse.com/thing:3448816
thingiverse
free

Trommel Schleifer (Tumbler) Kitchenaid by tobi66
...r one with a screw cap.
for the assembly you need 5 melting thread inserts m4, matching m4 screws and 2 bearings of size 12x28x8.
thingiverse
free

adjustable multi voltage power box for the stacker and trommel by caj
...to 12v switch and the other side to +12v lead out
solder the other 2 out plugs directly to the buck dc-dc converter -out and +out
thingiverse
free

Bremse für Kabeltrommel / Breke for cable drum by Kadettbar
...
thingiverse
verhindert beim schnellen abwickeln das nachrollen und somit kabelsalat auf der trommel.
material: tpu
infill: 100%
thingiverse
free

Full Mount System for 95mm dia Tromel by Seafax
...name suggests it is a mounting system for the trommel the gears and rollers are available on the original...
thingiverse
free

shaker vibrator agitator using a hobby motor r130 or r260 by caj
...neads a shaker motor i made this for my trommel i am making you can use this for a...
thingiverse
free

Einziehfedertrommel by Brausi
...eder.
prints both parts as stably as possible and glues both sides. so you have a stable transport drum for your pull-in spring.
Caj
3dfindit
free

AFT62-CAJ-NA
...aft62-caj-na
3dfind.it
catalog: yiheda
thingiverse
free

MAN Truck by caj
...man truck by caj
thingiverse
included is the designspark mechanical project file
thingiverse
free

magirus transport truck by caj
...magirus transport truck by caj
thingiverse
magirus-transport-pack-
thingiverse
free

The Simpsons 3d Silhouettes by caj
...the simpsons 3d silhouettes by caj
thingiverse
the simpsons 3d silhouettes
thingiverse
free

Aladdin 3D Silhouettes by caj
...aladdin 3d silhouettes by caj
thingiverse
aladdin 3d silhouettes
thingiverse
free

The Croods 3d Silhouettes by caj
...the croods 3d silhouettes by caj
thingiverse
the croods 3d silhouettes
thingiverse
free

Madagascar 3d Silhouettes by caj
...madagascar 3d silhouettes by caj
thingiverse
madagascar 3d silhouettes
thingiverse
free

puppet Gepetto head and hands by caj
...puppet gepetto head and hands by caj
thingiverse
for making a marionette
thingiverse
free

narrower slide quick release by caj
...narrower slide quick release by caj
thingiverse
remixed for this camera gimble
thingiverse
free

Disney 3d Couples silhouettes by caj
...disney 3d couples silhouettes by caj
thingiverse
disney couples silhouettes
Msi
3d_export
$5

msi optix
...msi optix
3dexport
monitor msi optix
3d_export
$5

MSI Monitor
...msi monitor
3dexport
msi gaming monitor
turbosquid
$38

MSI CR61 laptop
... available on turbo squid, the world's leading provider of digital 3d models for visualization, films, television, and games.
3d_export
$39

Compiuter msi 3D Model
...i 3d model
3dexport
compiuter laptop 2010 3ds max 3d studio model polygonal dwf obj
compiuter msi 3d model tomysss 28489 3dexport
turbosquid
$35

MSI GT70 gaming laptop
... available on turbo squid, the world's leading provider of digital 3d models for visualization, films, television, and games.
humster3d
$50

3D model of MSI GT80 Titan
...uy a detailed 3d model of msi gt80 titan in various file formats. all our 3d models were created maximally close to the original.
turbosquid
$15

Graphics Card Msi GeForce GTX 1660 Ventus OS
...e gtx 1660 ventus os for download as blend, 3ds, fbx, and obj on turbosquid: 3d models for games, architecture, videos. (1702385)
thingiverse
free

MSI
...msi
thingiverse
msi logo
thingiverse
free

MSI Dragon Logo by ForceVenom
...msi dragon logo by forcevenom
thingiverse
msi logo
thingiverse
free

MSI 970 Gaming IO Shield
...hingiverse
replacement io shield for msi 970 gaming motherboard.
works with:
msi 970 gaming
msi 970 gaming pro
msi 990fxa gaming
S7
3d_ocean
$70

Saleen S7
...ept coupe exotic prototype race racer s s7 saleen sedan sports street transport vehicle
high quality exterior/interior saleen s7.
3d_ocean
$50

Saleen S7
...y muscle race s s-7 s7 saleen sedan sports street transport tuner vehicle
highly detailed exterior and interior of the saleen s7.
turbosquid
$299

City S7
...s7
turbosquid
royalty free 3d model city s7 for download as on turbosquid: 3d models for games, architecture, videos. (1473468)
turbosquid
$5

Samsung S7
...rbosquid
royalty free 3d model samsung s7 for download as ma on turbosquid: 3d models for games, architecture, videos. (1655461)
turbosquid
$10

sunbeam s7
...oyalty free 3d model sunbeam s7 for download as obj and blend on turbosquid: 3d models for games, architecture, videos. (1392714)
3d_export
$5

Saleen S7 3D Model
...saleen s7 3d model
3dexport
car race saleen s7
saleen s7 3d model victormaciel 32891 3dexport
3d_export
$60

Saleen S7 3D Model
...saleen s7 3d model
3dexport
car saleen s7 vehicle deportive racer
saleen s7 3d model dercreations 22068 3dexport
3d_export
$59

Saleen S7 3D Model
...saleen s7 3d model
3dexport
saleen s7 car rim tire wheel sports saloon
saleen s7 3d model sixt 23383 3dexport
3d_ocean
$50

Saleen S7-R
...le r race s s7-r s7r saleen sedan sports street transport tuner vehicle
highly detailed exterior and interior of the saleen s7-r.
3d_export
$70

Saleen s7 3D Model
...3d model
3dexport
saleen s7 car supercar racing sport high poly vehicle vehicles auto
saleen s7 3d model zildasoft 30656 3dexport
Rush
turbosquid
$10

Rush Lounge Chair
...odel rush lounge chair for download as max, max, fbx, and obj on turbosquid: 3d models for games, architecture, videos. (1685984)
turbosquid
$19

set12 - Silent rush
... available on turbo squid, the world's leading provider of digital 3d models for visualization, films, television, and games.
turbosquid
$10

Philips Rush Mp3 Player
... available on turbo squid, the world's leading provider of digital 3d models for visualization, films, television, and games.
turbosquid
$6

18th Century Rush Light
... available on turbo squid, the world's leading provider of digital 3d models for visualization, films, television, and games.
3d_export
$99

Toyota Rush Daihatsu terios 3D Model
... daihatsu terios 2006 2007 2008 suv small all terrain japan corean car
toyota rush daihatsu terios 3d model squir 9089 3dexport
cg_studio
$99

Toyota Rush - Daihatsu Terios3d model
...ds .lwo .max .obj .xsi - toyota rush - daihatsu terios 3d model, royalty free license available, instant download after purchase.
3d_export
$15

Adrenaline Rush gravity product holder 3D Model
...ne rush gravity product holder pos materials energy drink
adrenaline rush gravity product holder 3d model plasticv 72512 3dexport
turbosquid
$39

Rush MH3 Tungsten Light Beam
... available on turbo squid, the world's leading provider of digital 3d models for visualization, films, television, and games.
turbosquid
$500

Rush Tiple 34-25 w Genesis 2500 Demolition Shear
... available on turbo squid, the world's leading provider of digital 3d models for visualization, films, television, and games.
cg_studio
$12

Stage Light & Rush Par 0013d model
...x .fbx .dxf .dae .3ds - stage light & rush par 001 3d model, royalty free license available, instant download after purchase.
22
3d_export
$25

rocks 22
...rocks 22
3dexport
rocks 3d model 22
turbosquid
$10

Luminaire - Lustre 22 22 Soleil
... available on turbo squid, the world's leading provider of digital 3d models for visualization, films, television, and games.
design_connected
$18

22 Bench
...22 bench
designconnected
etel interiores 22 bench benches computer generated 3d model. designed by etel carmona.
design_connected
$16

22 Chair
...22 chair
designconnected
etel interiores 22 chair chairs computer generated 3d model. designed by etel carmona.
3d_export
$6

tap-22
...tap-22
3dexport
3ddd
$1

Радиатор 22 типа
...радиатор 22 типа
3ddd
радиатор
радиатор 22 типа
3ddd
free

22 tube amplifier
...22 tube amplifier
3ddd
усилитель
22 tube amplifier
turbosquid
$35

Bracelet 22
...osquid
royalty free 3d model bracelet 22 for download as 3dm on turbosquid: 3d models for games, architecture, videos. (1548228)
turbosquid
$20

jamb 22
...turbosquid
royalty free 3d model jamb 22 for download as max on turbosquid: 3d models for games, architecture, videos. (1403875)
turbosquid
$18

Earrings 22
...osquid
royalty free 3d model earrings 22 for download as 3dm on turbosquid: 3d models for games, architecture, videos. (1548880)
G
3ddd
free

G. Moscatelli
...алка
вешалка 25 / 26 / 27коллекция: belle heleneбренд: g. moscatelliстрана: италияразмеры: высота - 190 / 195; диаметр - 50 / 60.
3ddd
$1
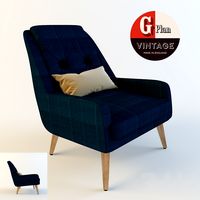
G Plan Vintage
...g plan vintage
3ddd
винтаж , g plan
g plan vintage armchair
turbosquid
free
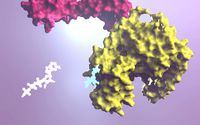
G protein
...otein
turbosquid
free 3d model g protein for download as c4d on turbosquid: 3d models for games, architecture, videos. (1309660)
turbosquid
$14

Fence G
...turbosquid
royalty free 3d model fence g for download as fbx on turbosquid: 3d models for games, architecture, videos. (1310122)
turbosquid
$7

G for Gun
...rbosquid
royalty free 3d model g for gun for download as max on turbosquid: 3d models for games, architecture, videos. (1685215)
turbosquid
$5

Letter G
...urbosquid
royalty free 3d model letter g for download as max on turbosquid: 3d models for games, architecture, videos. (1408463)
turbosquid
$5

Letter g
...urbosquid
royalty free 3d model letter g for download as max on turbosquid: 3d models for games, architecture, videos. (1408408)
turbosquid
$5

G Ring
...
turbosquid
royalty free 3d model g ring for download as stl on turbosquid: 3d models for games, architecture, videos. (1285079)
3ddd
$1

Infiniti / G-Chair
...infiniti / g-chair
3ddd
infiniti
www.infinitidesign.it/ita/g-chair.php
3ddd
$1
кресло G-68
...кресло g-68
3ddd
кресло
кресло руководителя g-68
Gold
turbosquid
$9

Ethereum Gold gold coin
...lty free 3d model ethereum gold gold coin for download as max on turbosquid: 3d models for games, architecture, videos. (1605128)
turbosquid
$9

PAX Gold gold coin
...
royalty free 3d model pax gold gold coin for download as max on turbosquid: 3d models for games, architecture, videos. (1554461)
3d_ocean
$2

Gold Bracelet
...gold bracelet
3docean
bracelet gold gold bracelet
22 carat gold bracelet
3d_ocean
$5

Gold
...compatible with vray 2.4 and above. you will get .max file* with 5 sphere primitives with the gold materials applied and the ....
3d_export
$5

rose gold gold ring
...is held in place by black snakes. this can be used in scenes or other projects. the inside of it has more code saying i love you.
turbosquid
$6

Gold
...squid
royalty free 3d model gold for download as obj and stl on turbosquid: 3d models for games, architecture, videos. (1336384)
3d_export
$5

Chest of gold
...chest of gold
3dexport
chest of gold
3d_ocean
$4

Gold Bar
...old gold bar gold block money yellow
realistic gold bar made in cinema 4d. materials included. .3ds .obj and .c4d files included.
3d_ocean
$3

Vray Gold
...vray gold
3docean
3dmax material gold material metal vray
vray gold material for 3dmax
3d_export
$6

gold ring
...gold ring
3dexport
gold ring jewelery
Scale
turbosquid
$20
Weight scale or Bathroom Scale
...ght scale or bathroom scale for download as max, fbx, and obj on turbosquid: 3d models for games, architecture, videos. (1664576)
turbosquid
$19

Scale
...e
turbosquid
royalty free 3d model scale for download as fbx on turbosquid: 3d models for games, architecture, videos. (1411722)
turbosquid
$5
Scales
...s
turbosquid
royalty free 3d model scales for download as ma on turbosquid: 3d models for games, architecture, videos. (1393439)
turbosquid
$40

Scale
... available on turbo squid, the world's leading provider of digital 3d models for visualization, films, television, and games.
turbosquid
$17
Scales
... available on turbo squid, the world's leading provider of digital 3d models for visualization, films, television, and games.
turbosquid
$12

Scale
... available on turbo squid, the world's leading provider of digital 3d models for visualization, films, television, and games.
turbosquid
free
Scale
... available on turbo squid, the world's leading provider of digital 3d models for visualization, films, television, and games.
3d_export
$7

of scales
...s have a flat point of support. the samples are rendered in the standard cinema 4d renderer. enjoy your use and creative success.
3d_export
$5
scale knob
...scale knob
3dexport
scale knob
3d_export
$20
cartoon weight scale or bathroom scale
...cartoon weight scale or bathroom scale
3dexport
texture size:512px number of texture:1 texture format: png
1
turbosquid
$69

armchairs(1)(1)
... available on turbo squid, the world's leading provider of digital 3d models for visualization, films, television, and games.
turbosquid
$15

ring 1+1
... available on turbo squid, the world's leading provider of digital 3d models for visualization, films, television, and games.
turbosquid
$10

chair(1)(1)
... available on turbo squid, the world's leading provider of digital 3d models for visualization, films, television, and games.
turbosquid
$8

Chair(1)(1)
... available on turbo squid, the world's leading provider of digital 3d models for visualization, films, television, and games.
turbosquid
$2

RING 1(1)
... available on turbo squid, the world's leading provider of digital 3d models for visualization, films, television, and games.
turbosquid
$1

house 1(1)
... available on turbo squid, the world's leading provider of digital 3d models for visualization, films, television, and games.
turbosquid
$1

Table 1(1)
... available on turbo squid, the world's leading provider of digital 3d models for visualization, films, television, and games.
turbosquid
$59

Formula 1(1)
...lty free 3d model formula 1 for download as max, fbx, and obj on turbosquid: 3d models for games, architecture, videos. (1567088)
design_connected
$11

No 1
...no 1
designconnected
sibast no 1 computer generated 3d model. designed by sibast, helge.
turbosquid
$2

desert house(1)(1)
...3d model desert house(1)(1) for download as 3ds, max, and obj on turbosquid: 3d models for games, architecture, videos. (1055095)