Thingiverse
GM328 Tilting Case
by Thingiverse
Last crawled date: 4 years, 2 months ago
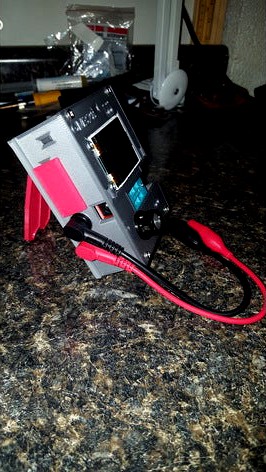
This case is more or less a set of replacement parts for the most common acrylic case sold for housing the DIY GM328 component tester. While it includes replacement parts for all the acrylic parts of the original case, with exception to the small battery partition piece, it requires the 8 M3 screws, nuts, and 4 nylon standoffs that came with the case to be absolutely complete.
This set lacks the little partition piece because I modeled in to it a more user friendly battery compartment.
Among the parts in this kit, there are three different left outer panels, and 2 different right outer panels. You'll only need 1 left and 1 right side piece. If you use my battery compartment, select a left and right piece that say "w_battery" in the filename. There are two left sides "w_battery", one with holes for sheathed banana jacks for connecting probe leads, and one without. 90% of what I use this tool for is easier handled by way of alligator clips rather than the onboard ZIF socket. I connect my banana jacks to terminals terminals designated 1 and 3 from the back side of the board. Starting the device with a component connected to terminals 1 and 3 will put it into a batch mode, allowing it to remain powered up and locked into the initial test. If you have 50 capacitors, resistors, diodes, etc. to test, this feature is great. Using terminals 1 & 2, or 2 & 3 will cause the device to run a single test and power off.
Why did I make this case that is so close to the original acrylic case? I've done this GM328 kit twice. I built mine 2 years ago, and another for a friend just a month or so ago. When I built mine, I drilled the holes for my banana jacks in the front center panel. To access those connections, the device must be laying flat on the bench which is not a good viewing angle. When I built one for a friend, I had a 3D printer and designed a tilting stand for these. Unfortunately, I couldn't use the stand on mine because the probe leads would bottom out on the bench.
I wanted to make a replacement piece for the one I drilled, and a replacement piece for the left side with my holes already in it. I also wanted an easier way to change the battery than disassembling the whole case each time. Since I'd already modeled the back for the tilting stand I posted here a few weeks ago, followed by the left, right, and front center portions of the acrylic case, I decided to eliminate the acrylic parts entirely, and modeled the entire case.
The measurements are fairly true to the original case design, and the pieces are individually interchangeable with the original case pieces. Use this kit entirely, or use only what you need from it.
If you're already using my tilting stand with the replacement case back, the part is identical to what's included in this kit, so there's no need to reprint that to use other parts from this kit.
Similar models
thingiverse
free

LCR-T4 Mega328 Transistor Tester Tilt Stand
...the same form factor and that your case is similar enough to work before printing. disregard the banana jacks...
thingiverse
free

NZXT Phantom Computer Case Latch by 3dnoobie
...i printed on my prusa mini. it is a bear to install this for the right side panel. i suspect the left side panel would be easier.
thingiverse
free

Replacement for SpikenzieLabs Solder:Time™ Acrylic Case by CoasterLabs
...board and battery nice and snug. this might require some sanding of the case and pcb up at the top, but mine has worked decently.
thingiverse
free

FatShark Battery Case Door by EightOneGulf
...ches, 2 on each side. carefully pry the plate off.
i've added a .stl with build-in supports, and a version without supports.
thingiverse
free

Covers for VARTA car battery terminals (right and left).
...covers for varta car battery terminals (right and left).
thingiverse
covers for varta car battery terminals (right and left).
thingiverse
free

YOSOO GM328 tester case by LU4AER
...yosoo gm328 tester case by lu4aer
thingiverse
this is a simple case with a battery compartment for the multi tester yosoo gm328.
thingiverse
free

MAKERbuino Case by makersquirrel
...nuts, slide the left part on the left side of the original case, screw the bolts and nuts back on, same goes for the right part).
thingiverse
free

Piano stand Studiologic vmk-88 plus
...t except the connection pieces that connect the right and left parts of the stand (connection_small.stl and down_connection.stl).
grabcad
free

NEGITIVE_BATTERY_TERMINAL_ADAPTER
...ad
super start side terminal adapter
part # 01327
terminal adapts top post battery terminal to a side terminal cable connection
grabcad
free

POSITIVE_BATTERY_TERMINAL_ADAPTER
...ad
super start side terminal adapter
part # 01327
terminal adapts top post battery terminal to a side terminal cable connection
Gm328
thingiverse
free

Gm328 transistor tester by Mendel_2
...gm328 transistor tester by mendel_2
thingiverse
http://www.alfadex.com/3d-printed-objects/gm328-transistor-tester/
thingiverse
free

Housing GM328 by D_o_S
... very cheap, very useful component-analyser. here i designed a nice housing. it´s not easy to print but the result is incredible.
thingiverse
free

Case for GM328 tester by Ihmevekotin
...ster by ihmevekotin
thingiverse
case for gm328 all-in-one component tester. requires 4 small screws to attach the circuit board.
thingiverse
free
YOSOO GM328 tester case by LU4AER
...yosoo gm328 tester case by lu4aer
thingiverse
this is a simple case with a battery compartment for the multi tester yosoo gm328.
thingiverse
free

GM328 Tester Case (Chassis) with Compartment by d1s0
...gm328 tester case (chassis) with compartment by d1s0
thingiverse
gm328 tester case (chassis) with compartment
thingiverse
free

GM328 Component Tester Case by LeinadTheBuilder
...e by leinadthebuilder
thingiverse
very simple case for the great gm328 component tester.
if you like it, please leave a like ;-)
thingiverse
free

Case for GM328 Tester by Perinski
...tools • accessories
photo video accessories
gadgets • accessories
knobs • other
thingiverse
free

GM328 Tester case by Scrachi
...d without battery location.
<= if you like my work, you can tip me on thingiverse :-)https://www.thingiverse.com/scrachi/about
thingiverse
free

GM328 Component Transistor Tester by firepower9966
....
two versions of top cover one with rounded corners (fillets) and one without.
remix of http://www.thingiverse.com/thing:1277163
thingiverse
free

Box for GM328 LCR Tester by AbbyJones
...nce lcr esr meter" and was bought here http://www.ebay.ca/itm/311343672563
a lid is now included with letters and without.
Tilting
3ddd
free
TILT
...tilt
3ddd
tilt
http://www.graypants.com
tilt
gp-133 -size: o: 46cm | h: 35cm.
3ddd
$1

TILT
...tilt
3ddd
kenneth cobonpue
http://www.kennethcobonpue.com/collection/view/44/tilt
design_connected
$9
Tilt
...signconnected
photo-realistic 3d models of the tilt shelves from bonaldo for 3d architectural and interior design presentations.
turbosquid
$7
Tilt
... available on turbo squid, the world's leading provider of digital 3d models for visualization, films, television, and games.
3ddd
$1
Urban electric Tilt
...urban electric tilt
3ddd
urban electric , tilt
urban electric tilt
design_connected
free

Tilt 70
...tilt 70
designconnected
free 3d model of tilt 70 by nc möbler designed by andersson, peter.
3d_export
$5

tilt door knob
...tilt door knob
3dexport
tilt door knob
turbosquid
$65
Tilt scale
... available on turbo squid, the world's leading provider of digital 3d models for visualization, films, television, and games.
turbosquid
$3

Tilted Cross
... available on turbo squid, the world's leading provider of digital 3d models for visualization, films, television, and games.
3d_export
$5
tilt shape door knob
...tilt shape door knob
3dexport
tilt shape door knob
Case
3d_export
$1

case
...case
3dexport
case
archibase_planet
free

Case
...case
archibase planet
showcase show-case glass case
glass-case + cakes - 3d model for interior 3d visualization.
archibase_planet
free

Case
...case
archibase planet
showcase show-case glass case
glass-case for chips - 3d model for interior 3d visualization.
archibase_planet
free

Case
...case
archibase planet
case shelving drawer
case - 3d model for interior 3d visualization.
archibase_planet
free

Case
...case
archibase planet
case rack locker
case - 3d model for interior 3d visualization.
archibase_planet
free

Case
...case
archibase planet
case drawer kitchen furniture
case - 3d model for interior 3d visualization.
archibase_planet
free

Case
...case
archibase planet
case cupboard shelving
glass case - 3d model for interior 3d visualization.
archibase_planet
free

Case
...case
archibase planet
case handbag suitcase
case - 3d model (*.gsm+*.3ds) for interior 3d visualization.
archibase_planet
free

Case
...case
archibase planet
case suitcase
case 5 - 3d model (*.gsm+*.3ds) for interior 3d visualization.
archibase_planet
free

Case
...case
archibase planet
locker case dresser
case - 3d model (*.gsm+*.3ds) for interior 3d visualization.