Thingiverse
Generate wood patterns with temperature changes by MoonCactus
by Thingiverse
Last crawled date: 4 years, 7 months ago
Script to generate texture via temperature gradients to get horizontal stripes that "look like wood". The last and only updated source code is now on github at https://github.com/MoonCactus/gcode_postprocessors/tree/master/wood
This is the code of my post here: http://betterprinter.blogspot.fr/2012/10/shades-of-brown-with-wood-filament-via.html
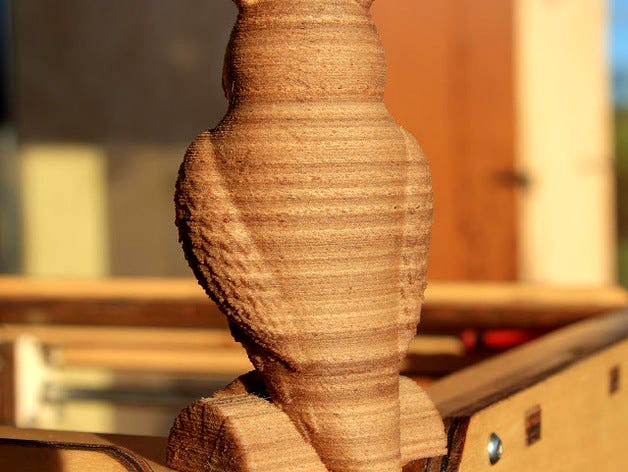
The owl is Cushwa's popular design at http://www.thingiverse.com/thing:18218
The picture which highlights the effect on a regular polygonal vas comes from mttwinmill (https://www.thingiverse.com/make:657526)
This thing is not an object to print, but a set of instruction that will "patch" your gcode file in place (it will be modified), so keep a backup if you need one.
The gcodeFile is the only compulsory parameter. Check the source code for more information.
Initial temperature settings will be overridden by the varying pattern that is generated by this script (a variant of recursive Perlin noise). You can run it multiple times to test different values and generated temperature curve until you like it.
Default values are minTemp=190, maxTemp=230 and grainSize=3. Higher temperatures produce darker bands (due to the wood being burnt). Do not let the wood stay too long in your nozzle else you might end up clogging it with carbon (which is quite hard to clean up)!
Download the latest python script from https://github.com/MoonCactus/gcode_postprocessors/tree/master/wood
This script was designed and works with "Python" (https://www.python.org/downloads/)
How to run it on windows (thanks to Nic/@nd1985):
Install python from https://www.python.org/downloads/windows/ or check http://docs.python.org/2/faq/windows.html
Open the windows command prompt.
If you search for cmd, it will pop up.
Drag the python file into the command prompt
Type -f and drag in the gcode file you want to modify
Type -i and enter the minimum temp you want (e.g. -i 180, with a space between the option and the Celcius degree)
idem, use -a maxtemp if you want
also -g grainsize if you want. I used the default 3.0
Hit enter. The script will process. When finished, the command prompt will reset to the state it was in when you first started. The original gcode you entered has now been modified.
Basic parameters
-f aka --file G-code file to process (with complete path if needed). This is the only required parameter.
-i aka --min Minimum allowed temperature (too low and the filament will not extrude!). Default is 180
-a aka --max Maximum allowed temperature (too high and the filament will carbonize!). Default is 230
Aesthetics
-g aka --grain Average "width" of the patterns (smaller means faster variations). Default is 3.0
-z aka --z-offset Shift the pattern vertically (e.g. if you want it to match some geometrical feature of your design). Default is 0.0
-r aka --random-seed Use a completely different pattern
-s aka --spikiness-power How "spiky" are the dark bands (sets the imbalance of light/dark bands). With higher values (eg 2 or 3), the dark stripes will be made sparser. You can get the opposite effect with value between 0 and 1 (eg. 0.5 will generate fatter dark bands, convenient for filament that get lighter with temperature). Values below 0.2 or above 3.0 are probably useless.
Advanced options
These are mostly to play nice with a few printer firmwares. Use only when needed!
-k aka --skip-start-z Do not change temperatures until provided height (e.g. when you are using a support/raft)
-t aka --first-temp Which temperature to start with. Default is to set it.
-u aka --max-upward Cap instant temperatures increases (in °C/layer), default is no cap!
-d aka --max-downward Cap instant temperatures decreases (in °C/layer)
-c aka --scan-for-z-hop Try to detect the "Z-hop" that some slicer do. Default is 5mm, use 0 to disable it.
-w aka --temp-command set the temperature g-code command to use (defaut is M104, but you might want M109 that waits for the temperature to settle before moving on, some printers may need this)
If you are using a command line interpreter and you have Python installed on your machine, you can run it like this, e.g. to generate temperatures that vary within 205 and 235°C use the following:
python wood.py --min 205 --max 235 --file myfile.gcode
When you want "faster" variations, just change the default 3mm --grain and use a smaller value, like
python wood.py --min 205 --max 235 --grain 1.5 --file myfile.gcode
If your printer stops with a "thermal runaway" error, you can tell the script to go slower and wait for temperatures to settle on each change, by using an alternate g-code command, e.g.:
python wood.py -w M109 --file myfile.gcode
(see https://www.simplify3d.com/support/articles/3d-printing-gcode-tutorial/#M104-M109 about the issue)
About Cura and Cura plugins
After multiple requests and at last, I converted the initial Cura plugin to a standalone Python script that no more needs Cura nor Skeinforge. I documented the process here by the way: http://betterprinter.blogspot.fr/2013/02/how-tun-run-python-cura-plugin-without.html
This script was an early but official plugin in Cura (version 12.11+). But Ultimaker broke its own support to the plugins with almost each new release (why?). I hope forthcoming Cura 4 will eventually settle to something that would not require me to fix the script with each new release. Sorry, but there will be no more support for Cura until they make their mind!
Last updates
20190307-113457 Clearer documentation
Wed Mar 29 18:53:31 CEST 2017 Moved to github! This is the terminal update that will appear here!
Wed Sep 28 12:41:55 CEST 2016 Instructions cleanup and cosmetic fix to the python script
Fri Jan 10 14:32:52 CET 2014 wood31 Fixed obsolete syntax that made Python3 fail (thanks @Mysli) wood32 is for Python3, should work also on Python2 but untested by me!
Thu Jan 9 23:10:51 CET 2014 Added some more options, and a Windows-friendly zipped version with windows line ends and zipped so that it does not get corrupted when downloaded or opened (this OS sucks so much that you have to pay for it, and you get a notepad as useful as an ashtray on a motorbike, so ridiculous!)
Sun Jul 7 21:43:12 UTC 2013 I added a limited web service hosted on https://www.tecrd.com/tools/stl_wood (but it may refuse your file because it is too big, or because the server is busy doing something else)
Tue Feb 12 08:35:53 UTC 2013 more readable ASCII art plot, can be re-run on itself, it will no more duplicate the commands and graph, fixed a bug in the numeric arguments (thanks to Fused3D)
This is the code of my post here: http://betterprinter.blogspot.fr/2012/10/shades-of-brown-with-wood-filament-via.html
The owl is Cushwa's popular design at http://www.thingiverse.com/thing:18218
The picture which highlights the effect on a regular polygonal vas comes from mttwinmill (https://www.thingiverse.com/make:657526)
This thing is not an object to print, but a set of instruction that will "patch" your gcode file in place (it will be modified), so keep a backup if you need one.
The gcodeFile is the only compulsory parameter. Check the source code for more information.
Initial temperature settings will be overridden by the varying pattern that is generated by this script (a variant of recursive Perlin noise). You can run it multiple times to test different values and generated temperature curve until you like it.
Default values are minTemp=190, maxTemp=230 and grainSize=3. Higher temperatures produce darker bands (due to the wood being burnt). Do not let the wood stay too long in your nozzle else you might end up clogging it with carbon (which is quite hard to clean up)!
Download the latest python script from https://github.com/MoonCactus/gcode_postprocessors/tree/master/wood
This script was designed and works with "Python" (https://www.python.org/downloads/)
How to run it on windows (thanks to Nic/@nd1985):
Install python from https://www.python.org/downloads/windows/ or check http://docs.python.org/2/faq/windows.html
Open the windows command prompt.
If you search for cmd, it will pop up.
Drag the python file into the command prompt
Type -f and drag in the gcode file you want to modify
Type -i and enter the minimum temp you want (e.g. -i 180, with a space between the option and the Celcius degree)
idem, use -a maxtemp if you want
also -g grainsize if you want. I used the default 3.0
Hit enter. The script will process. When finished, the command prompt will reset to the state it was in when you first started. The original gcode you entered has now been modified.
Basic parameters
-f aka --file
-i aka --min
-a aka --max
Aesthetics
-g aka --grain
-z aka --z-offset
-r aka --random-seed
-s aka --spikiness-power
Advanced options
These are mostly to play nice with a few printer firmwares. Use only when needed!
-k aka --skip-start-z
-t aka --first-temp
-u aka --max-upward
-d aka --max-downward
-c aka --scan-for-z-hop
-w aka --temp-command
If you are using a command line interpreter and you have Python installed on your machine, you can run it like this, e.g. to generate temperatures that vary within 205 and 235°C use the following:
python wood.py --min 205 --max 235 --file myfile.gcode
When you want "faster" variations, just change the default 3mm --grain and use a smaller value, like
python wood.py --min 205 --max 235 --grain 1.5 --file myfile.gcode
If your printer stops with a "thermal runaway" error, you can tell the script to go slower and wait for temperatures to settle on each change, by using an alternate g-code command, e.g.:
python wood.py -w M109 --file myfile.gcode
(see https://www.simplify3d.com/support/articles/3d-printing-gcode-tutorial/#M104-M109 about the issue)
About Cura and Cura plugins
After multiple requests and at last, I converted the initial Cura plugin to a standalone Python script that no more needs Cura nor Skeinforge. I documented the process here by the way: http://betterprinter.blogspot.fr/2013/02/how-tun-run-python-cura-plugin-without.html
This script was an early but official plugin in Cura (version 12.11+). But Ultimaker broke its own support to the plugins with almost each new release (why?). I hope forthcoming Cura 4 will eventually settle to something that would not require me to fix the script with each new release. Sorry, but there will be no more support for Cura until they make their mind!
Last updates
20190307-113457 Clearer documentation
Wed Mar 29 18:53:31 CEST 2017 Moved to github! This is the terminal update that will appear here!
Wed Sep 28 12:41:55 CEST 2016 Instructions cleanup and cosmetic fix to the python script
Fri Jan 10 14:32:52 CET 2014 wood31 Fixed obsolete syntax that made Python3 fail (thanks @Mysli) wood32 is for Python3, should work also on Python2 but untested by me!
Thu Jan 9 23:10:51 CET 2014 Added some more options, and a Windows-friendly zipped version with windows line ends and zipped so that it does not get corrupted when downloaded or opened (this OS sucks so much that you have to pay for it, and you get a notepad as useful as an ashtray on a motorbike, so ridiculous!)
Sun Jul 7 21:43:12 UTC 2013 I added a limited web service hosted on https://www.tecrd.com/tools/stl_wood (but it may refuse your file because it is too big, or because the server is busy doing something else)
Tue Feb 12 08:35:53 UTC 2013 more readable ASCII art plot, can be re-run on itself, it will no more duplicate the commands and graph, fixed a bug in the numeric arguments (thanks to Fused3D)