Thingiverse

Geeetech g2s Pro Frame Upgrade- Enclosure by NiklasF
by Thingiverse
Last crawled date: 3 years ago
For a university project we upgraded the frame of the Geeetech g2s Pro Delta Printer. The main goal was to make the frame more stable and enclose the print area to increase the quality of the prints. For materials we mostly used aluminium and acrylic plates and item profiles. Water-jet/laser cutting has been used for tooling.
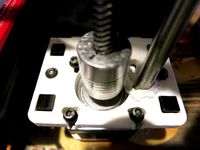
The original 8mm acrylic plates have been replaced by larger 4mm aluminium plates. All major holes and slots have been copied. In addition to that another aluminium plate has been added at the bottom which incorporates three adjustable feet. These three 4mm aluminium plates are connected through 6x570mm item aluminium profiles. The joints have been further tightened with 12 item angle brackets around the middle and bottom plate. In case you want to use 4mm plates as well you need to tighten the steel rods with 4mm washers as listed in the bill of materials below.
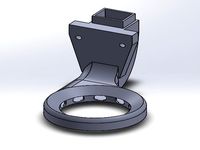
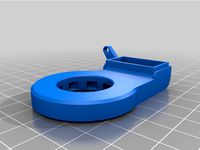
The shorts sides are enclosed with 2mm aluminium sheets and the long sides with 5mm acrylic sheets. From the front the built area can be accessed through an acrylic door and from the sides through two sliding doors which can be locked in place with a self-designed 3D-printed knob at the upper acrylic panel.
The bottom compartment is easy to access and offers plenty of space and mounts for cable management and electronics including the Raspberry Pi for Octoprint.
Overall from all these measures the printer became extremely stable and keeps the print area protected and noticeably warmer. Moreover, the printer looks even better now.
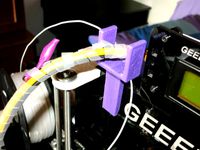
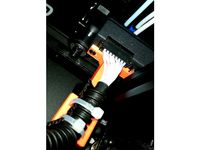
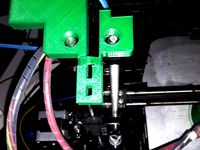
Besides the frame, work has been done as well in regards to temperature control, wifi connectivity and filament extrusion control. For this reason, at this point plenty of cables are still hanging around as it can be seen in the pictures. The holes for the top fan as well as the door magnet are not included in the drawings as you probably find your individual solutions for that.
This project is work in process. However, all files uploaded here already include the latest updates. Nevertheless, if you plan on doing the same just double check the most important holes and slots before cutting to avoid any waste material. If you find any mistakes or improvements do not hesitate to write it in the comments. In addition to that, if you need any other files I will try my best to catch up with that.
Have fun building and printing!
The original 8mm acrylic plates have been replaced by larger 4mm aluminium plates. All major holes and slots have been copied. In addition to that another aluminium plate has been added at the bottom which incorporates three adjustable feet. These three 4mm aluminium plates are connected through 6x570mm item aluminium profiles. The joints have been further tightened with 12 item angle brackets around the middle and bottom plate. In case you want to use 4mm plates as well you need to tighten the steel rods with 4mm washers as listed in the bill of materials below.
The shorts sides are enclosed with 2mm aluminium sheets and the long sides with 5mm acrylic sheets. From the front the built area can be accessed through an acrylic door and from the sides through two sliding doors which can be locked in place with a self-designed 3D-printed knob at the upper acrylic panel.
The bottom compartment is easy to access and offers plenty of space and mounts for cable management and electronics including the Raspberry Pi for Octoprint.
Overall from all these measures the printer became extremely stable and keeps the print area protected and noticeably warmer. Moreover, the printer looks even better now.
Besides the frame, work has been done as well in regards to temperature control, wifi connectivity and filament extrusion control. For this reason, at this point plenty of cables are still hanging around as it can be seen in the pictures. The holes for the top fan as well as the door magnet are not included in the drawings as you probably find your individual solutions for that.
This project is work in process. However, all files uploaded here already include the latest updates. Nevertheless, if you plan on doing the same just double check the most important holes and slots before cutting to avoid any waste material. If you find any mistakes or improvements do not hesitate to write it in the comments. In addition to that, if you need any other files I will try my best to catch up with that.
Have fun building and printing!
Similar models
thingiverse
free

Geeetech Y belt tensioner by Tijnv
...nter
you need a m4x30 bolt + nut (may need to dril the hole in the acrylic frame to 4mm)
and a pulley with 5mm bore + m5x20 bolt
thingiverse
free

Geeetech G2S Pro Stabilizer by Sokailu
...ch pylon an there you have it.
its a litle bit material expensive...
for the enclosure you can clide 4mm acrylic in from the top.
thingiverse
free

Geeetech G2s bearing plate upgrade mod by philbool
...he plate to attach the bearings are smaller than the stock plates this is because they are designed to be threaded with a m5 tap.
thingiverse
free

Tool Holder for Geeetech G2s Delta 3D Printer by DS_Desgin
...op.
...have fun :)
also check out my blue tape holder for the geeetech 3d printer:http://www.thingiverse.com/thing:1711845/#files
thingiverse
free

Chimera/Cyclops mount plate for Geeetech G2S Pro by martinengstrom
...der of the geeetech g2s pro delta printer. the small loop on the side is for a cable tie so that you can keep the wires in place.
thingiverse
free

Blue Tape Holder for Geeetech G2S Delta 3D-Printer by DS_Desgin
... or on the top.
...have fun :)
also check out my tool holder for the geeetech 3d printer:http://www.thingiverse.com/thing:1711895
thingiverse
free

Acrylic Enclosure's Printed Pieces
...ith less worry, but it will deter unwarranted hands from the printer as well. we're looking at you, middle school students ;)
thingiverse
free

Geeetech Printer PSU Cover & Clamps by bernbout
... over the psu and are a tight fit. then they are fixed to the frame and tightened in place with an m3 screw in the hole provided.
thingiverse
free

Geeetech I3 aluminium
...geeetech i3 aluminium
thingiverse
this is upgraded printer shaft and threaded shaft holder for better quality printing
thingiverse
free
![AC Power Jack Bracket [C14 etc.] by Nleinad](/t/8811158.jpg)
AC Power Jack Bracket [C14 etc.] by Nleinad
...for an ac power jack of type c14 or similar i designed it specifically to be used om my...
G2S
3ddd
$1
Stand G2
..., stand , ar3
комод-паттерн (g2) design by ar3+
turbosquid
$25
Ring G2
...turbosquid
royalty free 3d model ring g2 for download as stl on turbosquid: 3d models for games, architecture, videos. (1215199)
turbosquid
$19

FAMAS G2
...urbosquid
royalty free 3d model famas g2 for download as fbx on turbosquid: 3d models for games, architecture, videos. (1537479)
3d_ocean
$14

Mobile phone LG G2
... animation and rendering was done in softimage 2013. i am uploading obj. file with textures as well as softimage 2013 file whi...
turbosquid
$29

Pindad G2 Elite
...ree 3d model pindad g2 elite for download as ma, obj, and fbx on turbosquid: 3d models for games, architecture, videos. (1446515)
3d_export
$99
FAMAS G2 3D Model
...ic famas g2 france french fully gun mas rifle semi weapon 3d models assault weapon gun
famas g2 3d model humster3d 94303 3dexport
3d_export
$49

LG G2 3D Model
...g 3g android droid smartphone cell phone mobile cellular tft lcd touchscreen touch screen
lg g2 3d model humster3d 85156 3dexport
turbosquid
$100
Canon PowerShot G2
... available on turbo squid, the world's leading provider of digital 3d models for visualization, films, television, and games.
3d_export
$49

TMobile G2 3D Model
...se gingerbread 233 droid cell phone mobile cellular tft lcd touchscreen touch screen
tmobile g2 3d model humster3d 51180 3dexport
3ddd
$1
Ковёр G2
...ковёр g2
3ddd
ковёр
форматы в архиве:
max.2014
max.2011
obj
fbx
все текстуры присутствуют
Geeetech
3d_export
free
part right for geeetech acrylic i 3
...part right for geeetech acrylic i 3
3dexport
the engine can be shifted
3d_export
free
cable holder
...cable holder 3dexport for geeetech acrylic i...
thingiverse
free

geeetech a10 by Igor_garbuz
...geeetech a10 by igor_garbuz
thingiverse
model geeetech a10 ( solidworks).
thingiverse
free
geeetech calibration by muffler1979
...geeetech calibration by muffler1979
thingiverse
just a calibration test for the bed on a geeetech
thingiverse
free
Fan for Geeetech proB
...fan for geeetech prob
thingiverse
this is my fan for the geeetech pro b i3.
thingiverse
free

Chain for Geeetech A30
...chain for geeetech a30
thingiverse
this is my personal review of chain for geeetech a30.
thingiverse
free
Zugentlastung Hotend Geeetech A30T / Strain relief Geeetech A30T by 3DDennis1983
...zugentlastung hotend geeetech a30t / strain relief geeetech a30t by 3ddennis1983
thingiverse
zugentlastung hotend geeetech a30t
thingiverse
free
Kettenhalter i3x geeetech by Autark
...kettenhalter i3x geeetech by autark
thingiverse
geeetech i3x
thingiverse
free
Geeetech A10 Fanduct by stefan177gr
...geeetech a10 fanduct by stefan177gr
thingiverse
fanduct for geeetech a10
thingiverse
free
Geeetech filament guide by RicardoZ2018
...geeetech filament guide by ricardoz2018
thingiverse
desing for geeetech i3x
Upgrade
turbosquid
$15

Upgraded Glock
...e 3d model upgraded glock for download as obj, fbx, and blend on turbosquid: 3d models for games, architecture, videos. (1185950)
3ddd
$1

Calligaris / UPGRADE
...calligaris / upgrade
3ddd
calligaris
c материалом
3d_export
free

cz upgrade
...cz upgrade
3dexport
https://www.buymeacoffee.com/mestrezen3d https://linktr.ee/mestrezen3
turbosquid
$80

Custer Tank upgrade
... available on turbo squid, the world's leading provider of digital 3d models for visualization, films, television, and games.
turbosquid
$39

Domestos 1 upgrade
... available on turbo squid, the world's leading provider of digital 3d models for visualization, films, television, and games.
3d_export
$10

Upgraded tea cup
...upgraded tea cup
3dexport
a cup with an unusual design and a unique shape for a more enjoyable tea experience
3d_export
$8

dixy outlander classic style upgraded poplar wood lounge chair
...utlander classic style upgraded poplar wood lounge chair
3dexport
dixy outlander classic style upgraded poplar wood lounge chair
turbosquid
free

AK-12 + Upgrades low-poly 3D model
...ow-poly 3d model for download as fbx, blend, and unitypackage on turbosquid: 3d models for games, architecture, videos. (1501145)
evermotion
$700

Upgrade from V-ray 1.5 to 3.5 for 3ds max
...here is no need to purchase a new dongle - your current dongles will be reprogrammed to carry v-ray 3. evermotion 3d models shop.
evermotion
$300

Upgrade from V-Ray 2.0 to V-ray 3.5 for 3ds Max
... interface (gui) for editing settings on one machine and one render node for rendering on one machine. evermotion 3d models shop.
Enclosure
3d_export
free

electrical enclosure
...l enclosure where electrical devices like (relays, contactors, busbars ) are kept in order to protect from hazardous environment.
turbosquid
$100

GPU Enclosure
...yalty free 3d model gpu enclosure for download as obj and stl on turbosquid: 3d models for games, architecture, videos. (1381061)
3d_export
$5

Electrical Enclosure
...ed. also has tower lights attaced on the top.<br>file format that are available:<br>.step<br>.obj<br>.stl
archive3d
free

Enclosure 3D Model
...closure 3d model
archive3d
shower enclosure-acquarius- 3d model for interior 3d visualization.
archive3d
free

Enclosure 3D Model
...enclosure 3d model
archive3d
shower enclosure-omega- 3d model for interior 3d visualization.
archive3d
free

Enclosure 3D Model
...enclosure 3d model
archive3d
shower enclosure-vega - 3d model for interior 3d visualization.
archive3d
free

Enclosure 3D Model
...enclosure 3d model
archive3d
shower enclosure-zenith - 3d model for interior 3d visualization.
turbosquid
$20

shower enclosure
... available on turbo squid, the world's leading provider of digital 3d models for visualization, films, television, and games.
turbosquid
$14

Dumpster Enclosure
... available on turbo squid, the world's leading provider of digital 3d models for visualization, films, television, and games.
turbosquid
$25

3d printer enclosure
... model 3d printer enclosure for download as ipt, skp, and fbx on turbosquid: 3d models for games, architecture, videos. (1634310)
Pro
turbosquid
$29

Pro
...ree 3d model mac pro for download as obj, c4d, fbx, and blend on turbosquid: 3d models for games, architecture, videos. (1505782)
turbosquid
$15

Apple Mac Pro and Pro Display
...ee 3d model apple mac pro and pro display for download as max on turbosquid: 3d models for games, architecture, videos. (1417078)
3d_export
$5

iphone 13 pro max and pro
...3 pro max and 13 pro the model is made in four colors (graphite, gold, silver, and blue), all of which are attached in the files.
3d_export
free

sapphire pro
...sapphire pro
3dexport
sapphire pro 3d printer head mask
3d_export
$4

macbook pro
...macbook pro
3dexport
macbook pro 13" inch 2020 years model
3ddd
free

GentleLase Pro
... syneron , candela
gentlelase pro аппарат для лазерной эпиляции
turbosquid
$25

PRO frame
...rbosquid
royalty free 3d model pro frame for download as max on turbosquid: 3d models for games, architecture, videos. (1148329)
turbosquid
$5

Alien pro
...osquid
royalty free 3d model alien pro for download as blend on turbosquid: 3d models for games, architecture, videos. (1678446)
turbosquid
$5

iphone11 pro
...uid
royalty free 3d model iphone11 pro for download as blend on turbosquid: 3d models for games, architecture, videos. (1562707)
3ddd
$1

Mac Pro (appel)
...mac pro (appel)
3ddd
компьютер , apple
mac pro
Frame
archibase_planet
free

Frame
...frame
archibase planet
frame photo frame
frame n190813 - 3d model (*.gsm+*.3ds) for interior 3d visualization.
archibase_planet
free

Frame
...frame
archibase planet
frame photo frame
frame n071113 - 3d model (*.gsm+*.3ds) for interior 3d visualization.
3ddd
$1

Frame
...frame
3ddd
frame
3ddd
free

Frame
...frame
3ddd
frame
archibase_planet
free

Frame
...frame
archibase planet
frame mirror frame ornament
frame n260113 - 3d model (*.gsm+*.3ds) for interior 3d visualization.
archibase_planet
free

Frame
...frame
archibase planet
frame photo frame
frame photo n190813 - 3d model (*.gsm+*.3ds) for interior 3d visualization.
archibase_planet
free

Frame
...frame
archibase planet
frame window window frame
frame 1 - 3d model (*.gsm+*.3ds) for interior 3d visualization.
archibase_planet
free

Frame
...frame
archibase planet
frame window frame window
frame 3 - 3d model (*.gsm+*.3ds) for interior 3d visualization.
archibase_planet
free

Frame
...frame
archibase planet
frame wall frame decoration
frame 1 - 3d model (*.gsm+*.3ds) for interior 3d visualization.
archibase_planet
free

Frame
...frame
archibase planet
frame window window frame
frame 2 - 3d model (*.gsm+*.3ds) for interior 3d visualization.