Thingiverse
Garmin 910XT 22mm Aerobar Extension Mount by slonold
by Thingiverse
Last crawled date: 3 years ago
Overview
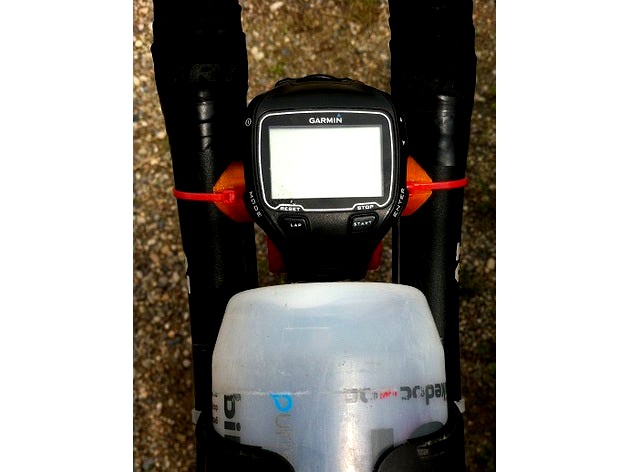
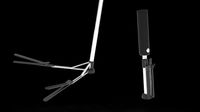
Simple system with adjustable viewing angle to mount a Garmin 910XT via the standard wrist strap to 22mm diameter aerobar extensions. Accommodates inner bar spacing of 40 to 50mm as well as shifter cables running on the inner face of the aerobars.
Tools and Materials Required
3mm x 3 to 6mm long or #3-48 x 1/8 to 1/4" long set screws for angle adjustment X2
1.5mm(for m3) or 0.050"( for #3-48) hex key for set screws
2.4mm or 3/32" (for m3) or 5/16" (for #3-48) drill bit to size set screw holes
m3 x 0.5 or #3-48 tap
Miniature Cable Ties (100mm/4" x 2.4mm/3/32" x 1mm/0.04") X4
Half round file ~12mm/1/2" and sharp knife for clean-up.
Printing
Print 2 of Garmin_Mount_Pin - recommend individually for best diameter consistency
Print 1 of either Garmin_Mount_Centre_Front_Adjust (pictured) or Rear_Adjust
Material: PETG recommended
Shell Thickness: 1.5 to 2mm
Infill: 10-15% should be plenty
Support: Not required if layer height is small. i used variable layer height from 0.32mm on the bottom of the pins to 0.16mm for the section with the cable tie passage (Slic3r) with a 0.5mm nozzle.
Assembly:
Size the angle adjustment holes and tap threads - remember PETG likes it slow, cool and needs frequent chip clean out in order to avoid rewarding you with a gummy mess. Note that you will likely have to bury the tap in order to get threads through to the bore of the centre piece but bear in mind that a snapped off tap in the work piece is a sad sight indeed.
Clean up the bore of the centre piece and outside of the centre pins ensuring pins fit freely but not loosely in centre piece and that the cable tie passages are reasonably clear..
Install a cable tie in each pin (a little judicious curving of the cable tie will help).
Push both pins fully into the centre piece.
Locate between extensions - note that oblong hole in centre piece faces up.
Add second cable ties and tighten firmly.
Mount watch - note that strap does not have to be tight - spare your spring pins
Adjust angle and fix by gently snugging set screws.
Similar models
thingiverse
free

Aerobar Mount by OdoSpace
.... the bar diameter is 22mm (may fit on others too).
to mount your garmin use the original garmin edge mount (see provided image).
thingiverse
free

Gopro (Garmin Virb) extension - adjustable angle
...gopro (garmin virb) extension - adjustable angle
thingiverse
adjustable extension mount for gopro and garmin virb
thingiverse
free

Pi 3 Home Assistant top, zip/cable tie bottom by bduhan
...rt for logo
no gpio or ribbon cable holes
bottom
cable/zip tie mounting holes along one side.
m3 machine screws secure pi and top
thingiverse
free

Garmin Forerunner 910xt Bicycle Mount by ohecker
...garmin forerunner 910xt bicycle mount by ohecker
thingiverse
mounts a garmin 910xt sportswatch to the stem of a bicycle.
thingiverse
free

Phone holder by Fredric
... the two holes to be tapped for m3 screws with 2.5 mm drill.
the other holes are drilled 3mm.
glue rubber on the bottom for grip.
thingiverse
free

Wyze Cam Mount Extension for Ender 3 by rothvin
...note: the wyze cam mount extension sits on the wyze cam mount which is available here: https://www.thingiverse.com/thing:3513349.
thingiverse
free
2020 Extrusion Cable Tie Mounts by JMadison
...hese are designed for cable ties less than 3mm wide.
the hole is for m3 flathead screws.
these should be printed without support.
thingiverse
free

Garmin Mount for Profile design T2 Aerobar by vishnujs
... to customize: http://a360.co/2bi83w4
disclaimer:
i have not tested the strength of this extensively, use it at your own risk :-)
thingiverse
free

Clip holder by bezelt
...ned this cable tie holder to hold the cable ties in place on my boat. one slit for the cable tie, and one hole for a screw / nut.
thingiverse
free

Ender 3 Pro X Axis Cover with Adjustable Endstop and Cable Tie Points by DJScopeSOFM
...er with multiple locating holes for the endstop and points for cable ties.
3d dwg attached so that you can modify it as you wish.
910Xt
thingiverse
free
Garmin Forerunner 910xt Bicycle Mount by ohecker
...garmin forerunner 910xt bicycle mount by ohecker
thingiverse
mounts a garmin 910xt sportswatch to the stem of a bicycle.
thingiverse
free

Garmin 910XT bracelet / wristband by Jonathanmf
...the short garmin 910xt wristband part.
need to be print with flexible filament, of course :)
fit perfectly.
have fun.
jonathan
thingiverse
free

Garmin 910XT charging clip repair by tommo27
...ginal clip is curved on all surfaces, my version is obviously flat on the back face for printing purposes but it works just fine.
thingiverse
free

Bike Watch mount Bike Handle Bar Mount 31.8mm Watch mount by PSomeone
...mount 31.8mm watch mount by psomeone thingiverse garmin™ forerunner 910xt but many other watches will fit. it's a simple...
Slonold
thingiverse
free
Crabby Cap Zesty Nimble SeeMeCNC HE280/Accelerometer Mount by slonold
... the ptfe tube should contact the bottom of the filament guide on centre without distortion. re-trim the ptfe tube if necessary.
thingiverse
free
Nimble Gimbal - Gimbaling Extruder Motor Mount for Zesty Nimble by slonold
...?). with the x60 i went with a 0.3mm nozzle and 0.2mm extrusion width, 3 perimeters, 0.125 layer height and 5 top/bottom layers.
thingiverse
free
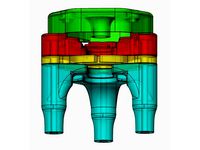
Prometheus Mount for SeeMeCNC Rostock Ball Joint Platform +/- Accelerometer Option by slonold
...ive to the clamp plate like a clam shell.
be sure to seat bowden tube and insert ptc retainer before mounting accelerometer board
thingiverse
free

PanelDue 5" and Duet 2 Mounts for SeeMeCNC Rostock Max V2 by slonold
...phery of the onyx bed. some tape to hold the bed and template down will be your friend whilst you outline the bed plate cut out.
thingiverse
free

Belt Tension Adjust Truck for SeeMeCNC Ball Joint System and 1"x1" Extrusion by slonold
...ion truck at top, check tension at middle against fixed distance reference. tension at will!! gently snug screws when finished.
thingiverse
free
Nimble Gimbal For 2020 Delta Frame by quadcells
...i saw slonold's nimble gimbal and liked the idea. slonold did a great job on his design. i needed...
thingiverse
free
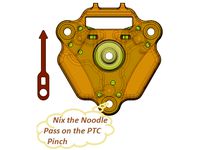
Nimble Gnu - System to Adapt the Zesty Nimble Extruder to a Prometheus V2 Hotend Mounted to a SeeMeCNC Balljoint Effector Platform with Accelerometer Probe PCB by slonold
...ter, strap down the whip.
remember to revisit your slicer retraction settings. it is a whole new world without the bowden tube.
thingiverse
free
Zesty Nimble V2 Breech Replica by kulfuerst
...p3 - bearing offset by 0.3 mm i like slonold#39;s naming system and adapted it here. i have not...
Aerobar
thingiverse
free

Barfly shim for aerobars by Enviro
...barfly shim for aerobars by enviro
thingiverse
a shim to mount a barfly accessory mount on standard aerobars.
thingiverse
free

Aerobar bracket riser by Mark_S
...ight of forward-projecting aerobars.
there are two sizes: 15 and 30 mm, which may be used in combination to give a rise of 45 mm.
thingiverse
free

aerobar phone/lamp holder by electronicstime
...erobars to mount my phoneholder. it fits on the btwin aerobar, but will work on others depending on the distance between the bars
thingiverse
free

Aerobars Headlamp/GoPro mount by Roxanna77
... roxanna77
thingiverse
this is a little bar for mounting a headlight or a gopro onto an set of profile designs century aerobars.
thingiverse
free

Garmin mount for aerobars by alga42
...diameter, print, clean up the mount area with a knife or sandpaper to damage the garmin as little as possible, clip on and enjoy.
thingiverse
free

Spinningbike Kettler Racer Aerobar-accessories by demjansein
...giverse
replacement for the broken parts of the aerobar-armrests of an older kettler racer spinning-bike (with a 22mm handlebar)
thingiverse
free
Aerobar Mount by OdoSpace
.... the bar diameter is 22mm (may fit on others too).
to mount your garmin use the original garmin edge mount (see provided image).
thingiverse
free

Bike aerobar BTA bottle cage mount by Mape
... most bta mounts don't work.
the plate should be attached to aerobar extension with 4 small zip ties or something equivalent.
thingiverse
free

Aerobar 50mm Riser with Di1 by JoeSay
...aerobar 50mm riser with di1 by joesay
thingiverse
50mm riser with di2 mount
thingiverse
free

Profile T1+ aerobar 40mm spacer by mathesonmd
... save your back. you'll need a pair of m6x55mm bolts for each spacer. profile charge $25 for these little pieces of plastic.
Garmin
turbosquid
$15

Garmin running watch
...l garmin running watch for download as max, 3ds, fbx, and obj on turbosquid: 3d models for games, architecture, videos. (1538692)
3d_export
$5

JPS GARMIN NUVI 3760T 3D Model
...car satellite video device screen map mobile vray electronics droid cgozzie
jps garmin nuvi 3760t 3d model cgozzie 80867 3dexport
3d_export
$5

JPS GARMIN NUVI 1490 3D Model
... car satellite video device screen map mobile vray electronics droid cgozzie
jps garmin nuvi 1490 3d model cgozzie 80866 3dexport
cg_studio
$45

GPS Navigator Garmin Nuvi 3103d model
...3ds .c4d .max .mb .obj - gps navigator garmin nuvi 310 3d model, royalty free license available, instant download after purchase.
turbosquid
$10

Garmin Vivo Smart HR_Fitness Wristband Blue
...rmin_vivo_smart_hr_fitness_wristband_blue for download as fbx on turbosquid: 3d models for games, architecture, videos. (1313628)
turbosquid
$30

Garmin dezl 560LMT 5" Bluetooth Portable Trucking GPS Navigator Trucker
... available on turbo squid, the world's leading provider of digital 3d models for visualization, films, television, and games.
3d_export
$65

TomTom GPS Navigator 3D Model
...tomtom gps navigator 3d model 3dexport tomtom gps navigator garmin navteq navtek nokia nuvi pda satellite wireless one device...
thingiverse
free

Garmin Mount
...garmin mount
thingiverse
garmin replacement mount
thingiverse
free

Garmin Adapter for GoPro
...garmin adapter for gopro
thingiverse
garmin adapter for gopro
thingiverse
free

garmin vivofit by cerezorg
...garmin vivofit by cerezorg
thingiverse
garmin vivofit strap
22Mm
turbosquid
$1

support mods 22mm for e-cig
... available on turbo squid, the world's leading provider of digital 3d models for visualization, films, television, and games.
3ddd
$1

JRM-0554
...производитель: johan-richard -http://www.johnrichard.com - модель: jrm-0554 размеры: w-610mm, d-1220mm, h-22mm ...
3d_export
$9

flower number 4
...121,643 edges: 364,995 facet: 243,330 tris: 243,330 x = 22mm y = 30 mm z = 2 mm need...
3d_export
$5

Cartouche-011
...carving on cnc machines length: 503mm width: 158mm height: 22mm ...
3d_export
$16

ring with stones
...ring with stones 3dexport current ring size is 22mm<br>ring rail size is 69.1<br>сentral stone is 6.5 mm<br>18 stones...
3d_export
$7

ring of blades
...in the archive.<br>ring diameter:<br>16mm 17mm 18mm 19mm 20mm 21mm 22mm 23mm<br>in the archive there are models of different quality:<br>high...
3d_export
$7
ring wild rocks
...wild rocks<br>ring diameter: 16mm 17mm 18mm 19mm 20mm 21mm 22mm 23mm need change write me: lilipop1122@mail.ru<br>there are 2 types...
3d_export
$5
puzzle cube
...to account for some sagging. the bridge length is 22mm cube size at default scale is...
3d_export
$7

knife
...igs<br>- stp<br>- stl<br>- knife: 20,232 vertices, 23,920 faces<br>- knife: (w)22mm (l)195mm (h)9mm<br>other models may be found in my...
3d_export
$19

cutlery set 3 pieces
...spoon: (w)42mm (l)180mm (h)11mm<br>- fork: (w)26mm (l)184mm (h)9mm<br>- knife: (w)22mm (l)195mm (h)9mm<br>other models may be found in my...
Extension
3d_export
$5
extension plug - extension socket
...model. low poly and game ready. with blender files and texture (.png).<br>verts: 424<br>faces: 364<br>tris: 808
3ddd
$1

Moooi, Extension Chair
... стул , вешалка
стулья фирмы moooi, коллекция extension
turbosquid
$300

Bedroom Extension
...
royalty free 3d model bedroom extension for download as skp on turbosquid: 3d models for games, architecture, videos. (1682078)
3d_export
$5
palo extensible
...palo extensible
3dexport
turbosquid
$39
Leg Extension
...ee 3d model leg extension for download as obj, fbx, and blend on turbosquid: 3d models for games, architecture, videos. (1276776)
3d_export
$5

lampe extensible architecte
...lampe extensible architecte
3dexport
lampe extensible architecte maisons du monde
turbosquid
$20

Leg Extension
... available on turbo squid, the world's leading provider of digital 3d models for visualization, films, television, and games.
turbosquid
$2

Garage Extension
... available on turbo squid, the world's leading provider of digital 3d models for visualization, films, television, and games.
turbosquid
free

Extension cable
... available on turbo squid, the world's leading provider of digital 3d models for visualization, films, television, and games.
3ddd
$1

Moooi Extension Chair
...moooi extension chair
3ddd
moooi
http://www.moooi.com/products/extension-chair
Mount
3d_export
free

mounting bracket
...mounting plate is the portion of a hinge that attaches to the wood. mounting plates can be used indoors, cabinetry and furniture.
turbosquid
$2

MOUNTING
... available on turbo squid, the world's leading provider of digital 3d models for visualization, films, television, and games.
turbosquid
free

Mounts
... available on turbo squid, the world's leading provider of digital 3d models for visualization, films, television, and games.
turbosquid
free

Mount Fuji
...fuji
turbosquid
free 3d model mount fuji for download as obj on turbosquid: 3d models for games, architecture, videos. (1579977)
3d_export
$5

Headphone mount LR
...headphone mount lr
3dexport
headphone mount l+r
turbosquid
$39

Mount rainier
...quid
royalty free 3d model mount rainier for download as fbx on turbosquid: 3d models for games, architecture, videos. (1492586)
turbosquid
$5

pipe mounting
...quid
royalty free 3d model pipe mounting for download as obj on turbosquid: 3d models for games, architecture, videos. (1293744)
turbosquid
$3

Mounting Tires
...uid
royalty free 3d model mounting tires for download as fbx on turbosquid: 3d models for games, architecture, videos. (1708511)
3d_export
$5

Magnetic GoPro Mount
...pro mount
3dexport
cool magnetic mount for gopro. allows you to mount the camera on flat metal surfaces and get exclusive shots.
turbosquid
$5

Stone Mount
...ty free 3d model stone mount for download as ma, obj, and fbx on turbosquid: 3d models for games, architecture, videos. (1370306)