Thingiverse

Gameboy Advance QI Converter by JohnHess
by Thingiverse
Last crawled date: 3 years, 1 month ago
Disclaimer : Work in progress , and I`m a novice when it comes to electric wiring.
So this a mod that makes a QI charging build for the GBA much neater and gives you the ability to use the USB-C charging without having to remove the cover. You can achieve this without 3d printing, I`ve linked a Youtube video below, explains the wiring better.
I am going to updating the Design and parts list soon
You will need a soldering iron and the items listed below:
-the 3d printed models
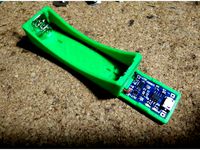
Charging board TP4056 LiPo 18650 battery Charger
Battery LIPO 103450 (1600mAH Ebay £14.99) or LIPO 103048 (1500mAH Ebay £6.65)
1N4001 Diode
A QI charger receiver adapter, ( If your not bothering with the 3D printing, make sure its a USB-C one / If you are using the 3d print dosent matter which receiver you use)
some wire 1.5mm maximum wide and not to thin that it cant handle constant electric current ( Im leaving this your discretion)
Solder and Flux is optional, but will make this easier.
Electrical tape or Capon tape
This video should explain the wiring for everything,(dont worry the placement on the charge board is exactly the same) and what each part will do. With this parts list it you dont have to cut anything on your shell, but you will require to remove the original battery holders/pegs (someone in comments please tell me what their called thanks :)
https://www.youtube.com/watch?v=4YVQiYM82ts&t=916s
Instructions, wiring is for the most part the same except for QI receiver that your gonna have to take apart:
Wire in the the battery onto the charging board
Grab the diode and solder wire (positve/Red) on each end so that the total length of the wire is around 8cm - important remember which side of the wire has the has the grey line on the diode.
Wire in the output for the GBA leave some length about 8 cm on the both,
Place some tape 2.5 cm long horizontally on the bottom of charge board
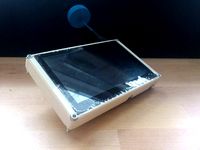
Place the 3D printed parts on both sides like in the pictures taping them in place.
Fish the wires through Body 2 (faces the battery contact on the PC of the GBA)
cut one negative and a positive wire for QI charging board output about 1.5 cm and solder them in
cut one negative and a positive wire about 2.5cm long and solder them to the charge input of the QI receiver.
Solder the in the 1,5 cm long wire to respective charge inputs on the charge board.
Place a piece of tape on top charge board.
Fish the 2.5 cm long wire one QI receiver board through Body 1.
Tape the qi charging board to the 3d print ( yes its a complete sandwich)
Solder the coil to the 2.5 cm long cables.
Fold the Coil on the top.
Just check on a QI charger if everything still works.
Done the rest is like the video
Yes Im going to video for this ;) once Ive finalised the design.
Thanks for reading and I`d love any Responses
So this a mod that makes a QI charging build for the GBA much neater and gives you the ability to use the USB-C charging without having to remove the cover. You can achieve this without 3d printing, I`ve linked a Youtube video below, explains the wiring better.
I am going to updating the Design and parts list soon
You will need a soldering iron and the items listed below:
-the 3d printed models
Charging board TP4056 LiPo 18650 battery Charger
Battery LIPO 103450 (1600mAH Ebay £14.99) or LIPO 103048 (1500mAH Ebay £6.65)
1N4001 Diode
A QI charger receiver adapter, ( If your not bothering with the 3D printing, make sure its a USB-C one / If you are using the 3d print dosent matter which receiver you use)
some wire 1.5mm maximum wide and not to thin that it cant handle constant electric current ( Im leaving this your discretion)
Solder and Flux is optional, but will make this easier.
Electrical tape or Capon tape
This video should explain the wiring for everything,(dont worry the placement on the charge board is exactly the same) and what each part will do. With this parts list it you dont have to cut anything on your shell, but you will require to remove the original battery holders/pegs (someone in comments please tell me what their called thanks :)
https://www.youtube.com/watch?v=4YVQiYM82ts&t=916s
Instructions, wiring is for the most part the same except for QI receiver that your gonna have to take apart:
Wire in the the battery onto the charging board
Grab the diode and solder wire (positve/Red) on each end so that the total length of the wire is around 8cm - important remember which side of the wire has the has the grey line on the diode.
Wire in the output for the GBA leave some length about 8 cm on the both,
Place some tape 2.5 cm long horizontally on the bottom of charge board
Place the 3D printed parts on both sides like in the pictures taping them in place.
Fish the wires through Body 2 (faces the battery contact on the PC of the GBA)
cut one negative and a positive wire for QI charging board output about 1.5 cm and solder them in
cut one negative and a positive wire about 2.5cm long and solder them to the charge input of the QI receiver.
Solder the in the 1,5 cm long wire to respective charge inputs on the charge board.
Place a piece of tape on top charge board.
Fish the 2.5 cm long wire one QI receiver board through Body 1.
Tape the qi charging board to the 3d print ( yes its a complete sandwich)
Solder the coil to the 2.5 cm long cables.
Fold the Coil on the top.
Just check on a QI charger if everything still works.
Done the rest is like the video
Yes Im going to video for this ;) once Ive finalised the design.
Thanks for reading and I`d love any Responses
Similar models
grabcad
free

Universal Qi Wireless Receiver Module
...rom the coil. make sure the coil is facing out towards the charger when you install it into your project, or it wont work at all!
grabcad
free

Wireless Charger Module
...dule + wireless qi ti charging module pcba circuit board coil receiver universal 5v 1a for mobile phone fast quick charge diy kit
thingiverse
free
TP4056 18650 Holder Charger by zeroeffekt
...lue them in place.
it's easier if you solder the wires to the tp4056 then slide it in place and then solder the contacts on.
thingiverse
free

Lipo Battery Charger and Organizer
... i created this box to hold the charger, the balance board and the batteries keeping them all in place and secure while charging.
thingiverse
free
FPV receiver by Cichaczech
...er video signal and power supply to lcd logic board. isolate all electronic parts ( i used kapton tape).
now put it all together.
thingiverse
free

Battery Charging Adapter for the Kyosho dNano by 3dprintingblog
... the battery holder part are available here: http://minirc-project.com/63-battery-charging-adapter-for-the-kyosho-dnano-rc-model/
thingiverse
free

Wireless charging phone stand using a $3 charging plate from china by leftthegan
...stick to make it more stable
tools neded:
3d printer
knife
phillips screw driver
soldering iron
hot glue gun
tutorial in the pics
3dwarehouse
free

LiPo Charger Basic - Mini-USB PRT-10401
...ed in the batteries we carry), and a mini-usb connector. #battery #charger #lipo #lipoly #lithium #lithium_polymer #sfe #sparkfun
thingiverse
free

Retrofalg GPI Case - LiPo battery adapter (no mod version)
...protect your solders from short circuits (see pictures)
it was designed for type-c usb 5 v 1a 18650 tp4056 printed circuit board.
thingiverse
free

GBA SP extended battery cover by sherks
... up with battery mod , 2 lipo battery that suite battery's hole , and add a type c charging board , to make it charge faster.

Gameboy
3d_export
$5

GameBoy
...gameboy
3dexport
game boy
turbosquid
$39

Gameboy
... available on turbo squid, the world's leading provider of digital 3d models for visualization, films, television, and games.
turbosquid
free

Gameboy
... available on turbo squid, the world's leading provider of digital 3d models for visualization, films, television, and games.
turbosquid
$16

Gameboy Color
...free 3d model gameboy color for download as png, max, and obj on turbosquid: 3d models for games, architecture, videos. (1338626)
turbosquid
$40

Gameboy 1989
...model gameboy (1989) for download as blend, fbx, obj, and dae on turbosquid: 3d models for games, architecture, videos. (1550925)
turbosquid
$6

gameboy low poly
...d
royalty free 3d model gameboy low poly for download as lwo on turbosquid: 3d models for games, architecture, videos. (1335132)
turbosquid
$6

Nintendo Gameboy toys
...ree 3d model nintendo gameboy toys for download as ma and obj on turbosquid: 3d models for games, architecture, videos. (1398117)
turbosquid
$3

Gameboy(Old school)
...model gameboy(old school) for download as obj, fbx, and blend on turbosquid: 3d models for games, architecture, videos. (1473507)
3d_export
$30
pink retro gameboy console blender
...ameboy console blender
3dexport
pink gameboy console made in blender https://lynkfire.com/gv https://www.instagram.com/gv.art.e/
3d_export
$19
Game Boy 3D Model
...game boy 3d model 3dexport gameboy game boy nintendo handheld videogame high quality toy children...
Qi
design_connected
free

Qi Seat RK-344
...seat rk-344
designconnected
mcguire furniture company qi seat rk-344 poufs computer generated 3d model. designed by robert kuo.
turbosquid
$8

Bathroom furniture set Scavolini QI
... furniture set scavolini qi for download as max, obj, and fbx on turbosquid: 3d models for games, architecture, videos. (1277208)
turbosquid
$15

7 CM Qi Charger Stand
... available on turbo squid, the world's leading provider of digital 3d models for visualization, films, television, and games.
3d_export
$5

set vases-no1- dei qi simple ceramic vase
...oration-creative-ornaments/dp/b07q9kw9yg<br>polys: 390.400<br>render: corona<br>formats: 3ds max 2015, obj, fbx
3ddd
free

Bross Eclipse
...eclipse 3ddd bross кресло eclipse (1662 qi / 1662l qi design enzo berti фабрика bross размер...
thingiverse
free

stand QI note 4 - support QI
...stand qi note 4 - support qi
thingiverse
support pour la base qi que l'on trouve sur ebay.
thingiverse
free

qi box by sniperdude
...qi box by sniperdude
thingiverse
qi box all parts from adafruit
thingiverse
free

Qi Dock by Stevetecx
...s very well. :)
attached is the:
qi dock.stl
for all the makers - qi dock.123dx
and a s3d gcode generated for a um2+ (pla, 0,15)
thingiverse
free

QI Nightstand by RalfRutke
...tand by ralfrutke
thingiverse
cut a whole in your nightstand or desk or whatever with a jigsaw.
place the qi inside and wire it.
thingiverse
free

Qi Charger Stand by OakLab
...ample, a qi charger corresponds to "aukey t20 qi wireless charger" (http://www.aukey.com/product/wireless-charger-t20).
Advance
turbosquid
$139

Carol (Advanced)
... available on turbo squid, the world's leading provider of digital 3d models for visualization, films, television, and games.
turbosquid
$15

Explay Advance
... available on turbo squid, the world's leading provider of digital 3d models for visualization, films, television, and games.
turbosquid
$15

ADVANCED ROOM.max
... available on turbo squid, the world's leading provider of digital 3d models for visualization, films, television, and games.
turbosquid
$2

Advanced Crate
... available on turbo squid, the world's leading provider of digital 3d models for visualization, films, television, and games.
turbosquid
$1
Advanced Canister
... available on turbo squid, the world's leading provider of digital 3d models for visualization, films, television, and games.
turbosquid
$20

automatic Advance Gun
...
royalty free 3d model automatic advance gun for download as on turbosquid: 3d models for games, architecture, videos. (1609069)
turbosquid
$4

Advanced Shower Equipment
...free 3d model advanced shower equipment for download as blend on turbosquid: 3d models for games, architecture, videos. (1282411)
turbosquid
$1

Advanced Sniper Rifle
...oyalty free 3d model advanced sniper rifle for download as obj on turbosquid: 3d models for games, architecture, videos. (720205)
3d_ocean
$32

Advanced Hospital Bed
...ds max 2010 or higher and many others. formats *.max scanline *.max vray *.max mentalray *.c4d advanced render *.c4d cinema 4d...
turbosquid
$17

Advance Rifle Patrol
...free 3d model advance rifle patrol for download as ma and obj on turbosquid: 3d models for games, architecture, videos. (1409260)
Converter
turbosquid
free
pallet converter
...d
royalty free 3d model pallet converter for download as rfa on turbosquid: 3d models for games, architecture, videos. (1285733)
3d_ocean
$85

Convertible Porsche
...agon
3d model of convertible porsche .object are grouped.rendering scene with,materials are include and detailed, with all files.
turbosquid
$5

GPU Converter
...yalty free 3d model gpu converter for download as 3ds and max on turbosquid: 3d models for games, architecture, videos. (1355494)
turbosquid
$14

Convert Sofa
... 3d model convert sofa for download as max, 3ds, fbx, and obj on turbosquid: 3d models for games, architecture, videos. (1546663)
3d_export
$15

pontiac gto convertible
...pontiac gto convertible
3dexport
pontiac gto convertible 3d model.
turbosquid
$10

Converter station
... available on turbo squid, the world's leading provider of digital 3d models for visualization, films, television, and games.
3d_ocean
$89

Audi A5 Convertible
...erman german interior interior luxury luxury sport sport vehicle vehicle
audi a5 convertible – high detailed model with interior.
3d_ocean
$55

Convertible Car
...d model of convertible car .objects are grouped.rendering scene with texture,materials are included and detailed, with all files.
3d_ocean
$89

Audi S5 Convertible
... german interior interior luxury luxury s5 s5 sport sport vehicle vehicle
audi s5 convertible – high detailed model with interior
design_connected
$27

Nomade Convertible Sofa
...ade convertible sofa
designconnected
ligne roset nomade convertible sofa computer generated 3d model. designed by gomez, didier.