Thingiverse

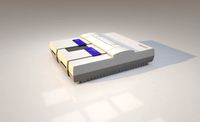
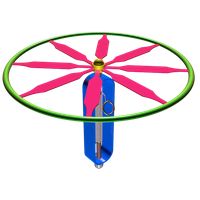
Functional Pokéball - Nintendo Switch Game Cartridge Case by samk3ys
by Thingiverse
Last crawled date: 3 years, 1 month ago
I wanted a cool way to hold my switch game carts and this is what I thought to do.
I modeled this pokéball a couple of months ago and it's one of my first big 3D printing projects; I'm quite proud of it and hope you all can enjoy it too. With the new Pokémon Let's Go games being announced I figured it's a great time to share!
Disclaimer: The switch logo is a trademark of Nintendo and the pokéball is a copyright of the Pokémon Company. I do not claim to own them.
Design
There's already quite a few nice pokéball designs on Thingiverse (see https://www.thingiverse.com/thing:1615753 by MrFozzie, https://www.thingiverse.com/thing:411193 by Intentional3D, & more), but none were exactly what I wanted. So I figured I'd improve my 3D modeling skills while making exactly what I want.
I made this in AutoDesk 123D Design, which is apparently discontinued now. I was going to share my design files until I heard that. However if you want the files to make any edits feel free to message me.
The pokéball can open and close (you can even add a small torsion spring to the hinge so it pops open). When printed at 100% size, you can use 1.75 mm filament as the hinge (I actually permanently melted the filament into the case using an old soldering iron). The button also has a spring in it and feels really nice. I used pen springs for the button and hinge (cut it and bent the ends), though you may be able to find nicer ones.
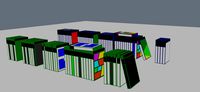
I made a few different layouts, but only printed the "9 carts" version so far. It's designed to hold tightly onto the cartridges, but not damage the game art b/c it has larger "windows" where the art is. The "9 carts - loose" does not have this, but shouldn't damage the art anyway. The "11 carts" may not leave much room to grab games if it's full. "flat" doesn't have any cartridge slots if you'd like a canvas to design your own. "hollow" is like a traditional pokéball and leaves more space for things other than cartridges. Each of the "carts" designs also have room for 2-4 micro-SD cards.
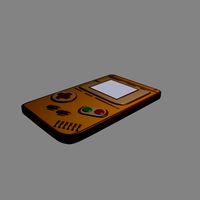
The bottom shell has a version called "90-degree cut", which simply guarantees the pokéball can open up to 90 degrees. Otherwise the top shell will hit the bottom shell before opening to a full 90 degrees. The top shell comes either original or with a cutout for a switch logo to be embedded.
Assembly
It's a modular design that should fit together easily. There are 5 parts: top outer shell, top inner shell, a button, bottom inner shell, and bottom outer shell. There are a few different versions for some parts (shown in 3D models).
Also, the button is 3 different parts (button, shell, & latches). To assemble put a spring (got mine from a pen) in the button cylinder and insert it into the shell. Hold that in place and push the latches in (may have to cut/sand the edges off). You may also have to glue the latches in depending on if they stay by themselves or fall out (button-tight may have more luck staying put). Be careful putting the button into the ring on the top inner shell (probably the most fragile part of the print, but should be pretty strong after getting the button in)
Make sure to remove all support material, especially where the button latches to the bottom inner shell, or else the ball may not be able to stay closed.
If you opt for the Switch Logo insert it may have to be sanded to fit properly into the top outer shell. I actually sanded the white logo edges and then stuck it in the freezer and later shoved it into place.
First get the button assembled and put into the top inner shell, lining the latch up with where it goes in the bottom inner shell. The outer shells fit onto their respective inner shells (they're keyed and will only fit one way) and should be glued once you have a fit you like. Then the top and bottom half fit together and a hinge (1.75 mm filament) can be inserted. This is the time to insert a torsion spring if you have one (it can be very tricky to position correctly and get the hinge in). I recommend hot gluing the ends of that spring onto the inner shells. Make sure the pokéball opens and closes to your liking and you're done! Message me if you need any help. I may try to make a video the next time I can print one (may not be until Fall).
I didn't design a stand, but there's a lot of nice ones. I really liked this one by xlitec13 (https://www.thingiverse.com/thing:656385).
Hope you like the design!
I modeled this pokéball a couple of months ago and it's one of my first big 3D printing projects; I'm quite proud of it and hope you all can enjoy it too. With the new Pokémon Let's Go games being announced I figured it's a great time to share!
Disclaimer: The switch logo is a trademark of Nintendo and the pokéball is a copyright of the Pokémon Company. I do not claim to own them.
Design
There's already quite a few nice pokéball designs on Thingiverse (see https://www.thingiverse.com/thing:1615753 by MrFozzie, https://www.thingiverse.com/thing:411193 by Intentional3D, & more), but none were exactly what I wanted. So I figured I'd improve my 3D modeling skills while making exactly what I want.
I made this in AutoDesk 123D Design, which is apparently discontinued now. I was going to share my design files until I heard that. However if you want the files to make any edits feel free to message me.
The pokéball can open and close (you can even add a small torsion spring to the hinge so it pops open). When printed at 100% size, you can use 1.75 mm filament as the hinge (I actually permanently melted the filament into the case using an old soldering iron). The button also has a spring in it and feels really nice. I used pen springs for the button and hinge (cut it and bent the ends), though you may be able to find nicer ones.
I made a few different layouts, but only printed the "9 carts" version so far. It's designed to hold tightly onto the cartridges, but not damage the game art b/c it has larger "windows" where the art is. The "9 carts - loose" does not have this, but shouldn't damage the art anyway. The "11 carts" may not leave much room to grab games if it's full. "flat" doesn't have any cartridge slots if you'd like a canvas to design your own. "hollow" is like a traditional pokéball and leaves more space for things other than cartridges. Each of the "carts" designs also have room for 2-4 micro-SD cards.
The bottom shell has a version called "90-degree cut", which simply guarantees the pokéball can open up to 90 degrees. Otherwise the top shell will hit the bottom shell before opening to a full 90 degrees. The top shell comes either original or with a cutout for a switch logo to be embedded.
Assembly
It's a modular design that should fit together easily. There are 5 parts: top outer shell, top inner shell, a button, bottom inner shell, and bottom outer shell. There are a few different versions for some parts (shown in 3D models).
Also, the button is 3 different parts (button, shell, & latches). To assemble put a spring (got mine from a pen) in the button cylinder and insert it into the shell. Hold that in place and push the latches in (may have to cut/sand the edges off). You may also have to glue the latches in depending on if they stay by themselves or fall out (button-tight may have more luck staying put). Be careful putting the button into the ring on the top inner shell (probably the most fragile part of the print, but should be pretty strong after getting the button in)
Make sure to remove all support material, especially where the button latches to the bottom inner shell, or else the ball may not be able to stay closed.
If you opt for the Switch Logo insert it may have to be sanded to fit properly into the top outer shell. I actually sanded the white logo edges and then stuck it in the freezer and later shoved it into place.
First get the button assembled and put into the top inner shell, lining the latch up with where it goes in the bottom inner shell. The outer shells fit onto their respective inner shells (they're keyed and will only fit one way) and should be glued once you have a fit you like. Then the top and bottom half fit together and a hinge (1.75 mm filament) can be inserted. This is the time to insert a torsion spring if you have one (it can be very tricky to position correctly and get the hinge in). I recommend hot gluing the ends of that spring onto the inner shells. Make sure the pokéball opens and closes to your liking and you're done! Message me if you need any help. I may try to make a video the next time I can print one (may not be until Fall).
I didn't design a stand, but there's a lot of nice ones. I really liked this one by xlitec13 (https://www.thingiverse.com/thing:656385).
Hope you like the design!
Similar models
thingiverse
free

Functional Pokéball - Nintendo Switch Game Cartridge Case (remix) by pharn
...d ceiling inside the top inner shell to keep the cartridges in place.
edit: 8/30/18 add stand that perfectly fits this pokeball.
thingiverse
free

DS to Switch Cartridge Adapter by Athakaspen
...ever cartridge holder you have.
disclaimer: does not allow your nintendo ds to play switch games. sadly.
created in fusion 360
grabcad
free

Hood inner and outer panel
...nd outer panel with engineering features like embosses, latches and stricker mounting area, hinges mounting area and mastic data
thingiverse
free

FinalGROM99 cartridge shell (for TI-99/4A) by remo_williams
...t has been flattened for 3d printing friendliness.
the buttons are designed to work with the boards original installed switches.
thingiverse
free

Customizable Air Wick Cover for manual operation by Razzer09
...f it in my bathroom so i designed this spray can cover to give it a more elegant look.
feel free to post your own designs.
enjoy.
thingiverse
free

Nerf Vulcan shell links (cartridge-style.) HARDWARE REQ.
...t's mostly flair. this is a rigid system, so if you make it too long it may snap, but it will look great in brass coloration!
thingiverse
free

Game King - Flashcart - Cartridge Case by teame
...! (m1.2 / m1.4 / m2 screws will work too...just use a maximum length of 4mm!
(like the screws of a gameboy-cartridge for example)
thingiverse
free

PokeBall - Fully Functional with Button and Hinge by MrFozzie
...e also quite tight as this works on my printer, let me know if you have problems with this.
happy printing and go catch them all!
thingiverse
free

Timer Ball - Fully Functional PokeBall with Button and Hinge by MrFozzie
...e also quite tight as this works on my printer, let me know if you have problems with this.
happy printing and go catch them all!
thingiverse
free

Vectrex Cartridge Shell for Kopp Multi cart. by Dr_Honda
...i cart board. as an fyi, this shell should also work with with oem and other pcb's.
2/10/2021: i added an embossed top shell.
Samk3Ys
thingiverse
free

Fall Guys Crown by samk3ys
...fusion 360. i tried to replicate the crown seen in the game and think it turned out well. sharing it for any other fall guy fans.
thingiverse
free
Functional Pokéball - Nintendo Switch Game Cartridge Case (remix) by pharn
...(remix) by pharn thingiverse this is a remix of samk3ys#39;s pokeball. on my mp select mini, i was having...
Pokéball
turbosquid
free

Pokéball
... available on turbo squid, the world's leading provider of digital 3d models for visualization, films, television, and games.
turbosquid
$1

Superball Pokéball
... available on turbo squid, the world's leading provider of digital 3d models for visualization, films, television, and games.
turbosquid
$1

Pokéball - Perfect model
... available on turbo squid, the world's leading provider of digital 3d models for visualization, films, television, and games.
3d_export
$5

pokemon ball
...pokemon ball 3dexport a pokemon ball (sometimes spelled as pokéball is a round device used in the pokémon series...
3d_export
$15

japan pokeball
...japan pokeball 3dexport pokéball or pokéball are spherical shaped compartments that serve to...
free3d
free

Pokéball
...pokéball
free3d
thingiverse
free

Pokéball by Josh3093
...pokéball by josh3093
thingiverse
a concept for 3d printing a pokéball. intended for being movable.
thingiverse
free

Pokéball by ModelerMaster
...rmaster
thingiverse
this model looks exactly like a pokéball from pokémon. this is for people to play with for pokémon plushies.
thingiverse
free

Pokéball by kreatix
...pokéball by kreatix
thingiverse
a pokeball
thingiverse
free

Pokéball by saveriosilli
... the mold of a pokéball. it can be carved in milling wax or any other material and used to make castings. it has not been tested.
Cartridge
turbosquid
$10
cartridge
...osquid
royalty free 3d model cartridge for download as sldpr on turbosquid: 3d models for games, architecture, videos. (1357854)
3d_export
$10
cartridge filter
...cartridge filter
3dexport
cartridge filter
turbosquid
$1

cartridge
...e 3d model cartridge for download as 3ds, obj, fbx, and blend on turbosquid: 3d models for games, architecture, videos. (1265144)
turbosquid
$25

Cartridge
... available on turbo squid, the world's leading provider of digital 3d models for visualization, films, television, and games.
3d_export
$9

cartridge ce285a
...cartridge ce285a
3dexport
high detailed printer cartridge 3d model.
3d_export
$10

80000 air volume cartridge filter inclined cartridge filter
...000 air volume cartridge filter inclined cartridge filter
3dexport
80000 air volume cartridge filter (inclined cartridge filter)
3d_export
$10

mineral cartridge
...ive soothing & sweet taste to the pure drinking water. the mineral cartridge can be used as substitute of post carbon filter.
turbosquid
$25
5.45x39 Cartridge
... 3d model 5.45x39 cartridge for download as max, 3ds, and obj on turbosquid: 3d models for games, architecture, videos. (1516718)
turbosquid
$25

7.62x39 Cartridge
... 3d model 7.62x39 cartridge for download as 3ds, max, and obj on turbosquid: 3d models for games, architecture, videos. (1303044)
turbosquid
$25
303 Cartridge
...free 3d model 303 cartridge for download as 3ds, max, and obj on turbosquid: 3d models for games, architecture, videos. (1303030)
Nintendo
turbosquid
$25

Nintendo
...del super nintendo/ tv for download as 3ds, max, obj, and fbx on turbosquid: 3d models for games, architecture, videos. (1213066)
3d_export
$40

nintendo switch
...nintendo switch
3dexport
3d model of nintendo switch, made in blender.
3d_ocean
$18

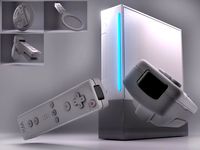
Nintendo Wii
...h quality renders, close ups and animations. the polycount is manualy optimized so it’s not hardware intensive when importing ...
3d_export
$25

The heart of nintendo
...the heart of nintendo
3dexport
do you need to know how nintendo is inside? that's it!
turbosquid
$10
SUPER NINTENDO
...uid
royalty free 3d model super nintendo for download as c4d on turbosquid: 3d models for games, architecture, videos. (1291068)
turbosquid
$19
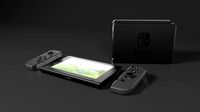
Nintendo Switch
...ree 3d model nintendo switch for download as ma, obj, and fbx on turbosquid: 3d models for games, architecture, videos. (1169424)
turbosquid
$8

Nintendo Switch
...ee 3d model nintendo switch for download as fbx, dae, and obj on turbosquid: 3d models for games, architecture, videos. (1617647)
turbosquid
$200
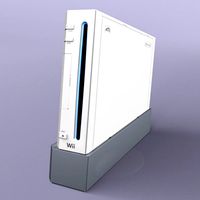
Nintendo Wii
... available on turbo squid, the world's leading provider of digital 3d models for visualization, films, television, and games.
turbosquid
$99
Nintendo Wii
... available on turbo squid, the world's leading provider of digital 3d models for visualization, films, television, and games.
turbosquid
$99

Nintendo 3DS
... available on turbo squid, the world's leading provider of digital 3d models for visualization, films, television, and games.
Functional
turbosquid
$1

functional clock
...d
royalty free 3d model functional clock for download as fbx on turbosquid: 3d models for games, architecture, videos. (1378928)
turbosquid
$5

functional door
... model functional door for download as 3ds, obj, c4d, and stl on turbosquid: 3d models for games, architecture, videos. (1483785)
3d_export
$5
multi function box
...multi function box
3dexport
it is multi function box in iges format
3ddd
$1
Fitness Equipament - Functional
...fitness equipament - functional
3ddd
треножер
fitness equipament functional, modeled from real model.
turbosquid
$19

Four function formula
...
royalty free 3d model four function formula for download as on turbosquid: 3d models for games, architecture, videos. (1154985)
turbosquid
$1
functional work table
...yalty free 3d model functional work table for download as max on turbosquid: 3d models for games, architecture, videos. (1198733)
3d_export
free
Multi-functional anaquel
...multi-functional anaquel
3dexport
https://www.dock4all.com/
turbosquid
$12
Multi-Function Knife
... available on turbo squid, the world's leading provider of digital 3d models for visualization, films, television, and games.
turbosquid
$9
function x black coin
...yalty free 3d model function x black coin for download as max on turbosquid: 3d models for games, architecture, videos. (1457828)
turbosquid
$8

Multi-function cylinder mechanism
...lti-function cylinder mechanism for download as ige and sldpr on turbosquid: 3d models for games, architecture, videos. (1223739)
Switch
archibase_planet
free
Switch
...switch
archibase planet
switch cluster switch
light switch 1 - 3d model for interior 3d visualization.
archibase_planet
free
Switch
...switch
archibase planet
switches switch
switch 1 - 3d model (*.gsm+*.3ds) for interior 3d visualization.
archibase_planet
free
Switch
...switch
archibase planet
closer button switch cluster switch
switch - 3d model (*.3ds) for interior 3d visualization.
archibase_planet
free
Switch
...switch
archibase planet
switch closer
light switch 2 - 3d model for interior 3d visualization.
archibase_planet
free
Switch
...switch
archibase planet
closer button switch
switch n300808 - 3d model (*.gsm+*.3ds) for interior 3d visualization
archibase_planet
free
Switch
...switch
archibase planet
closer button switch
switch n141108 - 3d model (*.gsm+*.3ds) for interior 3d visualization.
archibase_planet
free

Switch
...switch
archibase planet
cluster switch closer
switch n260609 - 3d model (*.gsm+*.3ds) for interior 3d visualization.
archibase_planet
free

Switch
...switch
archibase planet
button switch closer
switch 2 - 3d model (*.gsm+*.3ds) for interior 3d visualization.
archibase_planet
free

Switch
...switch
archibase planet
button switch closer
switch n070510 - 3d model (*.gsm+*.3ds) for interior 3d visualization.
3d_export
$5

switch
...switch
3dexport
3d model of a low-poly switch
Case
3d_export
$1

case
...case
3dexport
case
archibase_planet
free

Case
...case
archibase planet
showcase show-case glass case
glass-case + cakes - 3d model for interior 3d visualization.
archibase_planet
free

Case
...case
archibase planet
showcase show-case glass case
glass-case for chips - 3d model for interior 3d visualization.
archibase_planet
free

Case
...case
archibase planet
case shelving drawer
case - 3d model for interior 3d visualization.
archibase_planet
free

Case
...case
archibase planet
case rack locker
case - 3d model for interior 3d visualization.
archibase_planet
free

Case
...case
archibase planet
case drawer kitchen furniture
case - 3d model for interior 3d visualization.
archibase_planet
free

Case
...case
archibase planet
case cupboard shelving
glass case - 3d model for interior 3d visualization.
archibase_planet
free

Case
...case
archibase planet
case handbag suitcase
case - 3d model (*.gsm+*.3ds) for interior 3d visualization.
archibase_planet
free

Case
...case
archibase planet
case suitcase
case 5 - 3d model (*.gsm+*.3ds) for interior 3d visualization.
archibase_planet
free

Case
...case
archibase planet
locker case dresser
case - 3d model (*.gsm+*.3ds) for interior 3d visualization.
Game
3d_ocean
$4
Games
...games
3docean
3d games models real stick
3d, models, sports, games , trail
turbosquid
$5
Games
...s
turbosquid
royalty free 3d model games for download as skp on turbosquid: 3d models for games, architecture, videos. (1612115)
turbosquid
$65

game
... available on turbo squid, the world's leading provider of digital 3d models for visualization, films, television, and games.
turbosquid
$25

Game
... available on turbo squid, the world's leading provider of digital 3d models for visualization, films, television, and games.
turbosquid
$10

Game
... available on turbo squid, the world's leading provider of digital 3d models for visualization, films, television, and games.
turbosquid
$5
Game
...bosquid
royalty free 3d model gameplay for download as blend on turbosquid: 3d models for games, architecture, videos. (1274934)
3d_ocean
$7

game place
...game place
3docean
children game game park game place kids play luna park play
for kids game place
3d_export
$14
game character
...game character
3dexport
game character use for gaming
turbosquid
$20
Game Ready Car For Video Games
...e 3d model game ready car for video games for download as fbx on turbosquid: 3d models for games, architecture, videos. (1499375)
3d_ocean
$5
Game fence
...game fence
3docean
fence game
a high quality game ready fence.