Thingiverse
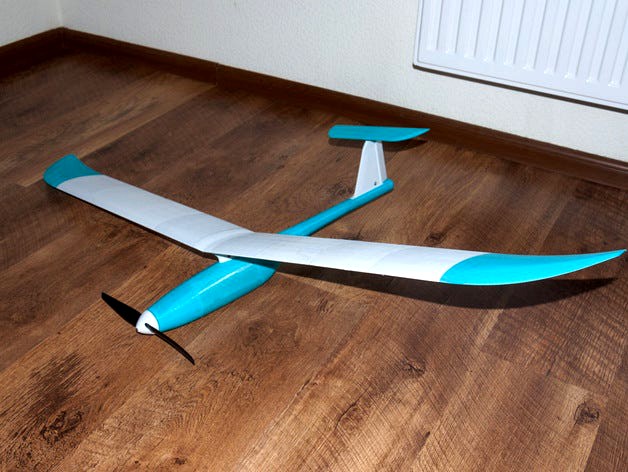
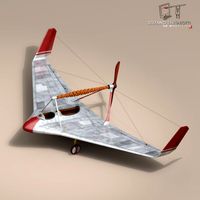
Fully 3D printed sailplane model. optimized for 0.2 nozzle (weight reduction) by grafalex
by Thingiverse
Last crawled date: 3 years ago
Overview
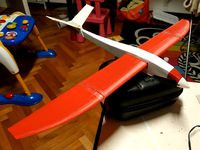
This is same Walt's Fully Printed Glider model, but optimized for 0.2mm nozzle to reduce weight and tweaked a little bit to improve printing accuracy.
Original design looks very interesting for me, but there were too many complains that resulting plane is too heavy. So I had to redesign some of the parts, keeping overall design unchanged.
I am uploading Solidworks models so that you can add more tweaks if needed.
UPDATE 14-Jun-2015: I finished printing the fuse and installing electronic components. Resulting weight is 636g including battery. Plastic parts are 320g.
However I doubt this plane can fly, and weight is not the problem. The real problem is weight centering which is 57% of the wing horde (tail is too heavy comparing with nose). It should be 25-30% for a normal flight. In other words plane will crash right after take off.
UPDATE 29-Jun-2015: I redesigned the fuse. I moved main fuse body farther to the nose, extending overall fuse+tail length by approx. 30 mm, while keeping wing-stab distance about the same. I also reduced tail parts diameter as well as walls thickness to reduce some weight.
This all should move CG to 25-30% depending on motor and prop
I just started printing these parts so perhaps I’ll be adding more tweaks to STL files.
UPDATE 12-Jul-2015: Minor update just fixed few issues on fuse main parts.
I finished printing fuse parts - everyting fits perfectly.
Still stuck on vert stab redesign.
UPDATE 15-Aug-2015: Finished designing vert stab. I preserved overall shape, but could not reproduce airfoil. No big deal, think.
Since tail got narrower, I had to decrease rudder horn size to fix the tail. I also updated motor mount part.
I am assembling the model right now. Will post updated photos and weight summary little later.
UPDATE 25-Aug-2015: Maiden flight was not too long. Just 3 seconds :) It did a loop and crashed vertically on the nose.
It might be caused by one (of more than one) of these reasons:
Tail is still to heavy
Horizontal stab was not set correctly in idle state and cause plane constantly pitch up
There is huge backlash in stab mount. It plays for several degrees which can be too much for fully deflectable stab
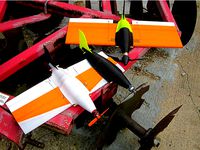
I am reprenting some of the parts that were broken on crash - wing tip, wing center, motor mount. Then I'll probably investigate whether I can use bowden for horizontal stab (to reduce backlash)
UPDATE 14 Sept 2015: Second flight ended the same wayhttps://www.youtube.com/watch?v=7Otw3EAnxgw
Not sure what happened. I removed all backlash on elevator, set elevator to 3 degrees down, double checked CG it was about 30%.
I will have some consulting with r/c plane modeling gurus. Then will decide what should I fix in the model.
UPDATE 25-Nov-2015: Made another design change
Made nose even longer
changed motor mount angle to 4 degrees down to address heavy propeller momentum
few minor changes in fuse parts, mostly reducing weight
Wing parts are untouched
This should move CG closer to the nose, Now should be around 20%
I am in progress of printing these parts. Will make another attempt
UPDATE 04-Sep-2016: Finally took courage to make another flight attempt.
As suggested I went to a field with a high grass. There I tried to throw plane several times from a small altitude. I was under impression that I throw it fast enough, but video shown that speed was too small. Obviously, plane wants more speed to fly. Otherwise it falls on a left wing.
Motorized flights (thrust at 30%) were a little better, but I still could not understand how to trim it right. CoG was at 20-25%, but when I add more thrust plane raised its nose too much. Eventually I had to trim elevator until it balked to the rudder. No more room to trim. Fortunately it helped.
Finally I added more thrust and it took off!! Though, the flight was not too long. I could not turn it back. Every time I tried to turn it tended to fall. Finally it raised its nose too much, did a loop and then I totally lost control.
Another thing I found after crash is too hot motor. It definitely requires some cooling.
Here is the video of my attempts. If you feel it is boring – go directly to 1:51 for the flight.https://youtu.be/BaLBQySvFkA
Summarizing my findings:
Plane needs speed to fly, it does not glide but fall immediately
Rudder does not turn plane as it should
No motor cooling
CG is still not in place, needs to be moved a little forward.
Not enough room for elevator to move (fixing CG should help)
It looks like there is a huge propeller momentum pulling plane up and left
What next? I have to regret my followers: I will not continue working on the project. Now it is time to move on. I have plenty of other projects to work on rather than stuck on this one. Though, I will be glad to see your prints and remixes.
During the project I got plenty of experience in different areas:
how to design plane models in Solidworks
how to calculate essential plane parameters
how to select proper material to print
learned a lot of 3D priniting stuff: different slicers, nozzles, printing speeds and temperatures, and so on
how to set up a model for its first flight
I am still interested in the idea of a 3D printed plane. But next time it will be something different. I would prefer to have at least 4-channel control (add ailerons) and I like take off the ground on wheels. I have not selected a model yet but I have couple ideas in mind.
Stay tuned.
Equipment
I used these electronic components
Motor – Turnigy 2209 1050kv 28 turn 15A
Prop – selecting between 10x6 Direct drive, APC 10x5 and SF 10x4.5
Servos – Hobbyking HXT900
Receiver – Hobbyking 6 channels (plan to change it with 3 channel receiver)
ESC – Turnigy Plush 18A
Battery – Zippy Compact 1300mAh 3S
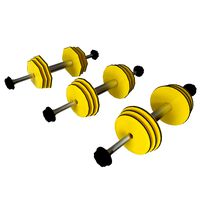
Here are my weight stats (for previous attempt)
Total for the wing, including carbon rods - 231g
Fuse printed parts – 129g
Total with electronics – 636g
I am uploading weights table as an Excel spreadsheet. Refer to second sheet for weight centering calculation.
Changed parts description (comparing to Walt's version)
Wing panels:
reduced walls thickness to 0.4mm. This will force exactly 2 perimeters (external and internal) when using 0.2mm nozzle. These 2 perimeters are sticked together very well giving extra strength (when printing original STL there was a distance between outer and inner walls and therefore printed model strength was quite poor)
added couple additional 2mm ribs every 20mm - this helps keeping wing shape more accurate, bending resistance
removed hooks to mount sections. Original hooks were too easy to break. Instead I added thickening on the top and bottom to increase gluing area
Wing tips:
It is now hollow with ribs instead of solid.
same thickening at the bottom to increase gluing area
Wing center links:
Original file had number of holes that suppose to reduce weight. But these holes require couple perimeters to be printed around them which add some weight. It appears that model without these holes and 5% infill weights less than original part with holes.
Original model had a bug around rear screw hole. I could not manage to fix it, but it does not make an impact on result quality (small piece of extra plastic could be easily removed after printing)
I added small membrane inside screw holes. It is needed to correctly print ceiling and hole above. Membrane can be easily removed with a drill
I do not like supports, but they work really well for this part.
If you do not like supports you can print this model using bridges. I added couple walls and supporting bridges at the solidworks file, but they are disabled by default. These walls should be removed after printing.
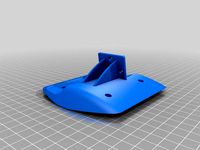
Horizontal stabilizer:
Same trick (as wing tips) worked here as well. I redesigned stab to be hollow with ribs
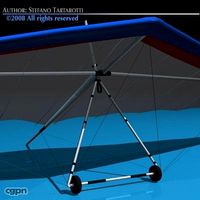
Fuse:
I completely re-developed fuse. My fuse version is twice lighter than original
Decreased shell thickness to 0.6mm – this is enough to keep its shape, but stay at lower weight.
Reduced main parts thickness and added big holes in order to reduce weight
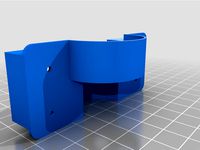
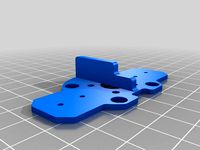
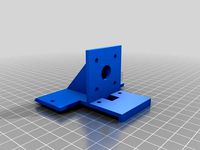
Redesigned servo mount, changed servo layout so that straight carbon push rods can be used instead of Bowden.
Servo mounting holes are designed to fit HXT900 servos
Motor mount is designed to fit my Turnigy 2209 motor. Mounting holes are 16 and 19mm and compatible with many other motors
Fuse shell parts are now mounted with special hooks. No screws. For front section I designed a bayonet-like mounting
Tail body moved little further to the nose to fix CG. Fuse made little longer at the nose by 40mm.
Wing mount shifted closer to the tail (fixing CG). To preserve wing-stab distance tail was extended a little bit
Tail:
Tail diameter decreased to 20mm, thickness to 0.8mm
Tail length extended to keep wing-stab distance
Horizontal stabilizer and link parts remain the same
Spinner:
I did not have 40mm spinner, so I just designed a printable one. I took collet, spacer and nut from other broken spinner.
Even more weight reduction
There is also possibility to reduce wing weight even more. The idea is to reduce wall thickness to 0.2mm - same as nozzle size. But this required couple extra ribs.
Unfortunately I got this idea after I printed my wing. I printed couple sections (just to evaluate the approach) but not the whole wing. Wing section weights about 9g, wing tip is about 10g. This all gives projected wing weight about 150g.
Surface of the printed part is not quite smooth, so certain degree of sanding is required.
I uploaded these files with Experimental* prefix. Please send me a note if this approach works for you.
This is same Walt's Fully Printed Glider model, but optimized for 0.2mm nozzle to reduce weight and tweaked a little bit to improve printing accuracy.
Original design looks very interesting for me, but there were too many complains that resulting plane is too heavy. So I had to redesign some of the parts, keeping overall design unchanged.
I am uploading Solidworks models so that you can add more tweaks if needed.
UPDATE 14-Jun-2015: I finished printing the fuse and installing electronic components. Resulting weight is 636g including battery. Plastic parts are 320g.
However I doubt this plane can fly, and weight is not the problem. The real problem is weight centering which is 57% of the wing horde (tail is too heavy comparing with nose). It should be 25-30% for a normal flight. In other words plane will crash right after take off.
UPDATE 29-Jun-2015: I redesigned the fuse. I moved main fuse body farther to the nose, extending overall fuse+tail length by approx. 30 mm, while keeping wing-stab distance about the same. I also reduced tail parts diameter as well as walls thickness to reduce some weight.
This all should move CG to 25-30% depending on motor and prop
I just started printing these parts so perhaps I’ll be adding more tweaks to STL files.
UPDATE 12-Jul-2015: Minor update just fixed few issues on fuse main parts.
I finished printing fuse parts - everyting fits perfectly.
Still stuck on vert stab redesign.
UPDATE 15-Aug-2015: Finished designing vert stab. I preserved overall shape, but could not reproduce airfoil. No big deal, think.
Since tail got narrower, I had to decrease rudder horn size to fix the tail. I also updated motor mount part.
I am assembling the model right now. Will post updated photos and weight summary little later.
UPDATE 25-Aug-2015: Maiden flight was not too long. Just 3 seconds :) It did a loop and crashed vertically on the nose.
It might be caused by one (of more than one) of these reasons:
Tail is still to heavy
Horizontal stab was not set correctly in idle state and cause plane constantly pitch up
There is huge backlash in stab mount. It plays for several degrees which can be too much for fully deflectable stab
I am reprenting some of the parts that were broken on crash - wing tip, wing center, motor mount. Then I'll probably investigate whether I can use bowden for horizontal stab (to reduce backlash)
UPDATE 14 Sept 2015: Second flight ended the same wayhttps://www.youtube.com/watch?v=7Otw3EAnxgw
Not sure what happened. I removed all backlash on elevator, set elevator to 3 degrees down, double checked CG it was about 30%.
I will have some consulting with r/c plane modeling gurus. Then will decide what should I fix in the model.
UPDATE 25-Nov-2015: Made another design change
Made nose even longer
changed motor mount angle to 4 degrees down to address heavy propeller momentum
few minor changes in fuse parts, mostly reducing weight
Wing parts are untouched
This should move CG closer to the nose, Now should be around 20%
I am in progress of printing these parts. Will make another attempt
UPDATE 04-Sep-2016: Finally took courage to make another flight attempt.
As suggested I went to a field with a high grass. There I tried to throw plane several times from a small altitude. I was under impression that I throw it fast enough, but video shown that speed was too small. Obviously, plane wants more speed to fly. Otherwise it falls on a left wing.
Motorized flights (thrust at 30%) were a little better, but I still could not understand how to trim it right. CoG was at 20-25%, but when I add more thrust plane raised its nose too much. Eventually I had to trim elevator until it balked to the rudder. No more room to trim. Fortunately it helped.
Finally I added more thrust and it took off!! Though, the flight was not too long. I could not turn it back. Every time I tried to turn it tended to fall. Finally it raised its nose too much, did a loop and then I totally lost control.
Another thing I found after crash is too hot motor. It definitely requires some cooling.
Here is the video of my attempts. If you feel it is boring – go directly to 1:51 for the flight.https://youtu.be/BaLBQySvFkA
Summarizing my findings:
Plane needs speed to fly, it does not glide but fall immediately
Rudder does not turn plane as it should
No motor cooling
CG is still not in place, needs to be moved a little forward.
Not enough room for elevator to move (fixing CG should help)
It looks like there is a huge propeller momentum pulling plane up and left
What next? I have to regret my followers: I will not continue working on the project. Now it is time to move on. I have plenty of other projects to work on rather than stuck on this one. Though, I will be glad to see your prints and remixes.
During the project I got plenty of experience in different areas:
how to design plane models in Solidworks
how to calculate essential plane parameters
how to select proper material to print
learned a lot of 3D priniting stuff: different slicers, nozzles, printing speeds and temperatures, and so on
how to set up a model for its first flight
I am still interested in the idea of a 3D printed plane. But next time it will be something different. I would prefer to have at least 4-channel control (add ailerons) and I like take off the ground on wheels. I have not selected a model yet but I have couple ideas in mind.
Stay tuned.
Equipment
I used these electronic components
Motor – Turnigy 2209 1050kv 28 turn 15A
Prop – selecting between 10x6 Direct drive, APC 10x5 and SF 10x4.5
Servos – Hobbyking HXT900
Receiver – Hobbyking 6 channels (plan to change it with 3 channel receiver)
ESC – Turnigy Plush 18A
Battery – Zippy Compact 1300mAh 3S
Here are my weight stats (for previous attempt)
Total for the wing, including carbon rods - 231g
Fuse printed parts – 129g
Total with electronics – 636g
I am uploading weights table as an Excel spreadsheet. Refer to second sheet for weight centering calculation.
Changed parts description (comparing to Walt's version)
Wing panels:
reduced walls thickness to 0.4mm. This will force exactly 2 perimeters (external and internal) when using 0.2mm nozzle. These 2 perimeters are sticked together very well giving extra strength (when printing original STL there was a distance between outer and inner walls and therefore printed model strength was quite poor)
added couple additional 2mm ribs every 20mm - this helps keeping wing shape more accurate, bending resistance
removed hooks to mount sections. Original hooks were too easy to break. Instead I added thickening on the top and bottom to increase gluing area
Wing tips:
It is now hollow with ribs instead of solid.
same thickening at the bottom to increase gluing area
Wing center links:
Original file had number of holes that suppose to reduce weight. But these holes require couple perimeters to be printed around them which add some weight. It appears that model without these holes and 5% infill weights less than original part with holes.
Original model had a bug around rear screw hole. I could not manage to fix it, but it does not make an impact on result quality (small piece of extra plastic could be easily removed after printing)
I added small membrane inside screw holes. It is needed to correctly print ceiling and hole above. Membrane can be easily removed with a drill
I do not like supports, but they work really well for this part.
If you do not like supports you can print this model using bridges. I added couple walls and supporting bridges at the solidworks file, but they are disabled by default. These walls should be removed after printing.
Horizontal stabilizer:
Same trick (as wing tips) worked here as well. I redesigned stab to be hollow with ribs
Fuse:
I completely re-developed fuse. My fuse version is twice lighter than original
Decreased shell thickness to 0.6mm – this is enough to keep its shape, but stay at lower weight.
Reduced main parts thickness and added big holes in order to reduce weight
Redesigned servo mount, changed servo layout so that straight carbon push rods can be used instead of Bowden.
Servo mounting holes are designed to fit HXT900 servos
Motor mount is designed to fit my Turnigy 2209 motor. Mounting holes are 16 and 19mm and compatible with many other motors
Fuse shell parts are now mounted with special hooks. No screws. For front section I designed a bayonet-like mounting
Tail body moved little further to the nose to fix CG. Fuse made little longer at the nose by 40mm.
Wing mount shifted closer to the tail (fixing CG). To preserve wing-stab distance tail was extended a little bit
Tail:
Tail diameter decreased to 20mm, thickness to 0.8mm
Tail length extended to keep wing-stab distance
Horizontal stabilizer and link parts remain the same
Spinner:
I did not have 40mm spinner, so I just designed a printable one. I took collet, spacer and nut from other broken spinner.
Even more weight reduction
There is also possibility to reduce wing weight even more. The idea is to reduce wall thickness to 0.2mm - same as nozzle size. But this required couple extra ribs.
Unfortunately I got this idea after I printed my wing. I printed couple sections (just to evaluate the approach) but not the whole wing. Wing section weights about 9g, wing tip is about 10g. This all gives projected wing weight about 150g.
Surface of the printed part is not quite smooth, so certain degree of sanding is required.
I uploaded these files with Experimental* prefix. Please send me a note if this approach works for you.
Similar models
thingiverse
free
F-16 Kit Card by ReeseN
...he fuselage is tight toward the end of assembly. the fuselage tail should be about even with the tail pipe. it still looks great.
thingiverse
free
RC Plane Motor Mount by awillybilly
...ere your specific motors mounting screws hit the mounting surface, mark those spots and drill holes sized for your motors screws.
thingiverse
free
CESSNA 182 Plus 1200mm Motor Mount by BlueWing58
...hin walls and 90% fill. you will need to use supports touching build-plate only. takes a couple of hours but worth it in the end.
thingiverse
free
RC Crobe micro-glider (wings and motor mount)
...weight (ready to flight). 22gr for each semi-wing, pretty similar to balsa wings. wing joiner: 3mm rod, sanded a...
thingiverse
free
3 hybrid planks, RC airplanes. by _Dave
....
with the small motor and smallish battery the plane is under 250 grams with a 50g motor and 2500mah battery it is 380 grams.
3dwarehouse
free
Glider
...or method of moving itself. the tail end is unfinished, but the wings and nose are mostly complete. #airplane #fly #glider #plane
thingiverse
free
Sky shadow s800 direct motor mount by Iamsadomaso
...otor to fuselage. it helped to reduce model cg that was far back with bigger and more heavy motor, resulting in tail heavy plane.
thingiverse
free
FPV49 motor mount 2 by TPL_Trax
...ue gift card plastic underneath to keep the metal from damaging the foam. or you could just glue it in. that should work as well.
thingiverse
free
FPV Flying Wing EPP Versand Knurrus Motor Mount by joeyscustoms
...th 100% infill so it should stand the force.
you have to sand the parts till they fit tight together and use some glue to fix it!
thingiverse
free
Echo DOT Wall Mount by elefantman
....
updated to v1.1 to add a little bit more stiffness to the sidewall. mine has shown a little sagging with the weight of the dot.
Grafalex
thingiverse
free

Сupboard сhild lock by grafalex
...lex
thingiverse
local shops sell child locks at insane price - $5-$10 for a small piece of plastic. i decided just to print one.
thingiverse
free
Master Skewb Stickers by grafalex
...oks well
source: https://cad.onshape.com/documents/bf620f19befda45965c3b88f/w/a652c79033dd85bf928e33fc/e/18066d97c332f2f99e90df4a
thingiverse
free
3x3x5 half proportional cuboid stickers by grafalex
... cuboid
sources: https://cad.onshape.com/documents/261a753cbbfccd8d1ff4df16/w/3a70cd35292cc1b0bde3a153/e/528b26b56a86904c466742f3
thingiverse
free
LimCube Dreidel 3x3x3 Cube Stickers by grafalex
...3x3 cube
source: https://cad.onshape.com/documents/b74f4cb2e6c06592a678dbf2/w/68fd0f7b6f6beea6d52efacc/e/3d017182177cb30c25f69202
thingiverse
free
Megaminx and Megamoid Stickers by grafalex
...stickers source: https://cad.onshape.com/documents/e78db50eb56cfcf97c969d0a/w/38ae2b66ddbcf4f0a68afa47/e/a69a394166ba51ff0a2032a8
thingiverse
free
DaYan Gem VI replacement stickers by grafalex
...al side.
source: https://cad.onshape.com/documents/ba90487a6e5115952c960fd6/w/e5827596d82df56964c27490/e/76221b41403208178f638429
thingiverse
free
Moyu Devil's Eye II Stickers by grafalex
... ii cube
source: https://cad.onshape.com/documents/6a142c09f914eff6f736217e/w/f6b355214ce0a18a3d82e3d7/e/f50568933b108d04202c2f77
thingiverse
free
6x6x4 Cuboid and Normal 6x6x6 Cube stickers by grafalex
...ttached.
source: https://cad.onshape.com/documents/58720979e3815217dc90ff22/w/ce45e869934a81676ba5808e/e/9f4cdc30da205abfc6289736
thingiverse
free
5x5x5 Pentahedron by grafalex
.... sources are at https://cad.onshape.com/documents/b03b208e338872ad860f2162/w/13c97839372d10b3223f95ef/e/80d438cc3b960f58d989e7a0
thingiverse
free
3x5x7 Ultimate Shape Shifter Stickers by grafalex
...document source: https://cad.onshape.com/documents/09201cf100ec7dfaa9a6bf11/w/bb8bc52e7458ddaf8417900f/e/c6cae6f81cbb889be105177c
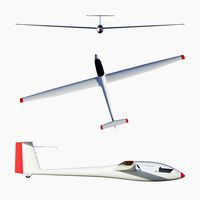
Sailplane
3d_export
$5
ask-21 sailplane
...o make this model. cycles render was used for the textures and renders.<br>---render background not included. mesh only.---
3d_export
$15
Hang Glider 3D Model
...hang glider 3d model 3dexport hang glider aircraft sailplane hang glider 3d model deepocean 91568...
3d_ocean
$2

Glider
...glider 3docean aircraft glider hang glider sailplane 3d model of glider.object are grouped.rendering scene with texture,materials...
3d_export
$25
Nimbus glider 3D Model
...nimbus glider 3d model 3dexport glider sailplane airplane civilian flight air sports nimbus nimbus glider 3d...
3d_export
$70
Ultralight 3D Model
...3dexport ultralight hang glider hangglider air airplane plane wind sailplane sail powered ultralight 3d model tartino 6235...
3d_export
$60

Hang glider 3D Model
...model 3dexport hang glider hangglider air airplane plane wind sailplane sail hang glider 3d model tartino 6206...
3d_export
$80

Antares 20E 3D Model
...antares 20e 3d model 3dexport glider sailplane airplane civilian flight air sports antares 20e antares20e antares...
3d_export
$90
Rubber band airplane 3D Model
...cartoon rubber band airplane aircraft plane propeller elastic glider sailplane textures toy rubber band airplane 3d model tartino 60119...
cg_studio
$60
Hang glider3d model
...cgstudio aircraft hang glider hangglider air airplane plane wind sailplane sail .3ds .c4d .obj - hang glider 3d model,...
3d_export
$90
rolladen-schneider ls4 glider
...etc. a very high quality model of a ls4 sailplane by rolladen-schneider. exterior and interior are very detailed and...
Reduction
3d_export
$16

Sleeping noise reduction earplugs
...; x 2.88" x 1.19"<br>- model parts: 6<br>- material count: 2<br>- xform: yes<br>- boxtrick: yes
3d_export
$32
speed reducer gear box worm helical wpx
...your, surf3d more information about 3d models : a reduction drive is a mechanical device to shift rotational speed....
3d_export
$10
wheel 360 degree
...mark 1 module. a neo motor with an 8:1 reduction is used to drive the robot, while a 775pro...
3d_ocean
$49
CRC12 - Cartoon Race Cars 12 + 2
...tris. pack contains mobile version of all models, ~50% reduction in tris...
3d_ocean
$12
CRCP02 - Cartoon Race Car Pack 02
...is around 4000-6000 tris. pack contains mobile version, ~50% reduction in tris count, around ~2000-2800...
3d_ocean
$12

CRCP09 - Cartoon Race Car Pack 09
...is around 4000-6000 tris. pack contains mobile version, ~50% reduction in tris count, around ~2000-2800...
3d_ocean
$12

Merlion
...website, my model slightly more complete and realistic, true reduction landmark of singapore...
3d_export
$5
mobile crusher
...power system, crawler chassis, main frame, crusher host, vibration reduction discharge screen, return conveying, discharge conveying. the model is...
3d_ocean
$12
CRCP10 - Cartoon Race Car Pack 10
...is around 4000-6000 tris. pack contains mobile version, ~50% reduction in tris count, around ~2000-2800...
3d_ocean
$12
CRCP05 - Cartoon Race Car Pack 05
...is around 4000-6000 tris. pack contains mobile version, ~50% reduction in tris count, around ~2000-2800...
Nozzle
3d_export
$5
nozzle
...nozzle
3dexport
3d_export
$49
fuel nozzles
...fuel nozzles
3dexport
fuel nozzles 3d model. include max, obj, fbx files.
archive3d
free

Nozzle 3D Model
...archive3d
nozzle hair-drier ware
nozzle - 3d model (*.gsm+*.3ds) for interior 3d visualization.
turbosquid
$25

Pirouette Nozzle
... available on turbo squid, the world's leading provider of digital 3d models for visualization, films, television, and games.
turbosquid
$10

Fuel Nozzle
...model fuel nozzle for download as c4d, fbx, obj, 3ds, and stl on turbosquid: 3d models for games, architecture, videos. (1672732)
turbosquid
$8
Aeration Nozzles
... available on turbo squid, the world's leading provider of digital 3d models for visualization, films, television, and games.
3d_export
$10

laval airjet nozzle
...laval airjet nozzle
3dexport
a simple modified laval nozzle (airjet shooter) for sorting purposes.
3d_export
$36

Gas nozzle 3D Model
... 3d model
3dexport
gas pump nozzle dispenser filling station petrol fuel spout tank gun
gas nozzle 3d model tartino 1945 3dexport
turbosquid
$10

Diecast Jet nozzle
... free 3d model diecast jet nozzle for download as obj and stl on turbosquid: 3d models for games, architecture, videos. (1425990)
turbosquid
$39
Rocket nozzle, supressor.
... available on turbo squid, the world's leading provider of digital 3d models for visualization, films, television, and games.
Optimized
turbosquid
$3
VolleyBall Optimized
... model volleyball optimized for download as obj, fbx, and dae on turbosquid: 3d models for games, architecture, videos. (1370381)
turbosquid
free
m4a1 optimized
... available on turbo squid, the world's leading provider of digital 3d models for visualization, films, television, and games.
turbosquid
free
PTERODACTYL Optimized CreatureCharacter
...l pterodactyl optimized creaturecharacter for download as fbx on turbosquid: 3d models for games, architecture, videos. (1705900)
turbosquid
$2
XIOLLA: Optimized Character
...free 3d model xiolla: optimized character for download as fbx on turbosquid: 3d models for games, architecture, videos. (1705725)
turbosquid
$8
Melia Azedarach Optimized
...l melia azedarach optimized for download as max, obj, and fbx on turbosquid: 3d models for games, architecture, videos. (1634816)
turbosquid
$80
Game Optimized Tools
... available on turbo squid, the world's leading provider of digital 3d models for visualization, films, television, and games.
3d_export
$13
Subaru B11S Optimized 3D Model
...ubaru b11s optimized 3d model
3dexport
subaru car cars b11s optimized 3onder
subaru b11s optimized 3d model 3onder 10518 3dexport
turbosquid
$15

Tutanhamon 3D - Unity Optimized
... 3d model tutanhamon 3d - unity optimized for download as fbx on turbosquid: 3d models for games, architecture, videos. (1182225)
turbosquid
$39
Rock Scanned "OPTIMIZED"
...
royalty free 3d model rock for download as max, fbx, and obj on turbosquid: 3d models for games, architecture, videos. (1292372)
turbosquid
$3
The Dead General Optimized Character Rig
...d model the dead general optimized character for download as on turbosquid: 3d models for games, architecture, videos. (1705429)
0
turbosquid
$12

Calligraphic Digit 0 Number 0
...hic digit 0 number 0 for download as max, obj, fbx, and blend on turbosquid: 3d models for games, architecture, videos. (1389318)
3d_export
$6

set-0
...set-0
3dexport
turbosquid
$6

hedge 0
...yalty free 3d model hedge 0 for download as max, obj, and fbx on turbosquid: 3d models for games, architecture, videos. (1450353)
turbosquid
$5

Nuber 0
...oyalty free 3d model nuber 0 for download as ma, obj, and fbx on turbosquid: 3d models for games, architecture, videos. (1564674)
turbosquid
$22

0.jpg
... available on turbo squid, the world's leading provider of digital 3d models for visualization, films, television, and games.
turbosquid
free

Steam Locomotive Fowler 4F 0-6-0
... available on turbo squid, the world's leading provider of digital 3d models for visualization, films, television, and games.
turbosquid
$10

Liquid Number 0
... model liquid number 0 for download as c4d, 3ds, fbx, and obj on turbosquid: 3d models for games, architecture, videos. (1689919)
turbosquid
$45

Dragon360_perspShape_tmp.0.jpg
... available on turbo squid, the world's leading provider of digital 3d models for visualization, films, television, and games.
turbosquid
$8

Rocks Debris 0
... available on turbo squid, the world's leading provider of digital 3d models for visualization, films, television, and games.
3d_export
$18

wood-guardrail-fence 0
...wood-guardrail-fence 0
3dexport
wood-guardrail-fence 0<br>3ds max 2015
Fully
turbosquid
$50
Drone fully rigged
...
royalty free 3d model drone fully rigged for download as max on turbosquid: 3d models for games, architecture, videos. (1282280)
turbosquid
$12

FULLY PARAMETRIC CHAIR
...alty free 3d model fully parametric chair for download as rvt on turbosquid: 3d models for games, architecture, videos. (1280209)
turbosquid
$10

firetruck-fully-rigged
...yalty free 3d model firetruck-fully-rigged for download as ma on turbosquid: 3d models for games, architecture, videos. (1653811)
turbosquid
$6

Fully rigged character
...ty free 3d model fully rigged character for download as blend on turbosquid: 3d models for games, architecture, videos. (1486076)
turbosquid
$3
Fully Rigged shark
...ee 3d model fully rigged 3d shark model for download as blend on turbosquid: 3d models for games, architecture, videos. (1517695)
turbosquid
$75
Fully Customizable Hospital
... available on turbo squid, the world's leading provider of digital 3d models for visualization, films, television, and games.
turbosquid
free
Fully Rigged Link
... available on turbo squid, the world's leading provider of digital 3d models for visualization, films, television, and games.
design_connected
$16
Troy W Fully Covered
...troy w fully covered
designconnected
magis troy w fully covered computer generated 3d model. designed by wanders, marcel.
cg_studio
$99

Pepe fully rigged3d model
...ully rigged3d model
cgstudio
.max - pepe fully rigged 3d model, royalty free license available, instant download after purchase.
3d_export
$60
Ankylosaur 8K - fully animated
...ankylosaur 8k - fully animated
3dexport
Weight
archibase_planet
free
Weight
...weight
archibase planet
weight
weight n030907 - 3d model for interior 3d visualization.
3ddd
$1
Weighted
...weighted
3ddd
weighted
высота (см)165ширина (см)75
archibase_planet
free
Weight
...weight
archibase planet
weight dumb-bell dumbbell
weight 24 kg n290313 - 3d model (*.gsm+*.3ds) for interior 3d visualization.
3d_export
free
weight
...weight
3dexport
archibase_planet
free

Weight
...weight
archibase planet
gym sport equipments
sport`s weight n010907- 3d model for interior 3d visualization.
turbosquid
$14
Weight
...uid
royalty free 3d model weight for download as max and obj on turbosquid: 3d models for games, architecture, videos. (1197215)
turbosquid
$19
Weight
...alty free 3d model weight for download as , stl, obj, and fbx on turbosquid: 3d models for games, architecture, videos. (1684982)
turbosquid
$4
Weights
...yalty free 3d model weights for download as max, obj, and fbx on turbosquid: 3d models for games, architecture, videos. (1494762)
turbosquid
$6
weights
... free 3d model weights for download as 3ds, obj, c4d, and fbx on turbosquid: 3d models for games, architecture, videos. (1261435)
turbosquid
$3
weight
...free 3d model weight for download as blend, dae, fbx, and obj on turbosquid: 3d models for games, architecture, videos. (1558127)
2
design_connected
$11

No 2
...no 2
designconnected
sibast no 2 computer generated 3d model. designed by sibast, helge.
turbosquid
$6

Cliff Rock 2-2
...uid
royalty free 3d model cliff rock 2-2 for download as obj on turbosquid: 3d models for games, architecture, videos. (1619161)
turbosquid
$29

Book variation 2 2
...3d model book variation 2 2 for download as max, obj, and fbx on turbosquid: 3d models for games, architecture, videos. (1366868)
turbosquid
$22

Classic baluster (2) (2)
...assic baluster (2) (2) for download as max, obj, fbx, and stl on turbosquid: 3d models for games, architecture, videos. (1483789)
turbosquid
$99

Smilodon 2 Pose 2
... available on turbo squid, the world's leading provider of digital 3d models for visualization, films, television, and games.
turbosquid
$20

Barrel Barricade 2-2
... available on turbo squid, the world's leading provider of digital 3d models for visualization, films, television, and games.
turbosquid
$6

Wall Trophy (2) (2)
... available on turbo squid, the world's leading provider of digital 3d models for visualization, films, television, and games.
turbosquid
free

Tire label 2 of 2
... available on turbo squid, the world's leading provider of digital 3d models for visualization, films, television, and games.
3ddd
$1

Кровать, 2 тумбочки, 2 светильника
...кровать, 2 тумбочки, 2 светильника
3ddd
кровать, 2 тумбочки, 2 светильника
нормальное качество
формат 3ds max
без текстур
3ddd
free

Кровать, 2 тумбочки, 2 светильника
...кровать, 2 тумбочки, 2 светильника
3ddd
кровать, 2 тумбочки, 2 светильника
нормальное качество
формат 3ds max
без текстур
Printed
design_connected
$27

...print
designconnected
moroso print computer generated 3d model. designed by wanders, marcel.
3ddd
free

Eichholtz Prints
...- eichholtz print central station i
13 - eichholtz print central station ii
14 - eichholtz print marisa
15 - eichholtz print tish
3ddd
$1

Eichholtz Prints
...print abstract - set of 2
10 - eichholtz print orange abstract
11 - eichholtz print buddha right
12 - eichholtz print buddha left
turbosquid
$1

... available on turbo squid, the world's leading provider of digital 3d models for visualization, films, television, and games.
3ddd
free

Eichholtz Prints
...of 4
2 - print dunbar 2 set of 4
3 - print guadeloupe 1 set of 4
4 - print guadeloupe 2 set of 4
5 - print giles
6 - print trett
3ddd
$1

Eichholtz Prints
...nt tutti frutti
3 - eichholtz prints watson - set of 2
4 - eichholtz prints antique nautilus - set of 2
5 - eichholtz print tiara
3d_export
$5

Monster for printing
...monster for printing
3dexport
monster 3d model printing
3ddd
free

printed rug
...printed rug
3ddd
ковер
very creative printed rug
3ddd
free

Eichholtz Prints
...иал: бумага
габариты (вхш): 72 x 62 см
описание: print sweetmeat - постер в деревянной раме.
3 - prints varsity set of 2
арти
3ddd
free

Art Print Posters
...art print posters
3ddd
прованс
art print posters by patrician prints