Thingiverse
Full Width Light Bar by Dzinr
by Thingiverse
Last crawled date: 2 years, 11 months ago
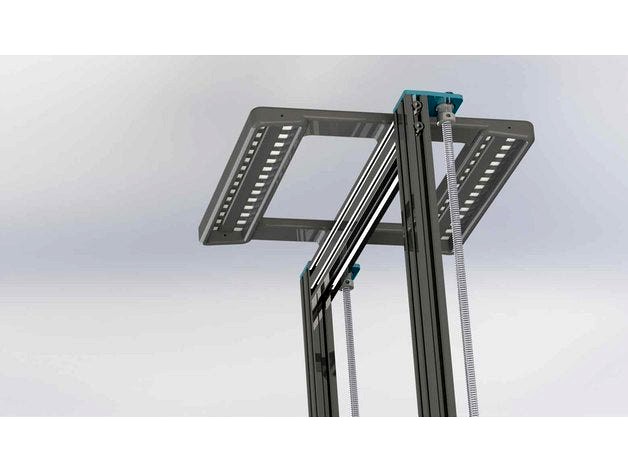
This is a simple modification of version of https://www.thingiverse.com/thing:4849418 (an LED fixture I created for my own needs), at the request of Allan47. I believe the intent is to be used on a CR10S which is laid out differently than my Sidewinder X1. The housings are designed to fit on a 300x 300 bed. This is an untested modification in this configuration. This fixture situates the LED lights near the outside perimeter of the build plate so the parts aren't in the shadows of the gantry and extruder.
I simply cut ends off the earlier version, extended slightly and mirrored the bodies. This configuration is apt to require a couple of screws mid section due to extra length.
Bottom housing was designed for a single t-nut on each end to hold in the t slot rails. The original fixture had 4 snap tabs to hold top housing to bottom, but due to layer direction, they didn't hold up so well. The intent to hold the top housing to the bottom is by sticking a piece of 1.75mm filament thru the holes in the 4 side locations (extra screws may be needed as mentioned above). This feature I haven't tested as I am still utilizing the original housings I made with no need for this configuration, but its a simple concept and doesn't require digging for screws.
This unit will require a 1M 5V USB Cool White LED Strip. I purchased https://www.ebay.com/itm/323187912842?var=512269096246 Cut the strip in designated areas between the copper dots and de-solder the USB cable. Hold the 2 housings together and mark the square hole openings on the inside of top housing for proper LED positioning. Peel the adhesive backing off the LED's and stick to inside of top housing. Run the USB cable up into one of the outer holes alongside the t-nut connection on the bottom housing. Solder the LED's to USB cable per wiring sketch on one end. Polarity is important with LED's. A slide switch can be added at your discretion. I am using an energy saving power strip that turns on and shuts off power to designated plugs when printer is switched on or off; therefore not requiring a switch.
Take a look at my other sidewinder X1 upgrades:
https://www.thingiverse.com/thing:4784042 Artillery Sidewinder X1 Extruder Cover V4 w/ Strain Reliefhttps://www.thingiverse.com/thing:4783250 Artillery Sidewinder X1 Left X Cover with Cable Strain Reliefhttps://www.thingiverse.com/thing:4774786 Bed Heater Strain Relief Artillery Sidewinder X1https://www.thingiverse.com/thing:4592828 V Slot Frame Spool Holderhttps://www.thingiverse.com/thing:4563465 ASX1 Runout Sensor Lead Inhttps://www.thingiverse.com/thing:4839858 Artillery Sidewinder X1 TFT Plug Guidehttps://www.thingiverse.com/thing:4849418 Light Bar (ASWX1 or other 2020 3D Printer Frame)https://www.thingiverse.com/thing:4863723 Sidewinder X1 Easy Firmware Flash TFT Switch Mount
Similar models
thingiverse
free

Light Bar (ASWX1 or other 2020 3D Printer Frame) by Dzinr
...erse.com/thing:4563465 asx1 runout sensor lead inhttps://www.thingiverse.com/thing:4839858 artillery sidewinder x1 tft plug guide
thingiverse
free

Artillery Barrage - Sidewinder X1 Mod Compilation by alsolis
...31743
t-nut m3 drop-in rotating v-slot - davinci2000https://www.thingiverse.com/thing:305060
enjoy!
cheers from the philippines!
thingiverse
free

Artillery Sidewinder X1 X-Axis Cover - Strain Relief Compatible by alsolis
...d the design to be able to fit:
sidewinder x1 v4 x ribbon cable strain relief - mdchrishttps://www.thingiverse.com/thing:4578906/
thingiverse
free

Artillery Sidewinder TFT Plug Guide by Dzinr
...hing:4563465 asx1 runout sensor lead inhttps://www.thingiverse.com/thing:4849418 light bar (aswx1 or other 2020 3d printer frame)
thingiverse
free

Minor TFT Button Mods by Dzinr
...om/thing:4858847 full width light barhttps://www.thingiverse.com/thing:4863723 sidewinder x1 easy firmware flash tft switch mount
thingiverse
free

Sidewinder X1 Easy Firmware Flash TFT Switch Mount by Dzinr
...com/thing:4849418 light bar (aswx1 or other 2020 3d printer frame)https://www.thingiverse.com/thing:4858847 full width light bar
thingiverse
free

Retaining cover for "Artillery Sidewinder X1 Bed Cable Strain Relief" by LeCedre83
... sidewinder x1 (03/2020) bed cable strain relief"
le lien : https://www.thingiverse.com/thing:4235748
plus besoin de rilsan.
thingiverse
free

Artillery Sidewinder X1 Cable Clamp Strain Relief Quick Release - with Slit by alsolis
... the cable.
this allows full visibility of the cable slot, and prevents damaging during remova and insertion of the ribbon cable.
thingiverse
free

Bed Heater Strain Relief Artillery Sidewinder X1 by Dzinr
...the remix info search box doesn't seem to be working tonight so the information is posted above. i'll try to edit later.
thingiverse
free

Artillery Sidewinder X1 V4 US 110V bed Strain Relief Cable Chain Adapter by CRXPYCreations
...ed version to fit the bed and cable position. this is for an artillery sidewinder x1 v4 us 110 volt model bought in january 2021.
Dzinr
thingiverse
free

Mosfet Bracket by Dzinr
...old reliable folgertech 2020 and was configured for its stock setup. diagonal supports included on ribs so no supports required!
thingiverse
free

Filament Spool Bearing 2020 by Dzinr
... need a lip inside to hold the spool in place. down the road, if there is a problem i might upgrade.
i printed with no supports.
thingiverse
free

X-Acto Gripster Replacement Body by Dzinr
...nd texture.
i added a brim and printed vertical with no issues. tolerances are close. you may have to file the inside slightly.
thingiverse
free

LCD Bracket Folger Tech 2020 by Dzinr
...ch numerous upgrades i have since made to printer including bed leveling knobs, z axis adjustment knob, x axis belt tension knob.
thingiverse
free

Heat Bed Glass Holder by Dzinr
... here: https://www.thingiverse.com/thing:2894364 , and compact z axis adjustment here: https://www.thingiverse.com/thing:3490367
thingiverse
free

Stop & Shop Key Fob Frame by Dzinr
...y layers where probably too wide. you might scale the insert at 98-99% if you need to.
too bad i didn't have purple filament!
thingiverse
free

Lipo Battery Low Voltage Tester Alarm Housing by Dzinr
...depressed when cap is snapped on. if so, just slit the shrink wrap in the corners of the led display enough where they lay flat.
thingiverse
free

Folger Tech 2020 Limit Switch Mount Replacement by Dzinr
...el as that is most crucial.
update. finally created the z axis adjustment found here: https://www.thingiverse.com/thing:3490367
thingiverse
free
Artillery Sidewinder TFT Plug Guide by Dzinr
...hing:4563465 asx1 runout sensor lead inhttps://www.thingiverse.com/thing:4849418 light bar (aswx1 or other 2020 3d printer frame)
Width
turbosquid
$3

Width Limitroadsign
...dth limitroadsign for download as 3ds, dae, fbx, obj, and stl on turbosquid: 3d models for games, architecture, videos. (1532893)
turbosquid
$10

Landmine Full Width Mine
... available on turbo squid, the world's leading provider of digital 3d models for visualization, films, television, and games.
3d_export
$10

Gusto 680 width trolley
...~ 100,000 model parts: 1 texture format: .png .jpg resolution: 1024*1024 pbr in substance painter formats: .obj .gltf .fbx .blend
3d_export
$10

Danner 1000 Width Desk
...~ 100,000 model parts: 1 texture format: .png .jpg resolution: 1024*1024 pbr in substance painter formats: .obj .gltf .fbx .blend
3d_export
$10

Rota 2200 width living cabinet
...~ 100,000 model parts: 1 texture format: .png .jpg resolution: 1024*1024 pbr in substance painter formats: .obj .gltf .fbx .blend
3d_export
$10

Morini table 2100 width
...xture format: .png .jpg<br>resolution: 1024*1024<br>pbr in substance painter<br>formats: .obj .gltf .fbx .blend
3d_export
$10

Danner 1000 Width Desk
...xture format: .png .jpg<br>resolution: 1024*1024<br>pbr in substance painter<br>formats: .obj .gltf .fbx .blend
turbosquid
$299

Wood chip Tripper Car Conveyor Set Belt Width 800 mm
...ripper car conveyor set belt width 800 mm for download as ige on turbosquid: 3d models for games, architecture, videos. (1525703)
3d_export
$10

Miel 5 tier 600 width chest of drawers
...xture format: .png .jpg<br>resolution: 1024*1024<br>pbr in substance painter<br>formats: .obj .gltf .fbx .blend
3d_export
$10

Legato 2000 Width AV Long Normal Type
...xture format: .png .jpg<br>resolution: 1024*1024<br>pbr in substance painter<br>formats: .obj .gltf .fbx .blend
Bar
archibase_planet
free
Bar
...bar
archibase planet
bar bar rack
bar 2 - 3d model for interior 3d visualization.
archibase_planet
free
Bars
...bars
archibase planet
horizontal bar parallel bars
parallel bars - 3d model for interior 3d visualization.
3d_export
$10

bar
...bar
3dexport
modern bar
3d_export
$10

bar
...bar
3dexport
modern bar
3d_export
$10

bar
...bar
3dexport
modern bar
3d_export
$10

bar
...bar
3dexport
modern bar
3d_export
$10

bar
...bar
3dexport
modern bar
3d_export
$10

bar
...bar
3dexport
modern bar
3d_export
$10

bar
...bar
3dexport
modern bar
3d_export
$10

bar
...bar
3dexport
modern bar
Full
3ddd
$1
Full Mobili
...ull mobili , шкаф
группа шкафов, серия мебели "классика" фабрики «full mobili»
turbosquid
$80
full man body+full facials
... available on turbo squid, the world's leading provider of digital 3d models for visualization, films, television, and games.
3ddd
$1
Full Mobili
...сика , стол
стол круглый офисный серия мебели "классика" фабрики «full mobili»
3ddd
$1

FULL MOBILI
... стол
cтол офисный серии мебели "классика" итальянской компании full mobili
design_connected
$16

Full Circle
...full circle
designconnected
atmosphere full circle computer generated 3d model.
3d_export
$5
full office
...full office
3dexport
this is full office cgi model created with maya -detailed -textured -uv mapped
design_connected
$16

Full Moon
...full moon
designconnected
roche bobois full moon computer generated 3d model. designed by ragot, cedric.
turbosquid
$100
FULL KITCHEN
...squid
royalty free 3d model full kitchen for download as skp on turbosquid: 3d models for games, architecture, videos. (1345817)
turbosquid
$15

Full Bedroomset
...id
royalty free 3d model full bedroomset for download as max on turbosquid: 3d models for games, architecture, videos. (1540649)
3d_export
$10
full human body
...full human body
3dexport
it is a full human sculpt
Light
archibase_planet
free

Light
...light
archibase planet
lamp lighting light
light - s2 - 3d model for interior 3d visualization.
archibase_planet
free

Light
...light
archibase planet
light luminaire lighting
light l0465 - 3d model (*.gsm+*.3ds) for interior 3d visualization.
3d_export
$5

lighting
...lighting
3dexport
lighting
3d_export
$5

lighting
...lighting
3dexport
lighting in livingroom
turbosquid
$3

Lighting Tree with Lights
...d model lighting tree with lights for download as max and 3ds on turbosquid: 3d models for games, architecture, videos. (1585507)
archibase_planet
free

Light
...light
archibase planet
luster lighting solution
light - s - 3d model for interior 3d visualization.
archibase_planet
free

Light
...light
archibase planet
luster lamp lighting
light 1 - 3d model for interior 3d visualization.
archibase_planet
free

Lights
...lights
archibase planet
surgical lights surgical lamp
surgical lights (floor) - 3d model for interior 3d visualization.
archibase_planet
free

Light
...light
archibase planet
lighting luminaire candlelight
light l0463 - 3d model (*.gsm+*.3ds) for interior 3d visualization.
3d_export
$18

street light-lighting-light-xia bing
...
3dexport
street light-lighting-light-xia bing<br>max 2015 v-ray 3 max 2015<br>textures<br>all files in zip...