Thingiverse
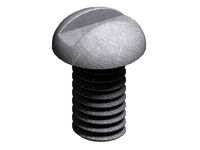
FrSky X-Light battery screw caps by Rygar1432
by Thingiverse
Last crawled date: 3 years ago
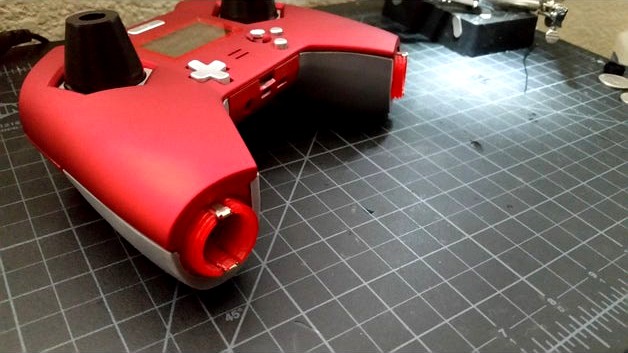
Let me start off with saying this mod is not for the faint of heart. I saw there was a need for a more secure battery cap with the new FrSky X-Light remote, so I designed one to hopefully help out a few fellow pilots. Below is a step by step description of the modification.
Parts are printed with PETG.
You will need one item that isn't included with the controller. A very thin piece of sheet metal, like you would see in a simple soda can. You will need to cut two small round plates the size of a quarter. I tried to design this mod with all stock parts but using this extra piece of thin metal was unavoidable but easy to obtain.
1= Print out the parts (I know that was a given)
2= Remove the old battery holders and wiring from the controller.
3= Unsolder the wire from the battery terminal at the back end of the battery holder.
4= Remove all wiring and metal terminal extenders from around the old battery holders.
Also remove the back terminal plate and spring.
5= Completely remove (desolder) the spring from the terminal back plate of the previous
step and save the springs for later.
6= Remove the hardware from within the battery caps. Keep the screws and spring plate.
7= Completely remove (desolder) the spring from the battery cap spring plate. You won't
be needing these springs again.
8 = BIG STEP HERE. Ok now you take the spring from the back battery terminal (the first
spring you removed) and the spring plate from the battery cap terminal and solder them
together. You will need to remove a small section of the bottom of the spring (only 1/2
to 1 coil) just enough to where the spring fits nicely on the center circle of the battery
cap terminal spring plate. You will also need to bend the bottom of the spring just a bit
inward where you cut the coil from the base of the spring to help make it fit on the plate
(This step is critical to give the proper spacing and tension for the new screw cap).
9= Place the back battery terminal plates into the new 3D printed screw type battery
holders (Yes without a spring). Solder the wire from the wire harness back to the plate.
Don't forget to use some heat shrink.
10= You will need to cut two small very thin metal plates 20mm in circumference to place in the new 3D printed battery cap inserts. Use a soda can and face the metal side up as
you place the metal plates inside the caps. Drill two holes in the plates to match the
screw holes in the cap incerts.
11= The battery terminal extenders that extend to the outer edge of the battery holder need to be bent 180 degrees to lay over the edge of the battery holder as shown in the pictures. This is a very delicate step. You only have one chance to bend the little end nub to face completely in the opposite direction.
If you try to bend it to fast or more than once it will simply break off. Note: Even if it
breaks off, the edge will still stick out past the edge of the battery holder enough to
make contact with the battery cap metal plate so don't worry.
You may have to layer more than one piece of metal in the cap to achieve proper
contact if you go all out and break all the ends off but it will still work. Note: adding
more layers of metal will also help you achieve a proper stopping point for the caps if
you find they are spinning too far past the point of being lined up with the controller.
12= Install the battery terminal extenders and wiring to the new 3D printed screw type
battery holders and install them into the controller just like the old battery holders were
installed.
13= This is another big step. You will need to modestly dremel out the inside of the battery
cap covers to make room for the screw type inserts. DO NOT DREMEL TO MUCH
OUT!! You can easily dremel through to the outer surface if your not careful. Take your
time and go slowly. I used the raised edge as a guide. Once you have removed far
enough out removing the raised edge you should be good and only need to dremel out
a little bit at a time to get just the right fit. This is the scariest step of the entire mode. I
can't stress enough GO SLOWLY. Your dealing with very thin walls. That being said
once I was done I still had at least 1.0 to .50mm left at the thinnest point.
14= Screw the 3D printed screw type inserts along with the spring and spring plate you
created on top of the metal plates into the battery cap covers (See pictures). Make
sure the right and left sides are in the proper battery cap covers with the top of the L or
R pointing towards the top of the cap. (Right and Left top and bottom is orientated
based from looking at the controller when in normal use facing up towards the user).
Note: Both caps screw on spinning towards the outside and screw off spinning towards
the inside. This allows for the caps to only be placed on the proper side and it looks
cool.
15= Enjoy not worrying about your caps coming off.
Similar models
thingiverse
free

Diatone ET 160 cable & antenna holder by patrikstrid
...ntenna tubes which will enable you to run the antenna wires through the back slots in the top plate right into the antenna tubes.
thingiverse
free

E23A 12V Battery holder by DotNetWorker
...back to allow the use of a pen or similar to push the battery out of the holder...
thingiverse
free

LED Lighting for Printrbot Plus by sscharnell
...together with the 4 screws and you are done. it should fit over the top rail without the need for any permanent type of fastener.
thingiverse
free

Dyson Cable Holder by CactiFantastico
... the screw/spring/washer into the new part and screw back down.
the original screw cover cannot be re-used with the design as is.
thingiverse
free

LIR18650 charger/tester adapter by evgs
...gs, wires, m3 screws and nuts, and a spring for negative battery terminal (i've got one from broken toy from aa-battery bay).
thingiverse
free

Universal Dremel/Bosch Battery Cap by secmaster
...he original battery cap and replace it with this one.
2018/01/07 update : added a new version with same height for all 3 latches.
thingiverse
free

Xbox One Controller 18650 battery holder with wire groove
...roller 18650 battery holder with wire groove
thingiverse
an updated 18650 battery holder, with wire groove for far end terminal.
thingiverse
free

18650 battery holder with spring by spiritplumber
...dy if you need a battery holder at three in the morning.
be sure to check out my other work at https://www.robots-everywhere.com/
thingiverse
free

FAT SHARK The FINAL - split 18650 battery case by jendapl
... front side contains the springs to provide extra space for wiring.
enjoy!
and also please comment with usefull ideas. thanks jan
thingiverse
free

GE Oven Knob Back Plate
...and the 2 screws for this to work. i suppose it could be remixed for a friction fit if you want too and use the original screws.
Rygar1432
thingiverse
free

RX5808 PRO PLUS cover for Fatshark Dominator V3 by Rygar1432
...ng all around the edges giving a professional clean looking finish such as you can buy in the stores so i designed my own. enjoy.
thingiverse
free

EVE 2.0 65mm by Rygar1432
...guard. added some space for both the front and rear props at the back edge. also made the supports stronger at the center spines.
thingiverse
free

RakonHeli Sized Frame 76mm by Rygar1432
..." (tpu)
edit: 6/8/18: i made the camera mounts a bit tighter around the cameras. also added a frame for the dys 1102 motors.
thingiverse
free

FrSky X-Light Thumb Sticks by Rygar1432
... the circle can be interpreted as a symbol of eternity, whether that be the eternity of god’s love or the eternal circle of life.
thingiverse
free

Micro 64 Nano Light by Rygar1432
... f3 frame for rcgroups.com member mukenukem.
edit: added beecore omnibus f3 frame 1.5 final cut
edit: added battery holder double
thingiverse
free

Tiny Whoop frame! FC spacing: 36X36MM diameter 3.0MM by Rygar1432
...24g with the fx805 combo, 3.5 to 4min flight times.
best filaments to use:
nylonx from matterhackers.
alloy 910 from taulman3d.
thingiverse
free

Tiny Whoop frame - 1S - 31g AUW by Kolosos
...auw by kolosos thingiverse this whoop is based on rygar1432#39;s idea, but i designed the model from scratch. fc...
Frsky
thingiverse
free

Frsky FLVSS support
...frsky flvss support
thingiverse
this a support for the frsky flvss
thingiverse
free

Wall Mount FRSKY
...wall mount frsky
thingiverse
wall maunt frsky
thingiverse
free

box for G.RX8 FRSKY
...box for g.rx8 frsky
thingiverse
case for g-rx8 frsky
thingiverse
free

Frsky XSR Mount by Laroktheblock
...frsky xsr mount by laroktheblock
thingiverse
universal frsky xsr mount
thingiverse
free

Frsky XSR Receiver Holder
...frsky xsr receiver holder
thingiverse
simple holder for frsky xsr receiver...
thingiverse
free

FrSky XSR mount by KostyaIgnatov
...frsky xsr mount by kostyaignatov
thingiverse
frsky xsr mount for lantian 215
thingiverse
free

Mount FrSky by My_Frame_FPV
...mount frsky by my_frame_fpv
thingiverse
thingiverse
free

FrSky GPS Case by albertoimpresion3d
...frsky gps case by albertoimpresion3d
thingiverse
caja para el gps de frsky
thingiverse
free

X8R Receiver - Frsky by tpetrom
...x8r receiver - frsky by tpetrom
thingiverse
a simple hold down mount for a frsky x8r receiver
thingiverse
free

Frsky X9D Wallmount by Asphyriax
...frsky x9d wallmount by asphyriax
thingiverse
wallmount for frsky taranis x9d and cutout for r9m module antenna.
Battery
3d_ocean
$2

Battery
...battery
3docean
battery electronic
a high quality battery .
3d_export
free
battery
...battery
3dexport
battery
3d_ocean
$5
Battery
...battery
3docean
battery electronics
a classic 6 v battery, high poly with materials
3d_ocean
$3
Batteries
...batteries 3docean aa aaa batteries battery d electronics energy materials power subdivision uv unwrapped aa,...
3d_export
$19
Lead-acid battery storage battery lithium battery
...ttery storage battery lithium battery
3dexport
1.lead-acid battery storage battery lithium battery 2.files include 3dmax obj fbx
3d_ocean
$7

Battery Model
...battery model
3docean
big battery car battery vehicle battery
car battery, big battery, vehicle battery.
3ddd
free

battery energier
...battery energier
3ddd
battery energier , батарейка
battery energier
turbosquid
free
battery
...battery
turbosquid
free 3d model battery for download as obj on turbosquid: 3d models for games, architecture, videos. (1151676)
3d_ocean
$1
Battery Model
...lack minus plus white yellow
this is battery model is about 1000 triangles. turntable preview is smoothed version of the battery.
3d_export
$10
battery 18650
...battery 18650
3dexport
battery 18650
Caps
3ddd
$1

cap
...cap
3ddd
cap
cap
3d_export
$10

cap
...cap
3dexport
cap
archibase_planet
free

Cap
...cap
archibase planet
cloth cap clothes clothing
cap - 3d model (*.gsm+*.3ds) for interior 3d visualization.
3ddd
free
Cap
...cap
3ddd
cap , кепка. бейсболка
реалистичная кепка
archibase_planet
free
Cap
...cap
archibase planet
cap water-closet lid sanitary ware
cap 880961 - 3d model for interior 3d visualization.
archibase_planet
free
Cap
...cap
archibase planet
cap sanitary ware water-closet lid
cap 991861 - 3d model for interior 3d visualization.
archibase_planet
free

Cap
...cap
archibase planet
cloth cap head-dress hat
cap n110708 - 3d model (*.gsm+*.3ds) for interior 3d visualization.
archibase_planet
free
Cap
...cap
archibase planet
wc cap water-closet lid
wc cap p5114 - 3d model (*.gsm+*.3ds) for interior 3d visualization.
archibase_planet
free
Cap
...cap
archibase planet
wc cap water-closet lid
wc cap r3901 - 3d model (*.gsm+*.3ds) for interior 3d visualization.
archibase_planet
free
Capping
...
archibase planet
chimney capping flue smoke-stack
chimney capping n020108- 3d model (*.gsm+*.3ds) for interior 3d visualization.
Screw
3d_export
$5
screw
...screw
3dexport
screw
turbosquid
$29

Screw driver and screws
... available on turbo squid, the world's leading provider of digital 3d models for visualization, films, television, and games.
3d_ocean
$2
Screw
... steel twist wood screw
screw 3d model in 2 different materials real world scale rendered with mental ray file formats: .max .obj
3d_ocean
$4

Screw
...n
3d bolt male mechanic metal nut parts prop propeller schraube schraubenmutter screw steel twist
screw 3d model, clean modeling.
turbosquid
$2
screw
...crew
turbosquid
royalty free 3d model screw for download as on turbosquid: 3d models for games, architecture, videos. (1198271)
turbosquid
free
Screw
...screw
turbosquid
free 3d model screw for download as obj on turbosquid: 3d models for games, architecture, videos. (1240851)
3d_ocean
$2
Frame Screw
...frame screw
3docean
construction screw
a frame screw and plug.
turbosquid
$27

screw
...w
turbosquid
royalty free 3d model screw for download as max on turbosquid: 3d models for games, architecture, videos. (1334064)
turbosquid
$20

SCREW
...
turbosquid
royalty free 3d model screw for download as sldas on turbosquid: 3d models for games, architecture, videos. (729733)
turbosquid
$1
Screws
...
turbosquid
royalty free 3d model screws for download as max on turbosquid: 3d models for games, architecture, videos. (1640360)
Light
archibase_planet
free

Light
...light
archibase planet
lamp lighting light
light - s2 - 3d model for interior 3d visualization.
archibase_planet
free

Light
...light
archibase planet
light luminaire lighting
light l0465 - 3d model (*.gsm+*.3ds) for interior 3d visualization.
3d_export
$5

lighting
...lighting
3dexport
lighting
3d_export
$5

lighting
...lighting
3dexport
lighting in livingroom
turbosquid
$3

Lighting Tree with Lights
...d model lighting tree with lights for download as max and 3ds on turbosquid: 3d models for games, architecture, videos. (1585507)
archibase_planet
free

Light
...light
archibase planet
luster lighting solution
light - s - 3d model for interior 3d visualization.
archibase_planet
free

Light
...light
archibase planet
luster lamp lighting
light 1 - 3d model for interior 3d visualization.
archibase_planet
free

Lights
...lights
archibase planet
surgical lights surgical lamp
surgical lights (floor) - 3d model for interior 3d visualization.
archibase_planet
free

Light
...light
archibase planet
lighting luminaire candlelight
light l0463 - 3d model (*.gsm+*.3ds) for interior 3d visualization.
3d_export
$18

street light-lighting-light-xia bing
...
3dexport
street light-lighting-light-xia bing<br>max 2015 v-ray 3 max 2015<br>textures<br>all files in zip...