Thingiverse
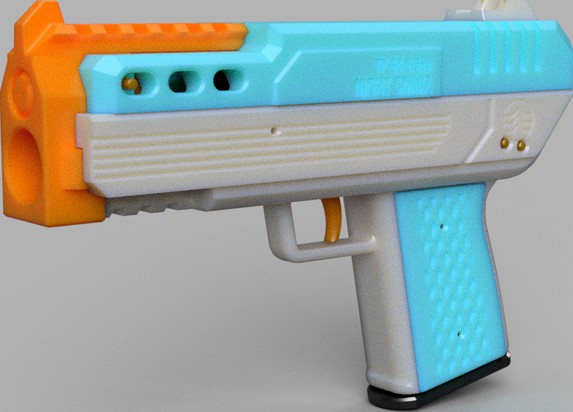
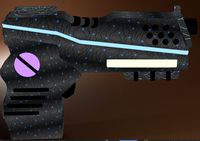
FP-68D Night Snake Compact dual cage FTW flywheel pistol foam blaster
by Thingiverse
Last crawled date: 4 years, 2 months ago
Have you ever wanted to have a compact blaster capable of skirting 150 FPS? Well, here you go.
This should be a rather simple build though you might find the catch assembly a little annoying. I encourage to experiment with springs and perhaps with print settings if you know what you are doing to create a blaster fine-tuned to your needs.
Grab your Snakethanhas here:https://www.thingiverse.com/thing:3890229
Feedback is very much welcome and though I might not be able to respond to everyone, I read everything. If you run into issues, I'll do my best to help.
Complete blaster available here:https://blogderrikksun.com/product/grass-snake/
I should also note that selling the blaster without permission is illegal. If you are a seller interested in selling and manufacturing Grass Snakes, please contact me directly.
Tips are highly appreciated and would help me a lot on future Nerf projects.
Version history:
1.0
Initial release
Hardware list:
-Standard Omron sized microswitch;
-Motors of choice. Honeybadgers seem to offer the best performance but from what I hear Fangs are a bit more reliable;
-FTW, Nightowl or Cabanossi flywheels (I've yet to test with the latter);
-Wiring and a battery plug of choice;
-Some M2.5x10 screws or their imperial equivalent. Preferably countersunk. You might need to shorten the one that fixes the trigger to the trigger link;
-12 Motor screws. The extra screws are for grip panels.
-A couple of approximately 5mm long and no more than 5mm in diameter compression springs for each catch. I've found that a pen springs work well. You might want to have a somewhat more loose spring for the Katana catch becasue of how it's set up. I would really encourage to experiment a bit with this, because both harder and softer springs will have their own advantages;
-An extension spring or two. I use one or two 0.4x4mm springs for the trigger. There shouldn't be much resistance in the return stroke of the trigger but it never hurts to have that extra bit of force. Again, a relatively average strength setup will suffice but you can experiment here as well. As I said, you can use two extension springs to double the force.
Print settings:
Parts are NOT oriented for printing
Best results with Cura slicer, otherwise I can't guarantee good tolerances.
Layer height: 0.24 or lower
Perimeters: 3 or more (no reason for more than 5)
Supports: Preferably use tree supports and if not, don't forget to place the supports everywhere, not only directly above build plate
Print speed: 60mm/s works best but that will depend on your setup as well
Print duration on minimal settings and 100 mm/s: about 20 hours in total
5 or more top/bottom layers but I feel you could use less
15% infill should be good but you might be able to get away with lower percentage
Grip panel is meant to be mirrored.
Print orientations are the same as a regular Grass Snake.
Make sure moving parts fit together without friction before proceeding to the next step
Assembly:
1) Assemble the trigger and trigger link with a screw.
2) slot in the trigger assembly with the link and pusher attached into their appropriate slots. Make sure the lever's half pipe is facing the outside. Secure the lever with a pin.
3) Screw on the extension spring(s) between trigger link and a slot on the frame.
4) Slot in the magazine catches with the springs. Start with the Talon catch. After securing that partially with a pin, proceed to the Katana catch. After that is done, insert the pin completely. Make sure that all the supports in the slots are cleared, the catch stoppers are properly sitting inside their slots and that the springs don't fall to the side while assembling, otherwise the mechanism won't work. Verify that you're happy with how it works by test inserting a magazine.
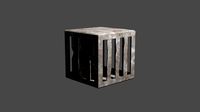
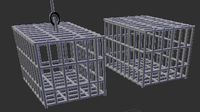
5) Assemble the cage. Insert and screw in the motors. Use 3-4mm long motor screws. Add the flywheels and make sure they're aligned nicely and take into account motor shaft looseness when doing it. When inserting the flywheels on their shafts make sure the motors are supported against something by the circular extensions on the opposite side and not the motor side walls, or worse, nothing at all. Try to not hit the tabs. You might need to shave the bridge on the cage a bit so that the flywheels fit.
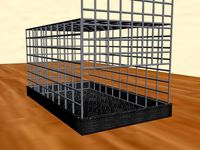
6) Wire up the cage with the switch (inverted). You can do that while everything is in the frame or outside of it. Make sure you cut the wires to appropriate lengths. Don't forget the battery plug. Keep in mind that the horizontal slot on the right is meant to hold it inside to save space. You can optionally add some LEDs in the front cavity. After that is done, secure the cage with two screws and the switch with a single screw on the left side of the blaster.
7) Add the cover and secure it with screws. You can try to test fire at this point.
8) Pick up the slide (frame top) and insert the iron sights into the dove tail slot.
9) To close off the blaster with the battery, put on the slide (frame top), slot in the tip, secure it with a pin and snap on the detent in the back.
10) Don't forget to screw on the grip panels with motor screws. Make sure they don't grind on the magazine, otherwise you will need to trim them a little.
11) Enjoy!
This should be a rather simple build though you might find the catch assembly a little annoying. I encourage to experiment with springs and perhaps with print settings if you know what you are doing to create a blaster fine-tuned to your needs.
Grab your Snakethanhas here:https://www.thingiverse.com/thing:3890229
Feedback is very much welcome and though I might not be able to respond to everyone, I read everything. If you run into issues, I'll do my best to help.
Complete blaster available here:https://blogderrikksun.com/product/grass-snake/
I should also note that selling the blaster without permission is illegal. If you are a seller interested in selling and manufacturing Grass Snakes, please contact me directly.
Tips are highly appreciated and would help me a lot on future Nerf projects.
Version history:
1.0
Initial release
Hardware list:
-Standard Omron sized microswitch;
-Motors of choice. Honeybadgers seem to offer the best performance but from what I hear Fangs are a bit more reliable;
-FTW, Nightowl or Cabanossi flywheels (I've yet to test with the latter);
-Wiring and a battery plug of choice;
-Some M2.5x10 screws or their imperial equivalent. Preferably countersunk. You might need to shorten the one that fixes the trigger to the trigger link;
-12 Motor screws. The extra screws are for grip panels.
-A couple of approximately 5mm long and no more than 5mm in diameter compression springs for each catch. I've found that a pen springs work well. You might want to have a somewhat more loose spring for the Katana catch becasue of how it's set up. I would really encourage to experiment a bit with this, because both harder and softer springs will have their own advantages;
-An extension spring or two. I use one or two 0.4x4mm springs for the trigger. There shouldn't be much resistance in the return stroke of the trigger but it never hurts to have that extra bit of force. Again, a relatively average strength setup will suffice but you can experiment here as well. As I said, you can use two extension springs to double the force.
Print settings:
Parts are NOT oriented for printing
Best results with Cura slicer, otherwise I can't guarantee good tolerances.
Layer height: 0.24 or lower
Perimeters: 3 or more (no reason for more than 5)
Supports: Preferably use tree supports and if not, don't forget to place the supports everywhere, not only directly above build plate
Print speed: 60mm/s works best but that will depend on your setup as well
Print duration on minimal settings and 100 mm/s: about 20 hours in total
5 or more top/bottom layers but I feel you could use less
15% infill should be good but you might be able to get away with lower percentage
Grip panel is meant to be mirrored.
Print orientations are the same as a regular Grass Snake.
Make sure moving parts fit together without friction before proceeding to the next step
Assembly:
1) Assemble the trigger and trigger link with a screw.
2) slot in the trigger assembly with the link and pusher attached into their appropriate slots. Make sure the lever's half pipe is facing the outside. Secure the lever with a pin.
3) Screw on the extension spring(s) between trigger link and a slot on the frame.
4) Slot in the magazine catches with the springs. Start with the Talon catch. After securing that partially with a pin, proceed to the Katana catch. After that is done, insert the pin completely. Make sure that all the supports in the slots are cleared, the catch stoppers are properly sitting inside their slots and that the springs don't fall to the side while assembling, otherwise the mechanism won't work. Verify that you're happy with how it works by test inserting a magazine.
5) Assemble the cage. Insert and screw in the motors. Use 3-4mm long motor screws. Add the flywheels and make sure they're aligned nicely and take into account motor shaft looseness when doing it. When inserting the flywheels on their shafts make sure the motors are supported against something by the circular extensions on the opposite side and not the motor side walls, or worse, nothing at all. Try to not hit the tabs. You might need to shave the bridge on the cage a bit so that the flywheels fit.
6) Wire up the cage with the switch (inverted). You can do that while everything is in the frame or outside of it. Make sure you cut the wires to appropriate lengths. Don't forget the battery plug. Keep in mind that the horizontal slot on the right is meant to hold it inside to save space. You can optionally add some LEDs in the front cavity. After that is done, secure the cage with two screws and the switch with a single screw on the left side of the blaster.
7) Add the cover and secure it with screws. You can try to test fire at this point.
8) Pick up the slide (frame top) and insert the iron sights into the dove tail slot.
9) To close off the blaster with the battery, put on the slide (frame top), slot in the tip, secure it with a pin and snap on the detent in the back.
10) Don't forget to screw on the grip panels with motor screws. Make sure they don't grind on the magazine, otherwise you will need to trim them a little.
11) Enjoy!
Similar models
thingiverse
free

FP-68S Twig Snake Extra Compact FTW flywheel pistol foam blaster
...nels with motor screws. make sure they don't grind on the magazine, otherwise you will need to trim them a little.
12) enjoy!
thingiverse
free

FP-68 Grass Snake Compact FTW flywheel pistol foam blaster
...nels with motor screws. make sure they don't grind on the magazine, otherwise you will need to trim them a little.
11) enjoy!
thingiverse
free

FRP-13 Mamba Heavy Nerf Rivals semi automatic pistol
...er by putting on the top and fixing it in place with pins. then, you slide in the barrel and fix it in by rotating it.
12) enjoy!
thingiverse
free

FCR-22 Taipan Assault Rifle FTW+Regular high performance foam blaster
...ud to fix them in.
17) optional: add the foregrip or iron sights. they use m5 screws to attach to the picatinny rails.
18) enjoy!
thingiverse
free

Base cage for Flywheel the world micro flywheels by SilverRoundIndustries
... been printed, feel free to make changes!
ftw micro flywheels: https://flywheeltheworld.com/shop/ftw-micro-flywheels-comet-white/
thingiverse
free

(Version 0.1) Drop in Kit for Nerf Projects by ExoticVoid
...s dual stage.
assemble it and glue it into whereever you like it to go.
i haven't tested that new version but it should work.
thingiverse
free

brushless motor flywheel cage and flywheels for Jyn Erso blaster
...o make space for the m3 bolts, and need to cut space for the motor pins, which will protrude through the left side of the blaster
thingiverse
free

Double Retaliator/Recon shotgun by Zero-Blade
...connections before gluing or screwing, depending on printer type and settings, some parts might need some sanding
happy blasting!
thingiverse
free

Display Stand & Screws/pins for Rey Blaster by Flannery42 by UnimatrixRed
... breaking when used. the rectangular connector is optional but again might be useful for alignment and better structural support.
thingiverse
free

IMPROVED Lil Hyper V3 by that_reason
...trigger using the nitefinder's original trigger screw or any similar screw with a flat metal bit on the end....

Ftw
thingiverse
free

KTM FTW by wiccanburn
...ktm ftw by wiccanburn
thingiverse
decorative keychain for my favorite brand.
thingiverse
free

FTW SYL 81
...ftw syl 81
thingiverse
keychain support your local 81 red machine 1%
thingiverse
free

EVGA 1080 FTW Custom Blower Shroud
...evga 1080 ftw custom blower shroud
thingiverse
custom shroud for evga 1080/1070 ftw gpu
thingiverse
free

FF11 Bastok FTW (Symbol) by PrintsIT
...ff11 bastok ftw (symbol) by printsit
thingiverse
display your bastok pride!
thingiverse
free

nerf FTW fly wheel micro fly wheel by Dsfrick
...n replace ftw
u can set a heat shrinkable tube on it if u want more friction
ftw fly wheel micro fly wheel
use 100% infil !!!!!!!
renderosity
$10

BBW FTW 2
...leen.duf<br />
nileen.duf.png<br />
<br />
thanks for looking!<br />
<br />
aliveshecried</p>
thingiverse
free

EVGA GTX 1070 FTW Custom Backplate by CyberDen_Systems
...lways, feel free to comment and ask questions. i'm a custom pc builder so i can always make custom designs if you need them.
thingiverse
free

FTW Custom Announcer Table For Little Brother by TheAwesomerEgger
...ou might want to either paint this or use different colored filaments, it is not needed, but it will definitely look alot better.
thingiverse
free

Ocarina FTW by pattywac
...fter i walked away for approximately 30 seconds. i'm going to change a couple things and will print off a new copy by friday
thingiverse
free

Alan Buddha by Almewa
...buddha by almewa thingiverse my face on a buddha! ftw!! ...
Flywheel
turbosquid
$1

Flywheel
...alty free 3d model flywheel for download as ige, obj, and stl on turbosquid: 3d models for games, architecture, videos. (1216111)
turbosquid
$1

Flywheel
...ee 3d model flywheel for download as ige, obj, stl, and sldpr on turbosquid: 3d models for games, architecture, videos. (1221999)
turbosquid
$1

Flywheel
...ee 3d model flywheel for download as ige, obj, stl, and sldpr on turbosquid: 3d models for games, architecture, videos. (1220977)
turbosquid
$1

Flywheel(1)
...alty free 3d model flywheel for download as ige, obj, and stl on turbosquid: 3d models for games, architecture, videos. (1217730)
3d_export
$5

six cylinder radial engine flywheel
...lywheel 3d model. this is installed basically to store electrical energy and deliver energy as a mechanical coupled with gear box
3d_export
$30
Compressed Air Engine 3D Model
...air engine 3d model 3dexport pneumatic compressor engine motor flywheel shaft camshaft piston valve block engineering compressed-air driven compressed...
3d_export
$10

Clutch disk 3D Model
...sedan speed gearbox differential drive shaft pressure plate bearing flywheel engine vehicle gear axle camshaft clutch disk 3d model...
3d_export
$75
Minature Wobble Steam Engine 3D Model
...3dexport minature wobble steam engine thermo thermodynamics combustion boiler flywheel crankshaft pistol cylinder power energy compressed air minature wobble...
3d_ocean
$4

Clutch disk
...auto axle bearing camshaft car clutch differential drive engine flywheel gear gearbox plate pressure sedan shaft speed vehicle a...
3d_export
$229

GT500 Engine - Disassembled Engine
...head<br>cylinder head bolts<br>engine tools<br>exhaust manifold - l<br>exhaust manifold - r<br>flywheellt;br>fuel injector system: -fuel injectors - l -fuel injectors -...
Blaster
turbosquid
free
Blaster
...id
free 3d model blaster for download as obj, fbx, and blend on turbosquid: 3d models for games, architecture, videos. (1259706)
3d_export
free
Blaster
...blaster
3dexport
turbosquid
$35
blaster
... available on turbo squid, the world's leading provider of digital 3d models for visualization, films, television, and games.
turbosquid
$29
Blaster
...d model blaster for download as 3ds, obj, fbx, blend, and dae on turbosquid: 3d models for games, architecture, videos. (1296833)
turbosquid
$5

Blaster
... available on turbo squid, the world's leading provider of digital 3d models for visualization, films, television, and games.
turbosquid
free

blaster
... available on turbo squid, the world's leading provider of digital 3d models for visualization, films, television, and games.
turbosquid
$10

Blaster Machine
...squid
royalty free 3d model blaster machine for download as on turbosquid: 3d models for games, architecture, videos. (1407293)
3d_export
$5
Blaster 3D Model
...blaster 3d model
3dexport
blaster weapon game gun wars star shoter movie
blaster 3d model daniilbondar 93841 3dexport
3d_ocean
$15

Ghetto Blaster
...o blaster
3docean
audio boombox cassette ghettoblaster music radio stereo
fully modeled ghetto blaster including uvw texture psd.
turbosquid
$1

Alien Blaster
...id
royalty free 3d model alien blaster for download as blend on turbosquid: 3d models for games, architecture, videos. (1258055)
Fp
3d_ocean
$6

FPS Hand
...love and skin colors can easily be changed by editing the included psd files. 4 color variations included in diffuse tga textu...
turbosquid
$75

FPS-05_RadarSet_ALT
... available on turbo squid, the world's leading provider of digital 3d models for visualization, films, television, and games.
turbosquid
$10

FPS Hand
... model fps hand for download as 3ds, obj, fbx, blend, and stl on turbosquid: 3d models for games, architecture, videos. (1296381)
turbosquid
$2

FPS Hand
... available on turbo squid, the world's leading provider of digital 3d models for visualization, films, television, and games.
3d_export
$15

FPS Hand 3D Model
...fps hand 3d model
3dexport
hand human male fps game shooter military
fps hand 3d model beatheart 67558 3dexport
turbosquid
$5

FPS Arm and Machete
...yalty free 3d model fps arm and machete for download as blend on turbosquid: 3d models for games, architecture, videos. (1220023)
turbosquid
$29

Grenade Animated FPS
...ree 3d model grenade fps animated for download as max and fbx on turbosquid: 3d models for games, architecture, videos. (1150124)
turbosquid
$6

Sniper Future FPS
... available on turbo squid, the world's leading provider of digital 3d models for visualization, films, television, and games.
3d_export
$40

FPS pack 3D Model
...dragunov svd sniper rgd5 fire smoke flash grenade hand fps game weapon bomb projectile
fps pack 3d model beatheart 67526 3dexport
turbosquid
$49

AK-47 Animated FPS
... free 3d model ak-47 animated fps for download as max and fbx on turbosquid: 3d models for games, architecture, videos. (1150144)
Snake
3d_export
free

snake
...snake
3dexport
snake done by mehul.c
turbosquid
$1

Snake - Lenny The Snake
... available on turbo squid, the world's leading provider of digital 3d models for visualization, films, television, and games.
archibase_planet
free

Snake
...snake
archibase planet
reptile snake serpent
snake n230908 - 3d model (*.gsm+*.3ds) for interior 3d visualization.
archibase_planet
free

Snake
...snake
archibase planet
snake crawler creeper
snake 1 n160408 - 3d model (*.gsm+*.3ds) for interior 3d visualization.
archibase_planet
free

Snake
...snake
archibase planet
snake crawler creeper
snake 2 n160408 - 3d model (*.gsm+*.3ds) for interior 3d visualization.
archibase_planet
free

Snake
...snake
archibase planet
snake cobra serpent animal
snake n010313 - 3d model (*.gsm+*.3ds) for interior 3d visualization.
design_connected
$18

Snake
...snake
designconnected
poliform snake armchairs computer generated 3d model. designed by roberto lazzeroni.
3d_export
$30

Snake Lenny The Snake 3D Model
...l
3dexport
lenny snake rattlesnake animal water ocean cartoon cartoonish scary
snake lenny the snake 3d model swp 78376 3dexport
3d_ocean
$4

snake skin
...ake skin high quality 2048×2048 size tileable texture. 1.snake skin_diffuse.jpg 2.snake skin_normal.jpg 3.snake skin_specular.jpg
turbosquid
$20

Snake
...e
turbosquid
royalty free 3d model snake for download as fbx on turbosquid: 3d models for games, architecture, videos. (1387076)
Cage
3d_export
$5
cage
...cage
3dexport
cage
archibase_planet
free

Cage
...cage
archibase planet
cage bird cage birdcage
cage 2 - 3d model (*.gsm+*.3ds) for interior 3d visualization.
archibase_planet
free

Cage
...cage
archibase planet
cage bird cage birdcage
cage 1 - 3d model (*.gsm+*.3ds) for interior 3d visualization.
archibase_planet
free
Cage
...cage
archibase planet
cage bird cage birdcage
cage 3 - 3d model (*.gsm+*.3ds) for interior 3d visualization.
archibase_planet
free

Cage
...cage
archibase planet
bird's cage cage
cage n020909 - 3d model (*.gsm+*.3ds) for interior 3d visualization.
archibase_planet
free
Cage
...cage
archibase planet
cage
cage monte- 3d model for interior 3d visualization.
3d_export
$7
cage
...cage
3dexport
3d cage model
archibase_planet
free

Cage
...cage
archibase planet
cage
cage n270211 - 3d model (*.gsm+*.3ds) for interior 3d visualization.
turbosquid
$5
Cage
...ge
turbosquid
royalty free 3d model cage for download as dwg on turbosquid: 3d models for games, architecture, videos. (1224275)
turbosquid
$4
cage
...squid
royalty free 3d model cage for download as max and fbx on turbosquid: 3d models for games, architecture, videos. (1368360)
Pistol
3d_export
free

Pistol
...pistol
3dexport
pistol
archibase_planet
free

Pistol
...pistol
archibase planet
pocket-pistol pistol fire-arms
pistol n210808 - 3d model (*.gsm+*.3ds) for interior 3d visualization.
3d_export
$5

pistol
...pistol
3dexport
3d model of a pistol
archibase_planet
free

Pistol
...pistol
archibase planet
pistol fire-arms gun
pistol n070111 - 3d model (*.3ds) for interior 3d visualization.
archibase_planet
free

Pistol
...pistol
archibase planet
pistol fire-arms gun
pistol n141214 - 3d model (*.gsm+*.3ds+*.max) for 3d visualization.
archibase_planet
free

Pistol
...pistol
archibase planet
fire-arms pistol shooter
pistol n211008 - 3d model (*.gsm+*.3ds) for interior 3d visualization.
archibase_planet
free

Pistol
...pistol
archibase planet
pistol revolver fire-arms gun
pistol n031011 - 3d model (*.3ds) for interior 3d visualization.
archibase_planet
free

Pistol
...pistol
archibase planet
pistol fire-arms gun
pistol black n050214 - 3d model (*.gsm+*.3ds) for interior 3d visualization.
archibase_planet
free

Pistol
...stol
archibase planet
pistol fire-arms beretta gun
pistol beretta n121213 - 3d model (*.gsm+*.3ds) for interior 3d visualization.
archibase_planet
free

Pistol
...pistol
archibase planet
pistol fire-arms gun
pistol 9 mm makarov n100111 - 3d model (*.3ds) for interior 3d visualization.
Foam
3d_export
$5

cylinder foam does not fall stand polyurethane foam
...cylinder foam does not fall stand polyurethane foam
3dexport
cylinder foam does not fall stand.<br>polyurethane foam
turbosquid
$1

Foam Gun
...urbosquid
royalty free 3d model foam gun for download as fbx on turbosquid: 3d models for games, architecture, videos. (1659619)
turbosquid
$39

Foam Hand
... available on turbo squid, the world's leading provider of digital 3d models for visualization, films, television, and games.
turbosquid
$14

Shaving Foam
... available on turbo squid, the world's leading provider of digital 3d models for visualization, films, television, and games.
turbosquid
$10

Foam Glider
... available on turbo squid, the world's leading provider of digital 3d models for visualization, films, television, and games.
turbosquid
$2

Foam Brush
... available on turbo squid, the world's leading provider of digital 3d models for visualization, films, television, and games.
turbosquid
$10

Foam fire extinguisher
...alty free 3d model foam fire extinguisher for download as max on turbosquid: 3d models for games, architecture, videos. (1700116)
design_connected
$7
TORK Foam Soap Dispenser
...tork foam soap dispenser
designconnected
tork foam soap dispenser computer generated 3d model.
turbosquid
$29
Sierra Foam Sofa
...e 3d model sierra foam sofa for download as max, fbx, and obj on turbosquid: 3d models for games, architecture, videos. (1575076)
turbosquid
$1
Sound Proofing Foam
... sound proofing foam for download as ige, obj, stl, and sldpr on turbosquid: 3d models for games, architecture, videos. (1289027)
Compact
3d_export
$5

compact freezer
...compact freezer
3dexport
the compact freezer is product about refrigeration machine
3d_ocean
$8
Compact Cassette
...
80s album analog audio cartridge cassette compact digital electronics lp mp3 music play record sound tape vinyl
compact cassette
design_connected
$20
Eames Compact
...eames compact
designconnected
herman miller eames compact computer generated 3d model. designed by eames, charles.
3d_ocean
$2

Compact Disc
...compact disc
3docean
album audio cd compact disc dvd laser disc movie music
a cd
3d_export
$10

land compacter
...land compacter
3dexport
turbosquid
$1

Compact knife
...quid
royalty free 3d model compact knife for download as obj on turbosquid: 3d models for games, architecture, videos. (1557900)
3d_export
$12
compact rotary broach
...compact rotary broach
3dexport
compact tool for drilling hexagonal holes in lathes!
turbosquid
free

Lada Compact
... 3d model lada compact for download as max, max, max, and fbx on turbosquid: 3d models for games, architecture, videos. (1623122)
turbosquid
$59
Compact Truck
... available on turbo squid, the world's leading provider of digital 3d models for visualization, films, television, and games.
turbosquid
$50
Compact kitchen
... available on turbo squid, the world's leading provider of digital 3d models for visualization, films, television, and games.
Night
3ddd
$1

Кровать Night-Night Riva 1920
...кровать night-night riva 1920
3ddd
riva
http://www.riva1920.it/it/prodotti/letti/night-night-262/
3ddd
$1

Night Stand
... night stand , прикроватная тумба
classical night stand
3d_export
$5

Night castle
...night castle
3dexport
night castle
3d_export
$5

night table
...night table
3dexport
night table
3d_export
$5

dragon night
...dragon night
3dexport
dragon night 3d model
3d_export
$5
Night city
...night city
3dexport
night city with roads and houses
turbosquid
$21

Night
... available on turbo squid, the world's leading provider of digital 3d models for visualization, films, television, and games.
3d_export
$5

Foggy night
...foggy night
3dexport
move to a fabulous foggy night location.
3d_export
$5
King Of The Night
...king of the night
3dexport
king of the night. lord of the cold and the dead.
3ddd
$1
Night Stand
...night stand
3ddd
резьба , тумба
night stand for bedroom
Dual
turbosquid
free

Dual Pistols
...ls
turbosquid
free 3d model dual pistols for download as fbx on turbosquid: 3d models for games, architecture, videos. (1320360)
turbosquid
$2

Dual Axe
...urbosquid
royalty free 3d model dual axe for download as fbx on turbosquid: 3d models for games, architecture, videos. (1332372)
turbosquid
$10

Dual Lesaths
... available on turbo squid, the world's leading provider of digital 3d models for visualization, films, television, and games.
3ddd
$1

плитка Dual Bianco (Испания)
...й плитки venis dual (испания). технические качества: устойчивость к стирания, отличная геометрия, отсутствие проблем при укладке.
turbosquid
$35

Dual Mesh Fonts
...ree 3d model dual mesh fonts for download as ma, obj, and fbx on turbosquid: 3d models for games, architecture, videos. (1352989)
turbosquid
$29

Dual Flask with Bungs
...del dual flask with bungs for download as obj, fbx, and blend on turbosquid: 3d models for games, architecture, videos. (1210512)
turbosquid
$19

Dual Socket Plug
...3d model dual socket plug for download as obj, fbx, and blend on turbosquid: 3d models for games, architecture, videos. (1303912)
turbosquid
$13

Dual Adjustable Pulley
... available on turbo squid, the world's leading provider of digital 3d models for visualization, films, television, and games.
turbosquid
$10

Amoi N809 Dual
... available on turbo squid, the world's leading provider of digital 3d models for visualization, films, television, and games.
turbosquid
$5

Dual Turret Tank
... available on turbo squid, the world's leading provider of digital 3d models for visualization, films, television, and games.