Thingiverse
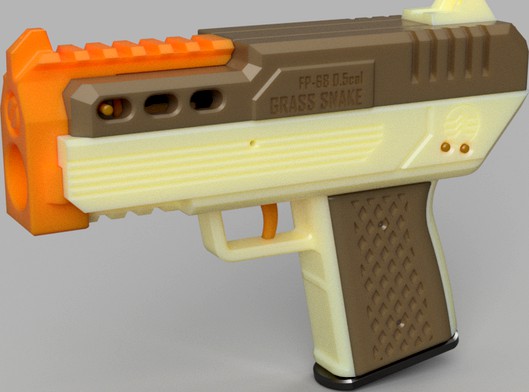
FP-68 Grass Snake Compact FTW flywheel pistol foam blaster
by Thingiverse
Last crawled date: 5 years, 6 months ago
NOTE: Because Thingiverse can't handle subfolders and needs some sort of unzipped .stl files 1.1 version files are in an archive.
This pistol is among the smallest and most versatile flywheel blasters available. The FP-68 Grass Snake is a compact pistol built to take both Katanas and Talons. Its mag release - free design allows for super quick reloads and a relatively simple catch system. It is ideal as a secondary for more competitive Nerf battles, as a blaster you could bring with you when travelling, or even as an HvZ primary - while it doesn't have top load you can stock up on a lot of its tiny mags. Or something to sneak into official Nerf events to show them how we do things in the homemade scene (I'm not actually asking for this please don't sue me)!
This should be a rather simple build though you might find the catch assembly a little annoying. I encourage to experiment with springs and perhaps with print settings if you know what you are doing to create a blaster fine-tuned to your needs.
Grab your Snakethanhas here:https://www.thingiverse.com/thing:3890229
Feedback is very much welcome and though I might not be able to respond to everyone, I read everything. If you run into issues, I'll do my best to help.
Complete blaster available here:https://blogderrikksun.com/product/grass-snake/
I should also note that selling the blaster without permission is illegal. If you are a seller interested in selling and manufacturing Grass Snakes, please contact me directly.
Tips are highly appreciated and would help me a lot on future Nerf projects.
Version history:
1.0
Initial release
1.1
Minor ergonomic improvements
Improved catches
Hardware list:
-Standard Omron sized microswitch;
-Motors of choice. Honeybadgers seem to offer the best performance but from what I hear Fangs are a bit more reliable;
-FTW, Nightowl or Cabanossi flywheels (I've yet to test with the latter);
-Wiring and a battery plug of choice;
-Some M2.5x10 screws or their imperial equivalent. Preferably countersunk. You might need to shorten the one that fixes the trigger to the trigger link;
-8 Motor screws. The extra screws are for grip panels.
-A couple of approximately 5mm long and no more than 5mm in diameter compression springs for each catch. I've found that a pen springs work well. You might want to have a somewhat more loose spring for the Katana catch becasue of how it's set up. I would really encourage to experiment a bit with this, because both harder and softer springs will have their own advantages;
-An extension spring or two. I use one or two 0.4x4mm springs for the trigger. There shouldn't be much resistance in the return stroke of the trigger but it never hurts to have that extra bit of force. Again, a relatively average strength setup will suffice but you can experiment here as well. As I said, you can use two extension springs to double the force.
Print settings:
Parts are NOT oriented for printing
Best results with Cura slicer, otherwise I can't guarantee good tolerances.
Layer height: 0.24 or lower
Perimeters: 3 or more (no reason for more than 5)
Supports: Preferably use tree supports and if not, don't forget to place the supports everywhere, not only directly above build plate
Print speed: 60mm/s works best but that will depend on yor setup as well
Print duration on minimal settings and 100 mm/s: about 20 hours in total
5 or more top/bottom layers but I feel you could use less
15% infill should be good but you might be able to get away with lower percentage
Grip panel is meant to be mirrored.
Make sure moving parts fit together without friction before proceeding to the next step
Assembly:
1) Assemble the trigger and trigger link with a screw.
2) slot in the trigger assembly with the link and pusher attached into their appropriate slots. Make sure the lever's half pipe is facing the outside. Secure the lever with a pin.
3) Screw on the extension spring(s) between trigger link and a slot on the frame.
4) Slot in the magazine cathces with the springs. Start with the Talon catch. After securing that partially with a pin, proceed to the Katana catch. After that is done, insert the pin completely. Make sure that all the supports in the slots are cler, the catch stoppers are properly sitting inside their slots and that the springs don't fall to the side while assembling, otherwise the mechanism won't work. Verify that you're happy with how it works by test inserting a magazine.
5) Assemble the cage. Insert and screw in the motors. Use 3-4mm long motor screws. Add the flywheels and make sure they're aligned nicely and take into account motor shaft looseness when doing it. When inserting the flywheels on their shafts make sure the motors are supported against something by the circular extensions on the opposite side and not the motor side walls, or worse, nothing at all. Try to not hit the tabs.
6) Wire up the cage with the switch (inverted). You can do that while everything is in the frame or outside of it. Make sure you cut the wires to appropriate lengths. Don't forget the battery plug. Keep in mind that the horizontal slot on the right is meant to hold it inside to save space. You can optionally add some LEDs in the front cavity. After that is done, secure the cage with two screws and the switch with a single screw on the left side of the blaster.
7) Add the cover and secure it with screws. You can try to test fire at this point.
8) Pick up the slide (frame top) and insert the iron sights into the dove tail slot.
9) To close off the blaster with the battery, put on the slide (frame top), slot in the tip, secure it with a pin and snap on the detent in the back.
10) Don't forget to screw on the grip panels with motor screws. Make sure they don't grind on the magazine, otherwise you will need to trim them a little.
11) Enjoy!