Thingiverse

Folger Tech i3 2020 Nema 17 Extruder Mount (El Scorpion) by chillysmokes
by Thingiverse
Last crawled date: 3 years, 1 month ago
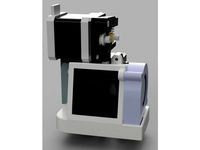
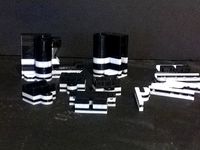
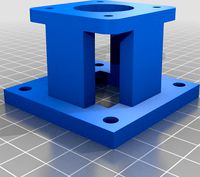
Version 1 in pictures is WHITE.Version 2 in pictures is BLUE. I haven't found the time to replace it in RL but you can be assured it works, I tested the fit on a Z-axis motor and it is oooooooooh-soooo-nice. All other important dimensions are coincident with the earlier version so I feel safe posting this now.
EDIT: I finally stuck it on... went on the motor perfectly; though I had to file out the 18mm diameter probe hole a tiny, TINY bit. I had to move the heat-block and throat back up almost all the way to the extruder as the fan ducts no longer go sooo low. So you can disregard moving the hot end down. I keep the instructions here just so newbies like me have a reference in case they need to make an adjustment. Looks pretty good. I'm happy with it.
If you are like me and so many others you (already did or are doing now) shopped around for upgrades to your printer BEFORE you bought one, had a list and made your decision on what to buy based on your upgrade options, bought the thing, put it together and started printing all your upgrades. I had a heck of a time finding my footing at first and the cooling/proximity probe mount points are pretty major aspects I simply could not fix without spending a bunch of cash and just replacing the extruder with a higher quality one... on a printer I just freaking bought. And even if I bought a better extruder I still needed to print new parts for it... so I made dun dun DUN!!!!! El Scorpion.... This part will help you if you are getting ready to print Toranado parts OR just want something that works.
This is an extruder mount for the Folger Tech i3 2020 direct drive extruder. I remixed this from 2 other "things", the Dual Blower/Radial Fan Duct Mount (Tevo Tarantula) bysupasorn and a proximity probe mount for the nema 17 direct drive extruder that I can't, for the life of me, find anymore to give credit to (SORRY YO). Either way, I had to almost completely remake the whole thing because the dimensions were all wrong or the walls were too thin or this, that; the idea was spawned from these two things and the fact that the Folger Tech i3 2020 direct drive extruder is difficult to find "accessories" for because of the limited mount options... that I found, anyway.
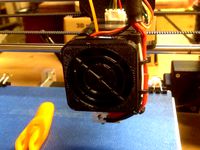
I had a cooling fan hitting below the nozzle from the front but found that my printed walls were not very smooth as cooling from one direction was not even as the y-axis moved the bed back and forth; the layer being laid down in the +y direction would not get any cooling but the layer laid down in the -y direction would get a bunch. After I made the first prototype (WHITE ABOVE) my prints looked uniform and good at 0.1 layer height with .4mm nozzle. Even if you don't use this puppy I highly recommend using a 360 fan duct or some other multi-angle blower.
The original dual blower duct fan thingy was awesome because both fans were bringing in air from the outside as they faced away from each other.
The El Scorpion is made for the following accessories:
2 50mm BLOWER fans
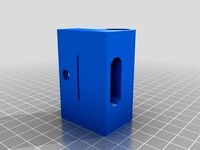
1 18mm proximity probe
Requires no hard-points as it mounts directly on the nema 17 motor. I guess you can use this on any direct drive extruder where the nema 17 faces forward.
The El Scorpion uses this hardware to fully construct:
4 50mm 3m socket cap screws
4 3m nylock nuts
2 small screws to mount each of the blowers (1 each) even though it is a snug fit into each duct
The fans plug into the ducts pretty snug but will line up with the anchor points differently so you will have to drill a pilot hole for each screw (I left plenty of room for error on each anchor point) but this is really a 30 second job and 2 screws in your junk drawer or misc screw bucket. Whatever works just don't crack the PLA. Yeah, I used PLA for its stiffness because of the proximity probe. This puppy will keep it stable and unmoving.
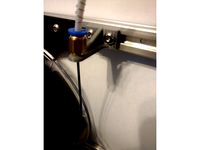
***The X-axis end-stop (which I keep on the right-hand side) will need to be moved to the upper 8mm smooth rod and then bent down at an angle to allow the carriage to hit it. Also, remove the two screws holding the end-stop to the 8mm rod clip, move the pcb up one hole and screw it on tight; 1 screw is all you need anyway 8)
Yeah, that's about it. In the original design I had to "bend" the nema 17 bracket apart to slide it on and then it would break. So now we have this puppy.
EDIT: I finally stuck it on... went on the motor perfectly; though I had to file out the 18mm diameter probe hole a tiny, TINY bit. I had to move the heat-block and throat back up almost all the way to the extruder as the fan ducts no longer go sooo low. So you can disregard moving the hot end down. I keep the instructions here just so newbies like me have a reference in case they need to make an adjustment. Looks pretty good. I'm happy with it.
If you are like me and so many others you (already did or are doing now) shopped around for upgrades to your printer BEFORE you bought one, had a list and made your decision on what to buy based on your upgrade options, bought the thing, put it together and started printing all your upgrades. I had a heck of a time finding my footing at first and the cooling/proximity probe mount points are pretty major aspects I simply could not fix without spending a bunch of cash and just replacing the extruder with a higher quality one... on a printer I just freaking bought. And even if I bought a better extruder I still needed to print new parts for it... so I made dun dun DUN!!!!! El Scorpion.... This part will help you if you are getting ready to print Toranado parts OR just want something that works.
This is an extruder mount for the Folger Tech i3 2020 direct drive extruder. I remixed this from 2 other "things", the Dual Blower/Radial Fan Duct Mount (Tevo Tarantula) bysupasorn and a proximity probe mount for the nema 17 direct drive extruder that I can't, for the life of me, find anymore to give credit to (SORRY YO). Either way, I had to almost completely remake the whole thing because the dimensions were all wrong or the walls were too thin or this, that; the idea was spawned from these two things and the fact that the Folger Tech i3 2020 direct drive extruder is difficult to find "accessories" for because of the limited mount options... that I found, anyway.
I had a cooling fan hitting below the nozzle from the front but found that my printed walls were not very smooth as cooling from one direction was not even as the y-axis moved the bed back and forth; the layer being laid down in the +y direction would not get any cooling but the layer laid down in the -y direction would get a bunch. After I made the first prototype (WHITE ABOVE) my prints looked uniform and good at 0.1 layer height with .4mm nozzle. Even if you don't use this puppy I highly recommend using a 360 fan duct or some other multi-angle blower.
The original dual blower duct fan thingy was awesome because both fans were bringing in air from the outside as they faced away from each other.
The El Scorpion is made for the following accessories:
2 50mm BLOWER fans
1 18mm proximity probe
Requires no hard-points as it mounts directly on the nema 17 motor. I guess you can use this on any direct drive extruder where the nema 17 faces forward.
The El Scorpion uses this hardware to fully construct:
4 50mm 3m socket cap screws
4 3m nylock nuts
2 small screws to mount each of the blowers (1 each) even though it is a snug fit into each duct
The fans plug into the ducts pretty snug but will line up with the anchor points differently so you will have to drill a pilot hole for each screw (I left plenty of room for error on each anchor point) but this is really a 30 second job and 2 screws in your junk drawer or misc screw bucket. Whatever works just don't crack the PLA. Yeah, I used PLA for its stiffness because of the proximity probe. This puppy will keep it stable and unmoving.
***The X-axis end-stop (which I keep on the right-hand side) will need to be moved to the upper 8mm smooth rod and then bent down at an angle to allow the carriage to hit it. Also, remove the two screws holding the end-stop to the 8mm rod clip, move the pcb up one hole and screw it on tight; 1 screw is all you need anyway 8)
Yeah, that's about it. In the original design I had to "bend" the nema 17 bracket apart to slide it on and then it would break. So now we have this puppy.
Similar models
thingiverse
free
Satsana Ender 3V2 with Direct Drive Conversion by bgyen
...
parts: 4020 fan (screws for fan), 5015 blower fan (screw for fan), 1xm3 8mm screw to attach fan duct to the direct drive bracket
thingiverse
free

Direct Drive MK8 Extruder Fan Duct (Prusa I3) by aajitlim
...pair with a downward facing blower fan attached to the front of your extruder setup. you'll want to get a fan mount separate.
thingiverse
free

Nema 17 Induction Proximity Sensor by djsupreme98
...hingiverse
a basic probe holder to assist in connecting to your direct drive extruder.
suggest clean up holes with 3mm drill bit
thingiverse
free

Direct drive blower fan mount by BubaLettow
...but this will mount in front of a 40mm? fan on a direct drive extruder and allow the ability to mount a blower for a part cooler.
thingiverse
free

Satsana Dual 4010 Fan Direct Drive with longer ducts by le1parrain
...in the slicer depending on your printer and another version with minimal built-in supports that are easy to remove.
print in petg
thingiverse
free

chimera fan mount by bradyhoover_designs
...f slightly less direct cooling from the right duct.
have fun printing and get those overhangs better with more efficient cooling.
thingiverse
free

Blower Fan Mounts for Geeetech i3X Acrylic by BSkorn
... bowden setup with an e3d hotend.
green mount was used with my old e3d bowden setup
black mount used on mk8 direct drive extruder
thingiverse
free

Dual blower filament cooling fan mount for Folger Prusa i3 Dual Extruder by Hydroslide
...wer fans to cool the filament for both extruders. the fans are 50mm blower fans and the mount sits on top of the extruder motors.
thingiverse
free

Combo fan setup for MK8 direct drive aluminium extruder by dasaki
... it fits your setup.
if you are a curious maker / "tinker" / hacker, have a look at my blog:http://www.therandomlab.com
thingiverse
free

Ender 3 / CR-10 Direct Drive mount (Hero v2 Fan Duct Compatible) by Powerstomp
...hingiverse
a direct drive mount for creality hotend with cutout for hero v2 fan duct.
uses all stock extruder motor and screws.
Chillysmokes
thingiverse
free

Chair Back REPAIR by chillysmokes
...d wood glue and then put it back and drove some screws in. been working well for months... even a few inadvertent chair tumbles.
thingiverse
free

Toranado NEMA 14 Cooler SIDE MOUNT by chillysmokes
... well??
edit: i use the cork insulator as well. the stepper is no longer hot to the touch. it is mildly warm after the upgrade.
thingiverse
free

LM2596 BUCK CONVERTER HOUSING by chillysmokes
...m outer diameter (3 pin, only use 2)
i made 3m nut indents on the bottom if you want to use the screws but you don't have to.
thingiverse
free

TORANADO Part Cooler Upgrade- SIDE MOUNT ET AL by chillysmokes
...e opposite side of the bltouch. if your heat-block is not oriented this way, then you simply have to spin the block 180 degrees.
thingiverse
free

Toranado Side Mount Quick Fit For x-axis 2020 v-slot upgrade by chillysmokes
...s, but i'm just too busy and it works well for me. kudos to toranado3d, sonnylowe, and lukie80 for their good work. thanks.
Folger
thingiverse
free

Folger Tech FT-5 Logos by GladstonesThingi
...folger tech ft-5 logos by gladstonesthingi
thingiverse
cut the folger tech logo out of my lithophanes with meshmixer.
thingiverse
free

LCD bracket for Folger 2020 by animoose
...ips to 2020 aluminium such as the frame of the folger 2020 and allows you to attach a reprapdiscount smart controller (20x4 lcd).
thingiverse
free

Folger Tech FT-5 Logo Lithophanes by GladstonesThingi
...ft-5 logo lithophanes by gladstonesthingi
thingiverse
used 3dp.rocks/lithophane to make a 3d image of the folger tech ft-5 logo.
thingiverse
free

Folger Tech Leadscrew with cable chain mounts by cmenchion
...ounts by cmenchion
thingiverse
folger tech leadscrew with cable chain mounts. cable chain available at http://www.folgertech.com
thingiverse
free
Extruder Fan Guard for a Folger RepRap 2020 Prusa i3 by JohnDiamond
...020 prusa i3 by johndiamond
thingiverse
finger guard for the fan on the extruder of a folger technologies reprap 2020 prusa i3.
thingiverse
free
Folger Tech Leadscrew with cable chain mounts by cmenchion
... set. the idler is just leadscrew, the motor and carriage have been moddem for cable chain available at http://www.folgertech.com
thingiverse
free
Folger Tech FT-5 Reverse Bowden Bracket by 2019tylernewcomb
...giverse
this is a bracket to add a reverse bowden tube to a folger tech ft-5 or any other printer with 20x20 aluminum extrusion.
thingiverse
free

Fan shroud for Folger Tech FT-5 3d Printer by cptnAWESOME
...tech ft-5 3d printer by cptnawesome
thingiverse
this is a fan shroud for folger tech ft-5 printers. it uses a 5015s blower fan.
thingiverse
free
Folger Tech Reprap 2020 I3 plastic Parts by CHRIS817
...lastic parts by chris817
thingiverse
folger tech reprap 2020 i3 plastic parts i needed new parts got these thought id share them
thingiverse
free
Controller cover for a Folger RepRap 2020 Prusa i3 by JohnDiamond
... cover and mounting kit for the arduino mega 2560 and ramps 1.4 controller boards on a folger technologies reprap 2020 prusa i3.
Scorpion
3d_ocean
$14
Scorpion
...scorpion
3docean
3d model scorpion
scorpion 3d model
3d_export
$5
Scorpion
...scorpion
3dexport
glass scorpion
turbosquid
$24

scorpion / wood scorpion
...lty free 3d model scorpion / wood scorpion for download as ma on turbosquid: 3d models for games, architecture, videos. (1319761)
archibase_planet
free

Scorpion
...scorpion
archibase planet
scorpion arachnida animals
scorpio - 3d model for interior 3d visualization.
archibase_planet
free

Scorpion
...scorpion
archibase planet
scorpion arachnida
scorpio n050808 - 3d model (*.gsm+*.3ds) for interior 3d visualization.
turbosquid
$59

Scorpion
...urbosquid
royalty free 3d model scorpion for download as max on turbosquid: 3d models for games, architecture, videos. (1378471)
turbosquid
$1

scorpion
...urbosquid
royalty free 3d model scorpion for download as c4d on turbosquid: 3d models for games, architecture, videos. (1288349)
turbosquid
free

Scorpion
...d
royalty free 3d model scorpion for download as obj and fbx on turbosquid: 3d models for games, architecture, videos. (1298317)
turbosquid
$69

Scorpion
... available on turbo squid, the world's leading provider of digital 3d models for visualization, films, television, and games.
turbosquid
$59

Scorpion
... available on turbo squid, the world's leading provider of digital 3d models for visualization, films, television, and games.
Nema
3d_export
$5
Electric Motor Nema 17
...electric motor nema 17
3dexport
40mm stepper motor nema 17 1.5a (17hs4401) motor 4-wire for 3d printer
turbosquid
$3
Nema 17
...rbosquid
royalty free 3d model nitro engine for download as on turbosquid: 3d models for games, architecture, videos. (1449252)
turbosquid
$1

Nema 17 Stepper motor
... available on turbo squid, the world's leading provider of digital 3d models for visualization, films, television, and games.
turbosquid
$1
Nema 17 Stepper Motor 59Nm
... available on turbo squid, the world's leading provider of digital 3d models for visualization, films, television, and games.
turbosquid
$3
Simple model of Nema 8 stepper motor
...del of nema 8 stepper motor for download as ipt, obj, and stl on turbosquid: 3d models for games, architecture, videos. (1543132)
3d_export
$5

simple model of nema 17 stepper motor
...ort
simple model, useful to prototype robots, 3d printers and other electronic diy projects<br>step and .ipt file included
3d_export
$5
simple model of nema 8 stepper motor
...robots, 3d printers and other electronic diy projects<br>current model: 20bygh33-0604a<br>step and .ipt file included
3ddd
free

Larte Luce
...class="star five "></div></div></li><li><img src="http://b.3ddd.ru/media/cache/sky_user_avatar_comment/avatar/users/117489.jpg" alt="ci-nema" width="35" height="35" class="img"><div class="name"><a href="/users/ci-nemaquot;>ci-nema</a></div><div class="raiting"><div class="star five "></div></div></li></ul><div class="more"><a href="/3dmodels/show/larte_luce/voted">еще</a></div></div><div class="number" rating="30" count="6"...
thingiverse
free

Nema 14 to Nema 17 Adapter by lukepat
...nema 14 to nema 17 adapter by lukepat
thingiverse
created a adapter for nema 14 to nema 17 mount.
thingiverse
free
Distance Nema 17 and Nema 23 by Krzysztof_Handtke
...distance nema 17 and nema 23 by krzysztof_handtke
thingiverse
distance to nema motors to build a cnc milling machine.
Tech
design_connected
$13

Tech
...tech
designconnected
alivar tech computer generated 3d model. designed by scandola, matteo.
design_connected
$16

Hi Tech
...hi tech
designconnected
living divani hi tech computer generated 3d model. designed by lissoni, piero.
3d_ocean
$15
Tech Light
...diomax 9 or above includes the .3ds and .obj files includes maps other features to note: the main light is grouped and the piv...
turbosquid
$60
Tech Commander
...uid
royalty free 3d model tech commander for download as fbx on turbosquid: 3d models for games, architecture, videos. (1209942)
turbosquid
$3

Tech Heart
...squid
royalty free 3d model tech heart for download as blend on turbosquid: 3d models for games, architecture, videos. (1480511)
3ddd
$1

Кресло Hi-Tech
...кресло hi-tech
3ddd
hi-tech
современное хромированное кресло
3ddd
$1
luster hi tech
...luster hi tech
3ddd
luster hi tech для офиса))
turbosquid
$10

Tech pokeball
...yalty free 3d model tech pokeball for download as obj and fbx on turbosquid: 3d models for games, architecture, videos. (1418339)
3ddd
$1
Стол hi-tech.
...стол hi-tech.
3ddd
стол hi-tech.
материалы, освещение, рендер.
turbosquid
$7
Shisha Tech
...ty free 3d model shisha 3d tech for download as sldas and ige on turbosquid: 3d models for games, architecture, videos. (1670897)
I3
3d_export
$10

suv i3
...suv i3
3dexport
suv i3 2013 series
3d_ocean
$89

BMW i3 2012
...y, in real units of measurement, qualitatively and maximally close to the original. model formats: - *.max (3ds max 2008 scanl...
cg_studio
$99

BMW i3 20143d model
...
cgstudio
.3ds .c4d .fbx .lwo .max .obj - bmw i3 2014 3d model, royalty free license available, instant download after purchase.
cg_studio
$99

BMW i3 20123d model
...tudio
.3ds .c4d .fbx .lwo .max .mb .obj - bmw i3 2012 3d model, royalty free license available, instant download after purchase.
cg_studio
$99

BMW i3 20143d model
...tudio
.3ds .c4d .fbx .lwo .max .mb .obj - bmw i3 2014 3d model, royalty free license available, instant download after purchase.
humster3d
$75

3D model of BMW i3 2014
...
buy a detailed 3d model of bmw i3 2014 in various file formats. all our 3d models were created maximally close to the original.
humster3d
$40

3D model of Kitchen Set I3
...uy a detailed 3d model of kitchen set i3 in various file formats. all our 3d models were created maximally close to the original.
3d_ocean
$30

Kitchen set i3
...ensils oven plates shelves sink table ware
kitchen set i3 include 3d models: cooker, oven, sink, cupboards, table, chair, plates.
3d_ocean
$89

BMW i3 2014
...y, in real units of measurement, qualitatively and maximally close to the original. model formats: - *.max (3ds max 2008 scanl...
cg_studio
$99

BMW i3 Concept 20113d model
...i3
.3ds .c4d .fbx .lwo .max .obj - bmw i3 concept 2011 3d model, royalty free license available, instant download after purchase.
17
3d_export
$6

rocks 17
...rocks 17
3dexport
rocks 3d model 17
3ddd
$1

PLANTS 17
...plants 17
3ddd
цветок , горшок
plants 17,, pots in diameter 100,80,60,40cm,,, enjoy
3d_export
$6
tap-17
...tap-17
3dexport
3d_export
$6

set-17
...set-17
3dexport
3d_export
$27

C-17 Globemaster
...c-17 globemaster
3dexport
c-17 globemaster
3ddd
free

Renault FT-17
...renault ft-17
3ddd
ft-17 , renault , танк
turbosquid
$40
cottage 17
...bosquid
royalty free 3d model cottage 17 for download as max on turbosquid: 3d models for games, architecture, videos. (1377003)
turbosquid
$30

Apartment 17
...squid
royalty free 3d model apartment 17 for download as max on turbosquid: 3d models for games, architecture, videos. (1432680)
turbosquid
$10

Surfboard 17
...squid
royalty free 3d model surfboard 17 for download as max on turbosquid: 3d models for games, architecture, videos. (1375686)
turbosquid
$7
Rock 17
...turbosquid
royalty free 3d model rock 17 for download as obj on turbosquid: 3d models for games, architecture, videos. (1486522)
Extruder
3ddd
$1

Extruded Chair
...extruded chair
3ddd
extruded , tom dixon
inspired by tom dixon extruded chair
turbosquid
$15

Extruded Table
... extruded table for download as blend, dae, fbx, obj, and stl on turbosquid: 3d models for games, architecture, videos. (1634137)
turbosquid
$2

3D Printer Extruder
...d
royalty free 3d model 3d printer extruder for download as on turbosquid: 3d models for games, architecture, videos. (1537359)
turbosquid
$1

Zombie extruded text
...oyalty free 3d model zombie extruded text for download as obj on turbosquid: 3d models for games, architecture, videos. (1322198)
turbosquid
$4

Extruder conical screw
...el extruder conical screw for download as sldpr, ige, and stl on turbosquid: 3d models for games, architecture, videos. (1524433)
turbosquid
$50

3d PRINTER - Extruder
... available on turbo squid, the world's leading provider of digital 3d models for visualization, films, television, and games.
turbosquid
$15

Extruded Table 2
...xtruded table 2 for download as blend, dae, fbx, obj, and stl on turbosquid: 3d models for games, architecture, videos. (1621846)
turbosquid
$10

Maya Extrude Tool
... available on turbo squid, the world's leading provider of digital 3d models for visualization, films, television, and games.
3d_export
$5

world earth extrude map
...world earth extrude map
3dexport
3ddd
$1

Simply Elegant Extruded Tree Coffee Table Design
...ble by link studios. the silhouette of a tree is visible at one angle, extruded from the surface to create the support structure.
2020
3d_export
$5

cyberpunk 2020
...cyberpunk 2020
3dexport
cyberpunk 2020
3d_export
$5
monster01 2020
...monster01 2020
3dexport
monster01 2020 dxf file rigged in mixamo.
3d_export
$129

explorer 2020
...explorer 2020
3dexport
3d_export
$5

mug 2020
...mug 2020
3dexport
3d_export
$15
3 rims 2020
...3 rims 2020
3dexport
new rims 2020 from inventor
turbosquid
$7

Keepsake of 2020
...ty free 3d model keepsake of 2020 for download as obj and stl on turbosquid: 3d models for games, architecture, videos. (1657350)
3d_export
$35

landrover 2020
...landrover 2020
3dexport
turbosquid
$15
Timeless 2020
...free 3d model timeless 2020 for download as max, obj, and fbx on turbosquid: 3d models for games, architecture, videos. (1433362)
turbosquid
$85

Q8 2020
... free 3d model audi q8 2020 for download as max, obj, and fbx on turbosquid: 3d models for games, architecture, videos. (1559582)
turbosquid
$59

Supra 2020
...ee 3d model supra 2020 for download as max, lwo, obj, and c4d on turbosquid: 3d models for games, architecture, videos. (1404492)
El
3ddd
$1

El torrent
...el torrent
3ddd
el torrent
фирма: el torrent il.luminacio-el torrent general catalogue. be 497
3ddd
$1

El Casco
...
el casco , настольные принадлежности
набор настольных принадлежностей компании el casco
turbosquid
$25

El Rey
...
turbosquid
royalty free 3d model el rey for download as max on turbosquid: 3d models for games, architecture, videos. (1261097)
turbosquid
$35

el.3ds
... available on turbo squid, the world's leading provider of digital 3d models for visualization, films, television, and games.
turbosquid
$20

El capitan.max
... available on turbo squid, the world's leading provider of digital 3d models for visualization, films, television, and games.
turbosquid
$20

El capitan.max
... available on turbo squid, the world's leading provider of digital 3d models for visualization, films, television, and games.
turbosquid
free

ELE VILLA
... available on turbo squid, the world's leading provider of digital 3d models for visualization, films, television, and games.
3d_export
$5

El Primo Matreshka
...el primo matreshka
3dexport
3d model el primo from brawl stars. style - toy matreshka. vertices: 4584 faces: 4762
3d_export
$15

El camino 3D Model
...el
3dexport
el camino 69 chevrolet automobile car pickup detailed custom high poly truck
el camino 3d model buncic 58908 3dexport
turbosquid
$50

3D EL Guitar
... available on turbo squid, the world's leading provider of digital 3d models for visualization, films, television, and games.
Mount
3d_export
free

mounting bracket
...mounting plate is the portion of a hinge that attaches to the wood. mounting plates can be used indoors, cabinetry and furniture.
turbosquid
$2

MOUNTING
... available on turbo squid, the world's leading provider of digital 3d models for visualization, films, television, and games.
turbosquid
free

Mounts
... available on turbo squid, the world's leading provider of digital 3d models for visualization, films, television, and games.
turbosquid
free

Mount Fuji
...fuji
turbosquid
free 3d model mount fuji for download as obj on turbosquid: 3d models for games, architecture, videos. (1579977)
3d_export
$5

Headphone mount LR
...headphone mount lr
3dexport
headphone mount l+r
turbosquid
$39

Mount rainier
...quid
royalty free 3d model mount rainier for download as fbx on turbosquid: 3d models for games, architecture, videos. (1492586)
turbosquid
$5

pipe mounting
...quid
royalty free 3d model pipe mounting for download as obj on turbosquid: 3d models for games, architecture, videos. (1293744)
turbosquid
$3

Mounting Tires
...uid
royalty free 3d model mounting tires for download as fbx on turbosquid: 3d models for games, architecture, videos. (1708511)
3d_export
$5

Magnetic GoPro Mount
...pro mount
3dexport
cool magnetic mount for gopro. allows you to mount the camera on flat metal surfaces and get exclusive shots.
turbosquid
$5

Stone Mount
...ty free 3d model stone mount for download as ma, obj, and fbx on turbosquid: 3d models for games, architecture, videos. (1370306)