GrabCAD

FOG NET TEST UNIT OF STONE
by GrabCAD
Last crawled date: 1 year, 11 months ago
Scalable Fog Net Test Unit - No Bolts, No Bird Bath, No Bull
This design uses a minimum number of easily fabricated parts/part types (minimal fillets/chamfers). No screws, washers nor nuts to lose in the field. No screwdrivers nor wrenches to bring - just a spike plate, a sledge hammer and a level. Concrete is optional. Changing ground spike length to suit the unit's height/configuration, local ground rigidity and expected weather conditions can further reduce cost.
Production of the assembly pins is achieved using basic drilling/shaping/forging.
The mounting clips are a small 2 piece die cast part, with the addition of 4 springs, and some basic flat and round stock.
For maximum strength, 50mm square steel tubing was selected, with a 4mm wall. For mass/weight/cost considerations, this could be changed to perhaps 40mm aluminum with a 3mm wall. Minimal setup currently comes to 100kg. 70mph winds are not a problem.
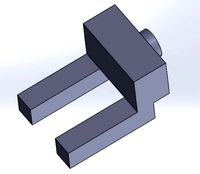
Assembly pins use zero insertion force, with the exception of the two hangers, which are closely fitted and held in place by a small insertion force. Lock plates in the assembly pins are held in position (fully open or fully locked) by the coil/bearing inside. Tab on the end of the lock plate eases manipulation.
Single unit design, for testing 1M^2 (Setup-1). Add another iteration on top for 2M^2 (Setup-2) and yet another for 3M^2 (Setup-3). Test multiple screen types, side by side, in the same horizontal array (Setup-4).
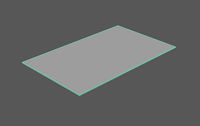
The displayed screen is 0.25mm diameter at 10mm spacings, to minimize file size as well as for visual clarity.
Setup-1 is in a .zip file in the /Files section. The rest of the files in the root folder are the contents of the Setup-1.zip file itself, with the images renamed.
I will upload the larger screens and models, upon request.
Construction and screen attachment is a breeze. Start by laying out the cross struts (small assembly pins pairing them up right at the start) and then the square tubing lengths on the ground, in formation, along with the vertical connectors. Snap those pieces together with long assembly pins, after you've properly placed your mounting clips (pull the knob on the clip's back side to slide over the holes to the correct position) on the square tubing. Two hangers , spaced evenly, are placed on the horizontal square tube that is situated at 1M above the ground. The water collector snaps into place, inside those two hangers. Once the main shape, all but the ground spikes, is assembled and laying flat and perpendicular to the install location, use the bottom vertical connectors as guides for ground spike spacing/placement. Once the spikes have been leveled and driven to the correct depth, the assembled frame can be brought to vertical by two people (3 people for Setup-3 or -4) and dropped on to the installed ground spikes. The completed frame is easily manipulated by gripping the unused vertical connector protrusions at the sides. The screen(s) can easily be installed during early phase of assembly, while still horizontal at ground level(laying thin slats across the frame to support the screen while fastening), or after the entire structure is fully built and in place, to save the screen from accidental contact during the lift.
Precise tweaking of the horizontal tubing length, for the purpose of suiting standard screen roll width (if there is one), is easily done. Shown here is a screen width of precisely 1M, with heights of 1M, 2M and 3M, including the few mm of the bottom edge that is tucked just inside the teeth of the water collector.
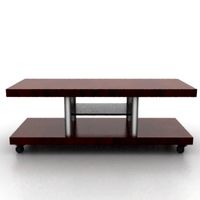
The water collector snaps into place, with the inward midbody force applied by the two hanger points on each wall helping to bring the top teeth sets of the collector slightly closer together (binding the base of the screen). Inside, the collector has a longitudinally centrally sloped bottom, to bring the water to the 6mm threaded exit (4mm inside), even if installed a little out of level. The exit is at the bottom centre, to minimize the water's length of travel/exposure to synthetics/tubing. A closed top to the collector and a small diameter collection point serve to minimize the evaporative loss. This also minimizes necessary maintenance/cleaning.
The top of the water collector has a very narrow profile, with a centre-peaked top, to prevent contamination by wind-blown debris, insects, birds, etc.
The screen mount clips are triple springed, for extra grip strength along the entire clip. The teeth are finely pointed and angled with a slight inward grab, to provide an aggressive hold. Once the teeth have a grip on the screen, incremental increase of screen tautness, point by point, is a snap. Makes for a quick screen install and/or replacement. 9 clips are shown on the simple setup, and 15 on the double height setup, but more or fewer can be easily used, based on maximum expected wind velocities (for example). Because the clips contact the square tubing on all 4 faces, they are installed by sliding them on to the end of the tubing before addition of the vertical connectors, cross struts and pins. A more complex (costly) version of the screen clip can easily be designed to resolve this condition of construction order.
Also, the mounting clip's grab force could be further increased by using heavier springs or by converting the triple spring array to a single threaded clamp spindle with a knob to match existing. Personally, I would start with the shown version, for sake of cost. At a certain pressure threshold, strong winds will begin to tear the screen away from the teeth before they give way.
But, when it comes right down to it, considering how effortlessly and quickly the screens are fastened with this design, it would make sense, working with this area/size of screen, when a wind storm is approaching, to merely take the screens inside and refasten them to the frame after the passing of the storm.
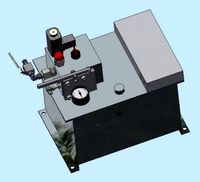
For flow rate measurement, a small laser optical switch is installed in the gap at the top of each end of the collector box, just below the bottom edge of the screen's profile. Each water drop's fall from the screen's bottom edge will block/refract the light beam, coming from the transmitter box on the left side of the collector, and trip the switch inside the receiver box on the right, leading to a counter also inside the receiver box. Drip rate measurements can be tracked in a range of circuit-dependant ways. A rechargeable 9V battery in each box is enough to power the simplest iteration of the circuit. To further eliminate the labour of replacing batteries, a solar cell strapped to the top of a simple stake can be added, next to the unit - one for each box.
This design uses a minimum number of easily fabricated parts/part types (minimal fillets/chamfers). No screws, washers nor nuts to lose in the field. No screwdrivers nor wrenches to bring - just a spike plate, a sledge hammer and a level. Concrete is optional. Changing ground spike length to suit the unit's height/configuration, local ground rigidity and expected weather conditions can further reduce cost.
Production of the assembly pins is achieved using basic drilling/shaping/forging.
The mounting clips are a small 2 piece die cast part, with the addition of 4 springs, and some basic flat and round stock.
For maximum strength, 50mm square steel tubing was selected, with a 4mm wall. For mass/weight/cost considerations, this could be changed to perhaps 40mm aluminum with a 3mm wall. Minimal setup currently comes to 100kg. 70mph winds are not a problem.
Assembly pins use zero insertion force, with the exception of the two hangers, which are closely fitted and held in place by a small insertion force. Lock plates in the assembly pins are held in position (fully open or fully locked) by the coil/bearing inside. Tab on the end of the lock plate eases manipulation.
Single unit design, for testing 1M^2 (Setup-1). Add another iteration on top for 2M^2 (Setup-2) and yet another for 3M^2 (Setup-3). Test multiple screen types, side by side, in the same horizontal array (Setup-4).
The displayed screen is 0.25mm diameter at 10mm spacings, to minimize file size as well as for visual clarity.
Setup-1 is in a .zip file in the /Files section. The rest of the files in the root folder are the contents of the Setup-1.zip file itself, with the images renamed.
I will upload the larger screens and models, upon request.
Construction and screen attachment is a breeze. Start by laying out the cross struts (small assembly pins pairing them up right at the start) and then the square tubing lengths on the ground, in formation, along with the vertical connectors. Snap those pieces together with long assembly pins, after you've properly placed your mounting clips (pull the knob on the clip's back side to slide over the holes to the correct position) on the square tubing. Two hangers , spaced evenly, are placed on the horizontal square tube that is situated at 1M above the ground. The water collector snaps into place, inside those two hangers. Once the main shape, all but the ground spikes, is assembled and laying flat and perpendicular to the install location, use the bottom vertical connectors as guides for ground spike spacing/placement. Once the spikes have been leveled and driven to the correct depth, the assembled frame can be brought to vertical by two people (3 people for Setup-3 or -4) and dropped on to the installed ground spikes. The completed frame is easily manipulated by gripping the unused vertical connector protrusions at the sides. The screen(s) can easily be installed during early phase of assembly, while still horizontal at ground level(laying thin slats across the frame to support the screen while fastening), or after the entire structure is fully built and in place, to save the screen from accidental contact during the lift.
Precise tweaking of the horizontal tubing length, for the purpose of suiting standard screen roll width (if there is one), is easily done. Shown here is a screen width of precisely 1M, with heights of 1M, 2M and 3M, including the few mm of the bottom edge that is tucked just inside the teeth of the water collector.
The water collector snaps into place, with the inward midbody force applied by the two hanger points on each wall helping to bring the top teeth sets of the collector slightly closer together (binding the base of the screen). Inside, the collector has a longitudinally centrally sloped bottom, to bring the water to the 6mm threaded exit (4mm inside), even if installed a little out of level. The exit is at the bottom centre, to minimize the water's length of travel/exposure to synthetics/tubing. A closed top to the collector and a small diameter collection point serve to minimize the evaporative loss. This also minimizes necessary maintenance/cleaning.
The top of the water collector has a very narrow profile, with a centre-peaked top, to prevent contamination by wind-blown debris, insects, birds, etc.
The screen mount clips are triple springed, for extra grip strength along the entire clip. The teeth are finely pointed and angled with a slight inward grab, to provide an aggressive hold. Once the teeth have a grip on the screen, incremental increase of screen tautness, point by point, is a snap. Makes for a quick screen install and/or replacement. 9 clips are shown on the simple setup, and 15 on the double height setup, but more or fewer can be easily used, based on maximum expected wind velocities (for example). Because the clips contact the square tubing on all 4 faces, they are installed by sliding them on to the end of the tubing before addition of the vertical connectors, cross struts and pins. A more complex (costly) version of the screen clip can easily be designed to resolve this condition of construction order.
Also, the mounting clip's grab force could be further increased by using heavier springs or by converting the triple spring array to a single threaded clamp spindle with a knob to match existing. Personally, I would start with the shown version, for sake of cost. At a certain pressure threshold, strong winds will begin to tear the screen away from the teeth before they give way.
But, when it comes right down to it, considering how effortlessly and quickly the screens are fastened with this design, it would make sense, working with this area/size of screen, when a wind storm is approaching, to merely take the screens inside and refasten them to the frame after the passing of the storm.
For flow rate measurement, a small laser optical switch is installed in the gap at the top of each end of the collector box, just below the bottom edge of the screen's profile. Each water drop's fall from the screen's bottom edge will block/refract the light beam, coming from the transmitter box on the left side of the collector, and trip the switch inside the receiver box on the right, leading to a counter also inside the receiver box. Drip rate measurements can be tracked in a range of circuit-dependant ways. A rechargeable 9V battery in each box is enough to power the simplest iteration of the circuit. To further eliminate the labour of replacing batteries, a solar cell strapped to the top of a simple stake can be added, next to the unit - one for each box.
Similar models
thingiverse
free

Hinge Pins and snaps for tool box by zdmbkjkyo2y
...nserted to keep hinges in place. use a dab of super glue inside top hole of the hinge on the open side to keep snap bar in place.
grabcad
free

FOG COLLECTOR NO 2
...ation, use spring to counter wind.
spring at top to keep the net in tension.
150mm dia. pipe for collector and casing for the net
thingiverse
free

Aero Garmin hanger for Cervelo P5 by motd2k
...standard garmin rubber band quarter turn fastener within the cutout area, then mount the box using the top tube accessory points.
grabcad
free

Fresh water fog challenge - 01 - Telespar frame
...vanized for outdoor use and all within 70mph wind load limits for that size mesh.
the wire on the top is to stop birds roosting.
thingiverse
free

Spring Clips (24mm Square Tube) by garethmur
...spring clips (24mm square tube) by garethmur
thingiverse
this spring clip fits inside a space of 24mm square tube
thingiverse
free

Raspberry Pi Box LCD 1602
...rinted without supports, but the bottom will need supports for the power port hole and the tabs which hold the pi-board in place.
thingiverse
free

Pick Locket by Gigi1970
...d snaps into place. there is a small hole in the top at the back for running a cord through if desired. see assembly notes below.
thingiverse
free

Kite Dropper by Ga1ihad
...parachute toy through the bottom hole and attach it with the paper clip. let the wind carry it to the top and fall to the ground.
thingiverse
free

hanger stopper by Pepewa
...d to put clothes and has a diameter of 30 mm projections to introduce seen and snap into place. the drawing is to insert a spike.
grabcad
free

Modular Fog net
...net
grabcad
a 1m² fog net designed to be easily interconnected, allowing to increase the working surface of the water collector.
Fog
3ddd
$1

fog light
...fog light
3ddd
fog
fog light model with chain, no light bulb,
turbosquid
$20

In-the-fog
... available on turbo squid, the world's leading provider of digital 3d models for visualization, films, television, and games.
design_connected
$27

Fog Kendall Sofa
...fog kendall sofa
designconnected
fog kendall sofa computer generated 3d model.
3ddd
$1

Полки In the Fog
... корпус каждого предмета мебели изготовлен из листового металла. а эффект «растворения» в воздухе создается с помощью перфорации.
3ddd
$1

Morosini Fog Plisse
...morosini fog plisse
3ddd
morosini
светильники fog plisse из италии фабрики morosini. цвета: белый, черный, слоновая кость, мокко
3ddd
$1

FOG panel
...fog panel
3ddd
панель
гипсовая панель модели fog1.
фри по желанию автора
3d_export
$18

poison fog forestevil buddhagold iron buddha
...
poison fog forest_evil buddha_gold iron buddha<br>max 2015 v-ray 3 max 2015<br>textures<br>all files in zip...
3ddd
$1

Гипсовая 3d панель Fog от Artpole
...ль fog от artpole
3ddd
панель
официальная модель от компании artpole.
производитель № 1 гипсовых панелей в россии.
www.artpole.ru
3d_ocean
$25

HDRI spherical sky panorama -0805- fog & mist
...r morning with a beautiful light play and magical colour shades (time: 08:05). this is a very rare real fog scenario with a mi...
3ddd
$1

Restoration Hardware/Linen Office Storage Accessories Fog
...х76h
small hanging file box:w330х180dх280h
large hanging file box:w405х180dх280h
в архиве присутствует 2010, 2012 версий 3ds max
Net
design_connected
$11

Net
...net
designconnected
moroso net computer generated 3d model. designed by hubert, benjamin.
3d_export
$15

Camouflage netting
...
3dexport
low poly camouflage netting. there are 3 different colors (woodland, desert and winter). net is created with alpha map
3ddd
$1

Net 80
...net 80
3ddd
gervasoni
кровать net 80 от gervasoni.
3ddd
$1

LAGO / NET
...lago / net
3ddd
lago , стеллаж
lago net comp 57
3ddd
$1

Kettal Net Sofa
...d
kettal , net , уличная мебель
kettal net sofa
design_connected
$16

Net chair
...net chair
designconnected
gervasoni net chair computer generated 3d model. designed by navone, paola.
design_connected
$4

Net 59
...net 59
designconnected
gervasoni net 59 computer generated 3d model. designed by navone, paola.
3ddd
$1

Net 07
...net 07
3ddd
ротанг , gervasoni
диван net 07 от gervasoni.
габариты: 2000*850*680
3d_export
$8

Volleyball net
...volleyball net
3dexport
volleyball net, made of metal and strong fabrics, in yellow and white color. formats are also present:
3ddd
$1

net 82
...net 82
3ddd
gervasoni
плетенный диван-кровать net 82 от gervasoni.
габариты:174*76*65
Stone
3ddd
$1

Stone
...stone
3ddd
stone
3d_export
$10
Stone
...stone
3dexport
ordinary stone
3d_ocean
$5
Stone
...stone
3docean
rock stone
stone 2048 texture obj and fbx format high quality
archibase_planet
free
Stone
...stone
archibase planet
stone rock
stone n260108 - 3d model (*.gsm+*.3ds) for interior 3d visualization.
archibase_planet
free
Stone
...stone
archibase planet
stone rock boulder
stone 4 - 3d model (*.gsm+*.3ds) for exterior 3d visualization.
archibase_planet
free

Stone
...stone
archibase planet
stone boulder rock
stone 5 - 3d model (*.gsm+*.3ds) for exterior 3d visualization.
archibase_planet
free
Stone
...stone
archibase planet
stone rock boulder
stone 3 - 3d model (*.gsm+*.3ds) for exterior 3d visualization.
archibase_planet
free
Stone
...stone
archibase planet
stone boulder rock
stone 1 - 3d model (*.gsm+*.3ds) for exterior 3d visualization.
archibase_planet
free
Stone
...stone
archibase planet
stone rock boulder
stone 2 - 3d model (*.gsm+*.3ds) for exterior 3d visualization.
3d_export
free

Stone
...stone
3dexport
realistic stone to create an atmospheric scene
Test
turbosquid
$99

test
...st
turbosquid
royalty free 3d model test for download as max on turbosquid: 3d models for games, architecture, videos. (1251637)
turbosquid
$63
TEST
...st
turbosquid
royalty free 3d model test for download as max on turbosquid: 3d models for games, architecture, videos. (1446233)
turbosquid
$1
test
...st
turbosquid
royalty free 3d model test for download as fbx on turbosquid: 3d models for games, architecture, videos. (1360941)
3d_export
free

johnny test
...johnny test
3dexport
johnny test 3d
turbosquid
$15

Test
... available on turbo squid, the world's leading provider of digital 3d models for visualization, films, television, and games.
turbosquid
$2

test
... available on turbo squid, the world's leading provider of digital 3d models for visualization, films, television, and games.
turbosquid
free

test
... available on turbo squid, the world's leading provider of digital 3d models for visualization, films, television, and games.
turbosquid
free

Test
... available on turbo squid, the world's leading provider of digital 3d models for visualization, films, television, and games.
turbosquid
free

Test
... available on turbo squid, the world's leading provider of digital 3d models for visualization, films, television, and games.
3d_export
$5
gripper test
...gripper test
3dexport
robot gripper test model
Unit
turbosquid
$4

UNIT
...unit
turbosquid
royalty free 3d model unit for download as on turbosquid: 3d models for games, architecture, videos. (1196686)
archibase_planet
free
Unit
...unit
archibase planet
desk board
entertainment unit 02 - 3d model (*.gsm+*.3ds) for interior 3d visualization.
3d_export
$15
control unit
...control unit
3dexport
control unit
3ddd
$1
bathroom unit
...bathroom unit
3ddd
bathroom unit
3ddd
$1

Crockery unit
...crockery unit
3ddd
сервант
crockery unit
3ddd
$1

Process unit
...process unit
3ddd
статуэтка
process unit
3d_export
$5

united nations
...united nations
3dexport
united nations-logo -cnc plant
turbosquid
$3

TV unit-1 / 2 unit
...-1 / 2 unit for download as 3ds, max, obj, fbx, dwg, and dae on turbosquid: 3d models for games, architecture, videos. (1207609)
3d_export
$5

tv unit
...tv unit
3dexport
the tv unit design simple design with texture for interior
3d_ocean
$5

Tv Unit
...gh quality apple tv unit. the model is made using 3ds max. hope you enjoy it and if you have any queries feel free to contact me.