Thingiverse
Floppy fish by chaszd
by Thingiverse
Last crawled date: 3 years ago
Requires extra materials
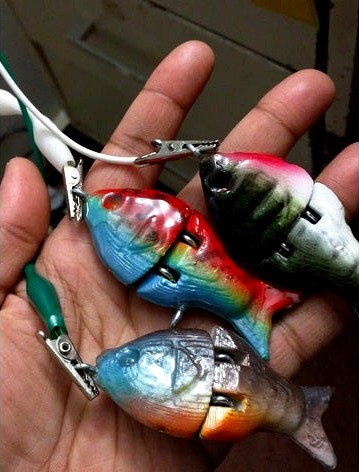
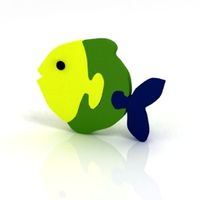
Made and tailored for my dad but he wanted me to share it. Took some of his lures and chose to model it off a bluegill. It sinks and I added bb cavity.
He said it works and has caught some fish on it. Added BB's 1 or 2 tiny ones make a lot of noise for the size.
Update: Played around and discovered if I added a hole between the eyes the fish dive a bit deeper and wiggle more before going back up. Added picture.
Materials
Glue - I use weldon 4, superglue will work too
Steel Rod cutter, dremel ,etc
Steel Rod 1/8 diameter, M3 20mm zinc screw and lob off the head
Screw eyes #216 I use the top picture for the V joint. It allows a lot of flip flop action
Epoxy, acetone, and patience. I use 5 min epoxy. Epoxy the head in the morning and tail in the evening. And put my brush in nail polish remover to save my brush.
I paint all parts separately, glue the head together, add all the screws -- epoxy. Assemble with the tail then epoxy the tail.
Assembly
Head - Do not glue eye screws yet
1.Glue it together
2.Add the eye screws inside the V. Twist it in until the thread doesn't show anymore. Make sure its horizontal. Don't glue eye screws, don't be me do it right the first time
Tail
Cut the steel rod to fit the groove.
Take the head, the eye screws will need to be horizontal. Put the steel rod through the screws then add/slide the bottom half of the tail it will fit in place. Make sure the screw relief of the tail is towards you, I've ruined a couple from this
Add the other tail. Before you glue, make sure it flip flops. Should move easily and make a clickclick sound. If it doesn't move easily loosen the screws.
Feel free to glue the screws now
Similar models
thingiverse
free

Flip Flop Beads Fish by zabirov_r
...тки перекидные, в виде рыбки.
for 1 set i used:
head 1pc
head lock 2pcs
ribbon 6 pcs
ribbon with fin 1pc
tail 1pc
tail lock 2 pcs
thingiverse
free

Eye modification for InMoov by bhouston
...i would glue it place once the eyes are adjusted correctly.
10/23/2015 this modification fits in gael's original head design.
thingiverse
free

Igloo Cooler Latch by McFunkerton
...ore screwing it to your cooler. if you do this, just make sure you don't use too much glue and glue the rod inside the latch!
thingiverse
free

gopro wrench by cheped
... the head screw. so i made this with a longer reach to the tightener screw. it helps alot to make sure you cam doesn't move..
thingiverse
free

Inshore Saltwater Fishing Lure by lanepulcini
...te a few sea trout with this model myself. let me know if you have any questions and be sure to check out my other lure designs.
thingiverse
free

Inosuke Hashibira Swords by Yessirmandawg
...e pieces stick together in order that the file is named. i put mine together using hot glue to make sure it doesn't fall out.
thingiverse
free

Home fountain/waterfall by Kyll4n
... 20cm high, 3,2cm hole
you must glue two parts together, i recommend adding some supports to make sure it doesn't fall apart.
thingiverse
free

Ice Fishing Rod
...lastic rod if you don't have a wood one. i added the model but haven't tested it.
happy printing/fishing. post you makes!
thingiverse
free

Fishing Rod by VitaliyT
...h support. i used a screw (m5*16) with nut to connect reel and rod. nut fix with glue. the alerter bite is on the end of the rod.
thingiverse
free
![Flip-Flops [gnamp] by gnamp](/t/8615678.jpg)
Flip-Flops [gnamp] by gnamp
...f flip-flips- and that's probably no good- unless like me when i'm dancing, you have two left feet...
~dom.
december 2017
Floppy
turbosquid
$2

Floppy
...
turbosquid
royalty free 3d model floppy for download as fbx on turbosquid: 3d models for games, architecture, videos. (1298033)
turbosquid
free

Floppy
... available on turbo squid, the world's leading provider of digital 3d models for visualization, films, television, and games.
3d_ocean
$5

Realistic Floppy Disc
...op storage usb
this is a model of a floppy disc. floppy discs were used as computer storage devices before the invention of usbs.
turbosquid
$29

Floppy Bird
...quid
royalty free 3d model floppy bird for download as blend on turbosquid: 3d models for games, architecture, videos. (1314253)
turbosquid
$6

table floppy
...squid
royalty free 3d model table floppy for download as max on turbosquid: 3d models for games, architecture, videos. (1424914)
3d_export
$5

Floppy disk 3D Model
...floppy disk 3d model
3dexport
floppy disk
floppy disk 3d model coolzero 36950 3dexport
turbosquid
$10

Floppy Cover.max
... available on turbo squid, the world's leading provider of digital 3d models for visualization, films, television, and games.
turbosquid
$10

Floppy disk
... available on turbo squid, the world's leading provider of digital 3d models for visualization, films, television, and games.
turbosquid
$10

floppy disk
... available on turbo squid, the world's leading provider of digital 3d models for visualization, films, television, and games.
turbosquid
$8

floppy disk
... available on turbo squid, the world's leading provider of digital 3d models for visualization, films, television, and games.
Fish
archibase_planet
free
Fish
...fish
archibase planet
fish aquarium fish toy fish
fish n250113 - 3d model (*.gsm+*.3ds) for interior 3d visualization.
archibase_planet
free
Fish
...fish
archibase planet
fish aquarium fish toy fish
fish n310113 - 3d model (*.gsm+*.3ds) for interior 3d visualization.
archibase_planet
free

Fish
...fish
archibase planet
fish aquarium fish
fish - 3d model (*.gsm+*.3ds) for interior 3d visualization.
archibase_planet
free
Fish
...fish
archibase planet
fish aquarium fish
fish - 3d model (*.gsm+*.3ds) for interior 3d visualization.
turbosquid
$200
Fish Red | Fish 3D | Fish devil | Fish fat
... available on turbo squid, the world's leading provider of digital 3d models for visualization, films, television, and games.
3d_export
free
fish
...fish
3dexport
fish
3ddd
$1
fish
...fish
3ddd
рыба
fish
archibase_planet
free
Fish
...fish
archibase planet
fish sculpture statue
fish - 3d model for interior 3d visualization.
archibase_planet
free
Fish
...fish
archibase planet
fish picturesque element
fish - 3d model (*.gsm+*.3ds) for interior 3d visualization.
archibase_planet
free

Fish
...fish
archibase planet
fish picturesque element
fish - 3d model (*.gsm+*.3ds) for interior 3d visualization.