Thingiverse

FliteTest Arrow complete FPV and electronic bay (Fuselage) by sebrob7
by Thingiverse
Last crawled date: 3 years, 3 months ago
French version will follow...
Edit (October 14th) : Sorry for this edit. I did some modifications since I've published this thing on october 9th, 2020. Some problems came in my lasts prints that I wanted to solve definitively. The versions you have downloaded may have changed even if the name did not. Everything is all set now, enjoy! :) If I add or change something in the future, I'll proceed by editing here on the top with the date and naming the parts with their version name. I will not delete the old parts from now on because they are working well as I tested them, unless I get reported there is a major problem with one of them. In that case, the edit will report it.
Introduction :
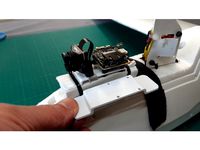
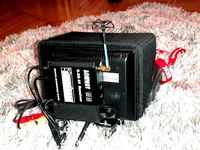
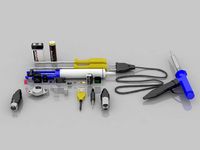
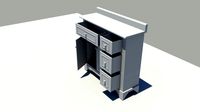
This design is the center piece of the FliteTest Arrow I designed to be able to fit in all my electronic, and Lipo (up to 1500mah). No bolts or nuts are required to assemble the parts together. I only use 8 zipties and a conventional strap. Theres is 9 parts printed in 3D, all in PLA.
Thank's to HaikuFPV for the inspiration (https://www.thingiverse.com/thing:1410967).
Try to use Tough PLA, like APLA+ if you can. ABS and other "hard" materials will work as well. Supports are mandatory for most parts.
(The picture shown is the first version of the fuselage.)
Parts :
1 - Fuselage (Version V4 and Tarsier version)
There's an integrated cam bracket to place your FPV (First Person View) camera on the front (19x19 or 19x20 camera). I use a Caddx Ratel full size as my regular camera. There's also a version of the fuselage to fit a Caddx Tarsier so you can record your flights without having to fit an HD cam on top of the wing. You place the board of this cam right behind the cam on the wall with 3M double sided tape or using zipties (that's why there is 4 holes on the wall) so you can just remove the nose (cover), and cut the ties to have access more easily to the board when you need to take your SD card out and access to you precious video content. You'll have to add length to your cables to reach the FC (Flight Controller) that is located at the back of the fuselage. And if you use the Tarsier, keep enough length to move up the board to access your SD card once the ties are removed.
You'll find holes on each sides of the fuselage for the cables that comes from the wings: cables from your VTX (Video Transmitter) and radio receiver that will be placed in the wings. I use a TBS (Team Black Sheep) Unify Pro32 with a TBS Triumph Pro antenna as my VTX and a Crossfire Nano RX with a standard antenna as my radio receiver. You also need to add length to these cables to reach the FC. Other cables that comes from the wings are the servo cables. I use 9g metal gear servos. You don't need to add length to the servo cables. There's also a tiny hole at the right left side of the fuselage for the cables coming from the GPS (Ground Positioning System) module (I use a BN-220) that will be placed in the wing (it reads the sky through the foam so I put some 3m double sided tape under it and place it in the foam back wing "sandwich", but watch out to keep your wires away from the prop!).
As I said, at the back, you'll find the space dedicated to the FC and the ESC (Electronic Speed Controller). I use a Matek F411 Wing as my FC and a Razor 32 V2 35A ESC as my ESC. There's also holes for the motor on the back of the fuselage. I use a iFlight Xing-E 2207 2750kv as my motor. A 6inch prop (racing edition) complete the set. This thing is a BEAST! I made 188km/h!
So yeah, it's fast. Your wings will take a lot of G's... That's why I added "flaps" that descends over the wings on each sides. When you glue your fuselage on the wing with hot glue, put a great amount of hot glue on bottom surface of the wing and where these flaps will lay on the wings. This reinforce tremendously the structure of the wing and once the glue is set, it's almost impossible to break the wing at the joint of the fuselage. I broke my last Arrow on a tree and it cracked in two pieces between the servo and the fuselage!
In the bottom of the fuselage, there's some spars along the wall to hold a floor so all the wires can run freely under the lipo and have some space to breath... There's also spars on the back walls for a second floor where you put your ESC, over the FC. We will talk about it later.
Finally, there's holes to guide a strap all over to the top, holding the "door", as we will talk about later...
Print it as it is on the plane, laying on the ground. This part needs supports!
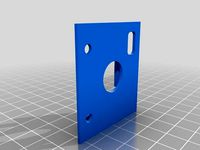
2 - Nose FPV part (V3 and Tarsier Version)
There's a hole for your "eye" and that's it! Four holes to hold this piece on the fuselage with four zipties while the curve of the part follows the curve on the fuselage. The front bottom straight line where there's the hole for your camera lose itself down in a cavity on the fuselage to hold your part in place. Nothing more to work on and it protects your camera. There's also a nose in case you use the Caddx Tarsier, which is not round, but "squaroundy", to fit the Tarsier cameras aspect.
Print it laying flat on the straight surface, where the "eye" hole is. Don't forget the support if you think you need it! But it will work without support.
3 - Lipo Door (V3)
It's more a cover than a door. It will fit in the space where you put your lipo, right on the spars placed in the inside walls of the fuselage. You just lock your strap over it once your lipo is securely placed in it's bay. Don't lock it like Hulk, otherwise, you'll destroy your tiny spars...
Here's how you guide your strap through the holes : A - Velcro facing the wing, you go through the hole over the wing. B - You guide the strap through the hole straight down the fuselage. C - Under the fuselage (under the plane), you guide your strap through the other hole (other side). D - You guide your strap in the hole coming out of the fuselage over the wing to the other side. *Be advised that it's easier if you do that before installing your electronics and the floor in the lipo bay. Once it's done, attach the strap over the cover and that's it, you hold it in place.
Print it as it. This part needs support!
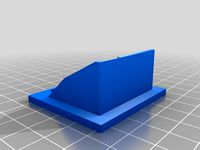
4 - Electronic Case (V3)
Airflow is important to let the ESC and the FC breath. There's a scoop to let air get in the electronic bay. Four holes to put 4 zipties to hold this part in place on the fuselage. The wall that goes down inside the fuselage protects the electronics from the lipo and this wall stops on the lipo floor down in the fuselage. There's also a "XT60" shaped hole to let your lipo connector get out of the electronic bay.
You print this part laying down on the inside wall, scoop in the air! This part needs support, otherwise, your scoop won't look like a race scoop...
5 - Lipo Floor (V1)
It's a floor... Nothing more to say about it. Wait! You'll see 2 recesses on it! Your strap will go through these recesses... Put these recesses in front, just saying it in case... And put some double sided tape (3M) to hold it in place, on the center wall supporting the floor in the fuselage.
Print it flat, no support...
6 - ESC Floor (V3)
It's another floor, but a bit more to say here... there's grooves on the back and on the front of that part, but they are different. The back groove allows the motor wires to go up to the ESC and it's a straight groove from the bottom to the top of the floor. The front groove allows the ESC wires to go down to the FC ans it's kind of a round groove from the top to the bottom of the floor. Same thing for that floor, put some 3M double sided tape to hold it in place right under the sides that will touch the spars on the wall. Double sided tape will be useful for your ESC as well...
Again, print it flat, no support...
7 - Rod Guide (V3)
This part will guide the metal rod that starts from the servo and goes to the control horn. It's designed so you punch it in your foamboard, take it out, put some hot glue in the holes it did and place it back with the rod in it. Place it in between the servo and the control horn. Once the glue has set, you take two tiny square pieces of foamboard glued together (one over another) and glue it under your rod right in front of your guide. This will keep your rod securely in place with a great look! There's also some stoppers so you don't go to far in the foamboard. Put glue under these stoppers as well to add strength when you glue your part on the wing.
Here's a trick, take a pen or something with a sharp end a make a hole where you want to place each end of your guide before pushing it in your foamboard, this will help a lot to punch your foamboard with the part without plying it.
Print it like it is on the STL file. Print 2 of it because you have 2 servos!
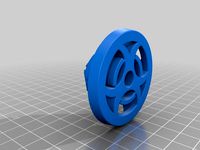
8 - Antenna rings
I use these rings to keep my antenna in place and tight it on the foamboard. The rings acts as a "sandwich" and keep the antenna straight and it protects the foamboard around the hole for the antenna as well.
Print it flat, no support...
9 - Wingtips (V 1)
Basic wingtips. One wingtip have a hole so it can suck fresh and cool air inside the wing to prevent the VTX to heat up too much. Make a tiny hole in the wing to let air enter in.
Print it flat, no support.
Different models to come...
That's it for the parts!
More details -
So, how to launch this beast? Hold it facing the sky, far from you, throttle up 3/4, let it go... You're up... You're high up far in the sky before you realize it in fact, so push right stick to see where you are...
I will probably make a version to put an Insta 360Go on the front, with a TPU mount that will stick to the frame with zipties (I love zipties!). Not sure yet... But anyway, you can certainly have a lot of fun with it, and get some 8-12 minutes of flight time out of it with a 1100mah 4S 100C, or even much much more if you switch to a 3-4S with less C (1500mah 45C or less as example) and a prop with less "Humph" or slow down on the throttle. Enjoy!
For the rest, you should take a look at www.Flitetest.com for more details on the Arrow or their other models. Here's the page of the model : https://store.flitetest.com/flite-test-arrow-maker-foam-electric-airplane-kit-737mm-flt-1166/p1218541. They have tutorials where they explain how to build it, and the plans are totally free. You'll have to tweek the plans a bit to make the fuselage, and the 9g servos fit the original plan. Feel free to contact me if you need help :)
There's also Paweł Spychalski on youtube who can explain who to setup INAV on your FC.
Have a great fly!
Edit (October 14th) : Sorry for this edit. I did some modifications since I've published this thing on october 9th, 2020. Some problems came in my lasts prints that I wanted to solve definitively. The versions you have downloaded may have changed even if the name did not. Everything is all set now, enjoy! :) If I add or change something in the future, I'll proceed by editing here on the top with the date and naming the parts with their version name. I will not delete the old parts from now on because they are working well as I tested them, unless I get reported there is a major problem with one of them. In that case, the edit will report it.
Introduction :
This design is the center piece of the FliteTest Arrow I designed to be able to fit in all my electronic, and Lipo (up to 1500mah). No bolts or nuts are required to assemble the parts together. I only use 8 zipties and a conventional strap. Theres is 9 parts printed in 3D, all in PLA.
Thank's to HaikuFPV for the inspiration (https://www.thingiverse.com/thing:1410967).
Try to use Tough PLA, like APLA+ if you can. ABS and other "hard" materials will work as well. Supports are mandatory for most parts.
(The picture shown is the first version of the fuselage.)
Parts :
1 - Fuselage (Version V4 and Tarsier version)
There's an integrated cam bracket to place your FPV (First Person View) camera on the front (19x19 or 19x20 camera). I use a Caddx Ratel full size as my regular camera. There's also a version of the fuselage to fit a Caddx Tarsier so you can record your flights without having to fit an HD cam on top of the wing. You place the board of this cam right behind the cam on the wall with 3M double sided tape or using zipties (that's why there is 4 holes on the wall) so you can just remove the nose (cover), and cut the ties to have access more easily to the board when you need to take your SD card out and access to you precious video content. You'll have to add length to your cables to reach the FC (Flight Controller) that is located at the back of the fuselage. And if you use the Tarsier, keep enough length to move up the board to access your SD card once the ties are removed.
You'll find holes on each sides of the fuselage for the cables that comes from the wings: cables from your VTX (Video Transmitter) and radio receiver that will be placed in the wings. I use a TBS (Team Black Sheep) Unify Pro32 with a TBS Triumph Pro antenna as my VTX and a Crossfire Nano RX with a standard antenna as my radio receiver. You also need to add length to these cables to reach the FC. Other cables that comes from the wings are the servo cables. I use 9g metal gear servos. You don't need to add length to the servo cables. There's also a tiny hole at the right left side of the fuselage for the cables coming from the GPS (Ground Positioning System) module (I use a BN-220) that will be placed in the wing (it reads the sky through the foam so I put some 3m double sided tape under it and place it in the foam back wing "sandwich", but watch out to keep your wires away from the prop!).
As I said, at the back, you'll find the space dedicated to the FC and the ESC (Electronic Speed Controller). I use a Matek F411 Wing as my FC and a Razor 32 V2 35A ESC as my ESC. There's also holes for the motor on the back of the fuselage. I use a iFlight Xing-E 2207 2750kv as my motor. A 6inch prop (racing edition) complete the set. This thing is a BEAST! I made 188km/h!
So yeah, it's fast. Your wings will take a lot of G's... That's why I added "flaps" that descends over the wings on each sides. When you glue your fuselage on the wing with hot glue, put a great amount of hot glue on bottom surface of the wing and where these flaps will lay on the wings. This reinforce tremendously the structure of the wing and once the glue is set, it's almost impossible to break the wing at the joint of the fuselage. I broke my last Arrow on a tree and it cracked in two pieces between the servo and the fuselage!
In the bottom of the fuselage, there's some spars along the wall to hold a floor so all the wires can run freely under the lipo and have some space to breath... There's also spars on the back walls for a second floor where you put your ESC, over the FC. We will talk about it later.
Finally, there's holes to guide a strap all over to the top, holding the "door", as we will talk about later...
Print it as it is on the plane, laying on the ground. This part needs supports!
2 - Nose FPV part (V3 and Tarsier Version)
There's a hole for your "eye" and that's it! Four holes to hold this piece on the fuselage with four zipties while the curve of the part follows the curve on the fuselage. The front bottom straight line where there's the hole for your camera lose itself down in a cavity on the fuselage to hold your part in place. Nothing more to work on and it protects your camera. There's also a nose in case you use the Caddx Tarsier, which is not round, but "squaroundy", to fit the Tarsier cameras aspect.
Print it laying flat on the straight surface, where the "eye" hole is. Don't forget the support if you think you need it! But it will work without support.
3 - Lipo Door (V3)
It's more a cover than a door. It will fit in the space where you put your lipo, right on the spars placed in the inside walls of the fuselage. You just lock your strap over it once your lipo is securely placed in it's bay. Don't lock it like Hulk, otherwise, you'll destroy your tiny spars...
Here's how you guide your strap through the holes : A - Velcro facing the wing, you go through the hole over the wing. B - You guide the strap through the hole straight down the fuselage. C - Under the fuselage (under the plane), you guide your strap through the other hole (other side). D - You guide your strap in the hole coming out of the fuselage over the wing to the other side. *Be advised that it's easier if you do that before installing your electronics and the floor in the lipo bay. Once it's done, attach the strap over the cover and that's it, you hold it in place.
Print it as it. This part needs support!
4 - Electronic Case (V3)
Airflow is important to let the ESC and the FC breath. There's a scoop to let air get in the electronic bay. Four holes to put 4 zipties to hold this part in place on the fuselage. The wall that goes down inside the fuselage protects the electronics from the lipo and this wall stops on the lipo floor down in the fuselage. There's also a "XT60" shaped hole to let your lipo connector get out of the electronic bay.
You print this part laying down on the inside wall, scoop in the air! This part needs support, otherwise, your scoop won't look like a race scoop...
5 - Lipo Floor (V1)
It's a floor... Nothing more to say about it. Wait! You'll see 2 recesses on it! Your strap will go through these recesses... Put these recesses in front, just saying it in case... And put some double sided tape (3M) to hold it in place, on the center wall supporting the floor in the fuselage.
Print it flat, no support...
6 - ESC Floor (V3)
It's another floor, but a bit more to say here... there's grooves on the back and on the front of that part, but they are different. The back groove allows the motor wires to go up to the ESC and it's a straight groove from the bottom to the top of the floor. The front groove allows the ESC wires to go down to the FC ans it's kind of a round groove from the top to the bottom of the floor. Same thing for that floor, put some 3M double sided tape to hold it in place right under the sides that will touch the spars on the wall. Double sided tape will be useful for your ESC as well...
Again, print it flat, no support...
7 - Rod Guide (V3)
This part will guide the metal rod that starts from the servo and goes to the control horn. It's designed so you punch it in your foamboard, take it out, put some hot glue in the holes it did and place it back with the rod in it. Place it in between the servo and the control horn. Once the glue has set, you take two tiny square pieces of foamboard glued together (one over another) and glue it under your rod right in front of your guide. This will keep your rod securely in place with a great look! There's also some stoppers so you don't go to far in the foamboard. Put glue under these stoppers as well to add strength when you glue your part on the wing.
Here's a trick, take a pen or something with a sharp end a make a hole where you want to place each end of your guide before pushing it in your foamboard, this will help a lot to punch your foamboard with the part without plying it.
Print it like it is on the STL file. Print 2 of it because you have 2 servos!
8 - Antenna rings
I use these rings to keep my antenna in place and tight it on the foamboard. The rings acts as a "sandwich" and keep the antenna straight and it protects the foamboard around the hole for the antenna as well.
Print it flat, no support...
9 - Wingtips (V 1)
Basic wingtips. One wingtip have a hole so it can suck fresh and cool air inside the wing to prevent the VTX to heat up too much. Make a tiny hole in the wing to let air enter in.
Print it flat, no support.
Different models to come...
That's it for the parts!
More details -
So, how to launch this beast? Hold it facing the sky, far from you, throttle up 3/4, let it go... You're up... You're high up far in the sky before you realize it in fact, so push right stick to see where you are...
I will probably make a version to put an Insta 360Go on the front, with a TPU mount that will stick to the frame with zipties (I love zipties!). Not sure yet... But anyway, you can certainly have a lot of fun with it, and get some 8-12 minutes of flight time out of it with a 1100mah 4S 100C, or even much much more if you switch to a 3-4S with less C (1500mah 45C or less as example) and a prop with less "Humph" or slow down on the throttle. Enjoy!
For the rest, you should take a look at www.Flitetest.com for more details on the Arrow or their other models. Here's the page of the model : https://store.flitetest.com/flite-test-arrow-maker-foam-electric-airplane-kit-737mm-flt-1166/p1218541. They have tutorials where they explain how to build it, and the plans are totally free. You'll have to tweek the plans a bit to make the fuselage, and the 9g servos fit the original plan. Feel free to contact me if you need help :)
There's also Paweł Spychalski on youtube who can explain who to setup INAV on your FC.
Have a great fly!
Similar models
thingiverse
free

Strix Nano Goblin - FC and ESC mount by DenLydigaste
...n place by the carbon spar in the wing so it won't move.
the fc i placed so the usb connector is just behind the carbon spar.
thingiverse
free

Wing spar support for Talon Pro mini talon by epquilloy
...ment from the wing spar by having more surface are in contact. apply glue to mount to the fuselage.
note: print 2 pieces of this.
thingiverse
free

Lipo Battery Strap Guide by markqv
...d it also keeps the strap from being damaged on landing. inside the fuse i glue down strips of velcro to help stabilize the pack.
thingiverse
free

Mini Talon Pro Rear Spar Brace by rx-midget
...issue. remove braces and glue them to the fuse sides making sure no glue obscures the inner opening for spar at the wing saddle.
thingiverse
free

ZOHD Dart 250G Lipo Mount
...for a velcro strap and also a channel for cable that connect to your camera in the nose of the wing.
https://youtu.be/8jr5izjzza4
thingiverse
free

JSM Xcalibur Wing Servo Cable connector
...ng servo cable connector
thingiverse
made for 2/3 pc. servo extension connector
can be placed in the side holes of the fuselage.
thingiverse
free

FT MIG-3 detachable wing reinforcement by Motorpixiegimbals
...in place with hot glue. add additional foamboard on the inside of the fuselage to reinforce it as well. add 3mm barbecue skewers.
thingiverse
free

Sky Shadow S800 wing clamp by GELMOz
...te well and certainly better than magnets or velcro. you could probably glue a clamp into the front spar area as well to be safe.
thingiverse
free

FPV ESC Ziptie 'SqeezeStrap' by hattybin
...nd sides of the esc (minimal but effective)
thread a 4"-6" ziptie through the two holesand wrap around the esc and arm.
thingiverse
free
Caddx Tarsier mount
... tarsier or any other split style camera with a 20mm hole spacing. designed to be taped down on a wing or fuselage for fixed wing
Flitetest
thingiverse
free

FliteTest Firewall by justindp2006
...flitetest firewall by justindp2006
thingiverse
flitetest firewall for power pods. i use it on my spitfire and works great.
thingiverse
free

FliteTest control horn by FooRider
...flitetest control horn by foorider
thingiverse
control horn for rc airplanes designed by flitetest.
thingiverse
free
FliteTest Swappable firewall reinforced by Lubis
...flitetest swappable firewall reinforced by lubis
thingiverse
flitetest swappable firewall reinforced
updated: 2014-08-23
thingiverse
free

FliteTest Simple Cub Mods by bigfoot13
...flitetest simple cub mods by bigfoot13
thingiverse
mods that i've made to my flitetest simple cub.
thingiverse
free
Flitetest swapable series fire wall by coolpratheesh
...flitetest swapable series fire wall by coolpratheesh
thingiverse
flitetest swapable series fire wall
thingiverse
free

FliteTest Mig 3 Canopy by jhallett
...tetest mig 3 canopy by jhallett
thingiverse
canopy for flitetest mig-3. print in vase mode and trim edges with scissors for fit
thingiverse
free

Flitetest Mini Arrow Vertical Stabilizer by robhsaunders
...flitetest mini arrow vertical stabilizer by robhsaunders
thingiverse
vertical stabilizer for flitetest's mini arrow.
thingiverse
free
Biohazard Gimbal Protectors by flitetest
...biohazard gimbal protectors by flitetest
thingiverse
biohazard gimbal protectors
thingiverse
free

Micro RunCam Insert by flitetest
...micro runcam insert by flitetest
thingiverse
micro runcam insert
thingiverse
free

Flitetest - FT Mini Control Horn by SidneyKi
... sidneyki
thingiverse
this is the control horn for the flitetest mini airplanes.http://store.flitetest.com/aircraft-accessories/
Fuselage
turbosquid
$60

Airplane fuselage compass
...d model airplane fuselage compass for download as max and obj on turbosquid: 3d models for games, architecture, videos. (1558309)
3d_ocean
$45

Boeing 737-300w
...blender internal render and compositor nodes in blender.for the fuselage doors, wings, tail and...
3d_export
$60

saab j21
...by saab. it used a relatively unorthodox twin boom fuselage with a pusher engine, giving the aircraft an unusual...
3d_ocean
$35

Aviocopter concept aircraft
...internal render. model consists of: front wings, rear tale, fuselage cockpit and propellers with engines. parts are...
cg_studio
$79

Gotha G.V.3d model
...gotha model 3d gv gun military bomber allowed perspectx fuselage versions misile bomb german heavy ww1 .3ds .c4d .fbx...
3d_export
$59

junkers ju-52
...objeckts in a file are divided on layers (a fuselage wings, an interior, gear, etc.) animation: door, cargo doors....
3d_ocean
$19

Embraer 190 commercial jet
...by material and by object.there is one texture for fuselage with windows and...
3d_ocean
$19

Bombardier cs300 airliner
...from the fuselage.there are 3 png textures one for fuselage 2050×2050px with passenger windows...
3d_ocean
$19

Dassault falcon 5x business jet
...render.there are 2 png textures for this model.one for fuselage 2050×2050png pixels...
3d_ocean
$19

Airbus A350-900 commercial aircraft
...standard lighs and materials.there are 2 textures, one for fuselage with windows and tail decals,second is...
Arrow
3d_export
$5

Arrow
...arrow
3dexport
20 arrows. arrow collection
3d_export
$5

arrow
...arrow
3dexport
arrow - 4k
3ddd
$1

arrow
...arrow
3ddd
luxy
производитель luxy
кресло arrow
3d_export
$5

arrow
...arrow
3dexport
modeling arrow format: maya 2014, 3d max 2014,obj, fbx,
3d_ocean
$3

Arrows
...nside of cinema4d files included are: arrows.c4d and arrows.obj the studio/scene set up used for the preview image isn’t inclu...
turbosquid
$1

Arrow
...w
turbosquid
royalty free 3d model arrow for download as fbx on turbosquid: 3d models for games, architecture, videos. (1332371)
turbosquid
$3

arrow
...quid
royalty free 3d model arrow for download as 3dm and max on turbosquid: 3d models for games, architecture, videos. (1671016)
turbosquid
$13

Arrow
...
royalty free 3d model arrow for download as ma, obj, and fbx on turbosquid: 3d models for games, architecture, videos. (1694685)
turbosquid
$1

Arrow
...
royalty free 3d model arrow for download as ma, obj, and fbx on turbosquid: 3d models for games, architecture, videos. (1362000)
turbosquid
free

Arrow
...
free 3d model arrow for download as max, fbx, blend, and upk on turbosquid: 3d models for games, architecture, videos. (1192030)
Fpv
turbosquid
$1
FPV VTX Antenna
...e 3d model fpv vtx antenna for download as obj, fbx, and stl on turbosquid: 3d models for games, architecture, videos. (1230317)
3d_export
$9

Fpv logo 3D Model
...onogram vehicle part of auto transport 3d model logo emblem detailed high quality badge
fpv logo 3d model rmodeler 59628 3dexport
3d_export
$8
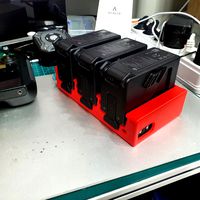
dji fpv battery slot holder
...er for 3 dji fpv batteries. holds perfectly without shaking. need 1 m3 countersunk head bolt. need to print 6 pin, 1 case, 1 cap.
3d_export
$10
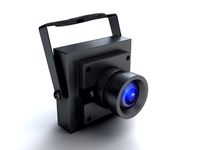
fpv camera hd 700tvl
...aterials are logically named<br>the main format is in 3ds max 2009.<br>satisfcation garranteed..<br>thank you !
thingiverse
free
FpV Mount (SOPORTE FPV) by elborjas1987
...fpv mount (soporte fpv) by elborjas1987
thingiverse
this is a fpv mount with the same holes of naza base.
thingiverse
free
fpv by tbutera
...fpv by tbutera
thingiverse
fpv
thingiverse
free
fpv by tbutera
...fpv by tbutera
thingiverse
fpv
thingiverse
free
FPV DRONE ROOSTER DJI FPV PART
...fpv drone rooster dji fpv part
thingiverse
fpv drone rooster dji fpv install part
thingiverse
free
FPV monitor
...tml?rmmds=myorder&cur_warehouse=cn
link for download : https://cults3d.com/fr/mod%c3%a8le-3d/divers/fpv-monitor-ecran-fpv-faf
thingiverse
free
FPV receiver mount for FPV display by petrex
...eceiver mount for fpv display by petrex
thingiverse
aomway receiver mount for field view 777 fpv monitor. with small cable tray.
Bay
3ddd
$1

Bay
...bay
3ddd
calligaris
стул bay итальянской фабрики сalligaris /max2011,fbx,obj,mat/
3ddd
$1

MDF / BAY
...mdf / bay
3ddd
bay , mdf italia
диван "bay"
*turbosmooth присутствует
turbosquid
$8

Bay
... available on turbo squid, the world's leading provider of digital 3d models for visualization, films, television, and games.
3ddd
$1
BAY XL
... giulio marelli
giulio marelli italia. bay xl.
диван, дизайн studio crgm в тканевом исполнении.
длина: 2.55
design_connected
$18

Bai Armchair
...bai armchair
designconnected
ondarreta bai armchair computer generated 3d model. designed by lizaso, ander.
3ddd
$1

Kichler Hayman Bay
...kichler hayman bay
3ddd
kichler , hayman bay
люстра kichler lighting 43256daw hayman bay
design_connected
$13

Bai Chandelier
...bai chandelier
designconnected
parachilna bai chandelier computer generated 3d model. designed by neri&hu.
3ddd
$1

Lamp poters bay
...lamp poters bay
3ddd
eichholtz
eichholtz, lamp poters bay
turbosquid
$32

Shuttle Bay
...ty free 3d model shuttle bay for download as ma, obj, and fbx on turbosquid: 3d models for games, architecture, videos. (1475258)
turbosquid
$20

Iris Bay
...free 3d model iris bay for download as 3ds, c4d, fbx, and stl on turbosquid: 3d models for games, architecture, videos. (1367781)
Electronic
turbosquid
$1

electron
...urbosquid
royalty free 3d model electron for download as max on turbosquid: 3d models for games, architecture, videos. (1157488)
turbosquid
$50

electronic
...
royalty free 3d model electronic for download as max and obj on turbosquid: 3d models for games, architecture, videos. (1289427)
turbosquid
$40

Electron
... available on turbo squid, the world's leading provider of digital 3d models for visualization, films, television, and games.
3d_ocean
$8
Electronic game
...electronic game
3docean
electronic games nu pogody wait a minute well
electronic game “well, wait a minute”, “nu pogody”
3ddd
$1
Brilux Electronic
...brilux electronic
3ddd
подвес. brilux electronic. польша. материалы настроены.
3d_export
free

electronic shop
...lectronic shop with high quality interior and exterior. it has tvs smartphone play station printer and many more electronic item.
3ddd
$1

Термостаты OJ Electronics
...ермостаты oj electronics
3ddd
oj electronics , термостат
термостаты фирмы oj electronics
3d_export
$8

electron 714
...electron 714
3dexport
game ready model for export to unreal engine soviet tv electron 714 pbr 4k
3ddd
$1

Термостат OJ Electronics
... oj electronics
3ddd
oj electronics , термостат
термостат occ2-1991 фирмы oj electronics
turbosquid
$60
Electronics Stuff
...
royalty free 3d model electronics stuff for download as max on turbosquid: 3d models for games, architecture, videos. (1624680)
Complete
turbosquid
$35
complete plan
...quid
royalty free 3d model complete plan for download as max on turbosquid: 3d models for games, architecture, videos. (1221693)
turbosquid
$10
COMPLETE WASHROOM
...
royalty free 3d model complete washroom for download as max on turbosquid: 3d models for games, architecture, videos. (1413853)
turbosquid
$1

Complete Office
...id
royalty free 3d model complete office for download as max on turbosquid: 3d models for games, architecture, videos. (1323641)
vizpark
$509

VP COMPLETE
...e is the ultimate collection of 3d archviz assets, including 900 3d models, 50 hdris, 100 tileable textures and pattern software.
turbosquid
$15
excercise complete
... available on turbo squid, the world's leading provider of digital 3d models for visualization, films, television, and games.
turbosquid
$1
complete cabinet
... available on turbo squid, the world's leading provider of digital 3d models for visualization, films, television, and games.
turbosquid
free

complete Desk.lwo
... available on turbo squid, the world's leading provider of digital 3d models for visualization, films, television, and games.
3d_export
$5
Complete Wall Pack
...complete wall pack
3dexport
a complete set of 14 walls
3d_ocean
$12

Complete Model
... any other purpose. model includes, tree, street light, bench with urn, horse model. total poly and verts are 282,036 and 334,...
turbosquid
$80

sasuke complete susanoo
...oyalty free 3d model sasuke complete susanoo for download as on turbosquid: 3d models for games, architecture, videos. (1693376)