Thingiverse

FliteTest Arrow complete FPV and electronic bay (Fuselage) by sebrob7
by Thingiverse
Last crawled date: 3 years, 4 months ago
French version will follow...
Edit (October 14th) : Sorry for this edit. I did some modifications since I've published this thing on october 9th, 2020. Some problems came in my lasts prints that I wanted to solve definitively. The versions you have downloaded may have changed even if the name did not. Everything is all set now, enjoy! :) If I add or change something in the future, I'll proceed by editing here on the top with the date and naming the parts with their version name. I will not delete the old parts from now on because they are working well as I tested them, unless I get reported there is a major problem with one of them. In that case, the edit will report it.
Introduction :
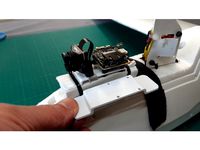
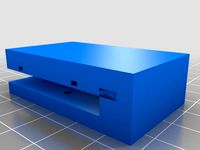
This design is the center piece of the FliteTest Arrow I designed to be able to fit in all my electronic, and Lipo (up to 1500mah). No bolts or nuts are required to assemble the parts together. I only use 8 zipties and a conventional strap. Theres is 9 parts printed in 3D, all in PLA.
Thank's to HaikuFPV for the inspiration (https://www.thingiverse.com/thing:1410967).
Try to use Tough PLA, like APLA+ if you can. ABS and other "hard" materials will work as well. Supports are mandatory for most parts.
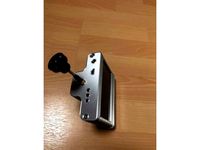
(The picture shown is the first version of the fuselage.)
Parts :
1 - Fuselage (Version V4 and Tarsier version)
There's an integrated cam bracket to place your FPV (First Person View) camera on the front (19x19 or 19x20 camera). I use a Caddx Ratel full size as my regular camera. There's also a version of the fuselage to fit a Caddx Tarsier so you can record your flights without having to fit an HD cam on top of the wing. You place the board of this cam right behind the cam on the wall with 3M double sided tape or using zipties (that's why there is 4 holes on the wall) so you can just remove the nose (cover), and cut the ties to have access more easily to the board when you need to take your SD card out and access to you precious video content. You'll have to add length to your cables to reach the FC (Flight Controller) that is located at the back of the fuselage. And if you use the Tarsier, keep enough length to move up the board to access your SD card once the ties are removed.
You'll find holes on each sides of the fuselage for the cables that comes from the wings: cables from your VTX (Video Transmitter) and radio receiver that will be placed in the wings. I use a TBS (Team Black Sheep) Unify Pro32 with a TBS Triumph Pro antenna as my VTX and a Crossfire Nano RX with a standard antenna as my radio receiver. You also need to add length to these cables to reach the FC. Other cables that comes from the wings are the servo cables. I use 9g metal gear servos. You don't need to add length to the servo cables. There's also a tiny hole at the right left side of the fuselage for the cables coming from the GPS (Ground Positioning System) module (I use a BN-220) that will be placed in the wing (it reads the sky through the foam so I put some 3m double sided tape under it and place it in the foam back wing "sandwich", but watch out to keep your wires away from the prop!).
As I said, at the back, you'll find the space dedicated to the FC and the ESC (Electronic Speed Controller). I use a Matek F411 Wing as my FC and a Razor 32 V2 35A ESC as my ESC. There's also holes for the motor on the back of the fuselage. I use a iFlight Xing-E 2207 2750kv as my motor. A 6inch prop (racing edition) complete the set. This thing is a BEAST! I made 188km/h!
So yeah, it's fast. Your wings will take a lot of G's... That's why I added "flaps" that descends over the wings on each sides. When you glue your fuselage on the wing with hot glue, put a great amount of hot glue on bottom surface of the wing and where these flaps will lay on the wings. This reinforce tremendously the structure of the wing and once the glue is set, it's almost impossible to break the wing at the joint of the fuselage. I broke my last Arrow on a tree and it cracked in two pieces between the servo and the fuselage!
In the bottom of the fuselage, there's some spars along the wall to hold a floor so all the wires can run freely under the lipo and have some space to breath... There's also spars on the back walls for a second floor where you put your ESC, over the FC. We will talk about it later.
Finally, there's holes to guide a strap all over to the top, holding the "door", as we will talk about later...
Print it as it is on the plane, laying on the ground. This part needs supports!
2 - Nose FPV part (V3 and Tarsier Version)
There's a hole for your "eye" and that's it! Four holes to hold this piece on the fuselage with four zipties while the curve of the part follows the curve on the fuselage. The front bottom straight line where there's the hole for your camera lose itself down in a cavity on the fuselage to hold your part in place. Nothing more to work on and it protects your camera. There's also a nose in case you use the Caddx Tarsier, which is not round, but "squaroundy", to fit the Tarsier cameras aspect.
Print it laying flat on the straight surface, where the "eye" hole is. Don't forget the support if you think you need it! But it will work without support.
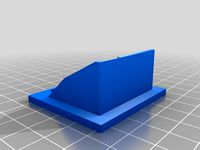
3 - Lipo Door (V3)
It's more a cover than a door. It will fit in the space where you put your lipo, right on the spars placed in the inside walls of the fuselage. You just lock your strap over it once your lipo is securely placed in it's bay. Don't lock it like Hulk, otherwise, you'll destroy your tiny spars...
Here's how you guide your strap through the holes : A - Velcro facing the wing, you go through the hole over the wing. B - You guide the strap through the hole straight down the fuselage. C - Under the fuselage (under the plane), you guide your strap through the other hole (other side). D - You guide your strap in the hole coming out of the fuselage over the wing to the other side. *Be advised that it's easier if you do that before installing your electronics and the floor in the lipo bay. Once it's done, attach the strap over the cover and that's it, you hold it in place.
Print it as it. This part needs support!
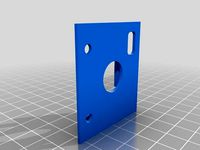
4 - Electronic Case (V3)
Airflow is important to let the ESC and the FC breath. There's a scoop to let air get in the electronic bay. Four holes to put 4 zipties to hold this part in place on the fuselage. The wall that goes down inside the fuselage protects the electronics from the lipo and this wall stops on the lipo floor down in the fuselage. There's also a "XT60" shaped hole to let your lipo connector get out of the electronic bay.
You print this part laying down on the inside wall, scoop in the air! This part needs support, otherwise, your scoop won't look like a race scoop...
5 - Lipo Floor (V1)
It's a floor... Nothing more to say about it. Wait! You'll see 2 recesses on it! Your strap will go through these recesses... Put these recesses in front, just saying it in case... And put some double sided tape (3M) to hold it in place, on the center wall supporting the floor in the fuselage.
Print it flat, no support...
6 - ESC Floor (V3)
It's another floor, but a bit more to say here... there's grooves on the back and on the front of that part, but they are different. The back groove allows the motor wires to go up to the ESC and it's a straight groove from the bottom to the top of the floor. The front groove allows the ESC wires to go down to the FC ans it's kind of a round groove from the top to the bottom of the floor. Same thing for that floor, put some 3M double sided tape to hold it in place right under the sides that will touch the spars on the wall. Double sided tape will be useful for your ESC as well...
Again, print it flat, no support...
7 - Rod Guide (V3)
This part will guide the metal rod that starts from the servo and goes to the control horn. It's designed so you punch it in your foamboard, take it out, put some hot glue in the holes it did and place it back with the rod in it. Place it in between the servo and the control horn. Once the glue has set, you take two tiny square pieces of foamboard glued together (one over another) and glue it under your rod right in front of your guide. This will keep your rod securely in place with a great look! There's also some stoppers so you don't go to far in the foamboard. Put glue under these stoppers as well to add strength when you glue your part on the wing.
Here's a trick, take a pen or something with a sharp end a make a hole where you want to place each end of your guide before pushing it in your foamboard, this will help a lot to punch your foamboard with the part without plying it.
Print it like it is on the STL file. Print 2 of it because you have 2 servos!
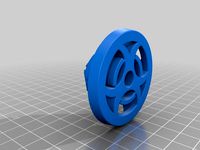
8 - Antenna rings
I use these rings to keep my antenna in place and tight it on the foamboard. The rings acts as a "sandwich" and keep the antenna straight and it protects the foamboard around the hole for the antenna as well.
Print it flat, no support...
9 - Wingtips (V 1)
Basic wingtips. One wingtip have a hole so it can suck fresh and cool air inside the wing to prevent the VTX to heat up too much. Make a tiny hole in the wing to let air enter in.
Print it flat, no support.
Different models to come...
That's it for the parts!
More details -
So, how to launch this beast? Hold it facing the sky, far from you, throttle up 3/4, let it go... You're up... You're high up far in the sky before you realize it in fact, so push right stick to see where you are...
I will probably make a version to put an Insta 360Go on the front, with a TPU mount that will stick to the frame with zipties (I love zipties!). Not sure yet... But anyway, you can certainly have a lot of fun with it, and get some 8-12 minutes of flight time out of it with a 1100mah 4S 100C, or even much much more if you switch to a 3-4S with less C (1500mah 45C or less as example) and a prop with less "Humph" or slow down on the throttle. Enjoy!
For the rest, you should take a look at www.Flitetest.com for more details on the Arrow or their other models. Here's the page of the model : https://store.flitetest.com/flite-test-arrow-maker-foam-electric-airplane-kit-737mm-flt-1166/p1218541. They have tutorials where they explain how to build it, and the plans are totally free. You'll have to tweek the plans a bit to make the fuselage, and the 9g servos fit the original plan. Feel free to contact me if you need help :)
There's also Paweł Spychalski on youtube who can explain who to setup INAV on your FC.
Have a great fly!
Edit (October 14th) : Sorry for this edit. I did some modifications since I've published this thing on october 9th, 2020. Some problems came in my lasts prints that I wanted to solve definitively. The versions you have downloaded may have changed even if the name did not. Everything is all set now, enjoy! :) If I add or change something in the future, I'll proceed by editing here on the top with the date and naming the parts with their version name. I will not delete the old parts from now on because they are working well as I tested them, unless I get reported there is a major problem with one of them. In that case, the edit will report it.
Introduction :
This design is the center piece of the FliteTest Arrow I designed to be able to fit in all my electronic, and Lipo (up to 1500mah). No bolts or nuts are required to assemble the parts together. I only use 8 zipties and a conventional strap. Theres is 9 parts printed in 3D, all in PLA.
Thank's to HaikuFPV for the inspiration (https://www.thingiverse.com/thing:1410967).
Try to use Tough PLA, like APLA+ if you can. ABS and other "hard" materials will work as well. Supports are mandatory for most parts.
(The picture shown is the first version of the fuselage.)
Parts :
1 - Fuselage (Version V4 and Tarsier version)
There's an integrated cam bracket to place your FPV (First Person View) camera on the front (19x19 or 19x20 camera). I use a Caddx Ratel full size as my regular camera. There's also a version of the fuselage to fit a Caddx Tarsier so you can record your flights without having to fit an HD cam on top of the wing. You place the board of this cam right behind the cam on the wall with 3M double sided tape or using zipties (that's why there is 4 holes on the wall) so you can just remove the nose (cover), and cut the ties to have access more easily to the board when you need to take your SD card out and access to you precious video content. You'll have to add length to your cables to reach the FC (Flight Controller) that is located at the back of the fuselage. And if you use the Tarsier, keep enough length to move up the board to access your SD card once the ties are removed.
You'll find holes on each sides of the fuselage for the cables that comes from the wings: cables from your VTX (Video Transmitter) and radio receiver that will be placed in the wings. I use a TBS (Team Black Sheep) Unify Pro32 with a TBS Triumph Pro antenna as my VTX and a Crossfire Nano RX with a standard antenna as my radio receiver. You also need to add length to these cables to reach the FC. Other cables that comes from the wings are the servo cables. I use 9g metal gear servos. You don't need to add length to the servo cables. There's also a tiny hole at the right left side of the fuselage for the cables coming from the GPS (Ground Positioning System) module (I use a BN-220) that will be placed in the wing (it reads the sky through the foam so I put some 3m double sided tape under it and place it in the foam back wing "sandwich", but watch out to keep your wires away from the prop!).
As I said, at the back, you'll find the space dedicated to the FC and the ESC (Electronic Speed Controller). I use a Matek F411 Wing as my FC and a Razor 32 V2 35A ESC as my ESC. There's also holes for the motor on the back of the fuselage. I use a iFlight Xing-E 2207 2750kv as my motor. A 6inch prop (racing edition) complete the set. This thing is a BEAST! I made 188km/h!
So yeah, it's fast. Your wings will take a lot of G's... That's why I added "flaps" that descends over the wings on each sides. When you glue your fuselage on the wing with hot glue, put a great amount of hot glue on bottom surface of the wing and where these flaps will lay on the wings. This reinforce tremendously the structure of the wing and once the glue is set, it's almost impossible to break the wing at the joint of the fuselage. I broke my last Arrow on a tree and it cracked in two pieces between the servo and the fuselage!
In the bottom of the fuselage, there's some spars along the wall to hold a floor so all the wires can run freely under the lipo and have some space to breath... There's also spars on the back walls for a second floor where you put your ESC, over the FC. We will talk about it later.
Finally, there's holes to guide a strap all over to the top, holding the "door", as we will talk about later...
Print it as it is on the plane, laying on the ground. This part needs supports!
2 - Nose FPV part (V3 and Tarsier Version)
There's a hole for your "eye" and that's it! Four holes to hold this piece on the fuselage with four zipties while the curve of the part follows the curve on the fuselage. The front bottom straight line where there's the hole for your camera lose itself down in a cavity on the fuselage to hold your part in place. Nothing more to work on and it protects your camera. There's also a nose in case you use the Caddx Tarsier, which is not round, but "squaroundy", to fit the Tarsier cameras aspect.
Print it laying flat on the straight surface, where the "eye" hole is. Don't forget the support if you think you need it! But it will work without support.
3 - Lipo Door (V3)
It's more a cover than a door. It will fit in the space where you put your lipo, right on the spars placed in the inside walls of the fuselage. You just lock your strap over it once your lipo is securely placed in it's bay. Don't lock it like Hulk, otherwise, you'll destroy your tiny spars...
Here's how you guide your strap through the holes : A - Velcro facing the wing, you go through the hole over the wing. B - You guide the strap through the hole straight down the fuselage. C - Under the fuselage (under the plane), you guide your strap through the other hole (other side). D - You guide your strap in the hole coming out of the fuselage over the wing to the other side. *Be advised that it's easier if you do that before installing your electronics and the floor in the lipo bay. Once it's done, attach the strap over the cover and that's it, you hold it in place.
Print it as it. This part needs support!
4 - Electronic Case (V3)
Airflow is important to let the ESC and the FC breath. There's a scoop to let air get in the electronic bay. Four holes to put 4 zipties to hold this part in place on the fuselage. The wall that goes down inside the fuselage protects the electronics from the lipo and this wall stops on the lipo floor down in the fuselage. There's also a "XT60" shaped hole to let your lipo connector get out of the electronic bay.
You print this part laying down on the inside wall, scoop in the air! This part needs support, otherwise, your scoop won't look like a race scoop...
5 - Lipo Floor (V1)
It's a floor... Nothing more to say about it. Wait! You'll see 2 recesses on it! Your strap will go through these recesses... Put these recesses in front, just saying it in case... And put some double sided tape (3M) to hold it in place, on the center wall supporting the floor in the fuselage.
Print it flat, no support...
6 - ESC Floor (V3)
It's another floor, but a bit more to say here... there's grooves on the back and on the front of that part, but they are different. The back groove allows the motor wires to go up to the ESC and it's a straight groove from the bottom to the top of the floor. The front groove allows the ESC wires to go down to the FC ans it's kind of a round groove from the top to the bottom of the floor. Same thing for that floor, put some 3M double sided tape to hold it in place right under the sides that will touch the spars on the wall. Double sided tape will be useful for your ESC as well...
Again, print it flat, no support...
7 - Rod Guide (V3)
This part will guide the metal rod that starts from the servo and goes to the control horn. It's designed so you punch it in your foamboard, take it out, put some hot glue in the holes it did and place it back with the rod in it. Place it in between the servo and the control horn. Once the glue has set, you take two tiny square pieces of foamboard glued together (one over another) and glue it under your rod right in front of your guide. This will keep your rod securely in place with a great look! There's also some stoppers so you don't go to far in the foamboard. Put glue under these stoppers as well to add strength when you glue your part on the wing.
Here's a trick, take a pen or something with a sharp end a make a hole where you want to place each end of your guide before pushing it in your foamboard, this will help a lot to punch your foamboard with the part without plying it.
Print it like it is on the STL file. Print 2 of it because you have 2 servos!
8 - Antenna rings
I use these rings to keep my antenna in place and tight it on the foamboard. The rings acts as a "sandwich" and keep the antenna straight and it protects the foamboard around the hole for the antenna as well.
Print it flat, no support...
9 - Wingtips (V 1)
Basic wingtips. One wingtip have a hole so it can suck fresh and cool air inside the wing to prevent the VTX to heat up too much. Make a tiny hole in the wing to let air enter in.
Print it flat, no support.
Different models to come...
That's it for the parts!
More details -
So, how to launch this beast? Hold it facing the sky, far from you, throttle up 3/4, let it go... You're up... You're high up far in the sky before you realize it in fact, so push right stick to see where you are...
I will probably make a version to put an Insta 360Go on the front, with a TPU mount that will stick to the frame with zipties (I love zipties!). Not sure yet... But anyway, you can certainly have a lot of fun with it, and get some 8-12 minutes of flight time out of it with a 1100mah 4S 100C, or even much much more if you switch to a 3-4S with less C (1500mah 45C or less as example) and a prop with less "Humph" or slow down on the throttle. Enjoy!
For the rest, you should take a look at www.Flitetest.com for more details on the Arrow or their other models. Here's the page of the model : https://store.flitetest.com/flite-test-arrow-maker-foam-electric-airplane-kit-737mm-flt-1166/p1218541. They have tutorials where they explain how to build it, and the plans are totally free. You'll have to tweek the plans a bit to make the fuselage, and the 9g servos fit the original plan. Feel free to contact me if you need help :)
There's also Paweł Spychalski on youtube who can explain who to setup INAV on your FC.
Have a great fly!
Similar models
thingiverse
free

Strix Nano Goblin - FC and ESC mount by DenLydigaste
...n place by the carbon spar in the wing so it won't move.
the fc i placed so the usb connector is just behind the carbon spar.
thingiverse
free

Wing spar support for Talon Pro mini talon by epquilloy
...ment from the wing spar by having more surface are in contact. apply glue to mount to the fuselage.
note: print 2 pieces of this.
thingiverse
free

Lipo Battery Strap Guide by markqv
...d it also keeps the strap from being damaged on landing. inside the fuse i glue down strips of velcro to help stabilize the pack.
thingiverse
free

Mini Talon Pro Rear Spar Brace by rx-midget
...issue. remove braces and glue them to the fuse sides making sure no glue obscures the inner opening for spar at the wing saddle.
thingiverse
free

ZOHD Dart 250G Lipo Mount
...for a velcro strap and also a channel for cable that connect to your camera in the nose of the wing.
https://youtu.be/8jr5izjzza4
thingiverse
free

JSM Xcalibur Wing Servo Cable connector
...ng servo cable connector
thingiverse
made for 2/3 pc. servo extension connector
can be placed in the side holes of the fuselage.
thingiverse
free

FT MIG-3 detachable wing reinforcement by Motorpixiegimbals
...in place with hot glue. add additional foamboard on the inside of the fuselage to reinforce it as well. add 3mm barbecue skewers.
thingiverse
free

Sky Shadow S800 wing clamp by GELMOz
...te well and certainly better than magnets or velcro. you could probably glue a clamp into the front spar area as well to be safe.
thingiverse
free

FPV ESC Ziptie 'SqeezeStrap' by hattybin
...nd sides of the esc (minimal but effective)
thread a 4"-6" ziptie through the two holesand wrap around the esc and arm.
thingiverse
free
Caddx Tarsier mount
... tarsier or any other split style camera with a 20mm hole spacing. designed to be taped down on a wing or fuselage for fixed wing
Flitetest
thingiverse
free

FliteTest Firewall by justindp2006
...flitetest firewall by justindp2006
thingiverse
flitetest firewall for power pods. i use it on my spitfire and works great.
thingiverse
free

FliteTest control horn by FooRider
...flitetest control horn by foorider
thingiverse
control horn for rc airplanes designed by flitetest.
thingiverse
free
FliteTest Swappable firewall reinforced by Lubis
...flitetest swappable firewall reinforced by lubis
thingiverse
flitetest swappable firewall reinforced
updated: 2014-08-23
thingiverse
free

FliteTest Simple Cub Mods by bigfoot13
...flitetest simple cub mods by bigfoot13
thingiverse
mods that i've made to my flitetest simple cub.
thingiverse
free
Flitetest swapable series fire wall by coolpratheesh
...flitetest swapable series fire wall by coolpratheesh
thingiverse
flitetest swapable series fire wall
thingiverse
free

FliteTest Mig 3 Canopy by jhallett
...tetest mig 3 canopy by jhallett
thingiverse
canopy for flitetest mig-3. print in vase mode and trim edges with scissors for fit
thingiverse
free

Flitetest Mini Arrow Vertical Stabilizer by robhsaunders
...flitetest mini arrow vertical stabilizer by robhsaunders
thingiverse
vertical stabilizer for flitetest's mini arrow.
thingiverse
free
Biohazard Gimbal Protectors by flitetest
...biohazard gimbal protectors by flitetest
thingiverse
biohazard gimbal protectors
thingiverse
free

Micro RunCam Insert by flitetest
...micro runcam insert by flitetest
thingiverse
micro runcam insert
thingiverse
free

Flitetest - FT Mini Control Horn by SidneyKi
... sidneyki
thingiverse
this is the control horn for the flitetest mini airplanes.http://store.flitetest.com/aircraft-accessories/
Fuselage
thingiverse
free

fuselage by theroar
...fuselage by theroar
thingiverse
this is a fuselage for the wing i created.
thingiverse
free

FT arrow fuselage
...fuselage
thingiverse
custom fuselage for ft arrow.
i glued the wing directly to the fuselage with hot glue,
the motor is a 1806.
thingiverse
free

Piper Cub Fuselage Hook
...piper cub fuselage hook
thingiverse
simple hook for holding items up in the fuselage on cub.
thingiverse
free

Battery tray - fuselage reinforcement
...se
support batterie et renfort du fuselage pour le zohd gt rebel.
battery tray and fuselage reinforcement for the rebel zohd gt.
thingiverse
free

Titoletta glider fuselage
...age skin, this part is the outer skin of the fuselage and is 1 perimeter thick.
3) the nose skin, again this is 1 perimeter thick
thingiverse
free

Skyhunter fuselage bottom protection (Skid)
...skyhunter fuselage bottom protection (skid)
thingiverse
skyhunter fuselage bottom protection skid
thingiverse
free

Open Fuselage Glider by Lanem747
...ge glider made to be cut out of foam board and flown with an engine or throw power. could also be an interesting model to modify.
thingiverse
free

dipole mount: through fuselage by Implicit
...le mount: through fuselage by implicit
thingiverse
dipole antenna mount, designed for the sma cable coming through the fuselage.
thingiverse
free

fuselage bridge for Reptile S1100
...tes the two hatches, it also reinforces the square pass through area between the battery and fc compartment. no special settings.
thingiverse
free

flight test mini arrow fuselage by TheMakerDmitriRedlin
...flight test mini arrow fuselage by themakerdmitriredlin
thingiverse
flight test mini arrow fuselage.
Bay
thingiverse
free

Electronics Bay / Altimeter Bay Wings
...arter scale patriot. the curvature of the outside wall of the wings matches the internal radius of the pml quarter scale patriot
thingiverse
free

Bay Bridge by fenyu0717
...bay bridge by fenyu0717
thingiverse
the bay bridge in san fransisco.
thingiverse
free

Rog Bay Plate by Ruben_NYC
...rog bay plate by ruben_nyc
thingiverse
computer bay
thingiverse
free

Kraken Battery Bay by Pango3001
...kraken battery bay by pango3001
thingiverse
kraken battery bay
thingiverse
free

Tampa Bay Art by ThePiercoost
...by thepiercoost
thingiverse
this is an stl of tampa bay, the bay of champions. i overlayed the roads to give it some more depth.
thingiverse
free

Green Bay Packers Logo
...green bay packers logo
thingiverse
this is the green bay packers logo
thingiverse
free

A Drive Bay by transistor86
... drive bay by transistor86
thingiverse
i designed this to slide into my a drive bay to hold my sd card reader. it is a snug fit.
thingiverse
free

The Pirate Bay Phoenix by Termsl
...the pirate bay phoenix by termsl
thingiverse
the pirate bay phoenix round shield
thingiverse
free

PC bay cover by Nofre
...pc bay cover by nofre
thingiverse
bay cover replace for a thermaltake armor case
thingiverse
free

ZMR250 receiver bay by NitzscheModellbau
...zmr250 receiver bay by nitzschemodellbau
thingiverse
zmr250 receiver bay. printed in flexible tpu.
Arrow
thingiverse
free

Arrow
...arrow
thingiverse
arrow
thingiverse
free

arrow
...arrow
thingiverse
just an arrow
thingiverse
free

Yondu Arrow Stand with Arrow by DemolitionX
...yondu arrow stand with arrow by demolitionx
thingiverse
yondu arrow stand and arrow
thingiverse
free

Arrow STOP for 5,65 Arrow
...arrow stop for 5,65 arrow
thingiverse
printmat.: tpu
thingiverse
free

arrow holder for mini arrows by darklynx
...arrow holder for mini arrows by darklynx
thingiverse
holder for mini arrows.
thingiverse
free

Arrow stand (for weighing arrows) by rdp837
...arrow stand (for weighing arrows) by rdp837
thingiverse
simple stand to allow the weighing of arrows.
thingiverse
free

Arrow by LittleJohn16
...arrow by littlejohn16
thingiverse
arrow
thingiverse
free

arrow by DylanWhitesel
...arrow by dylanwhitesel
thingiverse
arrow
thingiverse
free

Arrow Holder for 12 Arrows by Christian1983
...arrow holder for 12 arrows by christian1983
thingiverse
a arrow holder i made with autodesk fusion 360.
thingiverse
free

Arrow Bow
...arrow bow
thingiverse
arrow bow
Fpv
thingiverse
free
FpV Mount (SOPORTE FPV) by elborjas1987
...fpv mount (soporte fpv) by elborjas1987
thingiverse
this is a fpv mount with the same holes of naza base.
thingiverse
free
fpv by tbutera
...fpv by tbutera
thingiverse
fpv
thingiverse
free
fpv by tbutera
...fpv by tbutera
thingiverse
fpv
thingiverse
free
FPV DRONE ROOSTER DJI FPV PART
...fpv drone rooster dji fpv part
thingiverse
fpv drone rooster dji fpv install part
thingiverse
free
FPV monitor
...tml?rmmds=myorder&cur_warehouse=cn
link for download : https://cults3d.com/fr/mod%c3%a8le-3d/divers/fpv-monitor-ecran-fpv-faf
thingiverse
free
FPV receiver mount for FPV display by petrex
...eceiver mount for fpv display by petrex
thingiverse
aomway receiver mount for field view 777 fpv monitor. with small cable tray.
thingiverse
free

dji fpv rush fpv antenna mount spaceone fpv universal by husyildiz
...r original
rush fpv antenna mmx
at cura or prusa slicer please cut-off 0,5 mm maybe less at downside for no support printing !!!!
thingiverse
free

Camera FPV Quanum DIY FPV by emoleo
...camera fpv quanum diy fpv by emoleo
thingiverse
holding the camera for a drone
thingiverse
free

fpv goggles by pmalvino
...fpv goggles by pmalvino
thingiverse
fpv goggles
thingiverse
free

fpv gears by tbutera
...fpv gears by tbutera
thingiverse
fpv gears
Electronic
thingiverse
free

Electron by RikerLansdale
...electron by rikerlansdale
thingiverse
an electron to go on the electron ring
thingiverse
free

Electronics box
...onics box
thingiverse
electronics box
electronics box for ip camera mount for ender 3.
https://www.thingiverse.com/thing:4086651
thingiverse
free

electronic load
...electronic load
thingiverse
electronic load. maximum load 100v. 75w
thingiverse
free

Electronic Box
...electronic box
thingiverse
electronic box. arimf muffle furnace controller. no screw design.
thingiverse
free

Electronics enclosure
...electronics enclosure
thingiverse
a box that i plan to use for some of my electronics - still work in progress.
thingiverse
free

Electronics box for misc electronics by brfields44
... / electronics box. drill your holes for your wires to make it custom. i can also make changes if you need them. just message me.
thingiverse
free

electronic sructure by Phokas
...electronic sructure by phokas
thingiverse
electronic structure
thingiverse
free

Electronic board multimaterial
...electronic board multimaterial
thingiverse
electronic board multimaterial mod
thingiverse
free

Electron Ring by RikerLansdale
...electron ring by rikerlansdale
thingiverse
connects to the proton and has the electrons on it
thingiverse
free

Electron in LArTPC by lululaplap
...electron in lartpc by lululaplap
thingiverse
electron showering in a lartpc detector
Complete
thingiverse
free

hypercube complete by rhinorulz
...hypercube complete by rhinorulz
thingiverse
hypercube complete by mlggammer [created with 3dtin]
thingiverse
free

Halley - Complete Robot by wispdrone
...halley - complete robot by wispdrone
thingiverse
halley - complete robot
thingiverse
free

Francis turbine complete - Spiral hydro turbine complet
...f here somethik problem, download model here: https://grabcad.com/library/francis-turbine-complete-spiral-hydro-turbine-complet-1
thingiverse
free

Completing the Square by gbeemer
...incorporate visual and kinesthetic aspects of learning how to complete the square of a quadratic formula. this visual aspects...
thingiverse
free

Complete Animal Chess by David_Mussaffi
...omplete animal chess by david_mussaffi
thingiverse
complete animal chesshttps://youtu.be/rzd3rbpxmg4https://youtu.be/3rzjaulbzvu
thingiverse
free

completion of house by ketchuphound77777
...completion of house by ketchuphound77777
thingiverse
should i change the windows
thingiverse
free

A complete abomination by noah_makes_things
...a complete abomination by noah_makes_things
thingiverse
why
https://youtu.be/9u3dwf0i4iu
thingiverse
free

DnP | Complete Kit by dustnprint
...dnp | complete kit by dustnprint
thingiverse
dustnprint complete kit
designed for abs/petg, not tested yet in pla.
thingiverse
free

USA Complete Map by MawWebby
...usa complete map by mawwebby
thingiverse
this is a complete map of usa w/ all fifty states. including all alaska and hawaii.
thingiverse
free

Lucifer bust (complete)
...lucifer bust (complete)
thingiverse
lucifer bust, one of my first work