Thingiverse
Flip Up Visor modification for DtM 3.1 Face Shield by atst133
by Thingiverse
Last crawled date: 3 years, 4 months ago
Description
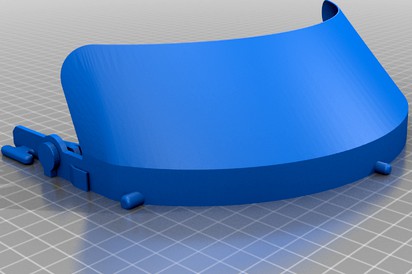
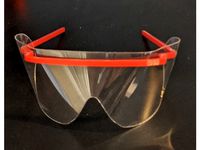
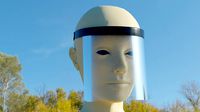
This is a remix of the DtM 3.1 NIH approved face shield with a print-in-place hinge to allow the visor to flip open. The shield profile is also modified to wrap around the sides more (similar to the DtM 4.0 injection mold version shape); as a result, there are also tabs added on each side to help secure the shield material. I have also included a non-hinged version with the same profile and side tabs.
Revisions:
12/17/20: Mk2 - simplified hinge area to only have 2 detents (middle positions drooped with use anyway); decreased hinge gap clearance from ~0.5 to 0.3 mm to reduce loosening over time. Adjust step file as below to further tighten or prevent fusing as necessary. .
Materials
The frame can be printed with any PLA or PETG filament
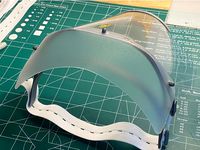
Any transparent sheet can be used for the shield itself - mounting holes are for a standard US 3-hole punch as with the source design, and the side tabs accomodate up to 11.5" width (or slightly oversized if the corners are rounded). Heavy (8 mil+) transparent report covers work quite well. Due to the mounting system, the thinner, overhead projector transparency sheets are more likely to rip, and do not hold shape as well. The bottom curved reinforcement shown in the photo is optional; the original Prusa RC3 reinforcement available here works well.
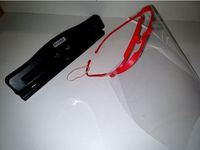
Foam insulation tape can be used to cushion the headband if desired; a towel or gauze bandage can also be wrapped around the frame for the same purpose.
Printing Parameters
Use layer height of 0.2-0.28 mm - smaller layer height is overkill and just dramatically slows the print; I have not tried larger heights but it might cause the hinge portion to fuse.
Extrusion width should be increased to 0.6 mm (150% on a 0.4 mm nozzle) - this will help speed the print, and reduce the likelihood of the hood portion delaminating/failing.
Use 3 perimeters for strength; infill can be 0-25% (basically only cosmetic and helps to make the "roof" of the elastic hook section to not cave in if your printer does not bridge well).
As long as you use 3 perimeters, top and bottom layers can actually be set to 0 and it will retain its structure and save a few minutes of print time, but a few areas will have a "wireframe" appearance. Set to 2 layers to have a better cosmetic result.
With these parameters and some basic velocity tuning, I got a print time of just under 2 hours with PLA on my (not particularly well calibrated) Ender 3 for the hinged version, and 1:45 for the non-hinged version; PETG print times are about 30 min slower (my printer is finicky with PETG).
This is a remix of the DtM 3.1 NIH approved face shield with a print-in-place hinge to allow the visor to flip open. The shield profile is also modified to wrap around the sides more (similar to the DtM 4.0 injection mold version shape); as a result, there are also tabs added on each side to help secure the shield material. I have also included a non-hinged version with the same profile and side tabs.
Revisions:
12/17/20: Mk2 - simplified hinge area to only have 2 detents (middle positions drooped with use anyway); decreased hinge gap clearance from ~0.5 to 0.3 mm to reduce loosening over time. Adjust step file as below to further tighten or prevent fusing as necessary. .
Materials
The frame can be printed with any PLA or PETG filament
Any transparent sheet can be used for the shield itself - mounting holes are for a standard US 3-hole punch as with the source design, and the side tabs accomodate up to 11.5" width (or slightly oversized if the corners are rounded). Heavy (8 mil+) transparent report covers work quite well. Due to the mounting system, the thinner, overhead projector transparency sheets are more likely to rip, and do not hold shape as well. The bottom curved reinforcement shown in the photo is optional; the original Prusa RC3 reinforcement available here works well.
Foam insulation tape can be used to cushion the headband if desired; a towel or gauze bandage can also be wrapped around the frame for the same purpose.
Printing Parameters
Use layer height of 0.2-0.28 mm - smaller layer height is overkill and just dramatically slows the print; I have not tried larger heights but it might cause the hinge portion to fuse.
Extrusion width should be increased to 0.6 mm (150% on a 0.4 mm nozzle) - this will help speed the print, and reduce the likelihood of the hood portion delaminating/failing.
Use 3 perimeters for strength; infill can be 0-25% (basically only cosmetic and helps to make the "roof" of the elastic hook section to not cave in if your printer does not bridge well).
As long as you use 3 perimeters, top and bottom layers can actually be set to 0 and it will retain its structure and save a few minutes of print time, but a few areas will have a "wireframe" appearance. Set to 2 layers to have a better cosmetic result.
With these parameters and some basic velocity tuning, I got a print time of just under 2 hours with PLA on my (not particularly well calibrated) Ender 3 for the hinged version, and 1:45 for the non-hinged version; PETG print times are about 30 min slower (my printer is finicky with PETG).
Similar models
grabcad
free

OralB cap V2.0
...ou use lower speeds while printing in order to be possible for the hinge layers to fuse correctly.
use support build plate only.
thingiverse
free

Protective visor (face shield) for health proffesionals fighting Coronavirus by joseamirandavelez
...to fit in a prusa i3 printer and other similary sized...
thingiverse
free
Rapid Production Face shield - 35min print - add on visor - US/A4 by FlyByTom
...et print time down to 35min with a .6mm on a mk3s. prusaslicer files added. aggressive print settings and speed intended for petg
thingiverse
free
BC Face Shield Frame (PPE) by Brewski
... stable. gcode now at .35mm layer height. print time ~33 minutes.
edit 2: version 3 released. added more material for durability.
thingiverse
free

Coleman Cooler Hinge by bwilly
...lso a version of the hinge without the "stop" that the original manufacturer's hinge has which may be preferential.
thingiverse
free
Pivoting Face Shield by tsweet730
...u.
after printing, insert an acetate sheet (projector transparency) into the band of the visor and assemble the three components.
thingiverse
free

REMIX of DtM v3.0 NIH approved face shield for Vase Spiralize printing by Nerys
...he thick model this can be printed in under 40 minutes!! it will however be a little heavier 50g but also super strong and rigid.
thingiverse
free
eye shield goggle frame stack by SarahRice
...ube.com/watch?v=racias1ssuc
the svg file is for lasercutting the clear portion of the goggles, 8 at a time. we used 0.3 mil petg.
thingiverse
free
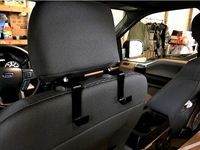
Seat-back Hook by timskloss
...ckup truck. the posts for the head rests were 13 mm in diameter.
update july 2017: i added extended versions for thicker seats.
thingiverse
free

COVID-19 Face Shield by madizmo
...ht you want but make sure your layer width is .50mm and set 5 shells or perimeters depending on your slicer. no infill is needed!
Atst133
thingiverse
free
Microphone Shock Mount by atst133
..., this should work fine printed in pla, but a semi-flexible filament such as petg, abs, or nylon would greatly improve longevity.
thingiverse
free
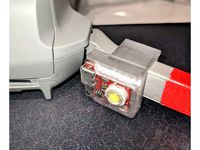
Strobon Rear Mount for Mavic Mini by atst133
...uot; to improve strength where the part must flex to insert/remove the light module. there is no functional difference otherwise.
thingiverse
free
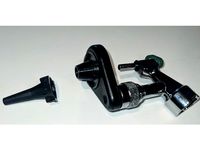
Welch Allyn Operating Otoscope Speculum Adapter by atst133
...he less common 521 series tips. this will only work with the ones that have the 3 retaining wings/little ramp things on the side.
thingiverse
free
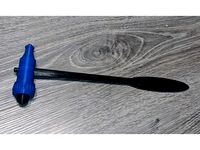
Reflex Hammer (Tromner style) by atst133
... is likely inherently impossible to properly sanitize/disinfect a fdm 3d print with all of its gaps/holes between surface layers.
thingiverse
free
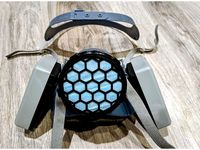
Exhaust Filter for 3M 7500 Series Respirators by atst133
...re too small for me to use comfortably; therefore i remixed it with a new 65 mm aperture, low profile filter box to fit my needs.
Dtm
turbosquid
$189
Audi DTM
... available on turbo squid, the world's leading provider of digital 3d models for visualization, films, television, and games.
turbosquid
$298

Mercedes AMG C63 DTM
...ree 3d model mercedes amg c63 dtm for download as obj and fbx on turbosquid: 3d models for games, architecture, videos. (1182909)
turbosquid
$60
MERCEDES C class DTM
... available on turbo squid, the world's leading provider of digital 3d models for visualization, films, television, and games.
3d_export
$20
Wheel of a Mercedes Model AMG DTM 3D Model
...dtm 3d model
3dexport
wheel tire llanta rueda mercedes amg dtm
wheel of a mercedes model amg dtm 3d model romerixo 55262 3dexport
3d_export
$99

Audi A5 DTM 2014 3D Model
...xport
2012 2013 2014 car sport germany fast racing race audi s5 touring a5 rs5 dtm
audi a5 dtm 2014 3d model squir 79230 3dexport
cg_studio
$129

Audi A5 DTM 20143d model
...5 dtm
.3ds .c4d .fbx .lwo .max .obj - audi a5 dtm 2014 3d model, royalty free license available, instant download after purchase.
3d_export
$60
Audi TT-R DTM 2003 3D Model
...odel
3dexport
audi tt-r dtm 2003 red bull ekstr?m eki race racecar germany tt
audi tt-r dtm 2003 3d model neubi3d 101412 3dexport
cg_studio
$111
Audi RS5 DTM 20143d model
...bj .lwo .fbx .dxf .dae .blend .3ds - audi rs5 dtm 2014 3d model, royalty free license available, instant download after purchase.
cg_studio
$99
Audi RS5 DTM 2013 - Molina3d model
...obj .lwo .fbx .blend .3ds - audi rs5 dtm 2013 - molina 3d model, royalty free license available, instant download after purchase.
3d_export
$111
BMW M4 DTM 2014 - 2015 3D Model
...rmany german motorsport europa fia 2014 2015 tourenwagen touring sportcar
bmw m4 dtm 2014 - 2015 3d model neubi3d 100820 3dexport
Visor
archibase_planet
free

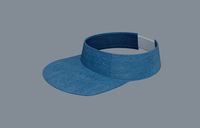
Visor
...visor
archibase planet
cap peak visor roof
building 3 n210608 - 3d model (*.gsm+*.3ds) for interior 3d visualization.
3d_export
$15

face visor- conrona visor- medical mask
...e visor- conrona visor- medical mask
3dexport
covid-19<br>new type corona<br>mask<br>visor<br>face visor
turbosquid
free
Expo Visor
...bosquid
free 3d model expo visor for download as 3ds and max on turbosquid: 3d models for games, architecture, videos. (1289598)
turbosquid
free
Chirurgical Visor
...d model chirurgical visor for download as blend, fbx, and obj on turbosquid: 3d models for games, architecture, videos. (1575611)
turbosquid
$9
Visor Cap
...ree 3d model visor cap for download as fbx, dae, obj, and stl on turbosquid: 3d models for games, architecture, videos. (1663984)
turbosquid
$5

Visor Cap
...isor cap for download as blend, blend, 3ds, dae, fbx, and obj on turbosquid: 3d models for games, architecture, videos. (1581966)
3ddd
$1
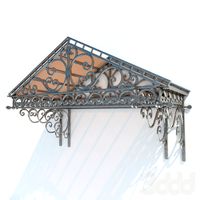
Forged visor № 5
... навес , ковка
forged visor № 5 from plastic roof cover
3ddd
$1
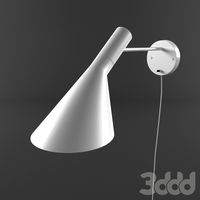
Настенный светильник AJ (Visor)
... visor
настенный светильник aj (visor)http://www.cosmorelax.ru/catalog/nastennye/cl608/
archive3d
free
Visor 3D Model
...
cap peak visor roof
building 3 n210608 - 3d model (*.gsm+*.3ds) for interior 3d visualization.
3ddd
free
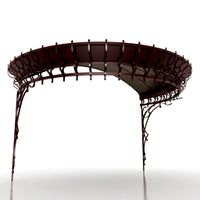
FORGED VISOR (FOR ROUND DOOR)
..., навес , ковка
exterior-for door-classic visor
Flip
design_connected
$13

Flip
...flip
designconnected
poliform flip chairs computer generated 3d model. designed by carlo colombo.
3ddd
$1
Flip
...p
3ddd
flip , foscarini
настенный светильник.
высота - 31см
ширина - 28см
глубина - 13см
design_connected
$13

Flip Around
...flip around
designconnected
menu flip around computer generated 3d model. designed by norm.
design_connected
$18

Flip armchair
...flip armchair
designconnected
poliform flip armchair computer generated 3d model. designed by colombo, carlo.
3d_export
$10
Carveli flip
...carveli flip
3dexport
turbosquid
$5
Flip Knife
...turbosquid
royalty free 3d model flip knife for download as on turbosquid: 3d models for games, architecture, videos. (1320007)
3d_export
$15
flip knife
... knife
3dexport
a 3d modelled, low poly flip knife made by me in blender. formats include: .obj, .stl, .ply, .fbx, .dae and .mtl
turbosquid
$10

Flip Flops
... free 3d model flip flops for download as blend, fbx, and obj on turbosquid: 3d models for games, architecture, videos. (1612271)
3ddd
$1
Flip-Top table
...flip-top table
3ddd
стол
стол системы flip-top. 1600х700
turbosquid
$60
Flip Clock
... available on turbo squid, the world's leading provider of digital 3d models for visualization, films, television, and games.
Shield
3d_export
$5
shield
...shield
3dexport
shield
3d_export
$5
Shield
...shield
3dexport
shield and a spear
3d_ocean
$6
Shield
...shield
3docean
game shield low polygon mei evil shild old shield shield
2048 texture obj,fbx,blend game ready.
3d_export
$5
Shield
...shield
3dexport
a shield that hasn't been made of materials will be available to everyone
3d_ocean
$4
Round Shield
...round shield
3docean
ancient battle fantasy knight medieval shield shields warrior
nice model of round shield.
3d_export
free
metal shield
...metal shield
3dexport
russian metal shield - anti-riot shield.
3d_export
$5

shield
...shield
3dexport
old shield, damaged and covered in mold. every file have a zip folder in with textures.
turbosquid
free
Shield
...shield
turbosquid
free 3d model shield for download as c4d on turbosquid: 3d models for games, architecture, videos. (1164800)
3d_export
$5
fire shield
...fire shield
3dexport
fire shield
turbosquid
$10

SHIELD
...
turbosquid
royalty free 3d model shield for download as obj on turbosquid: 3d models for games, architecture, videos. (1273553)
Modification
turbosquid
$12
AKMS (AK47 modification)
... available on turbo squid, the world's leading provider of digital 3d models for visualization, films, television, and games.
turbosquid
$79
BusTransForm - Modif Bus Thailand
...d model bustransform - modif bus thailand for download as obj on turbosquid: 3d models for games, architecture, videos. (1383303)
3d_export
$25
mitsubishi evo 9 modification
...mitsubishi evo 9 modification
3dexport
evo 9 has been modified with a nice and elegant look.
3d_ocean
$25
Dart Vader (modificated helm)
...niforms, as well as anatomical model of the character itself. the model is divided into groups for further editing. primarily ...
turbosquid
$15
FN SCAR-H modification low-poly game ready
...fication low-poly game ready for download as ma, obj, and fbx on turbosquid: 3d models for games, architecture, videos. (1386384)
3d_export
$5

sphere light
...sphere light
3dexport
the socket and light are modifables
3d_export
$5
Fabulous chest
...chest 3dexport fabulous chest for your game or further modification ...
3d_export
free
cold coffee
...cold coffee 3dexport cold coffee can. any required modification will be done at...
3d_ocean
$12
Cartoon Dump or Sand Truck
...already rig low poly modifier still in stack for modification unwrap uvw for material and colour...
3d_ocean
$12

Cartoon Cement Mixer Truck
...already rig low poly modifier still in stack for modification unwrap uvw for material and colour...
Face
turbosquid
$100
face a face
... available on turbo squid, the world's leading provider of digital 3d models for visualization, films, television, and games.
turbosquid
$6
Face To Face Swing
... available on turbo squid, the world's leading provider of digital 3d models for visualization, films, television, and games.
3ddd
$1
Almerich Face to Face
... гибкостью материала, прозрачностью и тактом, чтобы создавать игры со светом и тенью.
размеры: 48 x 48 x 155 см
полигоны: 39 376
design_connected
$11
Face
...face
designconnected
montis face chairs computer generated 3d model. designed by gerard van den berg.
turbosquid
$15
Face
...ce
turbosquid
royalty free 3d model face for download as mud on turbosquid: 3d models for games, architecture, videos. (1178369)
turbosquid
$6
Face
...ce
turbosquid
royalty free 3d model face for download as max on turbosquid: 3d models for games, architecture, videos. (1409756)
turbosquid
$1
Face
...uid
royalty free 3d model face for download as obj and blend on turbosquid: 3d models for games, architecture, videos. (1288500)
turbosquid
$150
Face
... available on turbo squid, the world's leading provider of digital 3d models for visualization, films, television, and games.
turbosquid
$50

face
... available on turbo squid, the world's leading provider of digital 3d models for visualization, films, television, and games.
turbosquid
$15
Face
... available on turbo squid, the world's leading provider of digital 3d models for visualization, films, television, and games.
3
turbosquid
$10

Mountain Bike 3 -3 of 3
...model mountain bike 3 (#3 of 3) for download as fbx and blend on turbosquid: 3d models for games, architecture, videos. (1438752)
turbosquid
$6

Rock 3-3
...urbosquid
royalty free 3d model rock 3-3 for download as obj on turbosquid: 3d models for games, architecture, videos. (1628065)
turbosquid
$29

Books 150 pieces 3-3-3
...books 150 pieces 3-3-3 for download as max, obj, fbx, and stl on turbosquid: 3d models for games, architecture, videos. (1384033)
turbosquid
$3

Genesis 3 Clothing 3
... available on turbo squid, the world's leading provider of digital 3d models for visualization, films, television, and games.
3d_export
$5

hinge 3
...hinge 3
3dexport
hinge 3
3ddd
$1

Розетка 3
...розетка 3
3ddd
розетка
розетка 3
turbosquid
$50

is-3
... available on turbo squid, the world's leading provider of digital 3d models for visualization, films, television, and games.
turbosquid
$10

Mountain Bike 3 -2 of 3
...model mountain bike 3 (#2 of 3) for download as fbx and blend on turbosquid: 3d models for games, architecture, videos. (1438750)
turbosquid
$10

Mountain Bike 1 -3 of 3
...model mountain bike 1 (#3 of 3) for download as fbx and blend on turbosquid: 3d models for games, architecture, videos. (1438743)
3d_export
$5

3 CATS
...3 cats
3dexport
3 cats pen holder
1
turbosquid
$69

armchairs(1)(1)
... available on turbo squid, the world's leading provider of digital 3d models for visualization, films, television, and games.
turbosquid
$15

ring 1+1
... available on turbo squid, the world's leading provider of digital 3d models for visualization, films, television, and games.
turbosquid
$10

chair(1)(1)
... available on turbo squid, the world's leading provider of digital 3d models for visualization, films, television, and games.
turbosquid
$8

Chair(1)(1)
... available on turbo squid, the world's leading provider of digital 3d models for visualization, films, television, and games.
turbosquid
$2

RING 1(1)
... available on turbo squid, the world's leading provider of digital 3d models for visualization, films, television, and games.
turbosquid
$1

house 1(1)
... available on turbo squid, the world's leading provider of digital 3d models for visualization, films, television, and games.
turbosquid
$1

Table 1(1)
... available on turbo squid, the world's leading provider of digital 3d models for visualization, films, television, and games.
turbosquid
$59

Formula 1(1)
...lty free 3d model formula 1 for download as max, fbx, and obj on turbosquid: 3d models for games, architecture, videos. (1567088)
design_connected
$11

No 1
...no 1
designconnected
sibast no 1 computer generated 3d model. designed by sibast, helge.
turbosquid
$2

desert house(1)(1)
...3d model desert house(1)(1) for download as 3ds, max, and obj on turbosquid: 3d models for games, architecture, videos. (1055095)