Thingiverse
Flashlight Shoulder Mount (Emisar D4v2) by attackhorse
by Thingiverse
Last crawled date: 4 years, 2 months ago
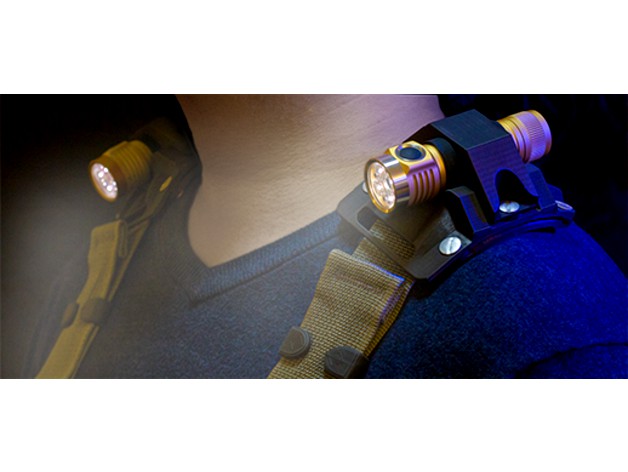
This is a flashlight mount for various types of shoulder straps to allow for handsfree use. It has been specifically designed to house an Emisar D4 and Emisar D4v2 flashlight (sans pocket clip) but can accommodate any flashlight with a cylindrical portion 25 mm or smaller in diameter and 51 mm or larger in length. The mount works best with shoulder straps approximately 46 mm wide and 2 mm thick, though there is a bunch of wiggle room. When used with an Emisar D4, this mount allows for full access to the switch and battery compartment without having to remove the flashlight from the mount. There is also minimal to no contact with the head of the flashlight to allow for maximum airflow.
You will need the following hardware for this build:
6 binding barrels and screws for ¼” thick material
6 neoprene washers for ¼” screw size
Miscellaneous strips of craft foam, rubber sheet, or other similar thin grippy material
I personally used this hardware, though alternatives can be found at your local hardware store:https://www.mcmaster.com/93121A325/https://www.mcmaster.com/90133A029/
Instructions
All the pieces can print without supports. You may need to print the bottom and top plate with a skirt for better bed adhesion. I only have PLA material so I printed at 100% infill and annealed the pieces in boiling water so the mount can withstand outdoor use. I’ve found setting the 3D printed pieces in room temperature water in a pot before bringing the water to boiling prevents any kind of warping.
Line the bottom plate’s holes up with the top plate and with your desired strap sandwiched in the center channel. If the strap slides around, glue a rubber or foam strip to one or both of the areas of each piece that come in contact with the strap--anything to grip the strap and keep the mount in place. Even a zig zag of hot glue could work. Insert the lower portion of 2 binding barrels into the 2 center holes in the top plate. You can temporarily screw the corresponding male part into them to hold them in place and keep them out of the way. Secure the top plate to the bottom plate with 4 binding barrels and neoprene washers in the very center between the plates. The neoprene washers are compressed by the barrels and act as lock washers.
Wrap your flashlight in a foam/rubber strip until the light fits snugly inside the top clamp. Secure the top clamp to the top plate with the center binding barrels mentioned earlier. Use 2 neoprene washers to keep these final 2 binding barrels secured. You’re done.
If you need any additional vertical height for the strap or flashlight, you can double up on the neoprene washers at each location. This also increases the locking action of the washers if needed.
The slot in the front of the mount is for small keychains and such and is not weight-bearing. Obviously do not use it to support your body weight. Injury or death may occur.
The straps I personally used for this project are part of an older version of this climbing harness:https://www.blackdiamondequipment.com/en_US/product/vario-chest-harness/
In the immortal words of Youtube’s Matt Smith, “Good lux.”