Thingiverse
Fire Emblem Levin Sword by Thatloudirishguy
by Thingiverse
Last crawled date: 3 years ago
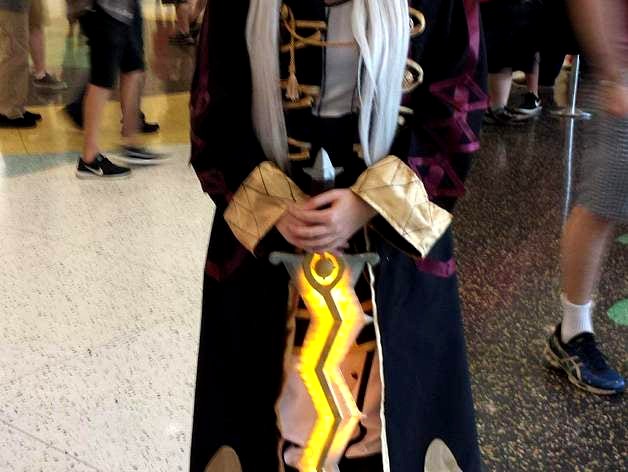
Here is a Levin Sword that I put together for a friend's cosplay at FanExpoCanada 2016. Submitting it now for the #CostumeChallenge
The bill of materials is relatively short:
Transparent Filament
Faux Leather Strip
Flexible LED Strip - Warm White
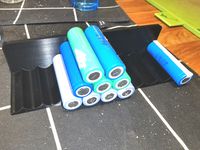
4x AA Long Battery holder
3x 14500 AA batteries
1x Dummy AA battery
1x Tiny switch
4mm⌀ metal rod - 20cm should be enough
Half-Remembered Step-By-Step Instructions
Once the parts are printed you'll want to glue them together.
I used epoxy resin and put it together in 2 halves first.
Then I superglued the LED strip into place and lined the halves up.
Then I cursed myself for not paying closer attention to which parts coincided with which parts, took one side apart, put it back together, then glued both halves together.
Next I glued the gems on, measured how much of the metal rod I would need to insert into the main body & grip to strengthen that join and glued that in place too.
After this it came time to fill all the gaps in the joins
Since I wanted it to allow light through I used layer after layer after layer of epoxy resin to build up the areas that had gaps/dips in the body until they were flush with the rest of the sword. This part took the longest by far, please do this in a suitably ventilated area and with a respirator, lungs are important OK?
Once the gaps were filled and I was happy with the state of the sword I hung it from the rafters in my garage and applied a layer of XTC3D in an attempt to get the surface as smooth as possible.
After this had dried I sanded it by hand with some high grit sandpaper to smooth it out as much as I could.
It was at this point that I dropped it on the arm of my chair and snapped it in half, tearing the LED strip in the process. I would advise against following this particular step.
If you did not skip the previous step you'll need to take a rotary tool and cut away 2 sections of the blade on either side, find the broken contact in the led strip and repair it with a soldering iron and some wire, all the while re-printing the pieces that you cut away and cursing the fact that you dropped it.
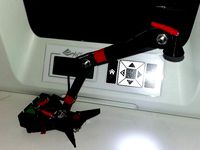
After the sword is sanded flat and you are happy with how it looks, it's time to mask it off for paint.
You can see in the attached pictures how I masked mine off, it's not a work of art but it got the job done
I used a single layer of Valspar Pewter Hobby Enamel on the blade as I quite like the metallic effect it gives.
The non-blade parts were Valspar Brass
Next I used a thin faux leather strip to wrap the handle to give it a more authentic look, this is quite easy but I think it looks great.
At this stage everything was ready, so I put some batteries in and realised I had way too much wire inside the handle for the pommel to close flush with the body.
I took some dupont connectors and cut them as necessary, then soldered male/female ends to the appropriate pins on the switch, and to the wires coming from the LED strip and the battery box. I have 0 electrical training and guessed my way through this, I'm sure you'll be fine - if not, feel free to ask!
Finally I hit the switch and all was well.
If you made it this far I'd like to congratulate you on suffering through my rambling memories of the process, I really need to work on documenting things as I do them.
If you have any interest in seeing some more of the things I make you can check out my instagram
The bill of materials is relatively short:
Transparent Filament
Faux Leather Strip
Flexible LED Strip - Warm White
4x AA Long Battery holder
3x 14500 AA batteries
1x Dummy AA battery
1x Tiny switch
4mm⌀ metal rod - 20cm should be enough
Half-Remembered Step-By-Step Instructions
Once the parts are printed you'll want to glue them together.
I used epoxy resin and put it together in 2 halves first.
Then I superglued the LED strip into place and lined the halves up.
Then I cursed myself for not paying closer attention to which parts coincided with which parts, took one side apart, put it back together, then glued both halves together.
Next I glued the gems on, measured how much of the metal rod I would need to insert into the main body & grip to strengthen that join and glued that in place too.
After this it came time to fill all the gaps in the joins
Since I wanted it to allow light through I used layer after layer after layer of epoxy resin to build up the areas that had gaps/dips in the body until they were flush with the rest of the sword. This part took the longest by far, please do this in a suitably ventilated area and with a respirator, lungs are important OK?
Once the gaps were filled and I was happy with the state of the sword I hung it from the rafters in my garage and applied a layer of XTC3D in an attempt to get the surface as smooth as possible.
After this had dried I sanded it by hand with some high grit sandpaper to smooth it out as much as I could.
It was at this point that I dropped it on the arm of my chair and snapped it in half, tearing the LED strip in the process. I would advise against following this particular step.
If you did not skip the previous step you'll need to take a rotary tool and cut away 2 sections of the blade on either side, find the broken contact in the led strip and repair it with a soldering iron and some wire, all the while re-printing the pieces that you cut away and cursing the fact that you dropped it.
After the sword is sanded flat and you are happy with how it looks, it's time to mask it off for paint.
You can see in the attached pictures how I masked mine off, it's not a work of art but it got the job done
I used a single layer of Valspar Pewter Hobby Enamel on the blade as I quite like the metallic effect it gives.
The non-blade parts were Valspar Brass
Next I used a thin faux leather strip to wrap the handle to give it a more authentic look, this is quite easy but I think it looks great.
At this stage everything was ready, so I put some batteries in and realised I had way too much wire inside the handle for the pommel to close flush with the body.
I took some dupont connectors and cut them as necessary, then soldered male/female ends to the appropriate pins on the switch, and to the wires coming from the LED strip and the battery box. I have 0 electrical training and guessed my way through this, I'm sure you'll be fine - if not, feel free to ask!
Finally I hit the switch and all was well.
If you made it this far I'd like to congratulate you on suffering through my rambling memories of the process, I really need to work on documenting things as I do them.
If you have any interest in seeing some more of the things I make you can check out my instagram
Similar models
thingiverse
free

LED, battery, switch clip-on light by kpaulsen
...just slide it onto the end of the z-axis arm, and switch it on. using a battery, there's no need to tap into any other wires.
thingiverse
free
Desk Lamp by Salalammas
...led
on-off switch
i glued the switch to the bottom plate
cause the battery is 9volts and the led is 3.5volts i needed a resistor.
thingiverse
free

8 AA Battery Pack Box by kagayaki
...teries to easily put them in serie so you get the 12v. the 12v can be split in parallel to your arduino and led-strip. good luck!
thingiverse
free

switch box for printrbot simple by warrior1465
...itches with led blue led. or something like that.
use this to hold the led strip you buyhttp://www.thingiverse.com/thing:385520
thingiverse
free

Master sword by YOYOMANs
... together and sanded. i spray-painted the whole thing after a lot of sanding. (i will make a blade an insert in the near future.)
thingiverse
free

elegant lantern by carlok
...d but for me the best way is a little lamp and two aa size batteries, don't forget the switch, in my project is on the bottom
thingiverse
free

Mini Lamp Base by rcdesigna
...6x.5 (whole switch size)
i hope this helps others.
please note: i have not printed yet. but as soon as i do i will upload images.
thingiverse
free

AA / 18650 Battery Tray by lilmikey
...ep by my batter charger. i put the 'dead' batteries in the middle tray and the charged batteries in the vertical stands.
thingiverse
free
18650 jig for gluing battery packs
... the cells in place, add glue and then add the next layer with cells. after that its time to solder or spot weld then together :)
thingiverse
free
Iron Man Arc Reactor for Osram Dot-it LED by ScotchBunny
... ring for putting it on a hook. i hotglued some magnet to the battery cover and stuck them to the metal piece through my t-shirt.
Thatloudirishguy
thingiverse
free

Doom Boardgame Organiser Remix by Thatloudirishguy
...bout the scale being off, i figured it would be useful to size it correctly and slice it for printing on a regular 8x8x8 printer.
thingiverse
free

Captain Falcon Belt Buckle by Thatloudirishguy
...of sanding to remove the blockiness. probably be a good idea to glue some kind of buckle clip to the back, that's what i did.
thingiverse
free

Megaman X Amiibo by Thatloudirishguy
... it up so i had to glue it back on, seems like i didn't do an amazing job repairing it but super glue is cheap and plentiful.
thingiverse
free

NES Controller Port for USB by Thatloudirishguy
... will get some use out of this.
added v2 which sits flush with the black front panel when placed against the internal grey panel.
thingiverse
free

FLSun Delta Endstop Mount by Thatloudirishguy
...ill all be in the exact same position.
this helped a lot with getting my autoleveling working, hopefully it can help some of you.
Levin
3d_export
$20

toyota levin 1983
...toyota levin 1983
3dexport
toyota levin 1983
turbosquid
$20

Levin Moai Figurine
...igurine for download as max, dwg, 3ds, fbx, stl, dxf, and obj on turbosquid: 3d models for games, architecture, videos. (1676765)
3d_export
$99

Toyota AE86 Levin 1983 j1987 3D Model
...rueno 1983 1984 1985 1986 1987 drift sport racing rally race japan jdm
toyota ae86 levin 1983 j1987 3d model squir 51375 3dexport
archive3d
free

Curtain 3D Model
...curtain 3d model archive3d curtain textile curtain levin - 3d model for interior 3d...
archive3d
free

Curtain 3D Model
...curtain 3d model archive3d curtain drop-curtain curtain levin 02 - 3d model for interior 3d...
3d_export
$99

Toyota Sprinter Trueno AE86 3door 1985 3D Model
...3d model 3dexport toyota sprinter trueno ae86 ae85 corolla levin sr5 1985 1983-1987 1983 1984 1986 1987 3-door hatchback...
3d_ocean
$89

Toyota Sprinter Trueno AE86 3-door 1985
...1983-1987 3-door ae85 ae86 corolla hatch hatchback japan japanese levin racing sport sprinter sr5 toyota toyota sprinter trueno trueno...
3dbaza
$5

Levin Moai Figurine (121132)
...;3ds max 2010. v-ray 2.40.03. file formats fbx, obj, 3ds, dae, dwg, dxf, stl. levin moai figurine. polygons: 5560. vertices: 5562
3dbaza
$3

Levine Bedside Table (317262)
...dside table (317262)
3dbaza
levine bedside table 3d model<br>brands: corrigan studio<br>59.6cm h x 43.3cm w x 42cm d
thingiverse
free

Fire Emblem Levin Sword Pen
...rse
this is the levin sword as a pen. just add a pen cartridge (not included) and you have yourself a functional ball point pen.
Emblem
3d_export
$5

Tesla emblem
...tesla emblem
3dexport
this is tesla emblem
3d_export
$5

Mitsubishi emblem
...mitsubishi emblem
3dexport
mitsubishi emblem 3d model
turbosquid
$5

emblem
... available on turbo squid, the world's leading provider of digital 3d models for visualization, films, television, and games.
3d_export
$5

cards emblems
...cards emblems
3dexport
3 types of logos all of the emblems are in 3 separated files, all extensions avilable
3d_export
$9

jaguar logo emblem
...jaguar logo emblem
3dexport
jaguar emblem logo
3d_export
$50

golf gti emblem
...golf gti emblem
3dexport
golf gti emblem lm
3d_export
$20

iron skull emblem
...iron skull emblem
3dexport
rusty iron skull emblem
3d_export
$5

emblem of the vologda region
...emblem of the vologda region
3dexport
emblem of the vologda region of russia
archive3d
free

Emblem 3D Model
...blem coat of arms blazon
emblem alpha n191011 - 3d model (*.3ds) for interior 3d visualization.
turbosquid
$10

Emblem of Russia
...ty free 3d model emblem of russia for download as max and obj on turbosquid: 3d models for games, architecture, videos. (1302926)
Sword
3d_ocean
$3

sword
...sword
3docean
sword
a high quality sword .
3d_export
$5

sword
...sword
3dexport
a sword made in a blender, a quality sword
3d_export
$35

Sword
...sword
3dexport
sword
3d_export
$10

sword
...sword
3dexport
sword
3d_export
$6

sword
...sword
3dexport
sword
3d_export
$5

sword
...sword
3dexport
sword
3d_export
$5

sword
...sword
3dexport
sword
3d_export
$5

Sword
...sword
3dexport
sword
3d_export
$5

sword
...sword
3dexport
sword
3d_export
$5

sword
...sword
3dexport
sword
Fire
3d_ocean
$6

Fire Hydrant
...fire hydrant
3docean
fire fire hydrant hydrant
basic fire hydrant
3d_export
free

fire
...fire
3dexport
no matter from which side you look at the fire, it will remain the same
archibase_planet
free

Fire extinguisher
...se planet
fire extinguisher fire-extinguisher grenade
fire extinguisher n261211 - 3d model (*.3ds) for interior 3d visualization.
3d_export
$30

fire salamander
...fire salamander
3dexport
fire salamander
3d_export
$5

fire hydrant
...fire hydrant
3dexport
fire hydrant
3d_export
$5

fire shield
...fire shield
3dexport
fire shield
3d_export
$5

the fire axe
...the fire axe
3dexport
the fire axe
archibase_planet
free

Fire Hydrant
...chibase planet
fire hydrant fireplug fire plug
fire hydrant n050515 - 3d model (*.gsm+*.3ds+*.max) for exterior 3d visualization.
3d_export
free

fire
...fire
3dexport
3d_ocean
$19

Fire Extinguisher
...alarm extinguisher fire fire extinguisher fireman flame hose tool
high poly model of fire extinguisher. 2k textures. 3d max. vray