Thingiverse
Filament Sample Card - Customizable SCAD by tkris_sd
by Thingiverse
Last crawled date: 4 years, 8 months ago
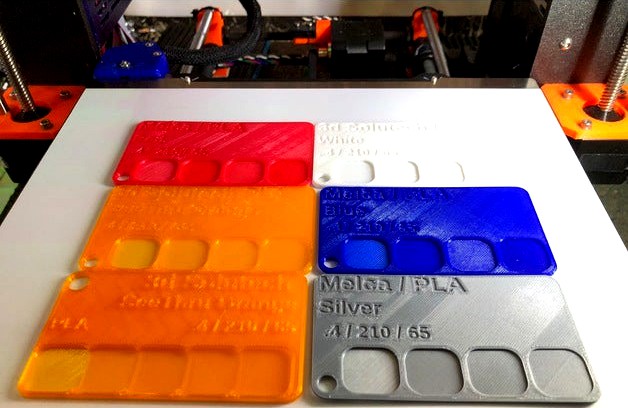
This is a Filament Sample card. There are many like it, this one is mine. I was inspired by many of them, but I wanted something I could easily tweak locally in OpenSCAD to generate a labeled sample of filament.
Code borrowed from https://www.thingiverse.com/thing:2972895 (I was not sure if I should call this a remix, as it is unrelated to the luggage tag, but I did borrow and modify the SCAD code that handles the text and text settings)
Inspiration for the layout comes from https://www.thingiverse.com/thing:2953888 - I really like that one but I did not want to use tinkercad.. I wanted an excuse to play in OpenSCAD more.
I included some sample STLs from the SCAD file just to give an idea what this makes.
It has a setting for either 4, 5, 6, 7 or 8 layer thickness samples.. I started with the 5 layout but I decided I wanted to move the keyring hole to the bottom to make room for longer text up top.. which led to the layout with 4 thicknesses.. a request inspired the modification to include 6,7,8. The code is not pretty =)
Of course you need to adjust your top and bottom layers to get the 8 layer sample to be just 8 layers without infill..
Update Oct 30
Have you printed way too many of these? Check out https://www.thingiverse.com/thing:3184777 by filamentally for a really cool way to store/organize them.
Update July 24
I noticed someone published a version without the keychain hole to use this as a 3d printed, print sample, business card. I've updated the scad code to make this available in customizer, and I've included a sample STL. Reminder that if you do this using customizer don't publish it unless you want the world to have that info =)
Thanks for the suggestion!
UPDATE July 15:
Do you like the layer based color change example in the pictures? Here is an easy way to do it in Slic3r P.E.:
Settings in the model/Customizer (you will need to adjust the layer in Slic3r if you change these)
1st layer .2,
layers .2,
card thickness 1.8,
Text position: outset
OPTIONAL: in Card Text Settings increase "Line # depth" to .6 or .8 (or a multiple of your layer height) to give the letters more height after the color change. The sample pictures are at .8. the SCAD default is .4
Slice the model in slic3r and look at the preview to insure that the letters first appear at Z=2.0.. If not, note down what Z height and use that instead.
In Slic3r, go to printer settings, Custom G-Code, and add the following line to "After layer change G-Code"
{if layer_z == 2.0}M600{endif}
adjust that 2.0 as needed.
This will inject the M600 color change G-Code at the right point of the gcode..
Optional: Save this as a NEW printer settings profile so you do not accidentally end up with a color change gcode at 2.0 in your other prints! I called mine Prusa MK3 DualColorSampleCard so I would be able to remember what the profile is for =)
This will work great with the Original Prusa printers and anyone else that supports the M600 colorchange (Wanhao i3 Plus with ADVi3++ firmware for instance)
UPDATE July 11:
I noticed that if you significantly resized the width of the card with the higher number of thickness samples, my math logic for the thickness sample spacing fell apart. I refactored that part of the code to make it more accurate and much easier to read.. and hey, it works now too! If you downloaded the .scad file already, you might want to grab the updated version.