Thingiverse
Filament Cutter / Snipper End Cut by jurassic73
by Thingiverse
Last crawled date: 4 years, 8 months ago
HIGH TORQUE SERVO + BLADE CAN CUT YOUR FINGER OFF *
DO NOT INSTALL BLADE WHEN TESTING POSITIONING *
INSTALL BLADE DURING FINAL ASSEMBLY *
I built this since I wanted to try building something using a servo controlled by arduino code. Also, I found the end snipping tedious with chasing the ends I cut off if they went flying and angling it right and thought up this cutter. It's worked pretty well for a few months now so sharing this with you all.
Demo and explanation about build (worth your 12 minutes if pondering this build) - https://youtu.be/x-8PTrVAQKs
Bill of materials (roughly $25 for required hardware)
https://www.aliexpress.com/item/10000150053486.html
(9) M3 16mm
4 on body lid
4 on anvil cover
1 for cutting arm to servo arm mount
(4) M3 12mm w/ washer
4 servo mount
(5) M3 10mm
2 on blade holder/cover
2 on switch cover
1 on arduino bracket
(1) M4 x 20mm
1 on cutting arm pivot point
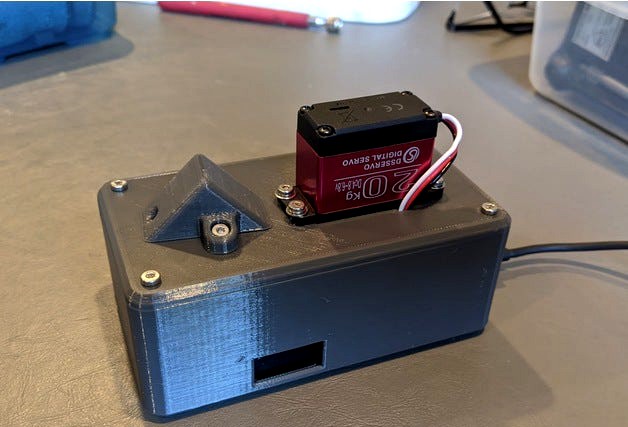
(1) high torque servohttps://www.amazon.com/gp/product/B076CNKQX4/
(2) bearingshttps://www.aliexpress.com/item/1005001386945274.html
623ZZ bearings - 10mm wide x 4mm high x 3mm hole
1 for cutting arm to servo arm pivot
1 to sacrifice for inner race to use as 4mm spacer for cutting arm to servo arm pivot bolt
(1) pro-micro arduinohttps://www.aliexpress.com/item/32821902128.html
(2) ft project wire for wiring limit switch
One bearing will be disassembled and used as a bushing between the servo arm and servo(see pics for install location):
1) use an exacto blade to get under and remove the bearing cover.
2) remove metal bearing spacer 'cage'
3) shift bearings to one side and middle race can be removed. This will serve as your bushing to space the bearing away from the servo arm and allow you to tighten the servo arm to arm bearing securely without any binding.
(1) limit switchhttps://www.ebay.com/itm/5-pc-TEMCo-Micro-Limit-Switch-Lever-Arm-Subminiature-SPDT-Snap-Action-LOT/283228402482
(1) 5v USB 1.5A power adapter (less power and servo may act odd/not function correctly)
All parts printed in PETG as it holds it's shape over time as PLA can deform under pressure.
The main body plate, cutting arm and anvil cover should be printed with (4) perimeters and 30% infill to be solid to support the arm and servo cutting mechanism. Printed at the higher end of my filament temp range to ensure solid layer adhesion.
No supports or brim required. Parts in .stl files are oriented as they should be on the print plate.
Filament cutter servo code:
https://pastebin.com/Zf3W0h7w
I did add a connect and disconnect to the code so the servo is not constantly trying to align/trigger while not in use.
Two seconds after the cut occurs, if filament is still inserted so the switch is depressed, the cut loop will run again until the filament is removed and not depressing the switch
You will create a sketch in Arduino IDE and upload this sketch to your arduino board. There are a number of tutorials out there on how to do this. :)
DO NOT INSTALL BLADE WHEN TESTING POSITIONING *
INSTALL BLADE DURING FINAL ASSEMBLY *
I built this since I wanted to try building something using a servo controlled by arduino code. Also, I found the end snipping tedious with chasing the ends I cut off if they went flying and angling it right and thought up this cutter. It's worked pretty well for a few months now so sharing this with you all.
Demo and explanation about build (worth your 12 minutes if pondering this build) - https://youtu.be/x-8PTrVAQKs
Bill of materials (roughly $25 for required hardware)
https://www.aliexpress.com/item/10000150053486.html
(9) M3 16mm
4 on body lid
4 on anvil cover
1 for cutting arm to servo arm mount
(4) M3 12mm w/ washer
4 servo mount
(5) M3 10mm
2 on blade holder/cover
2 on switch cover
1 on arduino bracket
(1) M4 x 20mm
1 on cutting arm pivot point
(1) high torque servohttps://www.amazon.com/gp/product/B076CNKQX4/
(2) bearingshttps://www.aliexpress.com/item/1005001386945274.html
623ZZ bearings - 10mm wide x 4mm high x 3mm hole
1 for cutting arm to servo arm pivot
1 to sacrifice for inner race to use as 4mm spacer for cutting arm to servo arm pivot bolt
(1) pro-micro arduinohttps://www.aliexpress.com/item/32821902128.html
(2) ft project wire for wiring limit switch
One bearing will be disassembled and used as a bushing between the servo arm and servo(see pics for install location):
1) use an exacto blade to get under and remove the bearing cover.
2) remove metal bearing spacer 'cage'
3) shift bearings to one side and middle race can be removed. This will serve as your bushing to space the bearing away from the servo arm and allow you to tighten the servo arm to arm bearing securely without any binding.
(1) limit switchhttps://www.ebay.com/itm/5-pc-TEMCo-Micro-Limit-Switch-Lever-Arm-Subminiature-SPDT-Snap-Action-LOT/283228402482
(1) 5v USB 1.5A power adapter (less power and servo may act odd/not function correctly)
All parts printed in PETG as it holds it's shape over time as PLA can deform under pressure.
The main body plate, cutting arm and anvil cover should be printed with (4) perimeters and 30% infill to be solid to support the arm and servo cutting mechanism. Printed at the higher end of my filament temp range to ensure solid layer adhesion.
No supports or brim required. Parts in .stl files are oriented as they should be on the print plate.
Filament cutter servo code:
https://pastebin.com/Zf3W0h7w
I did add a connect and disconnect to the code so the servo is not constantly trying to align/trigger while not in use.
Two seconds after the cut occurs, if filament is still inserted so the switch is depressed, the cut loop will run again until the filament is removed and not depressing the switch
You will create a sketch in Arduino IDE and upload this sketch to your arduino board. There are a number of tutorials out there on how to do this. :)