Thingiverse
Fiesta ST Pedal Spacer by makerust
by Thingiverse
Last crawled date: 3 years ago
EDIT 2: Hardware listed has only been tested by me for the 1.5" model. Any other model might require some fiddling, but since the stud size is given that should be no problem.
EDIT: I have added various heights of the pedal spacer, as several users have asked for shorter spacers. The file Pedal_Spacer3.STL is the original, 1.5 inch thick spacer (The "3" is in the name because it is the 3rd revision), and the rest of the sizes have more descriptive names following "Pedal_Spacer". The new sizes are 1.25", 1", 0.75", 0.5". Enjoy.
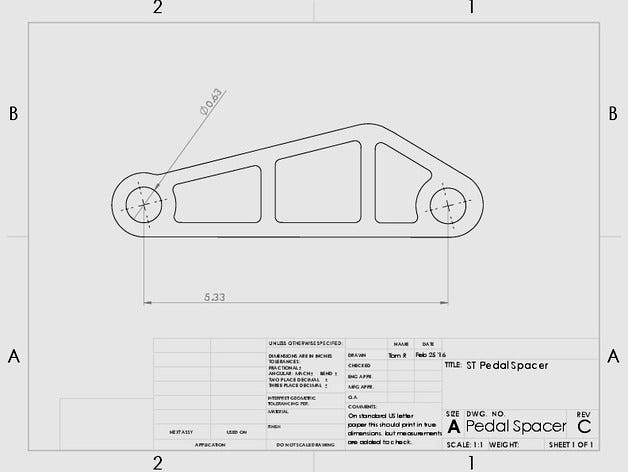
This part is a spacer for the accelerator pedal of a Ford Fiesta ST. As stock, the pedal sits about an inch and a half recessed from the brake and clutch pedal's plane, and this part, along with other hardware, brings the accelerator into the same plane. The advantage to this is less time spent switching between gas and brake, making cornering smother, it also seems to make the driver's seating more comfortable, but that's subjective.
I created this project as a cheaper alternative to available kits, and tried to make it as comprehensive as possible.
To install this you will need the following:
Tools:
Metric socket set, including 12mm and 13mm sockets and extension
Flat head screwdriver (optional)
Hardware:
M8 by 1-1/4 inch coupling nut
McMaster PN 90009A222
True Value PN 44768-B
M8 by 16mm bolt: I used a flange bolt if you do not, you may also want washers.
McMaster PN 95735A416
True Value PN 43338-B
You may also want a thread locker such a loctite or a spacer, I will explain below.
IMPORTANT: Wear gloves for install. Ford didn't grind the brake pedal arm, so I cut my thumbs to ribbons during the install. Don't be like me, have intact thumbs!
Installation Steps:
1: Remove the two OEM nuts from accelerator pedal. The lower nut is easily visible and is on the left of the pedal. The upper nut is on the right and is harder to reach. There is a third nut that appears to hold the plate to the firewall and is much easier to see than the upper pedal nut. Do not be fooled! Get under there and take a good look. I think the OEM nuts use some sort of mechanical thread locking, so they take a little more torque to get off than you might expect. Use the 13mm socket and extension for this step.
2: With the nuts off, slide the pedal away from the firewall off of the threaded studs. The pedal will still be connected by its wires, but you should have enough room for the install. If not, the side of the connector facing away from the firewall has a clip, depress the clip with your thumb and wiggle the connector off of the pedal. I had to use a flat head screwdriver here to shim the gap between the male and female part of the connector to get them apart. They are SNUG.
3: Screw the coupling nuts on to the studs. Here would be where you would use the spacers and thread locker if you have them. I may do this in the future, and then I will provide a spacer part number as well. Test fit the spacer with the coupling washers; the washers should be just a bit recessed of their holes.
4: Put the spacer on over the coupling nuts. The end where the hole is closer to the bend goes up.
5: Put the pedal over the spacer and use the M8 bolts to affix the pedal to the spacer and coupling nuts. Reattach the plug if you detached it.
Now you will likely need to readjust your seating, I did.
At this time I know the part fits a Fiesta ST and am working toward confirmation of it fitting a Focus ST. I provided drawings if you would like to take it upon yourself to confirm: just print it out on paper, make sure the dimensions are accurate, and please let me know whether or not it fits!
Thanks
EDIT:
Special thanks to Reddit's u/poco153 for providing the True Value part numbers. Check Poco's build out.
EDIT: I have added various heights of the pedal spacer, as several users have asked for shorter spacers. The file Pedal_Spacer3.STL is the original, 1.5 inch thick spacer (The "3" is in the name because it is the 3rd revision), and the rest of the sizes have more descriptive names following "Pedal_Spacer". The new sizes are 1.25", 1", 0.75", 0.5". Enjoy.
This part is a spacer for the accelerator pedal of a Ford Fiesta ST. As stock, the pedal sits about an inch and a half recessed from the brake and clutch pedal's plane, and this part, along with other hardware, brings the accelerator into the same plane. The advantage to this is less time spent switching between gas and brake, making cornering smother, it also seems to make the driver's seating more comfortable, but that's subjective.
I created this project as a cheaper alternative to available kits, and tried to make it as comprehensive as possible.
To install this you will need the following:
Tools:
Metric socket set, including 12mm and 13mm sockets and extension
Flat head screwdriver (optional)
Hardware:
M8 by 1-1/4 inch coupling nut
McMaster PN 90009A222
True Value PN 44768-B
M8 by 16mm bolt: I used a flange bolt if you do not, you may also want washers.
McMaster PN 95735A416
True Value PN 43338-B
You may also want a thread locker such a loctite or a spacer, I will explain below.
IMPORTANT: Wear gloves for install. Ford didn't grind the brake pedal arm, so I cut my thumbs to ribbons during the install. Don't be like me, have intact thumbs!
Installation Steps:
1: Remove the two OEM nuts from accelerator pedal. The lower nut is easily visible and is on the left of the pedal. The upper nut is on the right and is harder to reach. There is a third nut that appears to hold the plate to the firewall and is much easier to see than the upper pedal nut. Do not be fooled! Get under there and take a good look. I think the OEM nuts use some sort of mechanical thread locking, so they take a little more torque to get off than you might expect. Use the 13mm socket and extension for this step.
2: With the nuts off, slide the pedal away from the firewall off of the threaded studs. The pedal will still be connected by its wires, but you should have enough room for the install. If not, the side of the connector facing away from the firewall has a clip, depress the clip with your thumb and wiggle the connector off of the pedal. I had to use a flat head screwdriver here to shim the gap between the male and female part of the connector to get them apart. They are SNUG.
3: Screw the coupling nuts on to the studs. Here would be where you would use the spacers and thread locker if you have them. I may do this in the future, and then I will provide a spacer part number as well. Test fit the spacer with the coupling washers; the washers should be just a bit recessed of their holes.
4: Put the spacer on over the coupling nuts. The end where the hole is closer to the bend goes up.
5: Put the pedal over the spacer and use the M8 bolts to affix the pedal to the spacer and coupling nuts. Reattach the plug if you detached it.
Now you will likely need to readjust your seating, I did.
At this time I know the part fits a Fiesta ST and am working toward confirmation of it fitting a Focus ST. I provided drawings if you would like to take it upon yourself to confirm: just print it out on paper, make sure the dimensions are accurate, and please let me know whether or not it fits!
Thanks
EDIT:
Special thanks to Reddit's u/poco153 for providing the True Value part numbers. Check Poco's build out.
Similar models
thingiverse
free

CadetPedals Pedal shaft upgrade by Alekoy1
...ngle of the pedal.
-install a jam-nut on the end.
now you can install the pedal and gear as described in the original build guide
thingiverse
free

M8 bolts, nuts, threaded rods, standoffs, spacers and washer by Hersheljr
... standoffs in case i need them later.
i printed them with 0.2 layer height, they aren't loose or tight and works quite well.
thingiverse
free

Ender-5+ X & Y-Axis belt tensioner by RedWhere2020
...t used as thumb nut)
1x m4 flat washers
4x m2x10mm self tapping hex socket screws
plus of course the printed parts.
works for me.
grabcad
free

Dual Input pedal
...this is just an idea and i have not tested it in practice. i would appreciate any feedback or suggestions on how to make it work.
thingiverse
free

Graber i3 (6mm thick frame) spool holder (another one!) by MightyLAD
...lad
thingiverse
you'll also need:
m8 threaded rod (about 700mm long)
m8 nuts (8 off)
m8 washers (6 off)
608 bearings (4 off)
thingiverse
free

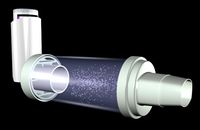
Fanatec Clubsport v3 Pedal Clutch delete and brake reposition spacers by fholgado
...ne down just a hair so that the spacers would not bind the pedals when moved.
re-assemble the base and plug wires back in.
enjoy!
thingiverse
free

My Z-nuts holder by Sjekkie
...i3 parts.
for the m5 threaded rods i have 3x m5 nuts in the holder.
for the m8 1x
for the coupling you need 4x m3x10mm and 4 nuts
thingiverse
free

CNC hold-down clamp by mdesavi
...sert instead of the plastic thread to improve durability.
other necessary parts:
m8 threaded steel bar
m8 washer
t-track nut/bolt
thingiverse
free

Bathtub Installation Spacers by COREi64
...they're pretty simple objects, but maybe it'll save someone else having to design it if they're doing a bath install.
grabcad
free

M8 Bolt with washer and Nyloc Nut
...m8 bolt with washer and nyloc nut
grabcad
m8 bolt with washer and nyloc nut
36mm full thread
stainless

Fiesta
turbosquid
$258

Fiesta Andina
...ty free 3d model fiesta andina for download as , fbx, and obj on turbosquid: 3d models for games, architecture, videos. (1554201)
cg_studio
$29

Fiesta Ferrero3d model
...fiesta ferrero3d model
cgstudio
.max - fiesta ferrero 3d model, royalty free license available, instant download after purchase.
3ddd
free

Гамак Besta Fiesta
...гамак besta fiesta
3ddd
гамак
гамак besta fiesta с подушками.
в архиве файлы для 2013/2015/2016 версий + fbx.
3d_export
$5

Ford Fiesta 2008 3D Model
...ford fiesta 2008 3d model
3dexport
ford fiesta
ford fiesta 2008 3d model xx3d 50730 3dexport
cg_studio
$79

Ford Fiesta 20043d model
...sta 2004 2005 focus rally
.3ds .lwo - ford fiesta 2004 3d model, royalty free license available, instant download after purchase.
turbosquid
$10

Fiesta Dining Chair
... available on turbo squid, the world's leading provider of digital 3d models for visualization, films, television, and games.
turbosquid
$7

Rug Stripe Fiesta
... available on turbo squid, the world's leading provider of digital 3d models for visualization, films, television, and games.
3d_export
$29

Fiesta Ferrero 3D Model
...kfast cream orange milk sponge cake chocolate choco food eat people kid child meal
fiesta ferrero 3d model fabelar 24439 3dexport
3d_export
$29

Ford Fiesta Mark3 3D Model
...a mark3 3d model
3dexport
ford fiesta mk3 mark3 1991 1995 compact coupe car auto
ford fiesta mark3 3d model mtumer 29442 3dexport
cg_studio
$29

Ford Fiesta Mark33d model
...iesta mark33d model
cgstudio
.max - ford fiesta mark3 3d model, royalty free license available, instant download after purchase.
Pedal
3d_export
$29

bike pedal
...bike pedal
3dexport
bike pedal lowpoly 3d model. multiple import formats thank you for reading
archive3d
free
Pedal 3D Model
...3d model
archive3d
pedal
pedal n240709 - 3d model (*.gsm+*.3ds) for interior 3d visualization.
archive3d
free
Pedal 3D Model
... 3d model
archive3d
pedal
pedal n121109 - 3d model (*.gsm+*.3ds) for interior 3d visualization.
3d_ocean
$7

Kids pedal car
...kids pedal car
3docean
car kids pedal red toy yellow
kids yellow and red pedal car
archive3d
free
Pedal 3D Model
... 3d model
archive3d
drum pedal
ft pedal - 3d model (*.gsm+*.3ds) for interior 3d visualization.
archive3d
free
Pedal 3D Model
...3d model
archive3d
drum kit pedal
pedal - 3d model (*.gsm+*.3ds) for interior 3d visualization.
turbosquid
$29

guitar pedal
...squid
royalty free 3d model guitar pedal for download as c4d on turbosquid: 3d models for games, architecture, videos. (1659748)
turbosquid
$4

Guitar Pedal
...squid
royalty free 3d model guitar pedal for download as max on turbosquid: 3d models for games, architecture, videos. (1363201)
3d_export
$5

brake pedal
...ort
brake pedal with 6:1 paddle ratio. available in step, iges and sldprt formats. can be converted to other formats on request.
turbosquid
$29

guitar pedal
... free 3d model guitar pedal for download as 3ds, obj, and c4d on turbosquid: 3d models for games, architecture, videos. (1442278)
Spacer
turbosquid
$55
Spacer
... available on turbo squid, the world's leading provider of digital 3d models for visualization, films, television, and games.
turbosquid
$60
grendizer & double spacer
... available on turbo squid, the world's leading provider of digital 3d models for visualization, films, television, and games.
3d_export
$5
Hex Spacers M3 Male-Female
... spacers m3 male-female
3dexport
hex spacers m3 male-female with length from 5mm to 60mm for printed circuit boards. step files.
3d_export
$5
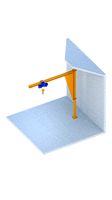
industrial lift - spacer crane
...crane<br>- 500 kg<br>- render 3ds max 2020 and corona renderer.<br>- formats: max 2020, max 2017, obj, fbx, stp
3d_export
$5

spacer hanging light
...lampshades: any total number of lamps: 6 polys: 18 546 verts: 19 045 https://imperiumloft.ru/lyustry-175/ev_a048924-eurosvet.html
turbosquid
$5
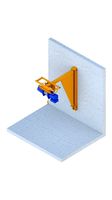
Industrial lift Spacer crane Renaissance construction
...naissance construction for download as max, max, fbx, and obj on turbosquid: 3d models for games, architecture, videos. (1571898)
3d_export
$7

industrial lift - spacer crane renaissance construction
...ction<br>- 750 kg<br>- render 3ds max 2020 and corona renderer.<br>- formats: max 2020, max 2017, obj, fbx, stp
3d_export
$10

Spacer Sliding Wardrobe 1200 Hanger
...painter available for all software<br>ue4. ue5. blender. maya. 3d max. unity. c4d.<br>formats: .obj .gltf .fbx .blend
3d_export
$5

Hockey puck 3D Model
...hockey puck 3d model 3dexport hockey puck spacer washer disk shim hockey puck 3d model gizmo_fbi 28754...
3d_export
$5

Front 30mm Lift Kit for 1996-2004 Nissan Pathfinder and 1997-2003 Infiniti QX4
...terrano r50, regulus 1997-2003 infiniti qx4 - front strut spacer ...
St
3ddd
$1

ST Luce
...st luce
3ddd
st luce
люстра потолочная светодиодная st luce sl869.502.04
люстра потолочная светодиодная st luce sl869.502.06
turbosquid
free

AT-ST
...at-st
turbosquid
free 3d model at-st for download as blend on turbosquid: 3d models for games, architecture, videos. (1286732)
3ddd
$1

ST TROPEZ chair
...st tropez chair
3ddd
st tropez
st tropez chair
3ddd
$1

ST LUCE SL531.613.15
...st luce sl531.613.15
3ddd
st luce
st luce sl531.613.15
3ddd
$1

ST Luce SL217.503.03
...st luce sl217.503.03
3ddd
st luce
люстра подвесная st luce, sl217.503.03
3ddd
$1

st luce
...st luce
3ddd
st luce
http://www.stluce.ru/catalog/3645/23861/
3ddd
$1

ST Luce SL878
...st luce sl878
3ddd
st luce
потолочная люстра st luce серия sl878
3ddd
$1

St Luce
...st luce
3ddd
st luce , laubello
http://www.stluce.ru/catalog/3645/23945/
3ddd
$1

St Luce
...st luce
3ddd
st luce , laubello
http://www.stluce.ru/catalog/3645/23969/
3ddd
$1

St Luce
...st luce
3ddd
st luce , voltri
http://www.stluce.ru/catalog/3645/23874/