Thingiverse

FDM Printer de Kleine Reus 300x300x900 by JobSmolders
by Thingiverse
Last crawled date: 3 years, 1 month ago
Translation of “de Kleine Reus” is Little Giant :-)
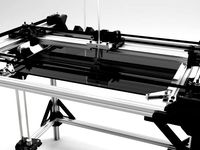
The creation of this printer began with dismantling of Big DIY Printer 2. It was fun to experiment whit this very big printer, but it was time to change it again. I never printed outside the heat bed (300x300mm) although this printer could do much larger than that. Also it took a lot of space and it was not portable at all. So a new printer design came into my mind. This printer has everything Big DIY printer 2 had but even higher in the Z axis. The X and Y axis are made much shorter this time because I didn’t exceed the dimensions of the Heat Bed anyway. This new printer is portable and takes much less space than Big DIY 3D Printer2.
The aluminum profiles I used are 30mmx33, 5mm, but other material whit other dimensions will also work. For instance 30mmx 40mm can also work due the design of clamping the profiles into place with a wedge construction. See the black ABS wedge on the picture. The brackets that hold the Z motors and rods fit on something that is 33,5mm.
The aluminum parts are screwed to the corner parts using M4x10mm bolts that go into little brackets that hold the nuts. These brackets (alu prof under m4 nut bracket.stl & alu prof under m4 nut bracket2.stl) fit into the slots of the aluminum parts.
The parts that connect the aluminum lengths of the frame are printed with 6 wall counts and 6 bottom and top layers. The Infill must be at least 35%. Otherwise it is not strong enough. One corner did break, but I was able to glue it. The material I used is PET-G
There are 2 different X cars: one is bigger and is made for 4 (LM10UU) linear bearings. The other is made for 2 (LM10LUU) linear bearings and is a bit shorter. In the pictures I have the lager one because this one came of the old Big DIY 3D printer2 and I didn’t want to print it again.
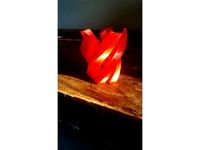
The diagonal aluminum profiles I used are actually too short. So do not follow this example. Of course it would be better to have these a bit longer so they will reach corner to corner. This will give the printer frame more stability. A cross would be even better. But for now these short ones work for me. This printer has run for more than 100 hours now. For example: the red Vase alone took one day :-). Later I also connected the frame with dampeners to the wall to take out even more vibrations.
The Heat Bed is just a glass plate (300x300mm) with a Kapton tape sticker that holds copper lanes as a heater. The glass plate is hold onto aluminum strips whit clips. The aluminum strips are mounted with bolts and springs onto other aluminum corner profiles. This Heat Bed has a dedicated 360W power supply. So I let this one be regulated by its own external FET. I have included a simple schematic with the pictures also. Yes I like to use an Opto-Coupler always, but it is not necessary.
Then I like to address the issue of having 2 motors on the Y and Z axis. The Ramps 1.4 board I used does not support more than one driver per axis. You may get away with wiring the motors in parallel on each driver, but I didn’t test that. Instead I just wires 2 drivers parallel per axis. I included a simple schematic on how to do this. It’s important to set the motor current the same on each parallel wired driver.
The spindles on the axis are M8. The standard spindles (included with nut) you can buy everywhere. I just used M8 treated rod and a M8 nut. To install the M8 nut the “m8 nut converter part.stl” can be used.
The extruder I used is a geared one, but a direct drive can also be used. For more info about the extruders see: https://www.thingiverse.com/thing:2784400 or the direct drive one: https://www.thingiverse.com/thing:2749974. I did include the STL’s for both.
The controller is a Ramps 1.4 hacked with DRV8825(X & Y axis) & A4988 (extruder & Z axis) drivers and an Arduino Mega. I have included the marlin firmware that I used. But beware, the steps/mm are for this printer, so they may be different for yours. It will work only if you have:
• Geared extruder 43 teeth to 10 teeth with an M8 extruder driver and 16 micro steps
• Z axis using treated M8 (metric) rod and 16 micro steps
• X & Y axis using a pulley with an diameter of 12mm and 32 micro steps
For information about configuring Marlin you can consult: http://marlinfw.org/docs/configuration/configuration.html
In the photos you can see the Power Supply’s and my DIY mains net filter mounted on an aluminum strip. If you do this be sure to isolate the Net filter and Power Supply’s from the rest of the frame and the metal case where the controller is housed. Otherwise the Atmel chip will do some very strange things due to EMF frequencies that are being dumped to the ground. Also it is very important to connect the net filter and power supplies to earth. Otherwise the EMF frequencies cannot escape and the Atmel chip will be influents in time, making long prints impossible. For the schematic please see the picture. Note that the capacitors need to be of an X2 and Y2 class so that if they die they are guaranteed not to short. C1 & C2 need to be of class X2. C3 & C4 need to be of class Y2. Also this filter needs to be in a metal case (see picture)
The Red fan ducts on the side of the nozzle are not my own design (RoPa here on Thingiverse: http://www.thingiverse.com/thing:1264477 ).
The Case for the Full Graphic Smart LCD Controller is a design by Wersy ( http://www.thingiverse.com/thing:87250 )
The parts I used for the X and Y axis:
• T2 timing belt 3 Meter in total
• 3 T2 pulleys diameter 12mm (but others diameters will work but steps/mm will change)
• 4X SCS10UU linear bearing Y axis
• 6X F624ZZ bearing for the tensioner side
• 6X 623ZZ bearing for the X car to guide the timing belt
• 4X LM10UU linear bearing or 2X LM10LUU linear bearing for the X car
• 2X 10mm x 500mm rod for the X axis
• 2X 10mm x 588mm rod for the Y axis
• 4X aluminum extruded profile 30mm x 33,5mm x 421mm (33,5 mm can also be 30mm – 35mm)
• 4X aluminum extruded profile 30mm x 33,5mm x 515mm (33,5 mm can also be 30mm – 35mm)
• 16X M5x40mm for the Y axis bearings
• 3X Nema17 stepper
• 8X M3x20mm and nuts
• 3X M4x40mm bolt
• 4X M4x20mm bolt
• 16X M4x10mm bolt & washers
• 15X M4 nut
• 30X M3x10mm bolt
• 4X M3x20mm bolt
• 2X M3x40mm bolt
• 27X M3 nut
Note: the bolts and nut may be different depending how you assemble your printer
The parts I used for the Z axis:
• 2X M8 spindle and nut or M8 treated rod and nut 1000mm long
• 2X M10x1000mm rod
• 2X LM10LUU linear bearing
• 2X Nema17 stepper
• 2X 608ZZ bearing
• 1X Aluminum extruded profile 30mm x 33,5mm x 420mm (33,5 mm can also be 30mm – 35mm)
• Heat Bed
• 16X M3x10mm bolt and nut
• 22X M4x10mm bolt & washers
• 4 springs for the heat bed
• 4Mx40mm bolts for heat bed
Note: the bolts and nut may be different depending how you assemble your printer
Parts for the frame:
• 8X M6x40mm
• 8X M6x80mm for the wedge
• 1X M8x130mm for filament holder
• 4X M8 nut for the filament holder
• 2X 608ZZ bearing
For the parts of the Extruder see: https://www.thingiverse.com/thing:2784400 or the direct drive one: https://www.thingiverse.com/thing:2749974.
Parts of the controller:
• 1X Arduino Mega
• 1X Ramps 1.4
• 6X stepper driver (A4988, DRV8825 etc)
• 2X 360W /12V Power Supply
• 3X End Switch
• 1X Hot End with heater and NTC
• 1X Heat Bed 300 x 300mm and NTC
• wires to wire everything
• Teflon tube +/- 600mm
• Mains Net Filter (optional)
• Mains breaker 4A
For more info about the Ramps board you can consult: http://reprap.org/wiki/RAMPS_1.4
If you have any questions feel free to ask :-)
If you think I forgot something or I made a mistake (it’s possible I’m only human :-) ),feel free to comment
The creation of this printer began with dismantling of Big DIY Printer 2. It was fun to experiment whit this very big printer, but it was time to change it again. I never printed outside the heat bed (300x300mm) although this printer could do much larger than that. Also it took a lot of space and it was not portable at all. So a new printer design came into my mind. This printer has everything Big DIY printer 2 had but even higher in the Z axis. The X and Y axis are made much shorter this time because I didn’t exceed the dimensions of the Heat Bed anyway. This new printer is portable and takes much less space than Big DIY 3D Printer2.
The aluminum profiles I used are 30mmx33, 5mm, but other material whit other dimensions will also work. For instance 30mmx 40mm can also work due the design of clamping the profiles into place with a wedge construction. See the black ABS wedge on the picture. The brackets that hold the Z motors and rods fit on something that is 33,5mm.
The aluminum parts are screwed to the corner parts using M4x10mm bolts that go into little brackets that hold the nuts. These brackets (alu prof under m4 nut bracket.stl & alu prof under m4 nut bracket2.stl) fit into the slots of the aluminum parts.
The parts that connect the aluminum lengths of the frame are printed with 6 wall counts and 6 bottom and top layers. The Infill must be at least 35%. Otherwise it is not strong enough. One corner did break, but I was able to glue it. The material I used is PET-G
There are 2 different X cars: one is bigger and is made for 4 (LM10UU) linear bearings. The other is made for 2 (LM10LUU) linear bearings and is a bit shorter. In the pictures I have the lager one because this one came of the old Big DIY 3D printer2 and I didn’t want to print it again.
The diagonal aluminum profiles I used are actually too short. So do not follow this example. Of course it would be better to have these a bit longer so they will reach corner to corner. This will give the printer frame more stability. A cross would be even better. But for now these short ones work for me. This printer has run for more than 100 hours now. For example: the red Vase alone took one day :-). Later I also connected the frame with dampeners to the wall to take out even more vibrations.
The Heat Bed is just a glass plate (300x300mm) with a Kapton tape sticker that holds copper lanes as a heater. The glass plate is hold onto aluminum strips whit clips. The aluminum strips are mounted with bolts and springs onto other aluminum corner profiles. This Heat Bed has a dedicated 360W power supply. So I let this one be regulated by its own external FET. I have included a simple schematic with the pictures also. Yes I like to use an Opto-Coupler always, but it is not necessary.
Then I like to address the issue of having 2 motors on the Y and Z axis. The Ramps 1.4 board I used does not support more than one driver per axis. You may get away with wiring the motors in parallel on each driver, but I didn’t test that. Instead I just wires 2 drivers parallel per axis. I included a simple schematic on how to do this. It’s important to set the motor current the same on each parallel wired driver.
The spindles on the axis are M8. The standard spindles (included with nut) you can buy everywhere. I just used M8 treated rod and a M8 nut. To install the M8 nut the “m8 nut converter part.stl” can be used.
The extruder I used is a geared one, but a direct drive can also be used. For more info about the extruders see: https://www.thingiverse.com/thing:2784400 or the direct drive one: https://www.thingiverse.com/thing:2749974. I did include the STL’s for both.
The controller is a Ramps 1.4 hacked with DRV8825(X & Y axis) & A4988 (extruder & Z axis) drivers and an Arduino Mega. I have included the marlin firmware that I used. But beware, the steps/mm are for this printer, so they may be different for yours. It will work only if you have:
• Geared extruder 43 teeth to 10 teeth with an M8 extruder driver and 16 micro steps
• Z axis using treated M8 (metric) rod and 16 micro steps
• X & Y axis using a pulley with an diameter of 12mm and 32 micro steps
For information about configuring Marlin you can consult: http://marlinfw.org/docs/configuration/configuration.html
In the photos you can see the Power Supply’s and my DIY mains net filter mounted on an aluminum strip. If you do this be sure to isolate the Net filter and Power Supply’s from the rest of the frame and the metal case where the controller is housed. Otherwise the Atmel chip will do some very strange things due to EMF frequencies that are being dumped to the ground. Also it is very important to connect the net filter and power supplies to earth. Otherwise the EMF frequencies cannot escape and the Atmel chip will be influents in time, making long prints impossible. For the schematic please see the picture. Note that the capacitors need to be of an X2 and Y2 class so that if they die they are guaranteed not to short. C1 & C2 need to be of class X2. C3 & C4 need to be of class Y2. Also this filter needs to be in a metal case (see picture)
The Red fan ducts on the side of the nozzle are not my own design (RoPa here on Thingiverse: http://www.thingiverse.com/thing:1264477 ).
The Case for the Full Graphic Smart LCD Controller is a design by Wersy ( http://www.thingiverse.com/thing:87250 )
The parts I used for the X and Y axis:
• T2 timing belt 3 Meter in total
• 3 T2 pulleys diameter 12mm (but others diameters will work but steps/mm will change)
• 4X SCS10UU linear bearing Y axis
• 6X F624ZZ bearing for the tensioner side
• 6X 623ZZ bearing for the X car to guide the timing belt
• 4X LM10UU linear bearing or 2X LM10LUU linear bearing for the X car
• 2X 10mm x 500mm rod for the X axis
• 2X 10mm x 588mm rod for the Y axis
• 4X aluminum extruded profile 30mm x 33,5mm x 421mm (33,5 mm can also be 30mm – 35mm)
• 4X aluminum extruded profile 30mm x 33,5mm x 515mm (33,5 mm can also be 30mm – 35mm)
• 16X M5x40mm for the Y axis bearings
• 3X Nema17 stepper
• 8X M3x20mm and nuts
• 3X M4x40mm bolt
• 4X M4x20mm bolt
• 16X M4x10mm bolt & washers
• 15X M4 nut
• 30X M3x10mm bolt
• 4X M3x20mm bolt
• 2X M3x40mm bolt
• 27X M3 nut
Note: the bolts and nut may be different depending how you assemble your printer
The parts I used for the Z axis:
• 2X M8 spindle and nut or M8 treated rod and nut 1000mm long
• 2X M10x1000mm rod
• 2X LM10LUU linear bearing
• 2X Nema17 stepper
• 2X 608ZZ bearing
• 1X Aluminum extruded profile 30mm x 33,5mm x 420mm (33,5 mm can also be 30mm – 35mm)
• Heat Bed
• 16X M3x10mm bolt and nut
• 22X M4x10mm bolt & washers
• 4 springs for the heat bed
• 4Mx40mm bolts for heat bed
Note: the bolts and nut may be different depending how you assemble your printer
Parts for the frame:
• 8X M6x40mm
• 8X M6x80mm for the wedge
• 1X M8x130mm for filament holder
• 4X M8 nut for the filament holder
• 2X 608ZZ bearing
For the parts of the Extruder see: https://www.thingiverse.com/thing:2784400 or the direct drive one: https://www.thingiverse.com/thing:2749974.
Parts of the controller:
• 1X Arduino Mega
• 1X Ramps 1.4
• 6X stepper driver (A4988, DRV8825 etc)
• 2X 360W /12V Power Supply
• 3X End Switch
• 1X Hot End with heater and NTC
• 1X Heat Bed 300 x 300mm and NTC
• wires to wire everything
• Teflon tube +/- 600mm
• Mains Net Filter (optional)
• Mains breaker 4A
For more info about the Ramps board you can consult: http://reprap.org/wiki/RAMPS_1.4
If you have any questions feel free to ask :-)
If you think I forgot something or I made a mistake (it’s possible I’m only human :-) ),feel free to comment
Similar models
thingiverse
free

XY_Plotter by modelatolyesi
...
1x ball-pen spring.
electronics:
arduino uno
cnc shield.
2x a4988 stepper driver.
9g. servo.
4x micro switch.
extension cables.
thingiverse
free

Geared Extruder using M8 extruder driver by JobSmolders
...r little gear)
9x m3 washer
11x m3 nut
if you have any questions or you think i forgot something, feel free to ask or comment :-)
thingiverse
free

Ender 3 filament holder
... bolt
2x m8 nuts and washers
4x m3x10mm bolts
4x hammer nuts (i 3d printed them for use with a m3 nut)
2x 608z bearings (8x22x7)
thingiverse
free

CR-10 Y-axis Linear Rail Mod by junaling
... print with abs or petg, especially if using an enclosure
instructions:
do not overtighten bolts, printed parts will easily crack
thingiverse
free
VEE CORE XY by maxdesign1990
...h - 300mm 2x
linear shaft
12mm dia shaft length - 400mm 2x
linear bearing
linear bearing 12mm lm12uu 4x
thingiverse
free

CNC laser cutter by TheMadScientist
... x 1000mm x 5mm plywood
2x 4mm to 8mm couplers
6x 8mm bearings
4x 8mm tee nuts
wood glue
patience
one day, i will make this....
thingiverse
free

Ekobots - Box-H 3D Printer. by jsirgado
...gs like this.
buy my designs at pinshape:http://pinshape.com/users/27920-jsirgado
the openscad file is there, you can change all.
thingiverse
free

Z-axis Linear rods by Propasilo
...earings with the m4 bolts, it's recommended that you first tap the holes, but it´s possible to just screw the bults in place.
grabcad
free

3D Printer Y Axis 1m
...2 x lm12uu linear bearings
4 x 608-rs5 m8 bearings
2 x m12 stainless steel rods 1000mm
1 x m8 stainless steel threaded rod 1000mm
thingiverse
free

Linear carriage nema 17 by nikki81
...8mm washers
6x 8mm nuts
1x 608zz bearing
4x lm8uu bearings
1x kw11-3z microswitch
8x 100mm cable ties
4x m3 5mm bolts
4x m3 nuts
Reus
3d_sky
free

Reus
...reus
3dsky
dinner table
table classic round shape reus
sketchfab
$15

3d scan Facade Reus
... (tarragona). reduced mesh but maintaining 8k texture maps. - 3d scan facade reus - buy royalty free 3d model by fovea (@3dfovea)
thingiverse
free

Klein Reus (Orania Mascot) by Zdrotski
...his model / mascot in the culture section.
a silhouette and a solid version is available to print.
have fun and happy printing!
thingiverse
free

Ubiquiti Unifi UAP AC PRO POE by reu
...ubiquiti unifi uap ac pro poe by reu
thingiverse
the support for the poe of ubiquiti unifi uap ac pro model (48v)
thingiverse
free

My printer test's by infomario
...i created. fell free to share ;) infomario reus. https://www.facebook.com/reparacion.de.ordenadores.reus ...
thingiverse
free

My printer test's by infomario
...mm so you have 2 layers :d infomario reus. https://www.facebook.com/reparacion.de.ordenadores.reus ...
grabcad
free

Pany companyia d'aigües de Reus
...pany companyia d'aigües de reus
grabcad
model popular homologat per aremsa
3dwarehouse
free

Pis Reus
...pis reus
3dwarehouse
pis a reus
3dwarehouse
free

REU
...reu
3dwarehouse
casita
Jobsmolders
thingiverse
free
Swirl lamp by JobSmolders
...swirl lamp by jobsmolders
thingiverse
another lampshade :-)
thingiverse
free
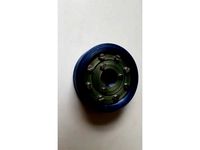
Bearing by JobSmolders
...bearing by jobsmolders
thingiverse
bearing printed in pet-g
needed also : 8x m4x20mm & 3x m3x20mm
thingiverse
free

Pot Head by JobSmolders
...pot head by jobsmolders
thingiverse
the photos speak for them selves :-)
printed in purple abs, res 0.2mm
thingiverse
free

MOCKUP SG90 Servo by JobSmolders
...mockup sg90 servo by jobsmolders
thingiverse
for designers. 123d file included
thingiverse
free

Logo Lamp by JobSmolders
...logo lamp by jobsmolders
thingiverse
printed using “spiralize outer contour mode” in orange translucent pet-g :-)
thingiverse
free

Nr. 9 by JobSmolders
...lders
thingiverse
this is just a little experiment with the “spiralize contour mode” in cura
printed in pet-g transparent smokey
thingiverse
free
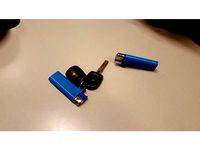
Lighter Holder Round by JobSmolders
...lighter holder round by jobsmolders
thingiverse
a way to connect a lighter to a key chain or hook
thingiverse
free
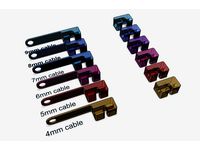
Cable Holder by JobSmolders
...newer and improved version on my own website, go to https://www.designuitinspiratie.nl/3d-printer/kabel-houder/
cable holders :-)
thingiverse
free

Mockup stepper 28BYJ-48 by JobSmolders
...mockup stepper 28byj-48 by jobsmolders
thingiverse
for designers. 123d file included :-)
thingiverse
free
MOCKUP Snail house fan by JobSmolders
...mockup snail house fan by jobsmolders
thingiverse
for designers + 123 3d autodesk file
Kleine
3ddd
$1

Bench by Conor Klein
...bench by conor klein
3ddd
скамья
bench by conor klein
3ddd
$1

Calvin Klein rugs
...in klein. в архиве 88 текстур.(1200х1800, 800х1080px)
collection rugs calvin klein. archived 88 textures.
(1200х1800, 800х1080px)
3d_export
$12

klein bottle
...h their transparent glass materials the objects were made with cinema 4d, but i provide the scene in its obj, stl and fbx version
turbosquid
free

Klein Bottle
... available on turbo squid, the world's leading provider of digital 3d models for visualization, films, television, and games.
3d_export
$15

Klein Bottle 3D Model
...klein bottle 3d model
3dexport
bottle klein
klein bottle 3d model shaputer 7645 3dexport
turbosquid
$45

Panzerfaust 30 Klein
... model panzerfaust 30 klein for download as 3ds, max, and obj on turbosquid: 3d models for games, architecture, videos. (1301077)
turbosquid
$1

Cubic Klein Bottle
... available on turbo squid, the world's leading provider of digital 3d models for visualization, films, television, and games.
3d_export
$45

Panzerfuast 30 Klein 3D Model
... klein rocket launcher rpg missle bomb german weapon world war ii anit tank
panzerfuast 30 klein 3d model plutonius 3447 3dexport
turbosquid
$15

Meissen Couture Sideboard Klein
... available on turbo squid, the world's leading provider of digital 3d models for visualization, films, television, and games.
turbosquid
$1

Klein bottle triangulated textured
... available on turbo squid, the world's leading provider of digital 3d models for visualization, films, television, and games.
Fdm
3d_export
$15

old brick wall with corner version
...texture + corner version. miniatures printing - resin & fdm ...
3d_export
$5

shutter shade sunglasses
...shutter shade sunglasses 3dexport this model suitable for fdm printer, the gaps between two dynamic part is 0.4...
3d_export
$5

toggle clamp
...model to your favorite size. this model design for fdm 3d printing plus it design with standard sheet metal...
3d_export
$10

cute kitten v2 stl 3d print model
...kitten v2 stl 3d print model 3dexport solid type (fdm and hollow type (sla & dlp)<br>stl file for 3d...
3d_export
free

Articulated centipede
...actual scale is the smallest scale i've tried for fdm with perfect results. you can scale it up with...
3d_export
$5

groot con grabadora
...is recommended to print these models with a good fdm printer by using some supports enabled, however you can...
3d_export
$5

deer christmas 3
...is recommended to print these models with a good fdm printer by using some supports enabled, however you can...
3d_export
$5

deer christmas 2
...is recommended to print these models with a good fdm printer by using some supports enabled, however you can...
3d_export
$5

deer christmas
...is recommended to print these models with a good fdm printer by using some supports enabled, however you can...
3d_export
$5

deer christmas 5
...is recommended to print these models with a good fdm printer by using some supports enabled, however you can...
Printer
archibase_planet
free

Printer
...inter
archibase planet
printer laser printer pc equipment
printer n120614 - 3d model (*.gsm+*.3ds) for interior 3d visualization.
archibase_planet
free

Printer
...rchibase planet
laser printer office equipment computer equipment
printer - 3d model (*.gsm+*.3ds) for interior 3d visualization.
turbosquid
$100

Printer
...er
turbosquid
royalty free 3d model printer for download as on turbosquid: 3d models for games, architecture, videos. (1487819)
turbosquid
$3

Printer
...turbosquid
royalty free 3d model printer for download as max on turbosquid: 3d models for games, architecture, videos. (1670230)
turbosquid
$1

printer
...turbosquid
royalty free 3d model printer for download as max on turbosquid: 3d models for games, architecture, videos. (1595546)
turbosquid
$1

printer
...turbosquid
royalty free 3d model printer for download as max on turbosquid: 3d models for games, architecture, videos. (1595105)
turbosquid
$10

Printer
...id
royalty free 3d model printer for download as max and 3dm on turbosquid: 3d models for games, architecture, videos. (1607146)
turbosquid
$7

Printer
...royalty free 3d model printer for download as ma, ma, and obj on turbosquid: 3d models for games, architecture, videos. (1644580)
turbosquid
$30

Printer
... available on turbo squid, the world's leading provider of digital 3d models for visualization, films, television, and games.
turbosquid
$20

Printer
... available on turbo squid, the world's leading provider of digital 3d models for visualization, films, television, and games.