Thingiverse
Fast bed level test pads (Prusa i3mk3) by Project2571
by Thingiverse
Last crawled date: 3 years ago
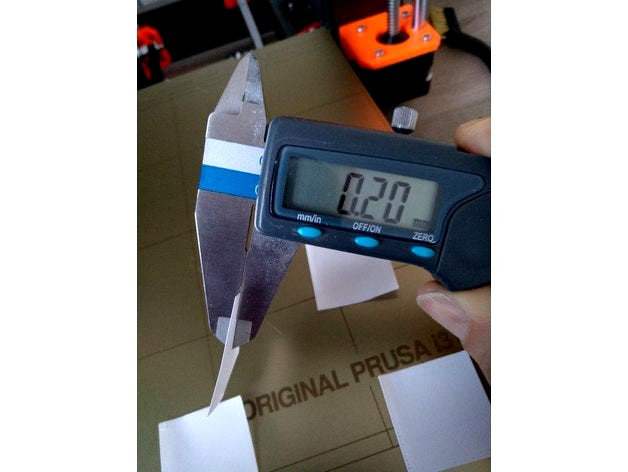
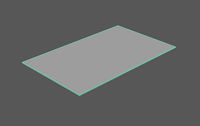
Simple and fast pads for testing and setting bed level correction for Prusa i3MK3.
I am using mainly PETG and test is done with that
Outer lines of pads are 240 mm x 200 mm and therefore no skirt.
Pads are 0.2 mm thin and printing time is 6 minutes
After assembling a kit I set all like said in manual and everything looks quite good. Live z adjustment was -180.
I did some test prints and noticed that bed level corrections was better in
left 0, right -5, front -15 and rear -5
This setting gives good results and it was important that steel sheet surface was clean ( I like to use basic washing-up liquid like fairy, good rinse and paper drying)
Still want to make sure that all corners are aligned as well as possible.
Procedure goes like this:
So I run these pads and got measurements with digital caliper
left rear 0.22 right rear 0.24 left front 0.21 and right front 0.21
rubbing with finger right rear feels a little rough as other were acceptable smooth
Correcting bed level again
left 0, right -7, front -15 and rear -7
New test print
left rear 0.21 right rear 0.22 left front 0.20 and right front 0.22
rubbing with finger all were acceptable smooth
Correcting bed level again
left 0, right -8, front -15 and rear -8
Another test print
left rear 0.21 right rear 0.20 left front 0.20 and right front 0.21
This is fine for me and no need to try to adjust all corners exactly 0.2. Finger rubbing gives smooth feeling for all and measuring results are inside acceptable tolerance.
Notice that when using caliper, rotate pad and take several measurements and find smallest point. This is usually against the grain and in the middle. Perimeter crossing gives some extra thickness in the perimeter area in these levels.
Similar models
thingiverse
free

Bed Test by tsh2
... but the middle seems slightly dished. to compensate, i set 'bed level correction' -ve at the back, and +ve at the front.
grabcad
free

Chiron Gauge holder
...bs or petg. i didn't use any supports.
3 perimeters, to give it some strength
15% infill at least
0.3mm layer height is good
thingiverse
free
Ender 3 leveling washer
...should help beginners that are having the issue of the bed coming out of level during a print.
feel free to remix for your needs.
thingiverse
free

Bed Level Correction Calibration Squares by makeryo
...4 outer squares (and center square) printed with an equal squish. further live adjust z will set all sides equally going forward.
thingiverse
free

Anet A8 bed level test by SIMKEH
...your bed screws and then print again.
feel free to donate a buck if it helped you :)
get your anet a8 here:
(click on the image)
thingiverse
free

Bed Correct Print for Prusa by piep3d
...er of my bed falls away and the level correction is necessary for me to print anything that is not small and centered on the bed.
thingiverse
free

Ender 3 Pro Bed Leveling Lock/Discretizer by themba
...ith my ender 3 pro. will probably work with ender 3 and possibly with ender 5/cr10. please report...
https://youtu.be/et03chfkvhs
thingiverse
free

UM2 Front + Rear Bowden Clip by RhinoAus
...it over the post so it won't unthread it when you move it. 2.5mm thick which is what i found worked best for me with no slop.
grabcad
free

VW window switch
...rabcad
1m0 959 855
(vw, audi, seat, skoda - for rear left and right door, for front right door) - corrected version (20.07.2017)
thingiverse
free

Joystick grips by prasadpp
...t. the trick worked..it gives additional leverage as fingers weight increases force. try the updated joystickringoffset.stl file.
Project2571
thingiverse
free

Kitchen towel hook by Project2571
...kitchen towel hook by project2571
thingiverse
small hook for kitchen etc.
thingiverse
free

Cord wrap holder by Project2571
...cord wrap holder by project2571
thingiverse
simple cord wrap holder
thingiverse
free

Water diviner by Project2571
...ater diviner by project2571
thingiverse
before this thing washing machine hose spreaded dirty water all over the bathroom floor.
thingiverse
free

Venetian blind wand holder by Project2571
...venetian blind wand holder by project2571
thingiverse
quick fix for broken one
thingiverse
free

Shower head holder by Project2571
...shower head holder by project2571
thingiverse
fit for 25 mm tube. please, feel free to fit for your needs
thingiverse
free

Wardrope clothes rail mount by Project2571
...wardrope clothes rail mount by project2571
thingiverse
wardrope clothes rail mount for 25mm tube
thingiverse
free

Tea infuser holder by Project2571
...r holder by project2571
thingiverse
drip station for tea infuser over the kitchen sink.
i think i like a good quality sencha. :)
thingiverse
free

Hook branch by Project2571
... towels, keys, clothes, whatever you want. two different models.
width is around 230 mm.
infill 30-50% for getting hooks stronger
thingiverse
free

Xiaomi Mi Max2 bed holder by Project2571
...xiaomi mi max2 bed holder by project2571
thingiverse
xiaomi mi max 2 bed holder.
thingiverse
free

Taylor tea thermometer travel case by Project2571
...taylor tea thermometer travel case by project2571
thingiverse
travel case to prevent switching thermometer on in a bag.
I3Mk3
thingiverse
free

Printer Toolboxes - Prusa I3MK3S
...printer toolboxes - prusa i3mk3s
thingiverse
.20
15%
thingiverse
free

Fan Covers - Prusa I3MK3S
...fan covers - prusa i3mk3s
thingiverse
make known fan covers multicolored!
thingiverse
free

Extruder Cable Management - Prusa I3MK3S
...extruder cable management - prusa i3mk3s
thingiverse
.20
15%
thingiverse
free

Extruder Dust Filter - Prusa I3MK3S
...extruder dust filter - prusa i3mk3s
thingiverse
.20
15%
thingiverse
free

Rubber Feet Holder (short) - Prusa I3MK3S
...rubber feet holder (short) - prusa i3mk3s
thingiverse
.20
15%
thingiverse
free

Raspberry pi mount for the Prusa I3mk3 by NotLikeALeafOnTheWind
...the poe board. it requires two m3 screws for attaching the mount to the printer and two or more for attaching the pi to the mount
thingiverse
free

Ikea Omlopp LED for Prusa i3Mk3s by RonnyvanGerwen
...t like a glove. clickn'play
these led's are a larger than henridiy www.thingiverse.com/thing:2419703
incl. fusion360 file
thingiverse
free

Prusa I3MK3S MMU2S Stepper Motor Direction Arrows
...r motor shaft ends. as seen in this you tube video describing some of my experiences with the mmu2s. https://youtu.be/s0jgtpr2ygs
thingiverse
free

équerre de remplacement d'alimentation prusa i3Mk3s by loic33m3
...3s by loic33m3
thingiverse
équerre pour remplacer l'alimentation lorsqu'elle est déplacée afin de garder de la rigidité.
thingiverse
free

Prusa I3Mk3S work light
...ion, use a lm2596 dc-dc converter to power the led strip, connect the dc-dc coverter to the power terminals in the einsy housing.
Pads
turbosquid
$15

Note Pad Writing Pad
...oyalty free 3d model note pad writing pad for download as max on turbosquid: 3d models for games, architecture, videos. (1309269)
3ddd
$1

Bed Padded
...bed padded
3ddd
padded bed , pixellin
padded bed , pixellin , bed 3d model
3d_export
$5

Padded stool
...padded stool
3dexport
padded stool
3d_export
free

Padded stool
...padded stool
3dexport
padded stool
3d_export
$5

pads
...pads
3dexport
3d_ocean
$2

mouse pad
...mouse pad
3docean
3d models computer electronics mouse
mouse pad 3d models. it’s mouse pad.
3d_export
$5

Padded stool
...padded stool
3dexport
leather padded stool on a metal base
3d_export
$5

Padded stool
...padded stool
3dexport
leather padded stool on a metal base.
3d_export
$8

Padded chair
...padded chair
3dexport
padded chair, black spout and light blue leatherette.
3d_export
$7

Padded Stool
...padded stool
3dexport
padded stool, black spout and light blue leatherette.
Prusa
turbosquid
$2

Frame Filament Guide Clip-On for Prusa Mk3
...rame filament guide clip-on for prusa mk3 for download as stl on turbosquid: 3d models for games, architecture, videos. (1634730)
3d_export
free

prusa i3 mk3s laser mount for opt lasers
...to learn more about the blue laser technology that conceived the cutting and engraving laser heads from opt lasers, please visit:
turbosquid
free

Prusa small printer adapter holder
...er for download as ipt, skp, dwg, dxf, fbx, ige, obj, and stl on turbosquid: 3d models for games, architecture, videos. (1642936)
3d_export
$30

geisha by jonathan adler
...** i did a 3d printing test in the prusa software, you can find it among the attached images.<br>exchange:<br>.blend...
thingiverse
free

Prusa without Prusa (rc2) by madless
...prusa without prusa (rc2) by madless
thingiverse
just the main part of prusa rc2 faceshield, without writing.
enjoy :)
thingiverse
free

Prusa by acejbc
...prusa by acejbc
thingiverse
prusa knob info
m3 8mm screw
thingiverse
free

Prusa house
...prusa house
thingiverse
how prusa house could look like...
thingiverse
free

Prusa Mk2 "Fake Prusa" LCD cover by anraf1001
...r by anraf1001
thingiverse
version of prusa's lcd cover with "fake prusa" instead of "original prusa"
thingiverse
free

Prusa stabilizator by gutiueugen
...prusa stabilizator by gutiueugen
thingiverse
prusa stabilizator
thingiverse
free

Keychain Prusa by rbarbalho
...keychain prusa by rbarbalho
thingiverse
keychain with text prusa.
Fast
3d_export
$5

toilet fast
...toilet fast
3dexport
fast model toilet.<br>verts 21472<br>faces 21616
turbosquid
$13

fast food
...royalty free 3d model fast food for download as blend and fbx on turbosquid: 3d models for games, architecture, videos. (1685616)
3ddd
free

rosenthal / Fast vase
...rosenthal / fast vase
3ddd
rosenthal
rosenthal fast vase
turbosquid
$20

Fast Food
...free 3d model fast food for download as ma, max, obj, and fbx on turbosquid: 3d models for games, architecture, videos. (1427379)
turbosquid
$65
table(fast)
... available on turbo squid, the world's leading provider of digital 3d models for visualization, films, television, and games.
turbosquid
$30

Fast Food
... available on turbo squid, the world's leading provider of digital 3d models for visualization, films, television, and games.
turbosquid
$20

fast food
... available on turbo squid, the world's leading provider of digital 3d models for visualization, films, television, and games.
turbosquid
$2
Fast Food
... available on turbo squid, the world's leading provider of digital 3d models for visualization, films, television, and games.
3d_export
$15
Fast table 3D Model
...fast table 3d model
3dexport
fast table
fast table 3d model modelix 59114 3dexport
turbosquid
free

Fast Food Cup
...turbosquid
free 3d model fast food cup for download as blend on turbosquid: 3d models for games, architecture, videos. (1206378)
Level
design_connected
$11

Levels
...levels
designconnected
one nordic levels computer generated 3d model. designed by form us with love.
design_connected
$7

Level
...level
designconnected
zanotta level shelves and storage computer generated 3d model. designed by arik levy.
turbosquid
$29
level
...ty free 3d model level for download as 3ds, obj, c4d, and fbx on turbosquid: 3d models for games, architecture, videos. (1272856)
turbosquid
$1
level
... available on turbo squid, the world's leading provider of digital 3d models for visualization, films, television, and games.
3d_export
$5

Mario level
...mario level
3dexport
mario level low quality for fun videos
3ddd
$1

LEVELS OF DISCOVERY
...етская мебель "levels of discovery". rab10003 princess mini rocker
кресло-качалка (мини) "принцесса навсегда"
3d_export
$19

level design
...level design
3dexport
you can use this design (level design) in your own game.
turbosquid
$60
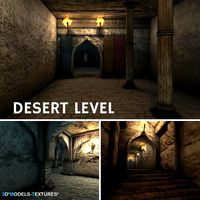
Desert level
...squid
royalty free 3d model desert level for download as fbx on turbosquid: 3d models for games, architecture, videos. (1208131)
turbosquid
$15
Transit Level
...quid
royalty free 3d model transit level for download as max on turbosquid: 3d models for games, architecture, videos. (1158112)
turbosquid
$14

Districts Level
...id
royalty free 3d model districts level for download as max on turbosquid: 3d models for games, architecture, videos. (1408410)
Bed
3ddd
$1

bed
...bed
3ddd
bed , постельное белье
bed
3ddd
$1

bed
...bed
3ddd
bed , постельное белье
bed
3ddd
$1

bed
...bed
3ddd
bed , постельное белье
bed
3ddd
$1

bed
...bed
3ddd
bed , постельное белье
bed
3ddd
$1

bed
...bed
3ddd
bed , постельное белье
bed
3ddd
$1

bed
...bed
3ddd
bed , постельное белье
bed
3ddd
free

bed
...bed
3ddd
bed , постельное белье
bed
3ddd
free

bed
...bed
3ddd
bed , постельное белье
bed
3ddd
$1

Bed
...bed
3ddd
bed , постельное белье , постель
bed
3d_export
$7

bed adairs bed
...rs bed
3dexport
bed adairs bed in modern style. if you want a smoother surface, please turn on turbosmooth in the modifier list.
Test
turbosquid
$99

test
...st
turbosquid
royalty free 3d model test for download as max on turbosquid: 3d models for games, architecture, videos. (1251637)
turbosquid
$63
TEST
...st
turbosquid
royalty free 3d model test for download as max on turbosquid: 3d models for games, architecture, videos. (1446233)
turbosquid
$1
test
...st
turbosquid
royalty free 3d model test for download as fbx on turbosquid: 3d models for games, architecture, videos. (1360941)
3d_export
free

johnny test
...johnny test
3dexport
johnny test 3d
turbosquid
$15

Test
... available on turbo squid, the world's leading provider of digital 3d models for visualization, films, television, and games.
turbosquid
$2

test
... available on turbo squid, the world's leading provider of digital 3d models for visualization, films, television, and games.
turbosquid
free

Test
... available on turbo squid, the world's leading provider of digital 3d models for visualization, films, television, and games.
turbosquid
free

test
... available on turbo squid, the world's leading provider of digital 3d models for visualization, films, television, and games.
turbosquid
free

Test
... available on turbo squid, the world's leading provider of digital 3d models for visualization, films, television, and games.
3d_export
$5
gripper test
...gripper test
3dexport
robot gripper test model