Thingiverse
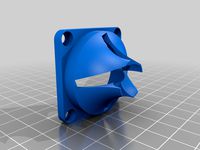
Fan Shroud Voxelab Aquila - Triple Fan and BLMount by n9jcv
by Thingiverse
Last crawled date: 3 years ago
Video link here;https://youtu.be/xta0gl2TDL0
UPDATE 2/25/21 - Update to instructions - found by a maker - You need 2 fan ducts - One for the left side and one for the right. You need to mirror the fan duct to print the second one, so that it is angled/oriented in the other direction.
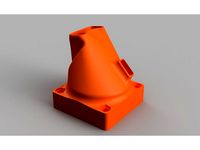
UPDATE 2/20/21 - per request, I have shorted the height of the fan duct from 23mm to 19mm to accommodate shorter hot ends. The new fan duct name is;
fanduct 4mm smaller 1PB SMALL.stl - source .skp also here
UPDATE 2/16/21 - Remixed a BLTOUCH mount by hav22 - Now installed and working with BLTOUCH (3D Touch actually from Triangle Labs).
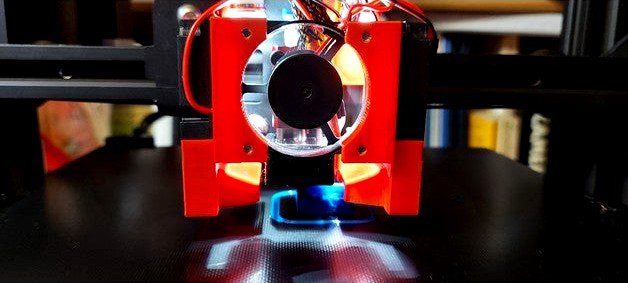
I was not happy with the fan shroud for the Voxelab Aquila. The fan shroud is so large, that it makes it near impossible to see what is being printed, and we all know how much fun it is to watch, and how important it is to see a good first layer go down.
Also, the Voxelab Aquila ships with a hotend fan and 1 print cooling fan. Having only 1 print cooling fan means that one side of your prints will suffer from less than optimal cooling.
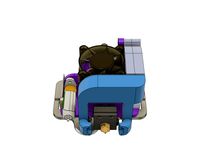
I designed this fan shroud to use the factory supplied fans (1 hot end cooling fan 40x40x10 and 1 print cooling fan - blower 40x40x10). You must also purchase 1 additional 40x40x10 blower fan.
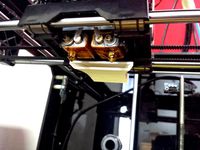
Another enhancement here is optional, but for me, I really like to have it lit where I am printing so I can see clearly what is happening. I designed this shroud to hold 2 LED lights. The Voxelab Aquila runs on 24V. The LEDs I am using are (194 168 T10) Auto LED lights. They are 12V. Rather than use a buck converter, I decided to use two LEDs and run them in series. Thus they run on 24V. Google voltage divider network if you want to understand the electronics theory.
To hook up the LEDs, I tapped into the power for the hotend as that fan is always on. The print cooling fans are not always on and I want the LEDs to always be on. The LEDs I purchased consume about 60ma each, so the current consumption is not a big concern. LEDs are polarity sensitive, so you must have the positive and ground correct or they will not light.
Wire the LEDs like this - 24V positive to the + on LED1, then from ground on LED1 go to + on LED2, then from ground on LED2 go to the 24V ground
To add the additional print cooling fan, tap into the power on the existing print cooling fan. They must be parallel, NOT series. Fans can not run in series, technically they may, but you will have issues and if one fails you are likely to see a lot of smoke, so don't do it.
List of materials needed:
24V Blower fan (1)https://www.aliexpress.com/item/32798634077.html?spm=a2g0o.productlist.0.0.3e266ff71u4tsa&algo_pvid=41cab677-2d29-4d99-8653-2deaa1cea11b&algo_expid=41cab677-2d29-4d99-8653-2deaa1cea11b-2&btsid=0bb0623316130174606025057e0ca2&ws_ab_test=searchweb0_0,searchweb201602_,searchweb201603_
12V LEDs (optional) (2) - https://www.amazon.com/gp/product/B015H3KTYG/ref=ox_sc_saved_title_5?smid=A1HUKFKSGZID4U&psc=1
2mm screws about 8 to 10mm in length (4)
6 inches of small 24-28 gauge wire for LEDs - this is for tying the LEDs to the shroud - see pictures
some small wire if needed to hook up fans and LEDs
UPDATE 2/25/21 - Update to instructions - found by a maker - You need 2 fan ducts - One for the left side and one for the right. You need to mirror the fan duct to print the second one, so that it is angled/oriented in the other direction.
UPDATE 2/20/21 - per request, I have shorted the height of the fan duct from 23mm to 19mm to accommodate shorter hot ends. The new fan duct name is;
fanduct 4mm smaller 1PB SMALL.stl - source .skp also here
UPDATE 2/16/21 - Remixed a BLTOUCH mount by hav22 - Now installed and working with BLTOUCH (3D Touch actually from Triangle Labs).
I was not happy with the fan shroud for the Voxelab Aquila. The fan shroud is so large, that it makes it near impossible to see what is being printed, and we all know how much fun it is to watch, and how important it is to see a good first layer go down.
Also, the Voxelab Aquila ships with a hotend fan and 1 print cooling fan. Having only 1 print cooling fan means that one side of your prints will suffer from less than optimal cooling.
I designed this fan shroud to use the factory supplied fans (1 hot end cooling fan 40x40x10 and 1 print cooling fan - blower 40x40x10). You must also purchase 1 additional 40x40x10 blower fan.
Another enhancement here is optional, but for me, I really like to have it lit where I am printing so I can see clearly what is happening. I designed this shroud to hold 2 LED lights. The Voxelab Aquila runs on 24V. The LEDs I am using are (194 168 T10) Auto LED lights. They are 12V. Rather than use a buck converter, I decided to use two LEDs and run them in series. Thus they run on 24V. Google voltage divider network if you want to understand the electronics theory.
To hook up the LEDs, I tapped into the power for the hotend as that fan is always on. The print cooling fans are not always on and I want the LEDs to always be on. The LEDs I purchased consume about 60ma each, so the current consumption is not a big concern. LEDs are polarity sensitive, so you must have the positive and ground correct or they will not light.
Wire the LEDs like this - 24V positive to the + on LED1, then from ground on LED1 go to + on LED2, then from ground on LED2 go to the 24V ground
To add the additional print cooling fan, tap into the power on the existing print cooling fan. They must be parallel, NOT series. Fans can not run in series, technically they may, but you will have issues and if one fails you are likely to see a lot of smoke, so don't do it.
List of materials needed:
24V Blower fan (1)https://www.aliexpress.com/item/32798634077.html?spm=a2g0o.productlist.0.0.3e266ff71u4tsa&algo_pvid=41cab677-2d29-4d99-8653-2deaa1cea11b&algo_expid=41cab677-2d29-4d99-8653-2deaa1cea11b-2&btsid=0bb0623316130174606025057e0ca2&ws_ab_test=searchweb0_0,searchweb201602_,searchweb201603_
12V LEDs (optional) (2) - https://www.amazon.com/gp/product/B015H3KTYG/ref=ox_sc_saved_title_5?smid=A1HUKFKSGZID4U&psc=1
2mm screws about 8 to 10mm in length (4)
6 inches of small 24-28 gauge wire for LEDs - this is for tying the LEDs to the shroud - see pictures
some small wire if needed to hook up fans and LEDs
Similar models
thingiverse
free

Sunhokey 2-in-1 fan duct by skysenpai
...1 fan duct for stock sunhokey extruder.
i design this fan duct so it can move around the fins because i love to see the printing.
thingiverse
free
Duplicator 4, Blower duct by Sam_E
...e 40x40x10 fan used previously so cools much better, great for larger overhangs. but the downside is it is a bit noisier as well.
thingiverse
free

CR-10 Upgrade Shroud with Larger Part Fan and BLTouch Built In!
...cluded spacers to set that fan distance and to let it breathe.
not yet tested, will update once i get time to print it!
thank you
thingiverse
free

Voxelab Aquila Satsana 5015 with BLTouch by quantumcosmic
... a mount for 5015 blower fan. this is the raised version with bltouch and without the "aquila" script across the front.
thingiverse
free
Ubis 13S Blower Fan Shroud by iClint
...ing fins on the hot end.
additionally a small indent has been added to the shrouds main opening to accomodate the larger hot end.
thingiverse
free

E3D Volcano Triple fan mount (+Voxelab Aquila Bracket) by Breadycorn
... and remixed it to add a little bit of clearance so that my own fanduct fits and has a little bit of clearance to the x carriage.
thingiverse
free

Fan shroud, dual cooling fan mounts, + ring LED mount for E3D v6 hotend. by TheKizard
...ll zip tie if necessary to keep shroud tight to hotend. (i haven't used it yet, but i included it in the design just in case)
thingiverse
free
Fan Shroud for MicroSwiss Direct Drive Extruder on Ender 5 Plus by GiulianoM
...e bridging angle to be 180 so that the bridge goes horizontally across the x axis.
otherwise the fan shroud printed great in pla.
grabcad
free

Voxelab Aquila Volcano Shroud
...voxelab aquila volcano shroud
grabcad
for voxelab aquila to be used with stock hardware plus 2 m3 screws.
thingiverse
free

E3D v6 fan duct with 2 Fans GDT4010S12B by StefTheo
...(efficient and silent cooling). you do not want to see the fan falling during printing ? tighten the screws firmly (put washers).
N9Jcv
thingiverse
free

HyperCube Z Rod holder by n9jcv
... rod holder by n9jcv
thingiverse
still in development - placing z rods inside the frame instead of hanging off of plastic clips.
thingiverse
free

Basic Business Card Holder Box by n9jcv
... kinds of business cards around the house. decided i needed to make a box to hold them. original sketchup file included. enjoy
thingiverse
free

spool mount holder for Anycubic Predator by n9jcv
...n insert a 5/16 threaded rod. use with these;https://www.thingiverse.com/thing:767317
use the scad to customize for spool sizes.
thingiverse
free

Pokemon Go Ball by n9jcv
...s
parts are separate so you can print with different colors. they just snap in and use just a dab of glue to hold them in place.
thingiverse
free

VERTICAL LCD DISPLAY VOXELAB AQUILA REMIX by n9jcv
...gree incline. this version is 66 degrees incline and allows better viewing angle when the printer is a chair height, imho.
enjoy
thingiverse
free

Chinese E3D hotend mount and cooling fan for Hypercube by n9jcv
...e to be mounted on a hypercube x carriage. includes a shroud for the e3d and a 40mm cooling fan. sketchup files included.
enjoy
thingiverse
free

Custom Adjustable Z Endstop for Prusa I3X or I3XL by n9jcv
... there are many adjustable z endstops, but i wanted one that fit perfectly and was completely reversible. this works perfectly.
thingiverse
free

Fallout 4 Light Switch Cover Plate by n9jcv
... remainder in yellow. please feel free to use any way you like. enjoy
printed on prusa i3 .3mm layers pla - sliced with cura
thingiverse
free

Remix Pencil Box by n9jcv
... just a bit of sanding on the edges of the nameplate to get it to fit. then just use a dab of glue to hold it if you like.
enjoy
thingiverse
free

BLTOUCH REMIX FOR VOXELAB AQUILA WITH TRIPLE FAN MOUNT by n9jcv
...g:4758228
reddit post with detailshttps://www.reddit.com/r/voxelabaquila/comments/li3ng2/new_triple_fan_shroud_for_aquila_hotend/
Voxelab
thingiverse
free

Voxelab Aquila 70mm by 0madem
...voxelab aquila 70mm by 0madem
thingiverse
mainboard cover for voxelab aquila 70x70x15 fan.
thingiverse
free

VoxeLab Aquila LCD Cap by elwoodb
...voxelab aquila lcd cap by elwoodb
thingiverse
voxelab aquila lcd cap
95,80х54,70х3
thingiverse
free

Voxelab Aquila Screen Frame by Junr05
...ogo was sidewas since mounting the screen vertical and it was giving me a little ocd lol so i made this screen frame to cover it.
thingiverse
free

Voxelab Aquila Filiment Guide by venomnet
...ment guide by venomnet
thingiverse
this filiment guide is designed to work with antibimmer voxelab aquila cable chain full set.
thingiverse
free

Voxelab SLA DrainBracet by shinano
...d printers.
platform temporary holding adapter for voxelab photofabrication printers.m8 x 50 hexagonal bolt and nut are required.
thingiverse
free

Voxelab Proxima Drain Bracket by 3D_Print_PT
... by 3d_print_pt
thingiverse
drain bracket for the voxelab proxima 6" resin 3d printer
v2 added some clearance for the knob.
thingiverse
free

Voxelab Aquila Riser Feet by daaar
...ngiverse
rear left riser for voxelab aquila. regular riser does not fit due to wire attachment
feet_riser_35_lightweight_b remix
thingiverse
free

Voxelab Aquila filament holder by thisnoise
...giverse
simple filament holder for the voxelab aquila, same as seen on the ender 3 prints but designed to be it's own thing.
thingiverse
free

Voxelab Aquila Display Vertical Mount by m_sfln
...lay vertical mount by m_sfln
thingiverse
display vertical mount for voxelab aquila.
v1 - in my photos.
v2 - fixes after testing.
thingiverse
free

Direct extruder BMG for Voxelab Aquila by Great_Photos
...on, the retract is 1mm. print time has decreased by at least 35%.
suitable for voxelab aquila only, not suitable for ender 3 !!!
Aquila
3d_export
$119

Aquila Adamo Concept open version 3D Model
...sion 3d model
3dexport
sport racing car aquila adamo concept
aquila adamo concept open version 3d model g24studio 94052 3dexport
3d_export
$119

Aquila Adamo Concept closed version 3D Model
...on 3d model
3dexport
sport racing car aquila adamo concept
aquila adamo concept closed version 3d model g24studio 94166 3dexport
humster3d
$75

3D model of TagAZ Aquila 2013
...a detailed 3d model of tagaz aquila 2013 in various file formats. all our 3d models were created maximally close to the original.
3d_export
$10

Ring of Aquila
... detailed dimensions are shown in the picture above) poligons: 722740 vertices: 722760 including blend, fbx, obj and stl formats.
3d_export
$5

Aquila 3D Model
...om seat sofa sport style super table transport truck usa vehicle vray war weapon wheel wood
aquila 3d model fkreig 16224 3dexport
3d_export
$25

aquila favonia - genshin impact
...ila favonia - genshin impact
3dexport
render by vray 5 format includes .max .3ds .obj .fbx .mtl .stl polys : 2.326 verts : 3.000
3d_export
$10

Seven rings from Dota
...the picture above) poligons: 49592 vertices: 49824 ring of aquila model dimensions: height - 22.8 millimeters length - 19...
thingiverse
free

imperial aquila by gokoen
...imperial aquila by gokoen
thingiverse
the imperial aquila
printed this to fit on my live-sized bolter.
thingiverse
free
Voxelab Aquila 70mm by 0madem
...voxelab aquila 70mm by 0madem
thingiverse
mainboard cover for voxelab aquila 70x70x15 fan.
thingiverse
free

Beaky aquila helmet
...verse
quick embossed version of the beaky helmet using the aquila symbol from here: http://bakadesign.dk/warhammer-40-000-icons/
Shroud
3d_export
$500

Centrifugal pump volute casing with impeller
...casing with impeller 3dexport volute casing with impeller and shroud ...
3d_export
$35
The Holy Face base relief 3D Model
...the holy face base relief 3d model 3dexport shroud turin veronica veronica's veil gospel ikon jesus holy face...
3d_export
$20
present car cloth presentation transport transportation shape concepts show celebration cover showro
...transportation shape concepts show celebration cover showroom covered revealin shroudd cover covering tarp draped fabric cloth showroom reveal revealing...
3d_export
$5

Lockheed F-117 Nighthawk lowpoly stealth bomber
...initial operating capability status in 1983. the aircraft was shroudd in secrecy until it was revealed to the public...
3d_export
$49
kriss vector gen 2 sub-d
...rear flip sight.<br>- vector ejection port.<br>- vector crb square shroud / 16"" sliencer.<br>- ds150 stock.<br>- .ma (maya 2020 ascii)<br>-...
3d_export
$10

vichy dining table
...in oak, sycamore and walnut marquetry.<br>even if the restaurant shroud the vichy in a long table cloth, two slender...
3d_export
$500

us navy pcu sterett ddg-104 arleigh burke class destroyer flight iia max
...the position has been shifted.<br>q. where are the exhaust shroud for the stacks?<br>a. since ddg-89, the exhaust system was...
thingiverse
free

shroud by samshay317
...shroud by samshay317
thingiverse
shroud
thingiverse
free

Fan Shroud
...fan shroud
thingiverse
this is a fan shroud for a 140mm fan
thingiverse
free
40mm fan shroud
...40mm fan shroud
thingiverse
40mm fan shroud
Triple
turbosquid
$10

Triple angle michael triple
...free 3d model triple angle michael triple for download as max on turbosquid: 3d models for games, architecture, videos. (1243156)
3d_export
$5

triple knob
...triple knob
3dexport
triple knob
3ddd
$1

flora triple
...flora triple
3ddd
slamp
подвес flora triple
3ddd
$1
Triple P!
...iple p!
3ddd
горшок , цветок , листья
triple p!
design_connected
$16

To triple sofa
...to triple sofa
designconnected
nurus to triple sofa computer generated 3d model. designed by ozelgin, tanju.
3d_export
$5

Triple bars
...triple bars
3dexport
these are triple bars for outdoor training/gymnastics. suitable for push-ups on uneven bars
turbosquid
$10

Triple Window
...quid
royalty free 3d model triple window for download as 3ds on turbosquid: 3d models for games, architecture, videos. (1484877)
turbosquid
$5

Triple copper
...free 3d model triple copper for download as max, obj, and fbx on turbosquid: 3d models for games, architecture, videos. (1317753)
turbosquid
$3

TRIPLE SWITCH
...free 3d model triple switch for download as max, obj, and fbx on turbosquid: 3d models for games, architecture, videos. (1369504)
turbosquid
$3

Triple bench
...d model triple bench for download as sldpr, ige, stl, and obj on turbosquid: 3d models for games, architecture, videos. (1560286)
Fan
3d_export
$5

fan
...fan
3dexport
fan 3d model, table fan, fan, electric fan, ventilator
archibase_planet
free

Fan
...fan
archibase planet
fan large fan
fan out n260707 - 3d model for interior 3d visualization.
archibase_planet
free

Fan
...fan
archibase planet
fan ceiling fan ventilator
fan stealth n300615 - 3d model (*.gsm+*.3ds) for interior 3d visualization.
3d_export
$15

fan
...fan
3dexport
is an ancient fan
3ddd
$1

Fan-C-Fan by marco gallegos
...n-c-fan by marco gallegos
3ddd
вентилятор , marco gallegos
fan-c-fan by marco gallegos
3d_export
$10

fan
...fan
3dexport
a detailed fan designed for home or space blowing is now available for only 19.99!
turbosquid
$1

Fan
...fan
turbosquid
free 3d model fan for download as on turbosquid: 3d models for games, architecture, videos. (1427865)
turbosquid
$14

Fan
...fan
turbosquid
royalty free 3d model fan for download as on turbosquid: 3d models for games, architecture, videos. (1415642)
3ddd
$1

Светильник Fan
...светильник fan
3ddd
fan , italamp
светильник fan, производитель italamp
turbosquid
$25

Fan
...fan
turbosquid
royalty free 3d model fan for download as c4d on turbosquid: 3d models for games, architecture, videos. (1483246)