Thingiverse
Extremely simple SSD mounting bracket for Lenovo IdeaPad Y510P
by Thingiverse
Last crawled date: 4 years, 2 months ago
UPDATE from B to C: The depth of the thicker boss was decreased by 1/4". This makes the removal process a lot easier than the previous version, which required you to pick up the drive and pull at an angle to remove it. Using version B could put undue stress on the SATA connector or lead to a minor injury. If you previously downloaded version B, then please delete it and download/print version C. Version letter is in the file name. :)
I bought a used Lenovo IdeaPad Y510P on eBay without a hard drive, and quickly realized that it was also missing the metal sled. My options were to order a $25 replacement part and wait a week for it to show up (which is somehow more expensive than the 240GB solid state drive I bought for it); or design and 3D print one myself, and have it in an hour. I'm pretty certain that this will not work in most other laptop models, but as I accumulate other laptops, I will probably design hard drive mounts for them as well. Feel free to experiment with this one for the time being.
Installation instructions:
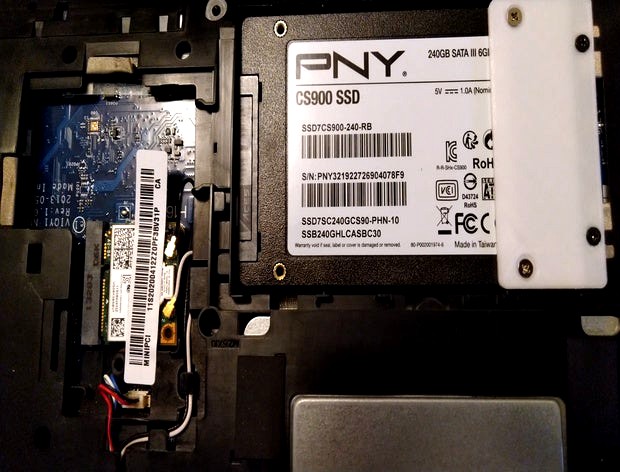
First and foremost, remove the battery; then unscrew and remove the plastic cover from the bottom of the laptop. To install the mount, attach it to the solid state drive first as shown in the photo, on the opposite side from the SATA connector, with two M3x4mm screws. Then, simply line up the SATA connector with the one on the motherboard, and slide the drive in. (The connector may initially translate to a slight angle; but once it is fully seated, the mount will seat down in the bay and keep the drive securely in place.) Finally, attach the mount to the laptop case using two M2.5x5mm laptop screws.
Removal instructions:
Opposite of installation; first, remove the two M2.5 screws holding the mount to the laptop chassis. Next, grip the mount with three or four fingers where it is attached to the drive, and pull the drive out of the SATA connector. It will slide and then stop when the connector is disengaged. (This makes a much sturdier removal method than the flimsy plastic film pull tab on the stock sled, that stretches and tears after maybe three uses!)
If you don't have the right screws on hand, eBay and Amazon both sell them in absurd quantities for under $10. Here's a good link to a variety kit:
https://www.amazon.com/CO-RODE-Notebook-Computer-Samsung/dp/B01GE9AK7I/ref=sr_1_3?keywords=laptop+screws&qid=1574496524&sr=8-3
Note that if you are using a mechanical hard drive in your Lenovo, then I don't recommend using this mount. The reason is that the stock mount will do a better job of protecting a HDD from shock damage. SSDs are obviously not susceptible to mechanical shock, so all that is really needed is strain relief for the SATA connector.
My wife has the 3D modeling skills, so she drew the model in Rhino 6.
I bought a used Lenovo IdeaPad Y510P on eBay without a hard drive, and quickly realized that it was also missing the metal sled. My options were to order a $25 replacement part and wait a week for it to show up (which is somehow more expensive than the 240GB solid state drive I bought for it); or design and 3D print one myself, and have it in an hour. I'm pretty certain that this will not work in most other laptop models, but as I accumulate other laptops, I will probably design hard drive mounts for them as well. Feel free to experiment with this one for the time being.
Installation instructions:
First and foremost, remove the battery; then unscrew and remove the plastic cover from the bottom of the laptop. To install the mount, attach it to the solid state drive first as shown in the photo, on the opposite side from the SATA connector, with two M3x4mm screws. Then, simply line up the SATA connector with the one on the motherboard, and slide the drive in. (The connector may initially translate to a slight angle; but once it is fully seated, the mount will seat down in the bay and keep the drive securely in place.) Finally, attach the mount to the laptop case using two M2.5x5mm laptop screws.
Removal instructions:
Opposite of installation; first, remove the two M2.5 screws holding the mount to the laptop chassis. Next, grip the mount with three or four fingers where it is attached to the drive, and pull the drive out of the SATA connector. It will slide and then stop when the connector is disengaged. (This makes a much sturdier removal method than the flimsy plastic film pull tab on the stock sled, that stretches and tears after maybe three uses!)
If you don't have the right screws on hand, eBay and Amazon both sell them in absurd quantities for under $10. Here's a good link to a variety kit:
https://www.amazon.com/CO-RODE-Notebook-Computer-Samsung/dp/B01GE9AK7I/ref=sr_1_3?keywords=laptop+screws&qid=1574496524&sr=8-3
Note that if you are using a mechanical hard drive in your Lenovo, then I don't recommend using this mount. The reason is that the stock mount will do a better job of protecting a HDD from shock damage. SSDs are obviously not susceptible to mechanical shock, so all that is really needed is strain relief for the SATA connector.
My wife has the 3D modeling skills, so she drew the model in Rhino 6.
Similar models
grabcad
free

Hard Drive SDD SATA 2.5"
...grabcad
hard drive ssd sata 2.5 inches.
this hard drive is inspired by the intel ssd 530 series, with real mounting dimensions.
thingiverse
free

3.5" HDD to SSD Exact Fit Adapter For Drive Sleds
...you will have left over from the hard drive. they could be special anti-vibration screws, as they are in the wl710av all-in-one.
thingiverse
free
Laptop HDD Hot Swap Cage by Zurkeyon
...of screw holes on the end of the drive for mounting a handle to.
glue them together for unlimited sata storage upgrades!
enjoy!
thingiverse
free

Lenovo Ideapad Laptop by ComixsYT
...lenovo ideapad laptop by comixsyt
thingiverse
this is based off of a lenovo ideapad laptop. i remade all the ports end vents.
grabcad
free

Hard Drive HDD SATA 2.5"
...d
laptop hard drive hdd sata 2.5 inches.
this hard drive is inspired by the seagate st3000lm016, with real mounting dimensions.
thingiverse
free

support HDD and SSD 2.5 Lenovo G565 by alien_2005
...support hdd and ssd 2.5 lenovo g565 by alien_2005
thingiverse
in case there is no hard drive box in this laptop model
thingiverse
free

M-SATA SSD by The_Great_Dano
... using the back slot mount but i also included a 2.5in adapter, 3.5in adapter, and blank that i designed for a quick build.
glhf
cg_trader
$3

laptop to desktop hard drive adapter | 3D
...l or external 3.5-inch drive bay, using standard unit mounting holes. the mounting to the pc case can be done with pc fan screws.
thingiverse
free

Laptop Hard Drive Adapter by adamboy7
...ss plastic, and the second "large" version that has all three holes for mounts that don't include the middle screw.
thingiverse
free

Atomos AtomX SSD Dock by u4142020
...of place when removing the drive.
the dock has tab rails that keep the drive parallel to the sata connector to prevent damage.
Ideapad
turbosquid
$26

Tablet Lenovo IdeaPad
...ablet lenovo ideapad for download as max, blend, fbx, and obj on turbosquid: 3d models for games, architecture, videos. (1669568)
turbosquid
$4

LENOVO ideapad Flex10
... available on turbo squid, the world's leading provider of digital 3d models for visualization, films, television, and games.
humster3d
$40

3D model of Lenovo Ideapad MIIX 300 Silver
... model of lenovo ideapad miix 300 silver in various file formats. all our 3d models were created maximally close to the original.
humster3d
$40

3D model of Lenovo Ideapad MIIX 300 Black
...d model of lenovo ideapad miix 300 black in various file formats. all our 3d models were created maximally close to the original.
thingiverse
free
Lenovo Ideapad Laptop by ComixsYT
...lenovo ideapad laptop by comixsyt
thingiverse
this is based off of a lenovo ideapad laptop. i remade all the ports end vents.
thingiverse
free

Lenovo Ideapad Touchscreen laptop cooling tray by ocarinakid
...o ideapad touchscreen cooling tray. it wil fit and computer that is less than 17inches in length and less than 15inches in width.
thingiverse
free

Vertical stand notebook Lenovo Ideapad 330 15.6'' by clasa102
...ion, small and space-saving, for very small desks. it is still quite stable even if the standard version is better for stability.
thingiverse
free

Lenovo IdeaPad Flex 10 under desk mount
...ketchup file is attached if you need to change the sizes of what you are mounting it to or you're using a different computer.
thingiverse
free

Butterfly laptop stand for 14" Lenovo Ideapad 720s by JakJakku
...ly topples as is.
i subtracted .1mm from each face of the gaps where the parts snap together, and it works perfectly in my print.
thingiverse
free

Lenovo ideapad100 switch power by Wilu88
...lenovo ideapad100 switch power by wilu88
thingiverse
experimental power switch to notebook lenovo ideapad 100
Lenovo
3d_export
$10

laptop lenovo
...laptop lenovo
3dexport
laptop lenovo
3d_export
free

Notebook lenovo
...notebook lenovo
3dexport
3d_export
$49

Lenovo A720 3D Model
...lenovo a720 3d model
3dexport
lenovo computer monitor
lenovo a720 3d model layritten 71534 3dexport
turbosquid
$60

Lenovo W700
... available on turbo squid, the world's leading provider of digital 3d models for visualization, films, television, and games.
turbosquid
$49

Lenovo K3
... available on turbo squid, the world's leading provider of digital 3d models for visualization, films, television, and games.
turbosquid
$39

Lenovo S60
... available on turbo squid, the world's leading provider of digital 3d models for visualization, films, television, and games.
turbosquid
$29

Lenovo S650
... available on turbo squid, the world's leading provider of digital 3d models for visualization, films, television, and games.
turbosquid
$15

Lenovo A859
... available on turbo squid, the world's leading provider of digital 3d models for visualization, films, television, and games.
turbosquid
$15

Lenovo A319
... available on turbo squid, the world's leading provider of digital 3d models for visualization, films, television, and games.
turbosquid
$10

Lenovo G510
... available on turbo squid, the world's leading provider of digital 3d models for visualization, films, television, and games.
Ssd
turbosquid
$2

Hp 512GB SSD
... free 3d model hp 512gb ssd for download as max, obj, and fbx on turbosquid: 3d models for games, architecture, videos. (1656846)
turbosquid
$19

Intel 730 SSD
... available on turbo squid, the world's leading provider of digital 3d models for visualization, films, television, and games.
3d_export
$25

3D SSD Hard Drive Exterior only
...3d ssd hard drive exterior only
3dexport
this ssd 3d modeling exterior only. interior is empty.
3d_export
$35

SanDisk Extreme Pro Portable SSD
... get the best results in blender. no extra plugins are required for this model. lights and cameras are not included in the scene.
3d_export
$10

Lian Li 3D Model
...model 3dexport lian li lianli 525 25 internal hdd ssd mounting kit vent filter black lian li 3d model...
3d_export
$7

External harddisk 3D Model
...components component computer pc hardware disk hard memory case ssd ide drive cable external storage electronics usb external harddisk...
3d_export
$45

Solid State Drive 3D Model
...3d model 3dexport solid state hard drive intel inside ssd media device storage store data fat 32 ntfs windows...
3d_export
$40
Lian Li parts pack vol1 3D Model
...vol1 3d model 3dexport lian li 525 internal hdd ssd mounting kit vent filter thumb screws fan cooler air...
cg_studio
$7

External harddisk3d model
...components component computer pc hardware disk hard memory case ssd ide drive cable external storage electronics usb .max .obj...
thingiverse
free

SSD Caddy by juliocfranco
...ssd caddy by juliocfranco
thingiverse
ssd adapter for upgrading a hard disk on a pc to a ssd
Extremely
3d_export
$10

extreme thriller
...extreme thriller
3dexport
australia's #1 favorite ride... the extreme thriller
turbosquid
$1

Skewb Extreme
...quid
royalty free 3d model skewb extreme for download as max on turbosquid: 3d models for games, architecture, videos. (1699716)
turbosquid
$45

Apple Airport Extreme
...model apple airport extreme for download as 3ds, max, and obj on turbosquid: 3d models for games, architecture, videos. (1299458)
3d_export
$24

Suzuki Samurai Extreme Ofrroad
...suzuki samurai extreme ofrroad
3dexport
modified indian suzuki samurai extreme offroad capability
turbosquid
$49

Extreme Ops Knife
... available on turbo squid, the world's leading provider of digital 3d models for visualization, films, television, and games.
turbosquid
$49

Teti Extreme Loudspeaker
... available on turbo squid, the world's leading provider of digital 3d models for visualization, films, television, and games.
turbosquid
$6

Voice Extreme X5
... available on turbo squid, the world's leading provider of digital 3d models for visualization, films, television, and games.
turbosquid
$3

Paintings Collection EXTREME NEON
...ngs collection extreme neon for download as max, c4d, and fbx on turbosquid: 3d models for games, architecture, videos. (1439544)
turbosquid
$10

Razer Lachesis Extreme Edition
... available on turbo squid, the world's leading provider of digital 3d models for visualization, films, television, and games.
turbosquid
$5

DRL VIP Extreme#1 radiator
... available on turbo squid, the world's leading provider of digital 3d models for visualization, films, television, and games.
Bracket
archibase_planet
free

Bracket
...bracket
archibase planet
bracket corbel holder
bracket 1 - 3d model (*.gsm+*.3ds) for interior 3d visualization.
archibase_planet
free

Bracket
...bracket
archibase planet
bracket corbel console
bracket 5 - 3d model (*.gsm+*.3ds) for interior 3d visualization.
archibase_planet
free

Bracket
...bracket
archibase planet
corbel holder bracket
bracket 6 - 3d model (*.gsm+*.3ds) for interior 3d visualization.
archibase_planet
free

Bracket
...bracket
archibase planet
bracket corbel console
bracket 8 - 3d model (*.gsm+*.3ds) for interior 3d visualization.
archibase_planet
free

Bracket
...bracket
archibase planet
bracket corbel holder
bracket n280911 - 3d model (*.gsm+*.3ds) for interior 3d visualization.
archibase_planet
free

Bracket
...bracket
archibase planet
holder corbel bracket
bracket 9 - 3d model (*.gsm+*.3ds) for interior 3d visualization.
archibase_planet
free

Bracket
...bracket
archibase planet
corbel holder bracket
bracket 10 - 3d model (*.gsm+*.3ds) for interior 3d visualization.
archibase_planet
free

Bracket
...bracket
archibase planet
corbel console bracket
bracket 11 - 3d model (*.gsm+*.3ds) for interior 3d visualization.
archibase_planet
free

Bracket
...bracket
archibase planet
holder console bracket
bracket 12 - 3d model (*.gsm+*.3ds) for interior 3d visualization.
archibase_planet
free

Bracket
...bracket
archibase planet
bracket corbel holder
bracket 13 - 3d model (*.gsm+*.3ds) for interior 3d visualization.
Mounting
3d_export
free

mounting bracket
...mounting plate is the portion of a hinge that attaches to the wood. mounting plates can be used indoors, cabinetry and furniture.
turbosquid
$2

MOUNTING
... available on turbo squid, the world's leading provider of digital 3d models for visualization, films, television, and games.
turbosquid
free

Mounts
... available on turbo squid, the world's leading provider of digital 3d models for visualization, films, television, and games.
turbosquid
free

Mount Fuji
...fuji
turbosquid
free 3d model mount fuji for download as obj on turbosquid: 3d models for games, architecture, videos. (1579977)
3d_export
$5

Headphone mount LR
...headphone mount lr
3dexport
headphone mount l+r
turbosquid
$39

Mount rainier
...quid
royalty free 3d model mount rainier for download as fbx on turbosquid: 3d models for games, architecture, videos. (1492586)
turbosquid
$5

pipe mounting
...quid
royalty free 3d model pipe mounting for download as obj on turbosquid: 3d models for games, architecture, videos. (1293744)
turbosquid
$3

Mounting Tires
...uid
royalty free 3d model mounting tires for download as fbx on turbosquid: 3d models for games, architecture, videos. (1708511)
3d_export
$5

Magnetic GoPro Mount
...pro mount
3dexport
cool magnetic mount for gopro. allows you to mount the camera on flat metal surfaces and get exclusive shots.
turbosquid
$5

Stone Mount
...ty free 3d model stone mount for download as ma, obj, and fbx on turbosquid: 3d models for games, architecture, videos. (1370306)
Simple
turbosquid
$1

Simple goblet (Taca simples)
... available on turbo squid, the world's leading provider of digital 3d models for visualization, films, television, and games.
3d_export
$5
simple bench
...simple bench
3dexport
the simple bench which can be used in simple projects or video-games.
3d_export
$5
simple knob
...simple knob
3dexport
simple knob
3d_export
$5
simple handle
...simple handle
3dexport
simple handle
3d_export
$5
simple button
...simple button
3dexport
simple button
3d_export
$5

simple spindle
...simple spindle
3dexport
simple spindle
3d_export
$5

simple wheel
...simple wheel
3dexport
simple wheel
3d_export
$5

simple chair
...simple chair
3dexport
simple blue chair
3d_export
free
Simple room
...simple room
3dexport
here is a simple but beautiful room
3ddd
free

SIMPLE | Кресло
...io cianfarra , simple
производитель area declic дизайн giulio cianfarra коллекция simple