Thingiverse
Even Bigger Giant Clock by geit_de
by Thingiverse
Last crawled date: 3 years, 3 months ago
I wanted a wall clock and a shelf to use dead space above my stair case, so I choose this project from DIY machines: https://www.thingiverse.com/thing:4207524
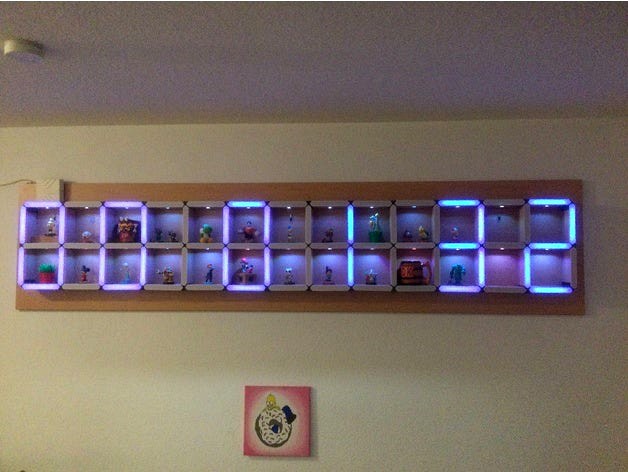
Since the original clock was kind of small, did not provide a proper 24 hour display and seconds were absents, I deceided to go big. And boy this will be an even bigger giant clock.
For this design I used only the parts provided in the original project. You need those to make yourself a clock, too. This thingy just provides some neat enhancements I developed during the 6 weeks of printing and building.
My layout will be 13 segments wide and 2 segments up. In total the clock plate will be 2600x600mm in size.
The Shelf/Time format will be "14:13:12" and takes 67 segments in total.
I also plan to use an ESP32 instead of an Arduino to run a server and get network time.
My first contribution to the nice clock design is a new template.
The old template is nice, but has some odd side effects. If your printer(s) are not 100% calibrated the template will not be square. Also when printing on multiple printers you may run into size issues. Since the old template is only half a digit, these errors may be visible in the result.
That is why I designed and printed little cross segment spacers. Together with some failed core prints (caused by a nasty hardware fault) you get a full size 7 digit template, which is far easier to print and also saves plastic as it uses the failed prints. :D
Even without failed prints this template is a good replacement as I has the same foot print on the printer than the core elements. So a big print bed and perfect bed adhesion in the outer regions is not required. Just print 7 times the base of the core elements and 6 of these spacers. Glue them together and done. I used cheap ABS for all inner parts, so with some acetone the result is a sturdy single piece.
I marked this project work in place, but that just means the clock itself. The spacers are working great. :D I included the FreeCAD source files in case you want to modify the dimensions.
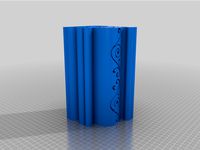
Ok, second addtion: Spacers! These increased the print time of the clock even more :D
I created inserts for the segments spaces. These basically sit everywhere between segments and keep them in place and straight. I added three kinds of elements. All of them leave room for the wires at the bottom, so there is no change to the base clock required.
Just pop them in and done.
First is a cross section for the middle parts and a fill up version for bottom, top and sides. The last element is a little corner plate to fit the overall new look.
The elements are 90mm in height, so they are recessed about 10mm below the actual light surface, when fully pushed in. If found it better that way as it gives the shelf a more 3D and interesting look. If you prefer to fill the gabs between segments flat, you can change the value in the parametric source file I included.
To export all models you simply need to export the objects and hiding the changes afterwards. First is the center spacers, then one section gets filled and the last is the corner piece. Just hide the last two element changes and export to get the modified object files.
I added the spacers for several reasons. The wires were visible from below and since my clock is mounted above the stairs everyone looking up would see the multi color wires between segments.
The second reason was that light from the shelf lights escaped through the segment gaps into the section below resulting in a cross shaped light beam under each lid shelf.
Third reason for these were that I had some weird issues mounting the segment brackets and these spacers lock them in position.
Fourth reason is that the shelfs itself get even more stable and feel more solid.
Fifth reason is that the clock will be mounted in "mid air", so dusting is a problem. All the spacers and blocks fill up the gabs, so there is no way spiders and dust will sit between the elements.
Sixth reason is that the overall look from any side now looks cool. :D
Hell yeah. The clock benefits from all these spacers. :D
The basic clock hardware was done with all the parts above, but there are a few additional prints I made to get it perfect.
Since I was unable to use the kitchen mounts from the orignal design, I had to go for a solution using three holes in the wall and screw in hooks.
I used a 10mm drill and some force to get an ellipse shape. I designed covers so the the crappy hole surrounding gets hidden, when the clock plate is mounted.
Since I forgot about a fat rain drainage pipe in the wall, which of course was exactly where I planned and drilled the hole in advance to make it perfect, I had to drill a fourth hole (which was a total disaster and looks even more like crap) and to cover up the misplaced hole. So I adapted my original cover design and closed the hole to get a totally closed cover up.
The last model I added to my giant clock was a cover for the power supply. It was´t that important and I did not waste much time on the design. It just gets dropped onto the power supply and stays in place by gravity.
I think it gives the otherwise bright white look a wooden step like offset.
For those who are interested in the power supply: It is a MeanWell, LPV-60-5 ; LED power supply 40W 5V 8A
For full brightness and all LEDs turned on, I would require a bigger power supply, but the used FastLED driver software is aware of that and calculates the output current and reduce the brightness, so it will never overload the power supply. In addition to that less than half of the LEDs are lit during normal operation anyway and the clock never was ment to be a room light. During the build I made some tests using some 2.1A power supply normally used for a Raspberry Pi3. It worked flawless, too So I consider this MeanWell powersupply perfect for the job and it even fits perfectly inside a shelf segment as I connected the clock to a electric wall box at the ceiling and an external power supply would be in the way and more visible than this solution.
The ESP32 software is basically done. I added several clock changing effects and modes.
So the changing digits fade in and out, slide up or down and so on. I probably add more in the future. This is fun. The spacing dots between hours and minutes and minutes and seconds have their own animations, too. I also partly implemented an overlay section, which allows to run over some light effects. Like a sparkly shine or some rainbow effekt. Even raster line colourization like known from the C64 demo scene are possible for the overlay mode.
Even the shelf's got independent configurations, so they can be all on, take the color of the clock segment above or only one group is randomly lid for an hour and then the lights are moving randomly again. All changes are done with nice fading, so the overall style is already nice. :D
Of course all colors can be adjusted.
A web interfaces allowing changing using a computer or phone is already in place and just needs a little CSS love from my side. The clock itself gets its time from the internet and takes care of summer and winter time adjustments. I plan to add a date display, Pizza timer, Alarm clock, door bell visualizer and other stuff, too.
The source code will be released here, once everything is in place and somewhat cleaned.
Since the original clock was kind of small, did not provide a proper 24 hour display and seconds were absents, I deceided to go big. And boy this will be an even bigger giant clock.
For this design I used only the parts provided in the original project. You need those to make yourself a clock, too. This thingy just provides some neat enhancements I developed during the 6 weeks of printing and building.
My layout will be 13 segments wide and 2 segments up. In total the clock plate will be 2600x600mm in size.
The Shelf/Time format will be "14:13:12" and takes 67 segments in total.
I also plan to use an ESP32 instead of an Arduino to run a server and get network time.
My first contribution to the nice clock design is a new template.
The old template is nice, but has some odd side effects. If your printer(s) are not 100% calibrated the template will not be square. Also when printing on multiple printers you may run into size issues. Since the old template is only half a digit, these errors may be visible in the result.
That is why I designed and printed little cross segment spacers. Together with some failed core prints (caused by a nasty hardware fault) you get a full size 7 digit template, which is far easier to print and also saves plastic as it uses the failed prints. :D
Even without failed prints this template is a good replacement as I has the same foot print on the printer than the core elements. So a big print bed and perfect bed adhesion in the outer regions is not required. Just print 7 times the base of the core elements and 6 of these spacers. Glue them together and done. I used cheap ABS for all inner parts, so with some acetone the result is a sturdy single piece.
I marked this project work in place, but that just means the clock itself. The spacers are working great. :D I included the FreeCAD source files in case you want to modify the dimensions.
Ok, second addtion: Spacers! These increased the print time of the clock even more :D
I created inserts for the segments spaces. These basically sit everywhere between segments and keep them in place and straight. I added three kinds of elements. All of them leave room for the wires at the bottom, so there is no change to the base clock required.
Just pop them in and done.
First is a cross section for the middle parts and a fill up version for bottom, top and sides. The last element is a little corner plate to fit the overall new look.
The elements are 90mm in height, so they are recessed about 10mm below the actual light surface, when fully pushed in. If found it better that way as it gives the shelf a more 3D and interesting look. If you prefer to fill the gabs between segments flat, you can change the value in the parametric source file I included.
To export all models you simply need to export the objects and hiding the changes afterwards. First is the center spacers, then one section gets filled and the last is the corner piece. Just hide the last two element changes and export to get the modified object files.
I added the spacers for several reasons. The wires were visible from below and since my clock is mounted above the stairs everyone looking up would see the multi color wires between segments.
The second reason was that light from the shelf lights escaped through the segment gaps into the section below resulting in a cross shaped light beam under each lid shelf.
Third reason for these were that I had some weird issues mounting the segment brackets and these spacers lock them in position.
Fourth reason is that the shelfs itself get even more stable and feel more solid.
Fifth reason is that the clock will be mounted in "mid air", so dusting is a problem. All the spacers and blocks fill up the gabs, so there is no way spiders and dust will sit between the elements.
Sixth reason is that the overall look from any side now looks cool. :D
Hell yeah. The clock benefits from all these spacers. :D
The basic clock hardware was done with all the parts above, but there are a few additional prints I made to get it perfect.
Since I was unable to use the kitchen mounts from the orignal design, I had to go for a solution using three holes in the wall and screw in hooks.
I used a 10mm drill and some force to get an ellipse shape. I designed covers so the the crappy hole surrounding gets hidden, when the clock plate is mounted.
Since I forgot about a fat rain drainage pipe in the wall, which of course was exactly where I planned and drilled the hole in advance to make it perfect, I had to drill a fourth hole (which was a total disaster and looks even more like crap) and to cover up the misplaced hole. So I adapted my original cover design and closed the hole to get a totally closed cover up.
The last model I added to my giant clock was a cover for the power supply. It was´t that important and I did not waste much time on the design. It just gets dropped onto the power supply and stays in place by gravity.
I think it gives the otherwise bright white look a wooden step like offset.
For those who are interested in the power supply: It is a MeanWell, LPV-60-5 ; LED power supply 40W 5V 8A
For full brightness and all LEDs turned on, I would require a bigger power supply, but the used FastLED driver software is aware of that and calculates the output current and reduce the brightness, so it will never overload the power supply. In addition to that less than half of the LEDs are lit during normal operation anyway and the clock never was ment to be a room light. During the build I made some tests using some 2.1A power supply normally used for a Raspberry Pi3. It worked flawless, too So I consider this MeanWell powersupply perfect for the job and it even fits perfectly inside a shelf segment as I connected the clock to a electric wall box at the ceiling and an external power supply would be in the way and more visible than this solution.
The ESP32 software is basically done. I added several clock changing effects and modes.
So the changing digits fade in and out, slide up or down and so on. I probably add more in the future. This is fun. The spacing dots between hours and minutes and minutes and seconds have their own animations, too. I also partly implemented an overlay section, which allows to run over some light effects. Like a sparkly shine or some rainbow effekt. Even raster line colourization like known from the C64 demo scene are possible for the overlay mode.
Even the shelf's got independent configurations, so they can be all on, take the color of the clock segment above or only one group is randomly lid for an hour and then the lights are moving randomly again. All changes are done with nice fading, so the overall style is already nice. :D
Of course all colors can be adjusted.
A web interfaces allowing changing using a computer or phone is already in place and just needs a little CSS love from my side. The clock itself gets its time from the internet and takes care of summer and winter time adjustments. I plan to add a date display, Pizza timer, Alarm clock, door bell visualizer and other stuff, too.
The source code will be released here, once everything is in place and somewhat cleaned.
Similar models
thingiverse
free

Power Supply Shelf Bracket with Spacer by booze007
...ze007
thingiverse
i modified the existing shelf bracket to add a spacer so the supply can be mounted with 1 strap and a bracket.
thingiverse
free

Hictop Prusa i3 Power Supply Cover by Duc76
...ns,
4/17/2016
made changes to center hole. increased diameter by 1mm and changed center hole support to have less contact points.
thingiverse
free

Double switch or socket spacer. 15mm, 2 gang, UK by marmalade43
... take a power supply from an existing socket.
rather than make holes, i ran some trunking, printed this spacer and it looks good.
thingiverse
free

EMT8 modified parts and HP power supply mount by Dudley1001
... hole for a switch harvested from a atx power supply. i glued some brackets to the lower mount and held the cover on with screws.
thingiverse
free

Giant Hidden Shelf Edge Clock by donkni
...sed the breadboard for power distribution. i think the overall affect really cleans up the wiring in the main processor segment.
thingiverse
free

Tronxy X5S Power Supplies Enclosure by lutinplunder
...rted before powering on.
edit: i have included the solidworks 2018 files for this, since they have been requested multiple times.
thingiverse
free

Dremel Battery Adapter by gabetz89
...pply. i used some 14 gauge solid copper wire to make the contact points and some stranded wire to connect it to the power supply.
thingiverse
free

Komplement hinge drill template by vinnieB
...s are hanging fine now. this might be useful for someone that wants to change the look of the closets but not replace everything.
thingiverse
free

Kossel mini PS3 power supply adapter by mballoni
...:
lid (done)
secundary support (i had to saw it, changing the design soon)
power button support
pictures (some more must be done)
thingiverse
free
miniture shelf by DocBoyales
...hoice, but i have done some shelf brackets in the same fasion as this shelf and printed them on the side and they came out great.
Geit
thingiverse
free

GeitPrinter by geit_de
...(magnetic parking)
2x m3 15mm counter sunk enclosure screws (e3dv6 fan)
8x 4mm cubic neodymium magnets (magnetic parking)
3dwarehouse
free

model houdertje voor in geit
...model houdertje voor in geit
3dwarehouse
model houdertje voor in geit
3dwarehouse
free

Playground skip goat _Wip geit toestel
...playground skip goat _wip geit toestel
3dwarehouse
3dwarehouse
free

Geit Kip en Konijnenhok voor open verblijf
...geit kip en konijnenhok voor open verblijf
3dwarehouse
hok geschikt voor 2-3 dwergeitjes tot 50-60 cm 3-4 konijnen 3-5 kippen
3dwarehouse
free

Goat
...goat 3dwarehouse goat geit 3d geit 3d goat...
3dwarehouse
free
estonian 'my home'
...'my home' 3dwarehouse its my home in estonia autor geit griin #estonia #gonsiori...
3dwarehouse
free

Stal / Barn
...invented it myself. #barn #boerderij #cow #cows #farm #geit #geitn #hok #koe #koeien #schaap #schapen #sheep...
3dwarehouse
free
Ibex (adult male)
...steep regions to avoid predators. #animal #beast #beest #dier #geit #goat #ibex #mammal #mountain...
3dwarehouse
free

schaap
...leveren. het is een herkauwer, nauw verwant met de geit de soort behoort tot het geslacht ovis, waar ook...
Giant
3d_export
$49

Iron Giant
...iron giant
3dexport
iron giant film
turbosquid
$70

giant
... available on turbo squid, the world's leading provider of digital 3d models for visualization, films, television, and games.
turbosquid
$30

The Giant
... available on turbo squid, the world's leading provider of digital 3d models for visualization, films, television, and games.
3ddd
$1

Anglepoise Giant
...anglepoise giant
3ddd
anglepoise giant
anglepoise giant lamp, fully shaded and rigged so you can add it to you scene easily
design_connected
$18

Giant 1227
...giant 1227
designconnected
anglepoise giant 1227 computer generated 3d model. designed by carwardine, george.
3ddd
free
Cosmo Giant
...ax , cosmo , giant
высота (см)92
диаметр (см)45
3d_export
$5

Giant weak
...giant weak
3dexport
giant weak<br>you can open it in blender with texture and skeleton
turbosquid
$68

Gates of giant
...uid
royalty free 3d model gates of giant for download as max on turbosquid: 3d models for games, architecture, videos. (1592556)
turbosquid
$6

Giant Shrooms
...quid
royalty free 3d model giant shrooms for download as fbx on turbosquid: 3d models for games, architecture, videos. (1671319)
turbosquid
$1

iron giant
...
royalty free 3d model iron giant for download as max and fbx on turbosquid: 3d models for games, architecture, videos. (1399411)
Bigger
turbosquid
$50

Marvelous Designer and 3DS Max: Curtains02 Bigger
...s designer and 3ds max: curtains02_bigger for download as max on turbosquid: 3d models for games, architecture, videos. (1477775)
turbosquid
$50

Marvelous Designer and 3DS Max: Curtains01 Bigger
...s designer and 3ds max: curtains01_bigger for download as max on turbosquid: 3d models for games, architecture, videos. (1477765)
turbosquid
$50

Marvelous Designer and 3DS Max: Curtains01 Variation Bigger
... and 3ds max: curtains01_variation_bigger for download as max on turbosquid: 3d models for games, architecture, videos. (1477772)
3d_ocean
$8

Scoop Highchair
...comfy high chair for little ones, stylish stool for bigger ones! as used in yo!sushi...
3d_ocean
$1

Paper Strips Seamless Background
...file • tiling texture click here if you need bigger file at...
3ddd
$1

De Sede 88 daybed and table
...are unwrapped. these models are a part of a bigger set of modules to be...
3ddd
$1

De Sede 88 pouf and base module
...are unwrapped. these models are a part of a bigger set of modules to be...
3d_ocean
$3
Engagement Rings
...shiny silver wedding a pair of engagement rings. a bigger one without a diamond and a smaller ring with...
3d_export
$5

twisted lines ring
...thin one, but you can re scale it to bigger one easily. there are many format in the zip...
3d_ocean
$15

Building Blocks
...quality, low polygonal models, easy to tile into a bigger structure. - poly count: 2628 - formats: max /obj...
Clock
3d_ocean
$4

Clock
...clock
3docean
clock hand kitchen clock time watch
a clock
archibase_planet
free

Clock
...clock
archibase planet
clock table clock alarm-clock
clock orange - 3d model (*.gsm+*.3ds) for interior 3d visualization.
archibase_planet
free

Clock
...clock
archibase planet
clock table clock alarm-clock
clock yellow - 3d model (*.gsm+*.3ds) for interior 3d visualization.
archibase_planet
free
Clock
...clock
archibase planet
clock alarm-clock
clock n100707 - 3d model for interior 3d visualization.
archibase_planet
free

Clock
...clock
archibase planet
clock table clock
clock - 3d model (*.gsm+*.3ds) for interior 3d visualization.
archibase_planet
free
Clock
...clock
archibase planet
clock striking clock
clock - 3d model (*.gsm+*.3ds) for interior 3d visualization.
archibase_planet
free

Clock
...clock
archibase planet
clock wall clock
clock 1 - 3d model (*.gsm+*.3ds) for interior 3d visualization.
archibase_planet
free
Clock
...clock
archibase planet
clock wall clock
clock 2 - 3d model (*.gsm+*.3ds) for interior 3d visualization.
archibase_planet
free

Clock
...clock
archibase planet
clock wall clock
clock 3 - 3d model (*.gsm+*.3ds) for interior 3d visualization.
archibase_planet
free

Clock
...clock
archibase planet
alarm clock alarm-clock
clock - 3d model (*.gsm+*.3ds) for interior 3d visualization.
Even
turbosquid
$20

Evening Dress
...oyalty free 3d model evening dress for download as ma and obj on turbosquid: 3d models for games, architecture, videos. (1146724)
3d_export
$7

evening cafe
...evening cafe
3dexport
turbosquid
$10

Evening room
... available on turbo squid, the world's leading provider of digital 3d models for visualization, films, television, and games.
turbosquid
$10

Evening dress
... available on turbo squid, the world's leading provider of digital 3d models for visualization, films, television, and games.
3ddd
$1
Calligaris Even Plus
...calligaris even plus
3ddd
calligaris
calligaris_chair_even plus
turbosquid
$47

Evening dress 8
... available on turbo squid, the world's leading provider of digital 3d models for visualization, films, television, and games.
turbosquid
$34

Evening dress 3
... available on turbo squid, the world's leading provider of digital 3d models for visualization, films, television, and games.
turbosquid
$34

Evening dress 2
... available on turbo squid, the world's leading provider of digital 3d models for visualization, films, television, and games.
turbosquid
$34

Evening dress 1
... available on turbo squid, the world's leading provider of digital 3d models for visualization, films, television, and games.
turbosquid
$11

Clothing - Evening Gown
... available on turbo squid, the world's leading provider of digital 3d models for visualization, films, television, and games.